Last Updated on 2 years by Amelia Johansson
Kodi No Limits Magic is the best and the most popular build all over the world. It has various Addons, unique skins, provides live TV, and many more if you are looking for a step-by-step guide on how to install No Limits on your device.
Then there is the complete and perfect guide that will show you all the steps with screenshots. Isn’t it a great deal? Of course, it is so make sure you read the whole article and don’t miss a single part of it as you may lose some information out there.
What is Kodi’s No Limits Magic?
If you are a newbie in the world of Kodi Builds, then you may hear this name for the first time. As for the old users, it is the famous and most loved name because this Build is considered the number one build of all time with a massive number of benefits.
This comes with the Silvo mod of the Aeon Nox 5 skin, which is also the famous and very easy-to-use Skin among individuals. As there are many builds available out there, No limits are unique from them as most of them are dead or not working after some time.
As compared to these, you will get the new updates regularly, and they keep updating the Addons as well. It is March 2020, but the Build is still alive like it was many years ago. This is the thing why it is famous and the most loved Build of all time.
It was previously available only for the Kodi 17.6 Krypton, but after the new updates, we are now able to use it on 18.5 Leia. If you still have the older version, don’t worry, you can still use it on Krypton, and the steps are the same for both.
STEP #1: Enable Unknown Sources for third-party Apps
If you are going to use No limits Magic on Firestick, then make sure you have a jailbroken device. Because without this, you won’t be able to get or may face the issue at the time of installation. So, if you didn’t jailbreak yet just follow the link given below: How To Jailbreak Firestick Step-by-Step guide
Now as we have jailbreak Firestick now we are ready to proceed to our step-by-step guide to installing No limits build:
First, install Kodi 19.0 Leia latest version from here: Install Kodi 19.0 Leia on Firestick
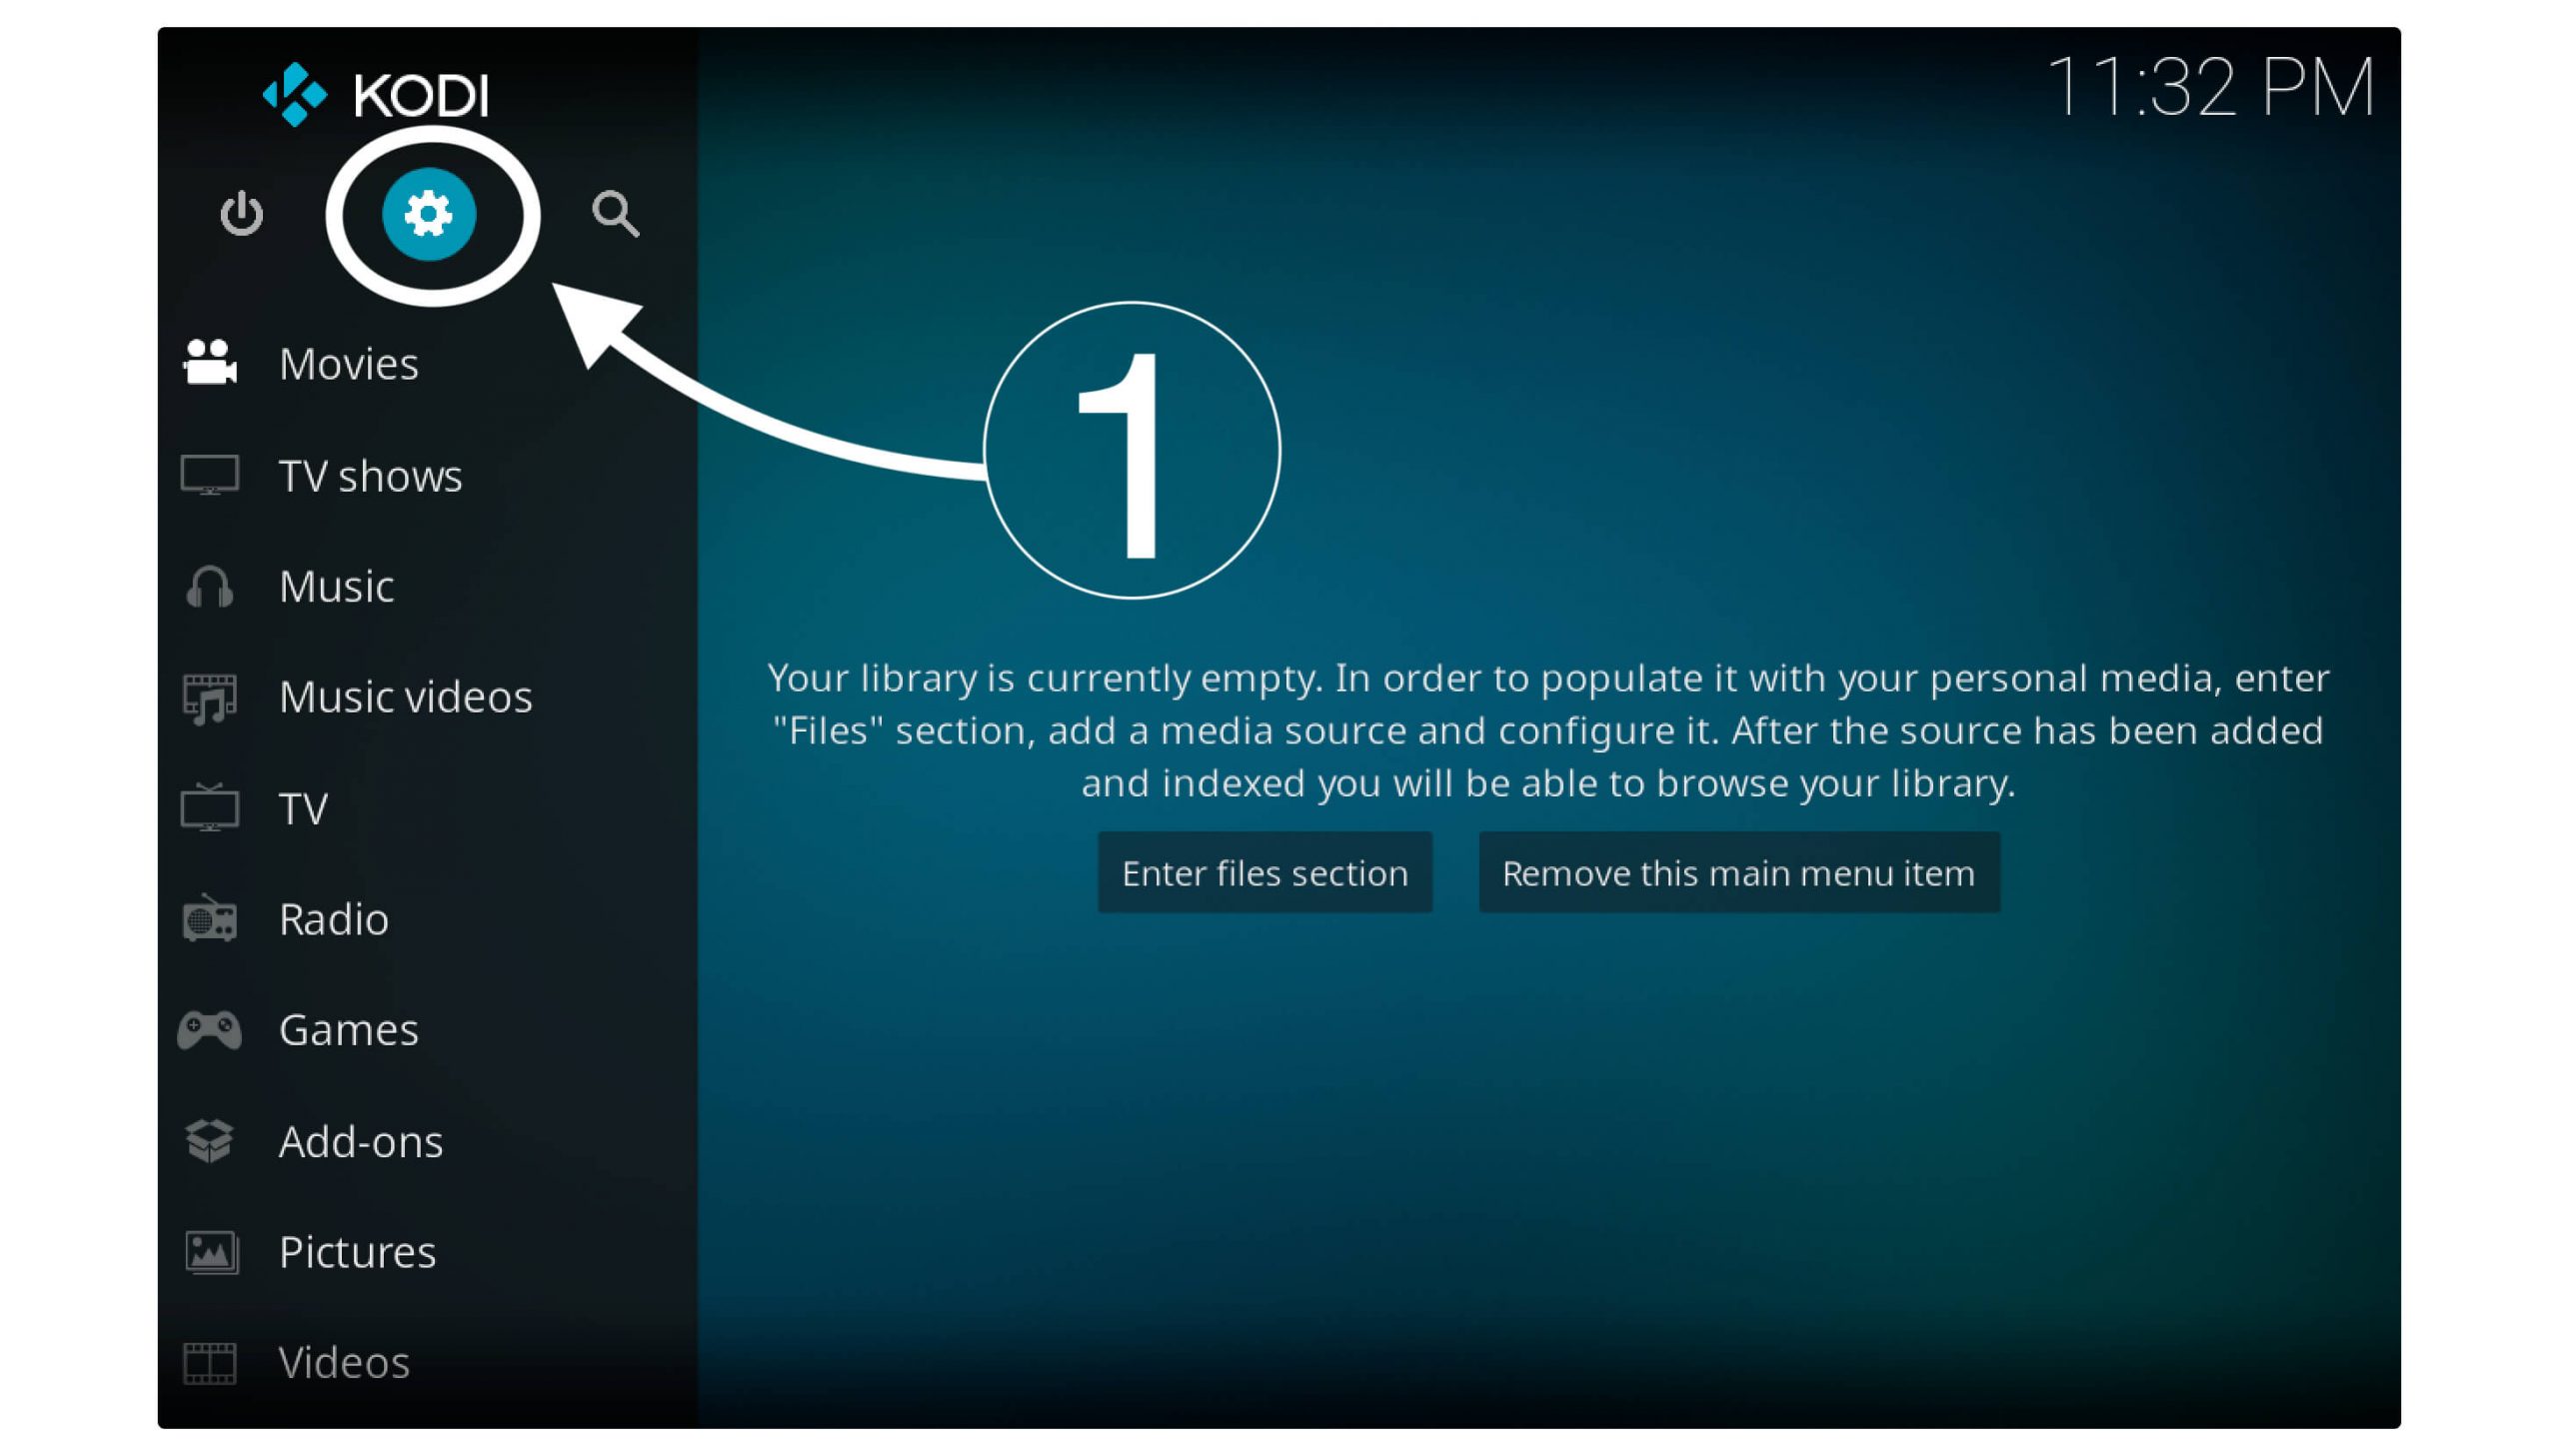
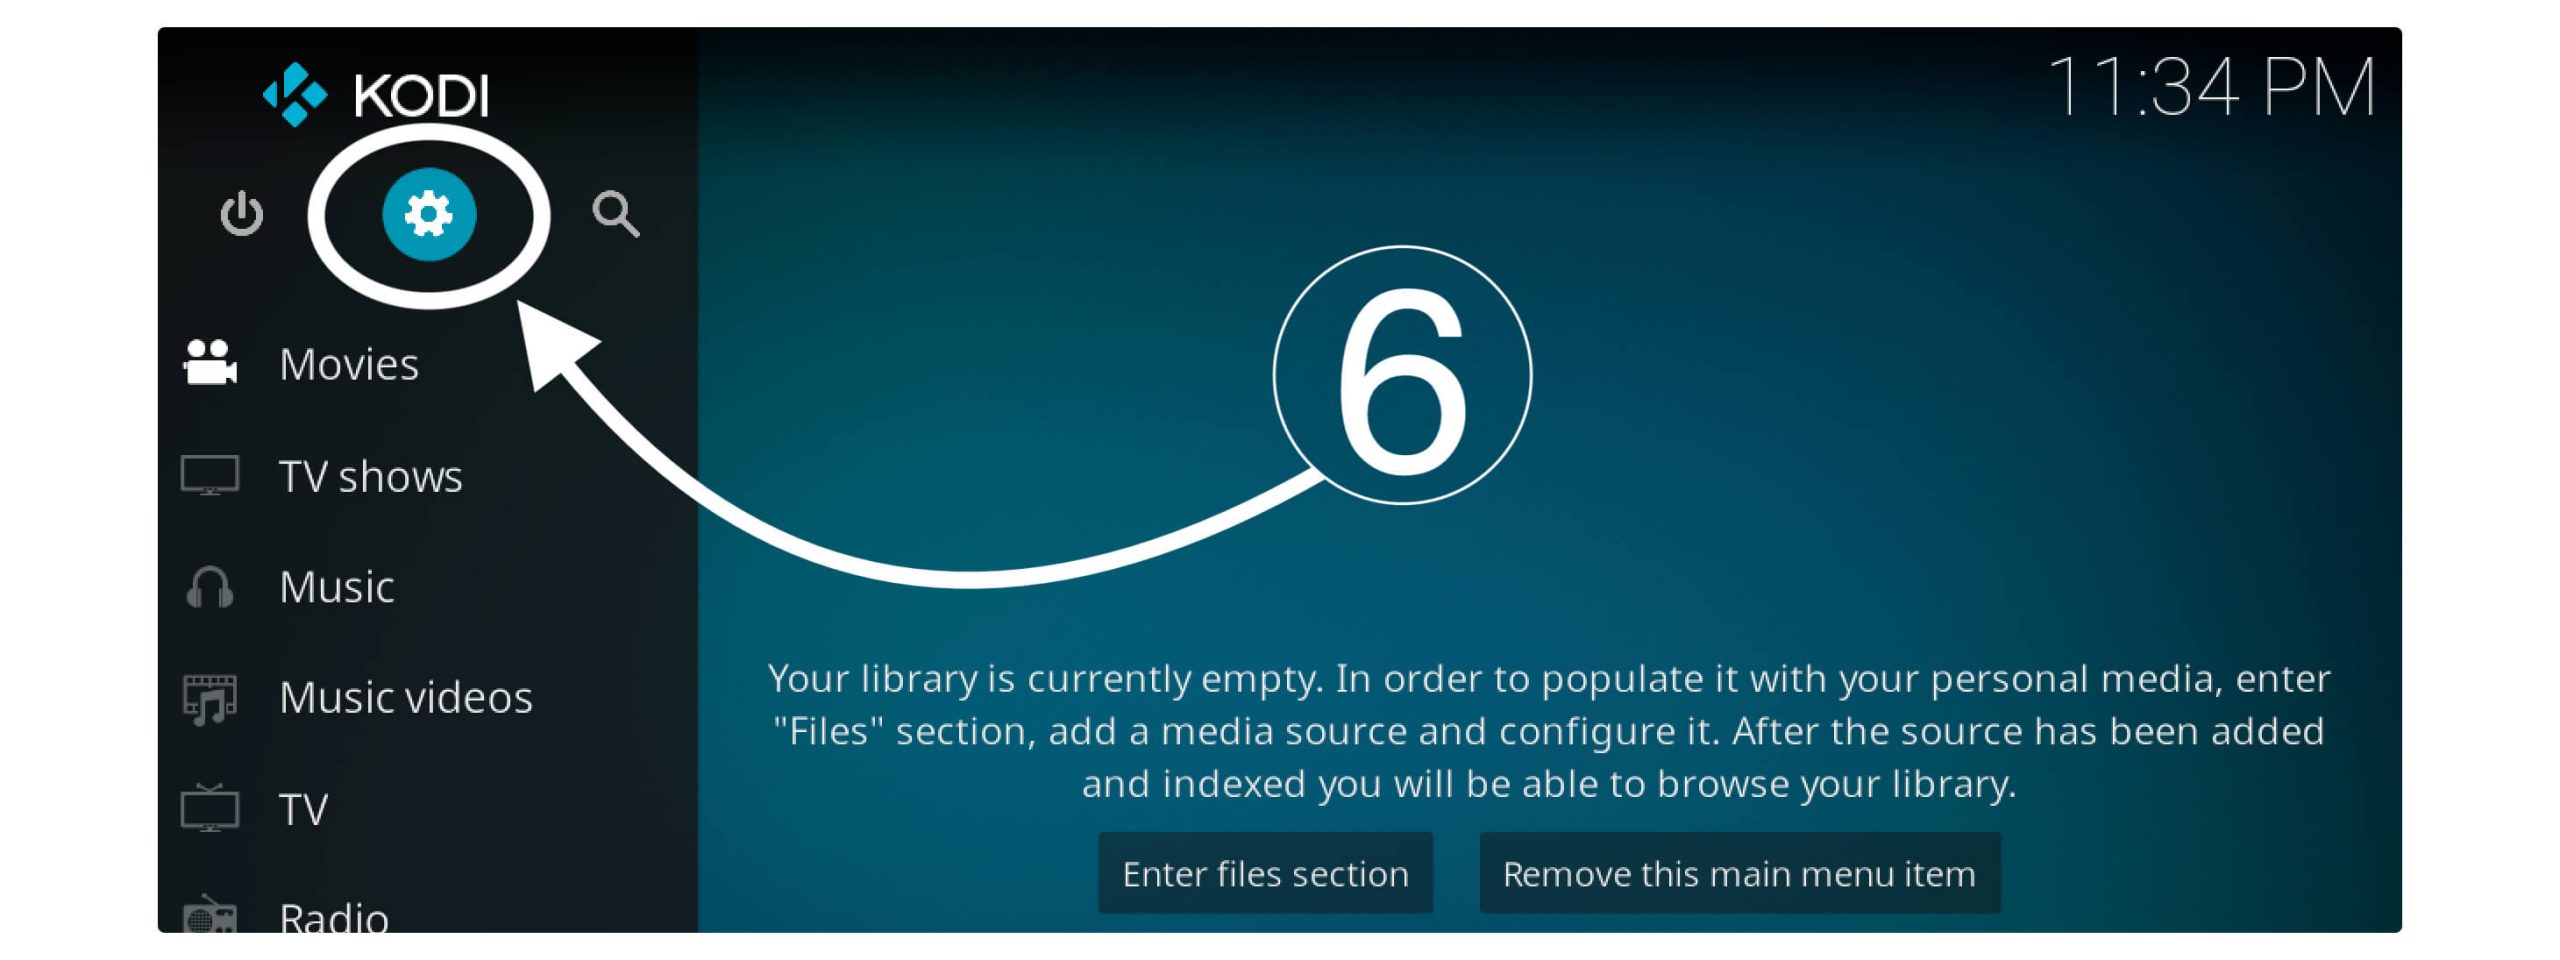
Now launch it on your device and then from the Home Screen click on the Setting (Gear) icon next to the Power button.
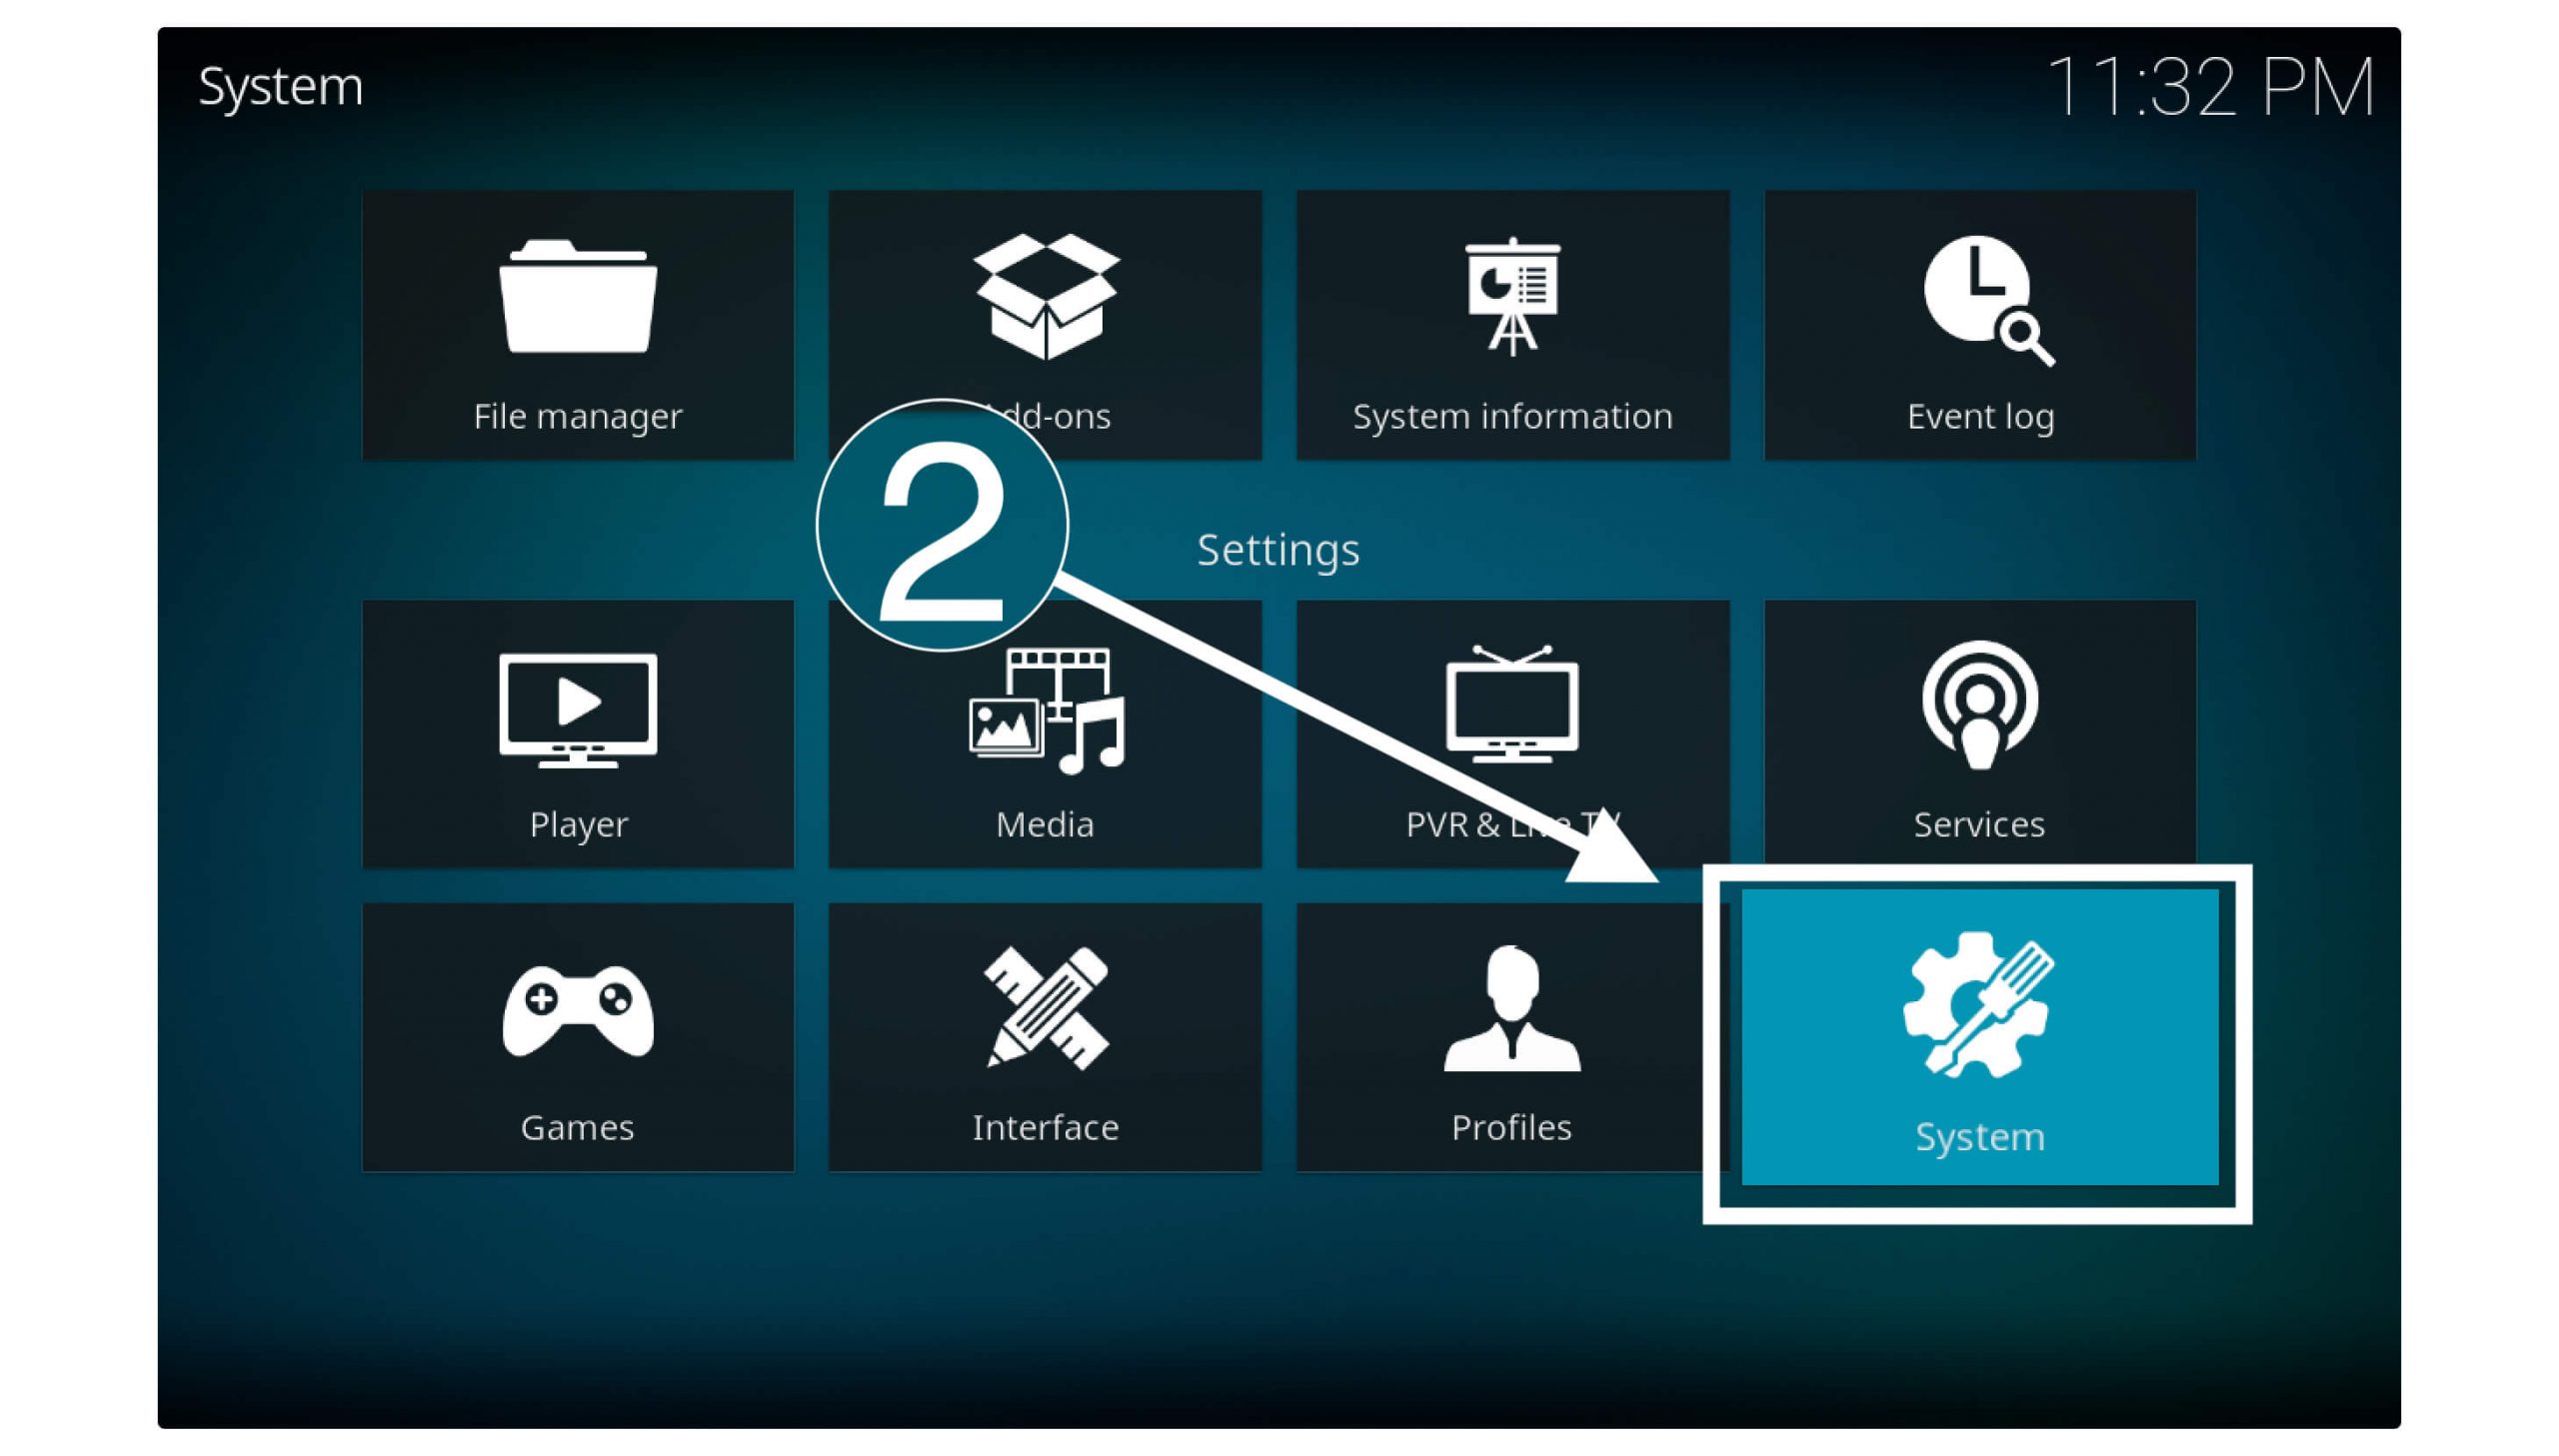
From the Settings, just hover down and then select System Settings.
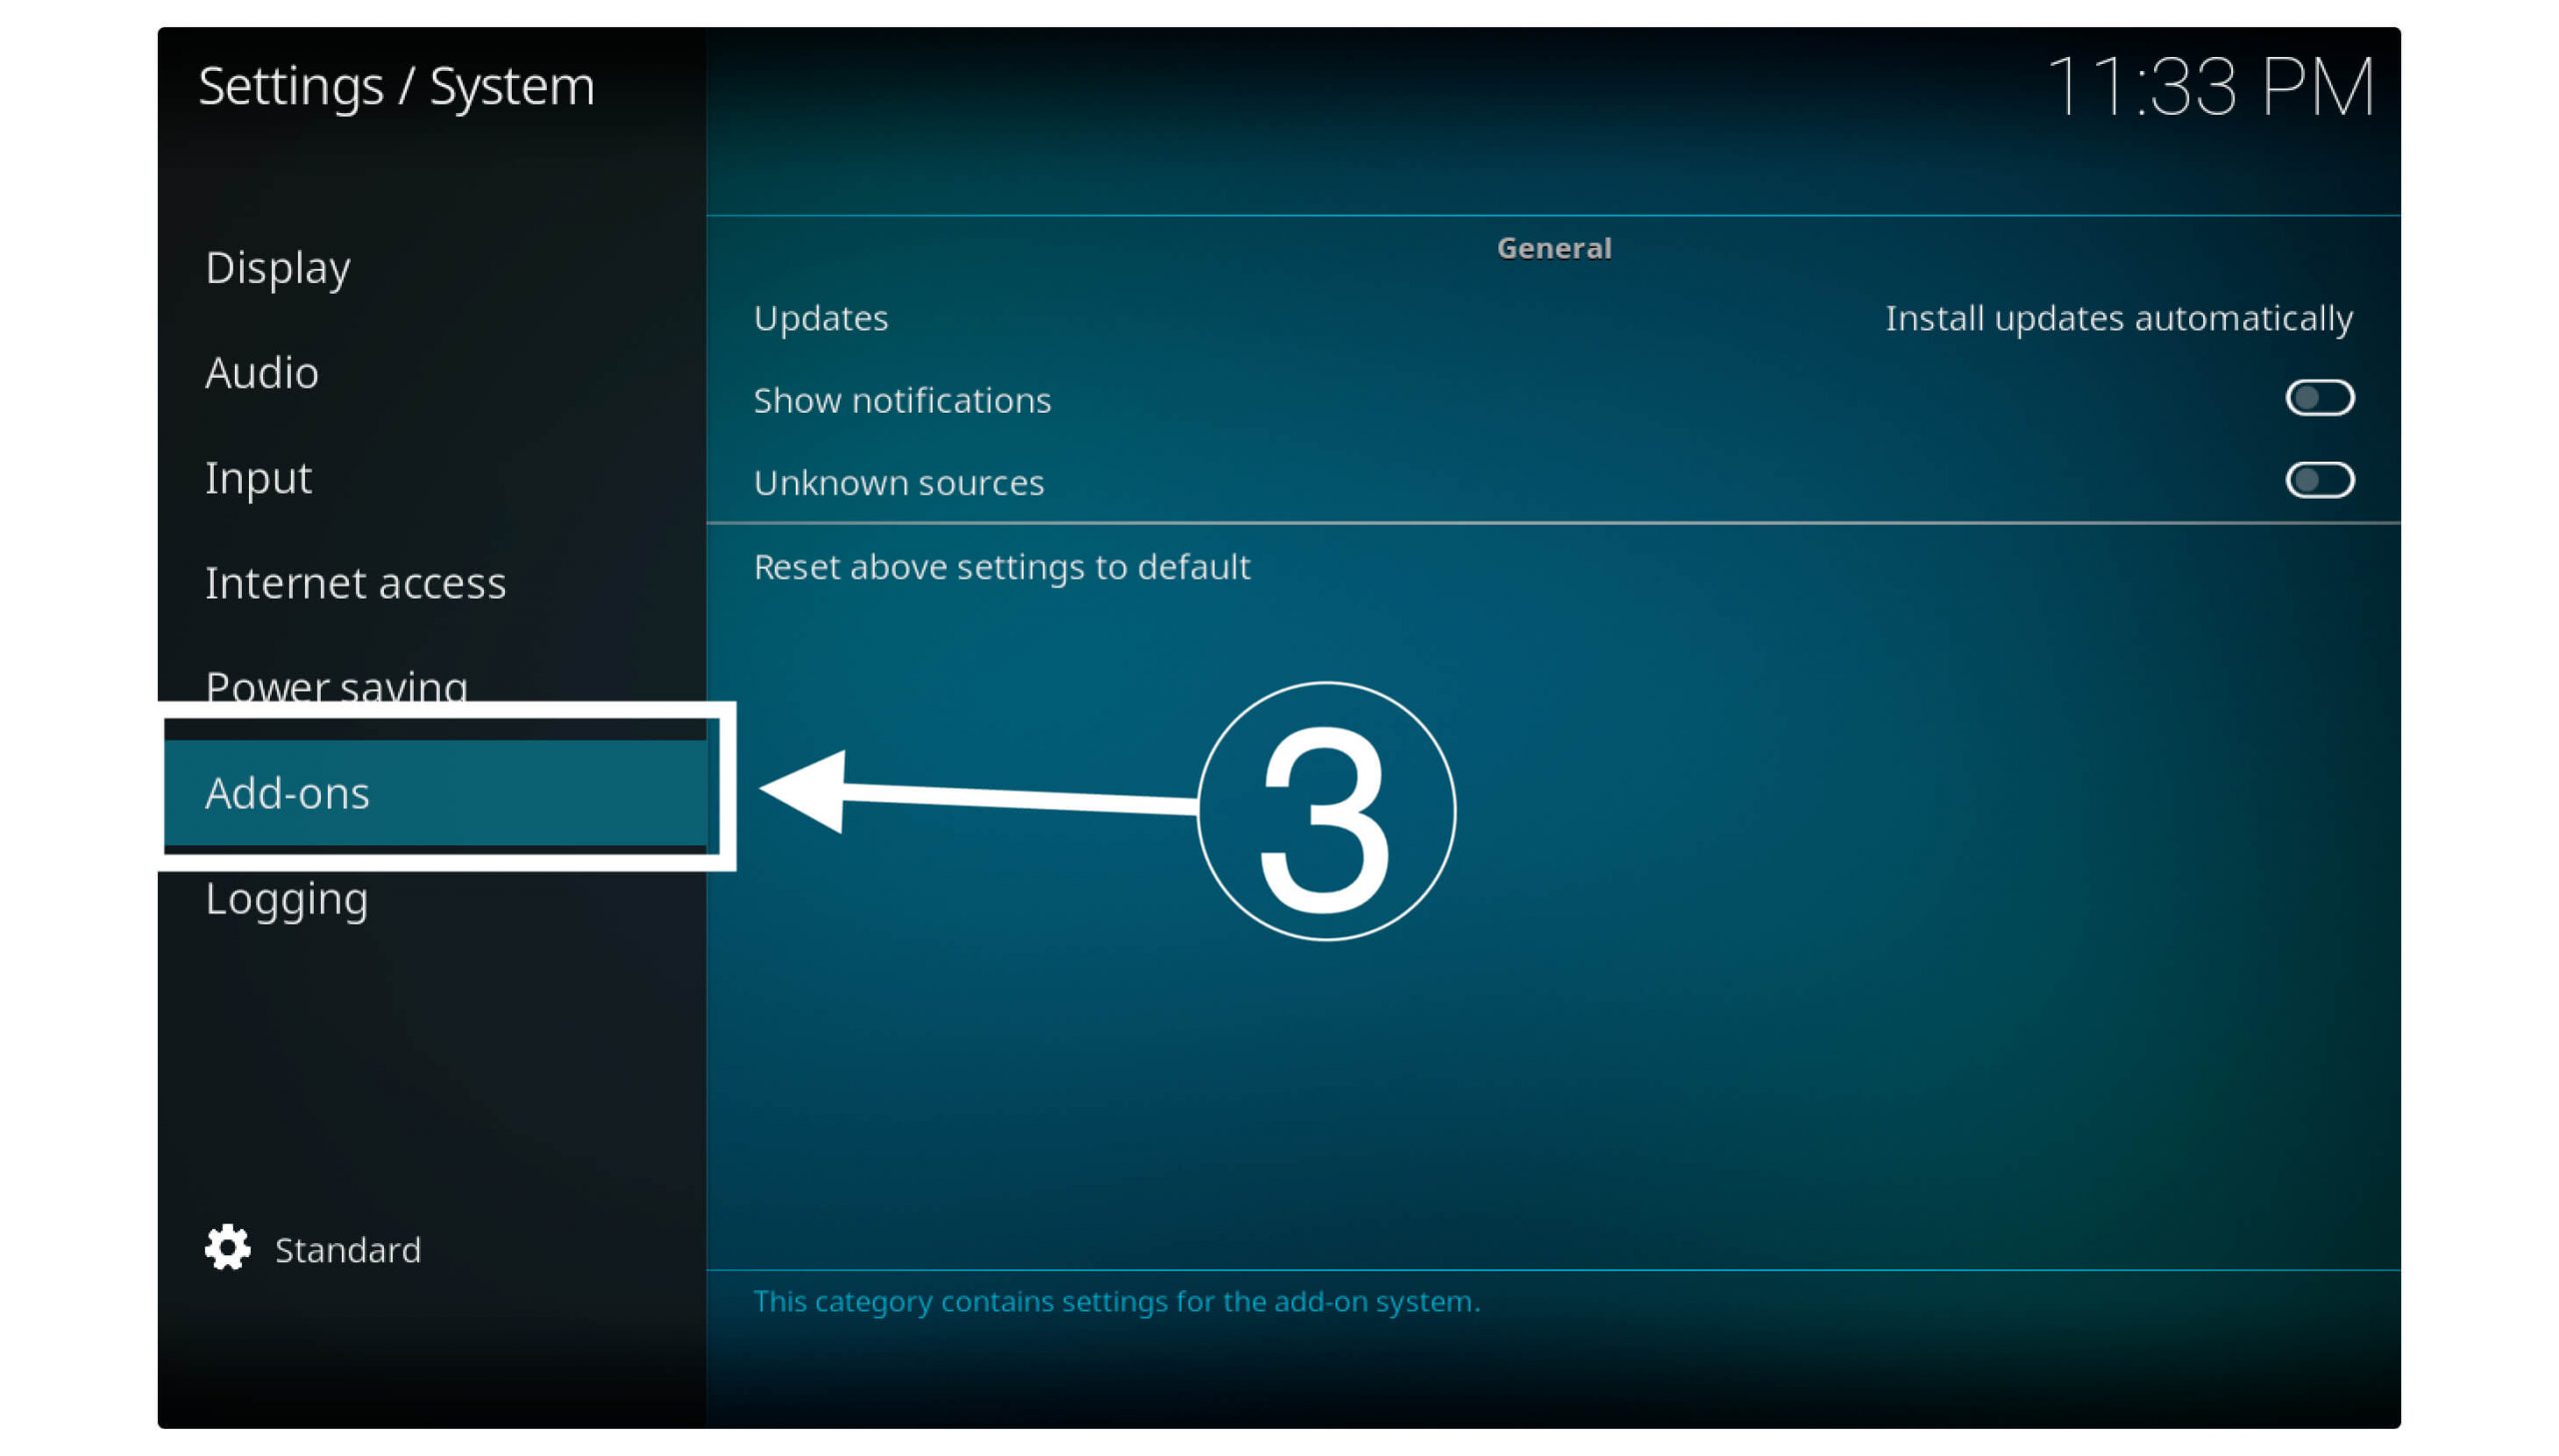
Now you have to choose the Addons section from the left side in System Settings.
After this, simply enable Unknown Sources using the switcher (see screenshot below).
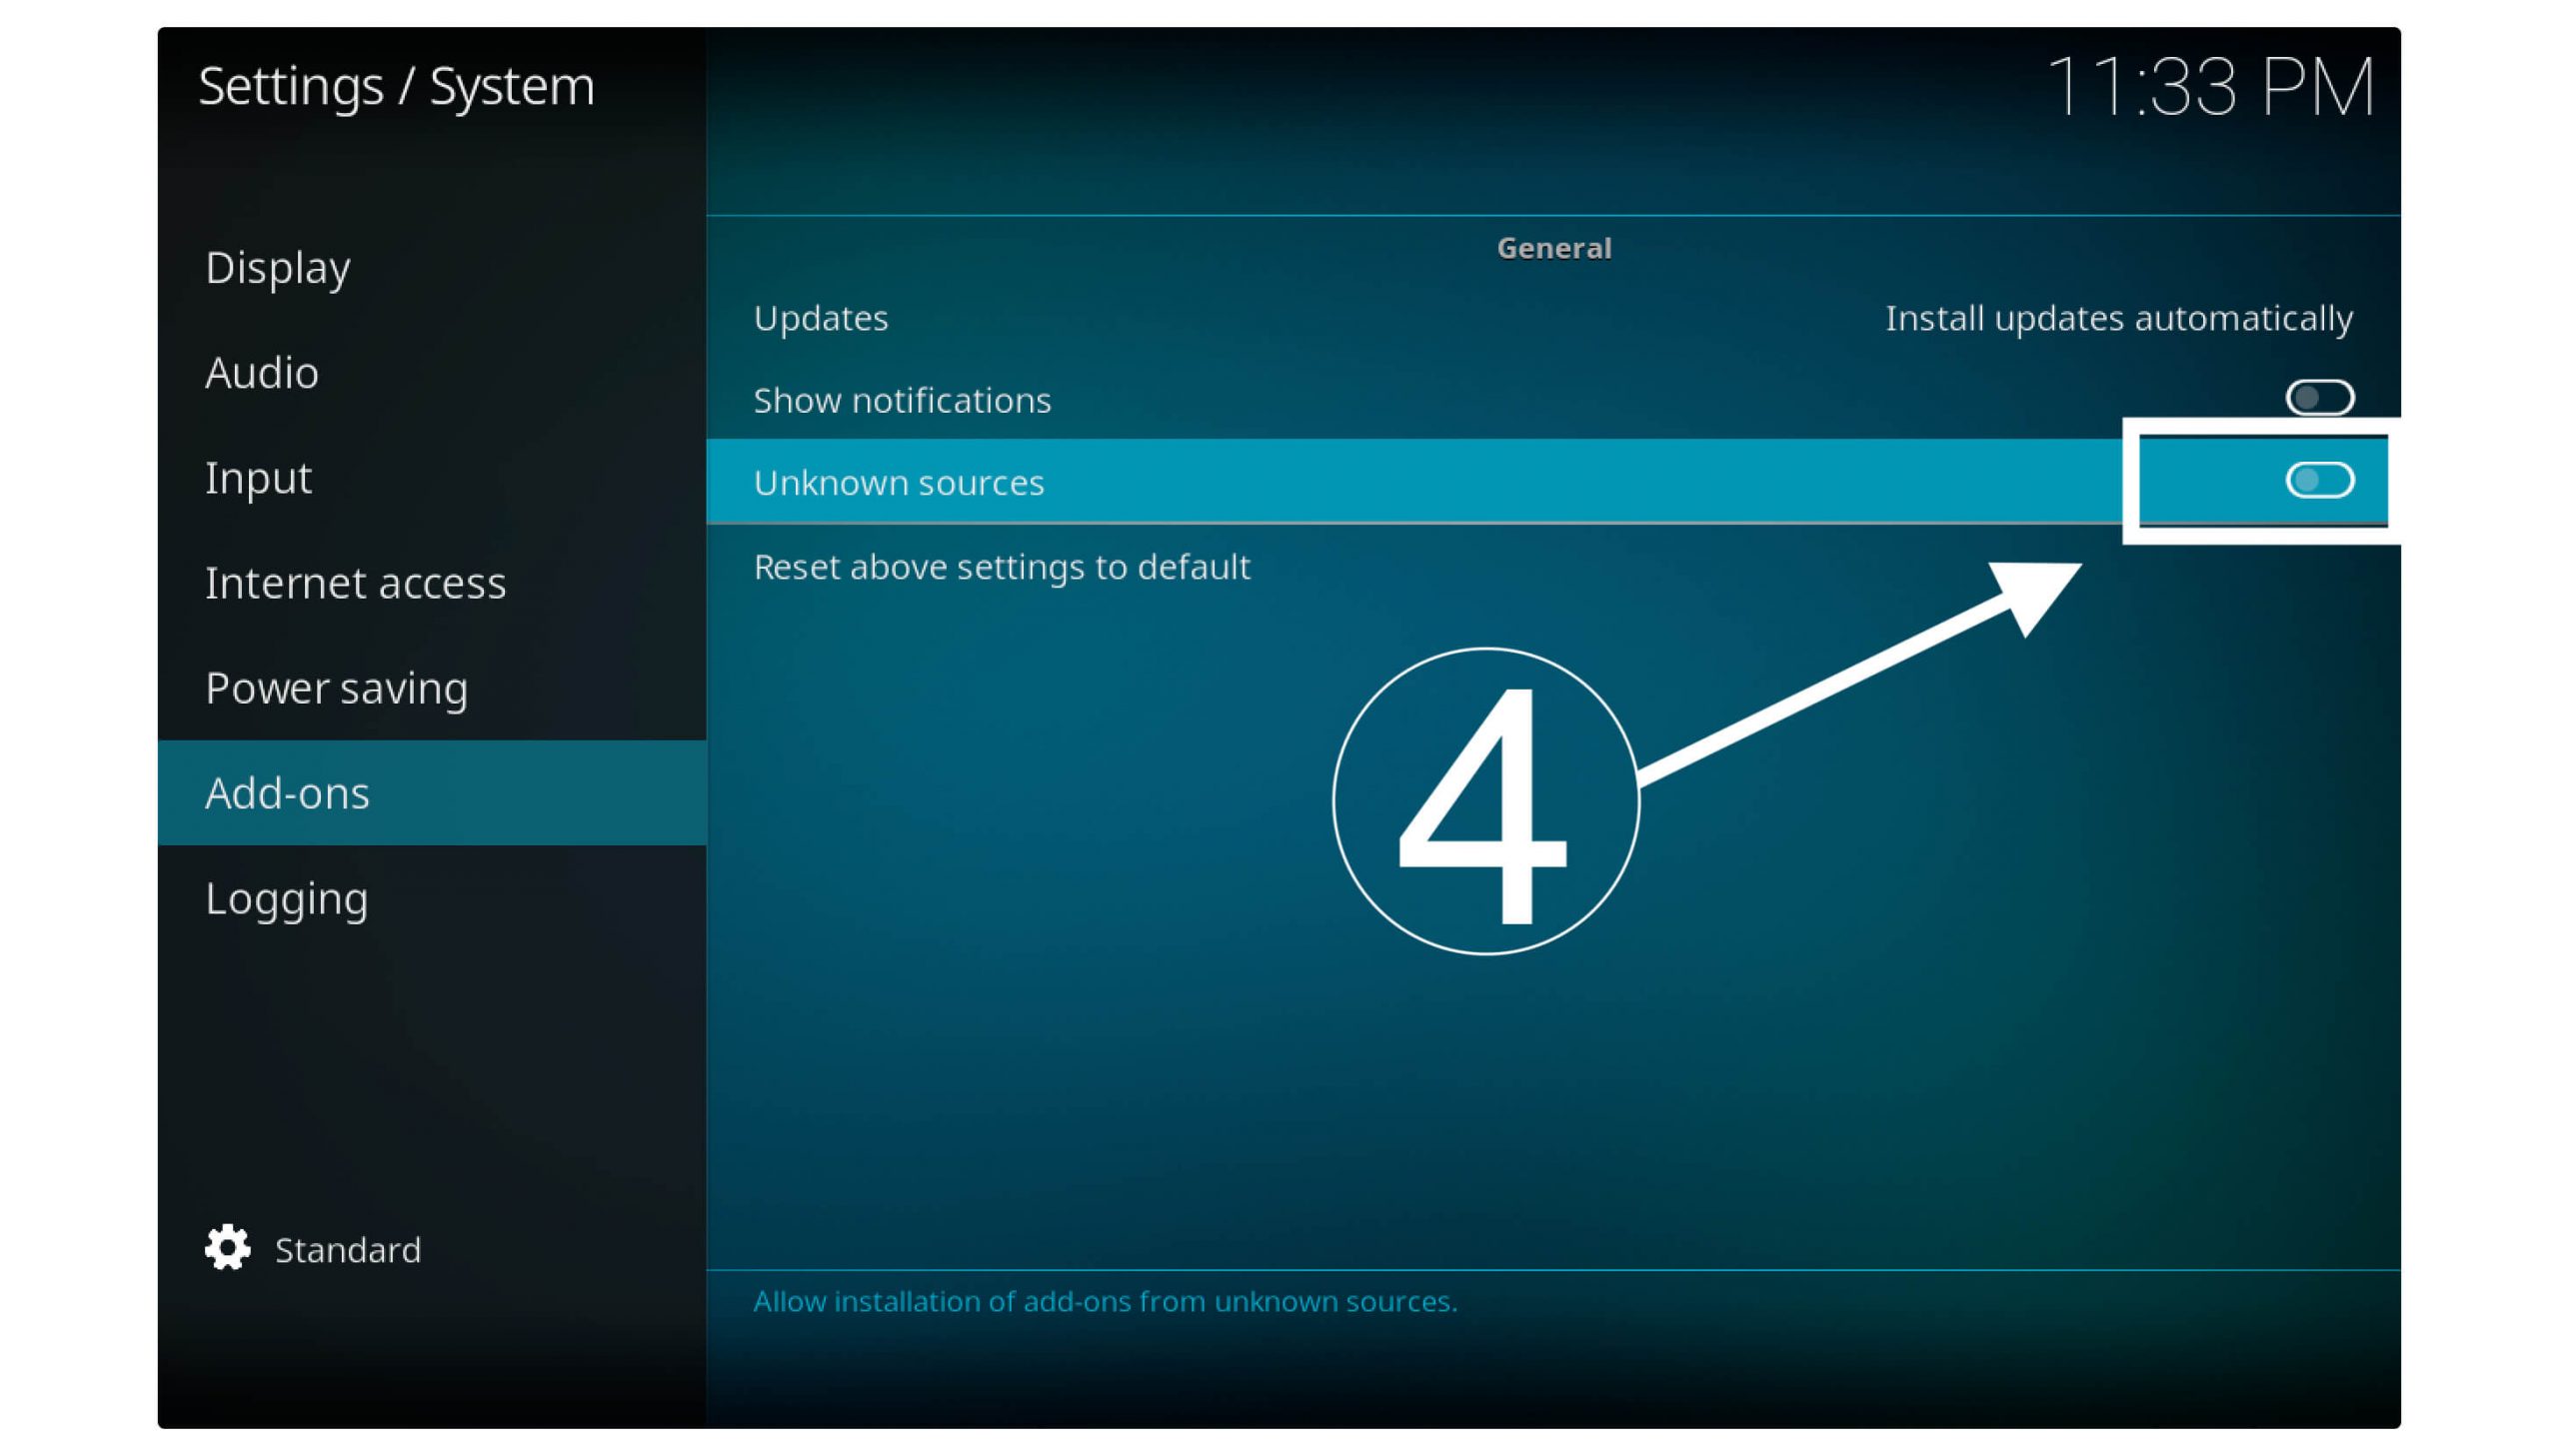
It will warn you that it is blocked for security etc. Just ignore it and again select Enable from these two buttons.
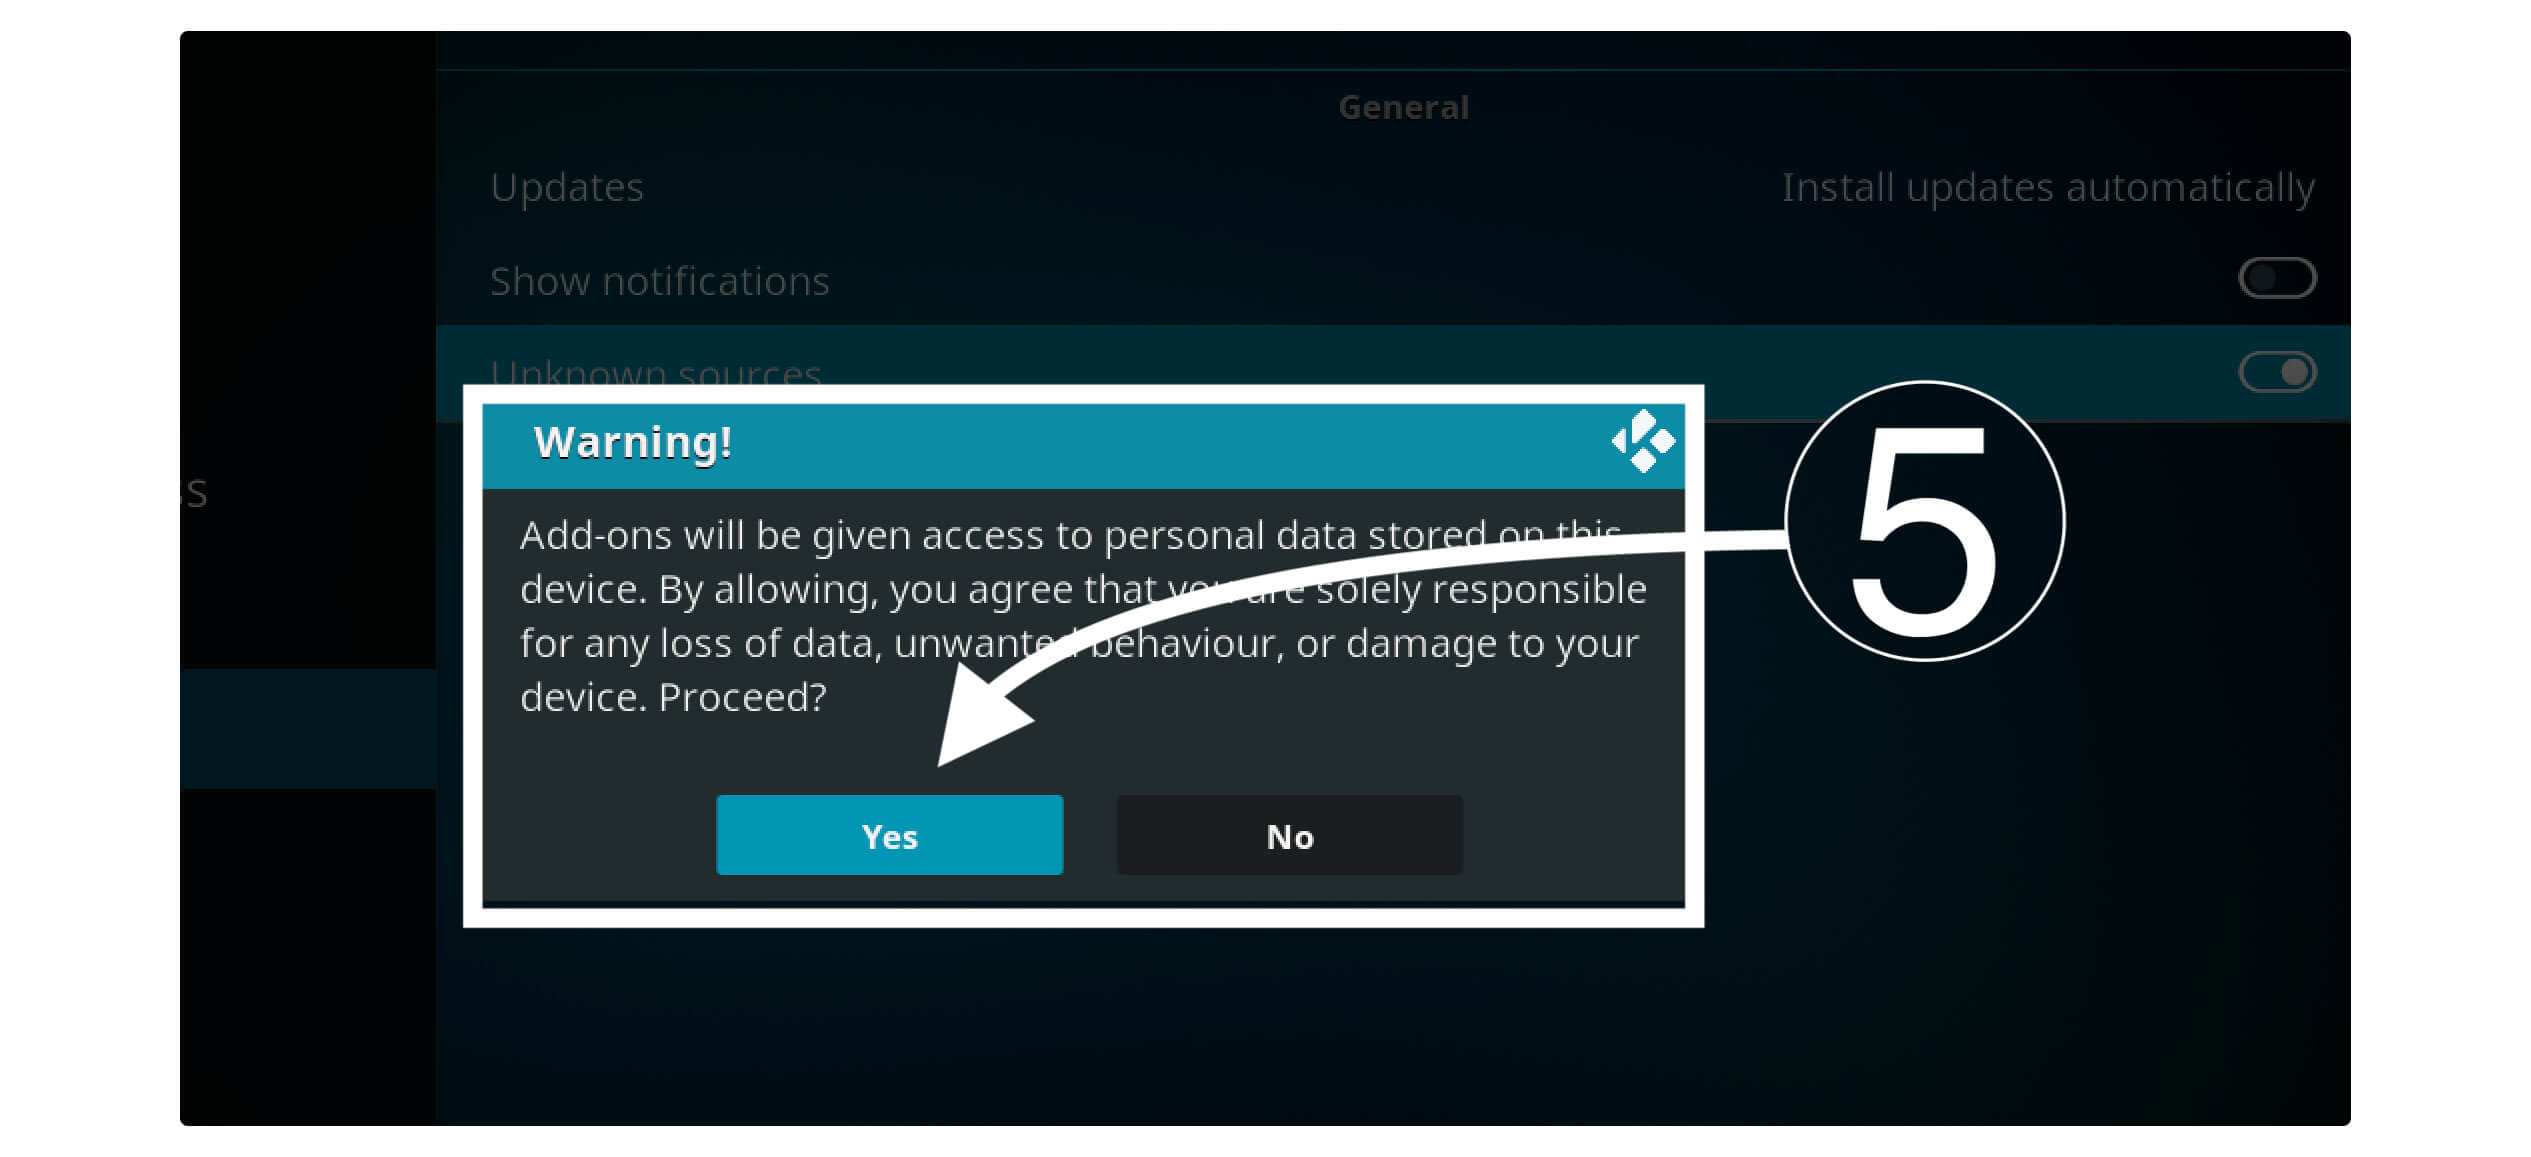
Now we have enabled Unknown Source installation on Kodi, and we are ready to install No Limits Magic. We enable it because this Build is from an Unknown or 3rd-party developer, and installation from these sources is blocked by default.
STEP #2: Add No Limits Wizard Source
We cannot directly download and install this Wizard on Kodi, so first, we have to add the source URL of it and then will be able to download it easily.
If you don’t know the proper way to add a source, then don’t worry, just see the screenshots below and follow all the steps carefully to easily add any source.
Launch Kodi and then click on the Settings icon near Power Button (as mentioned in the above guide).
So, from here, you simply need to choose File Manager.
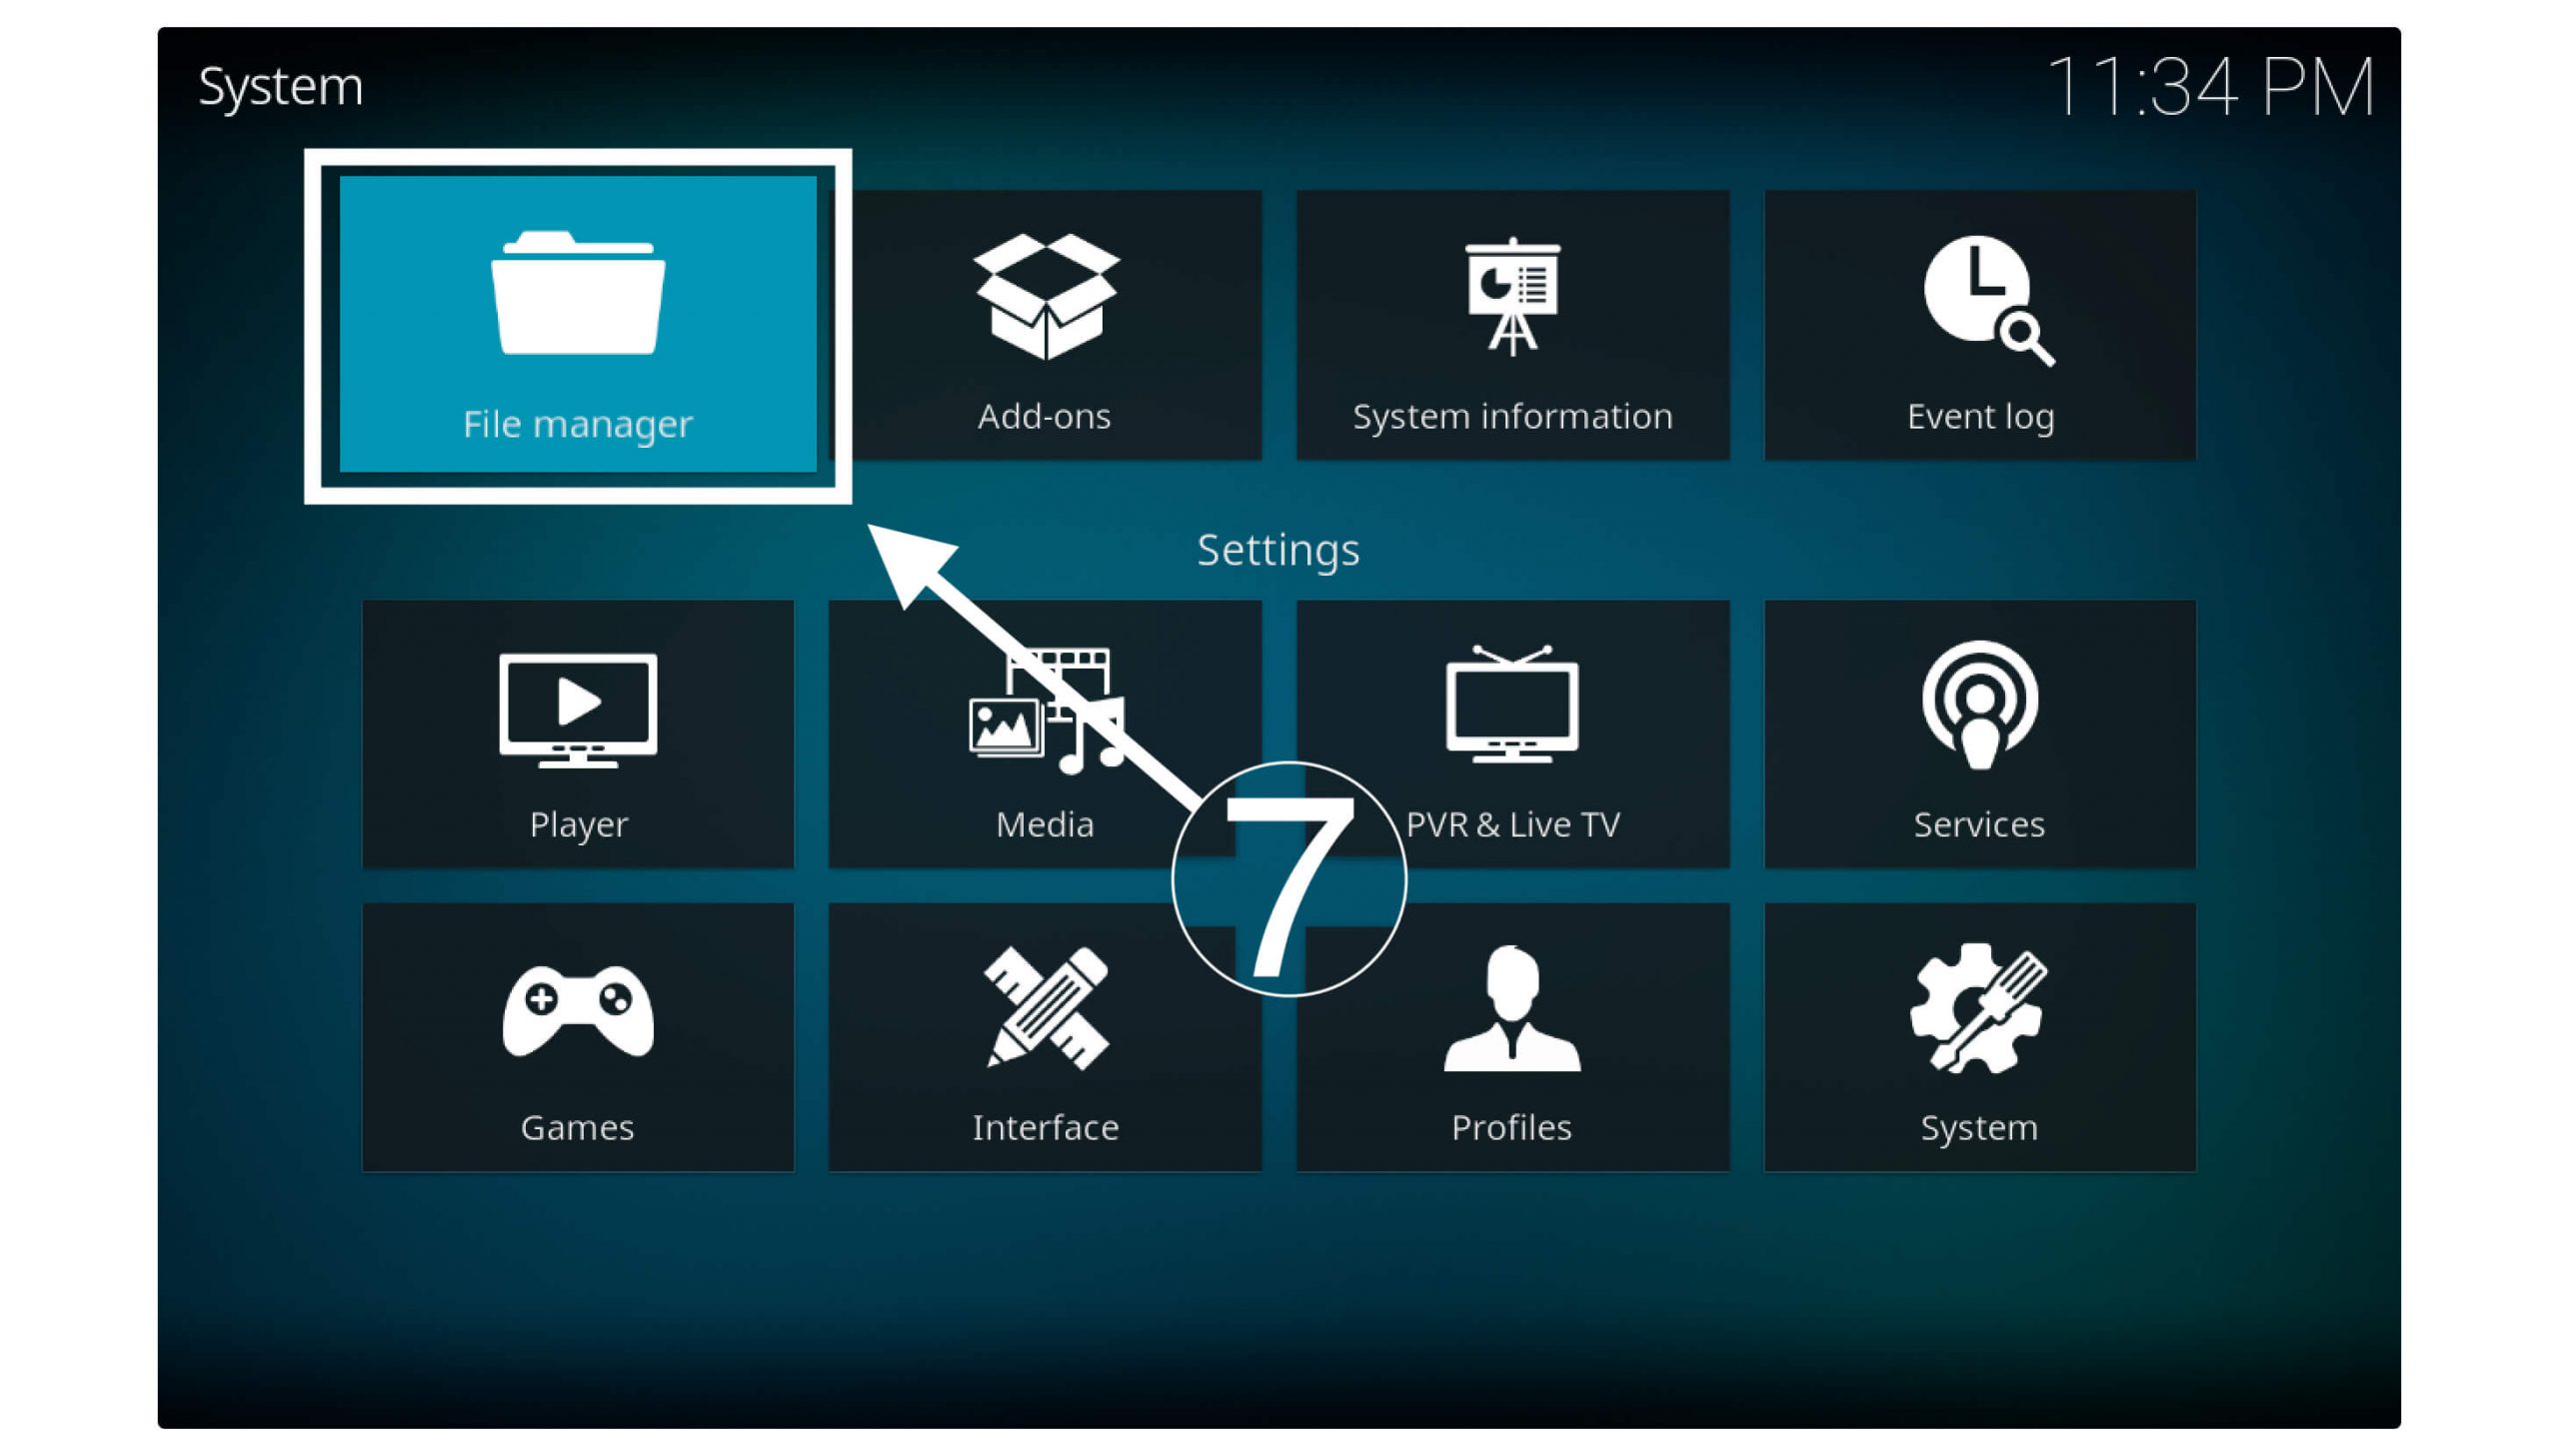
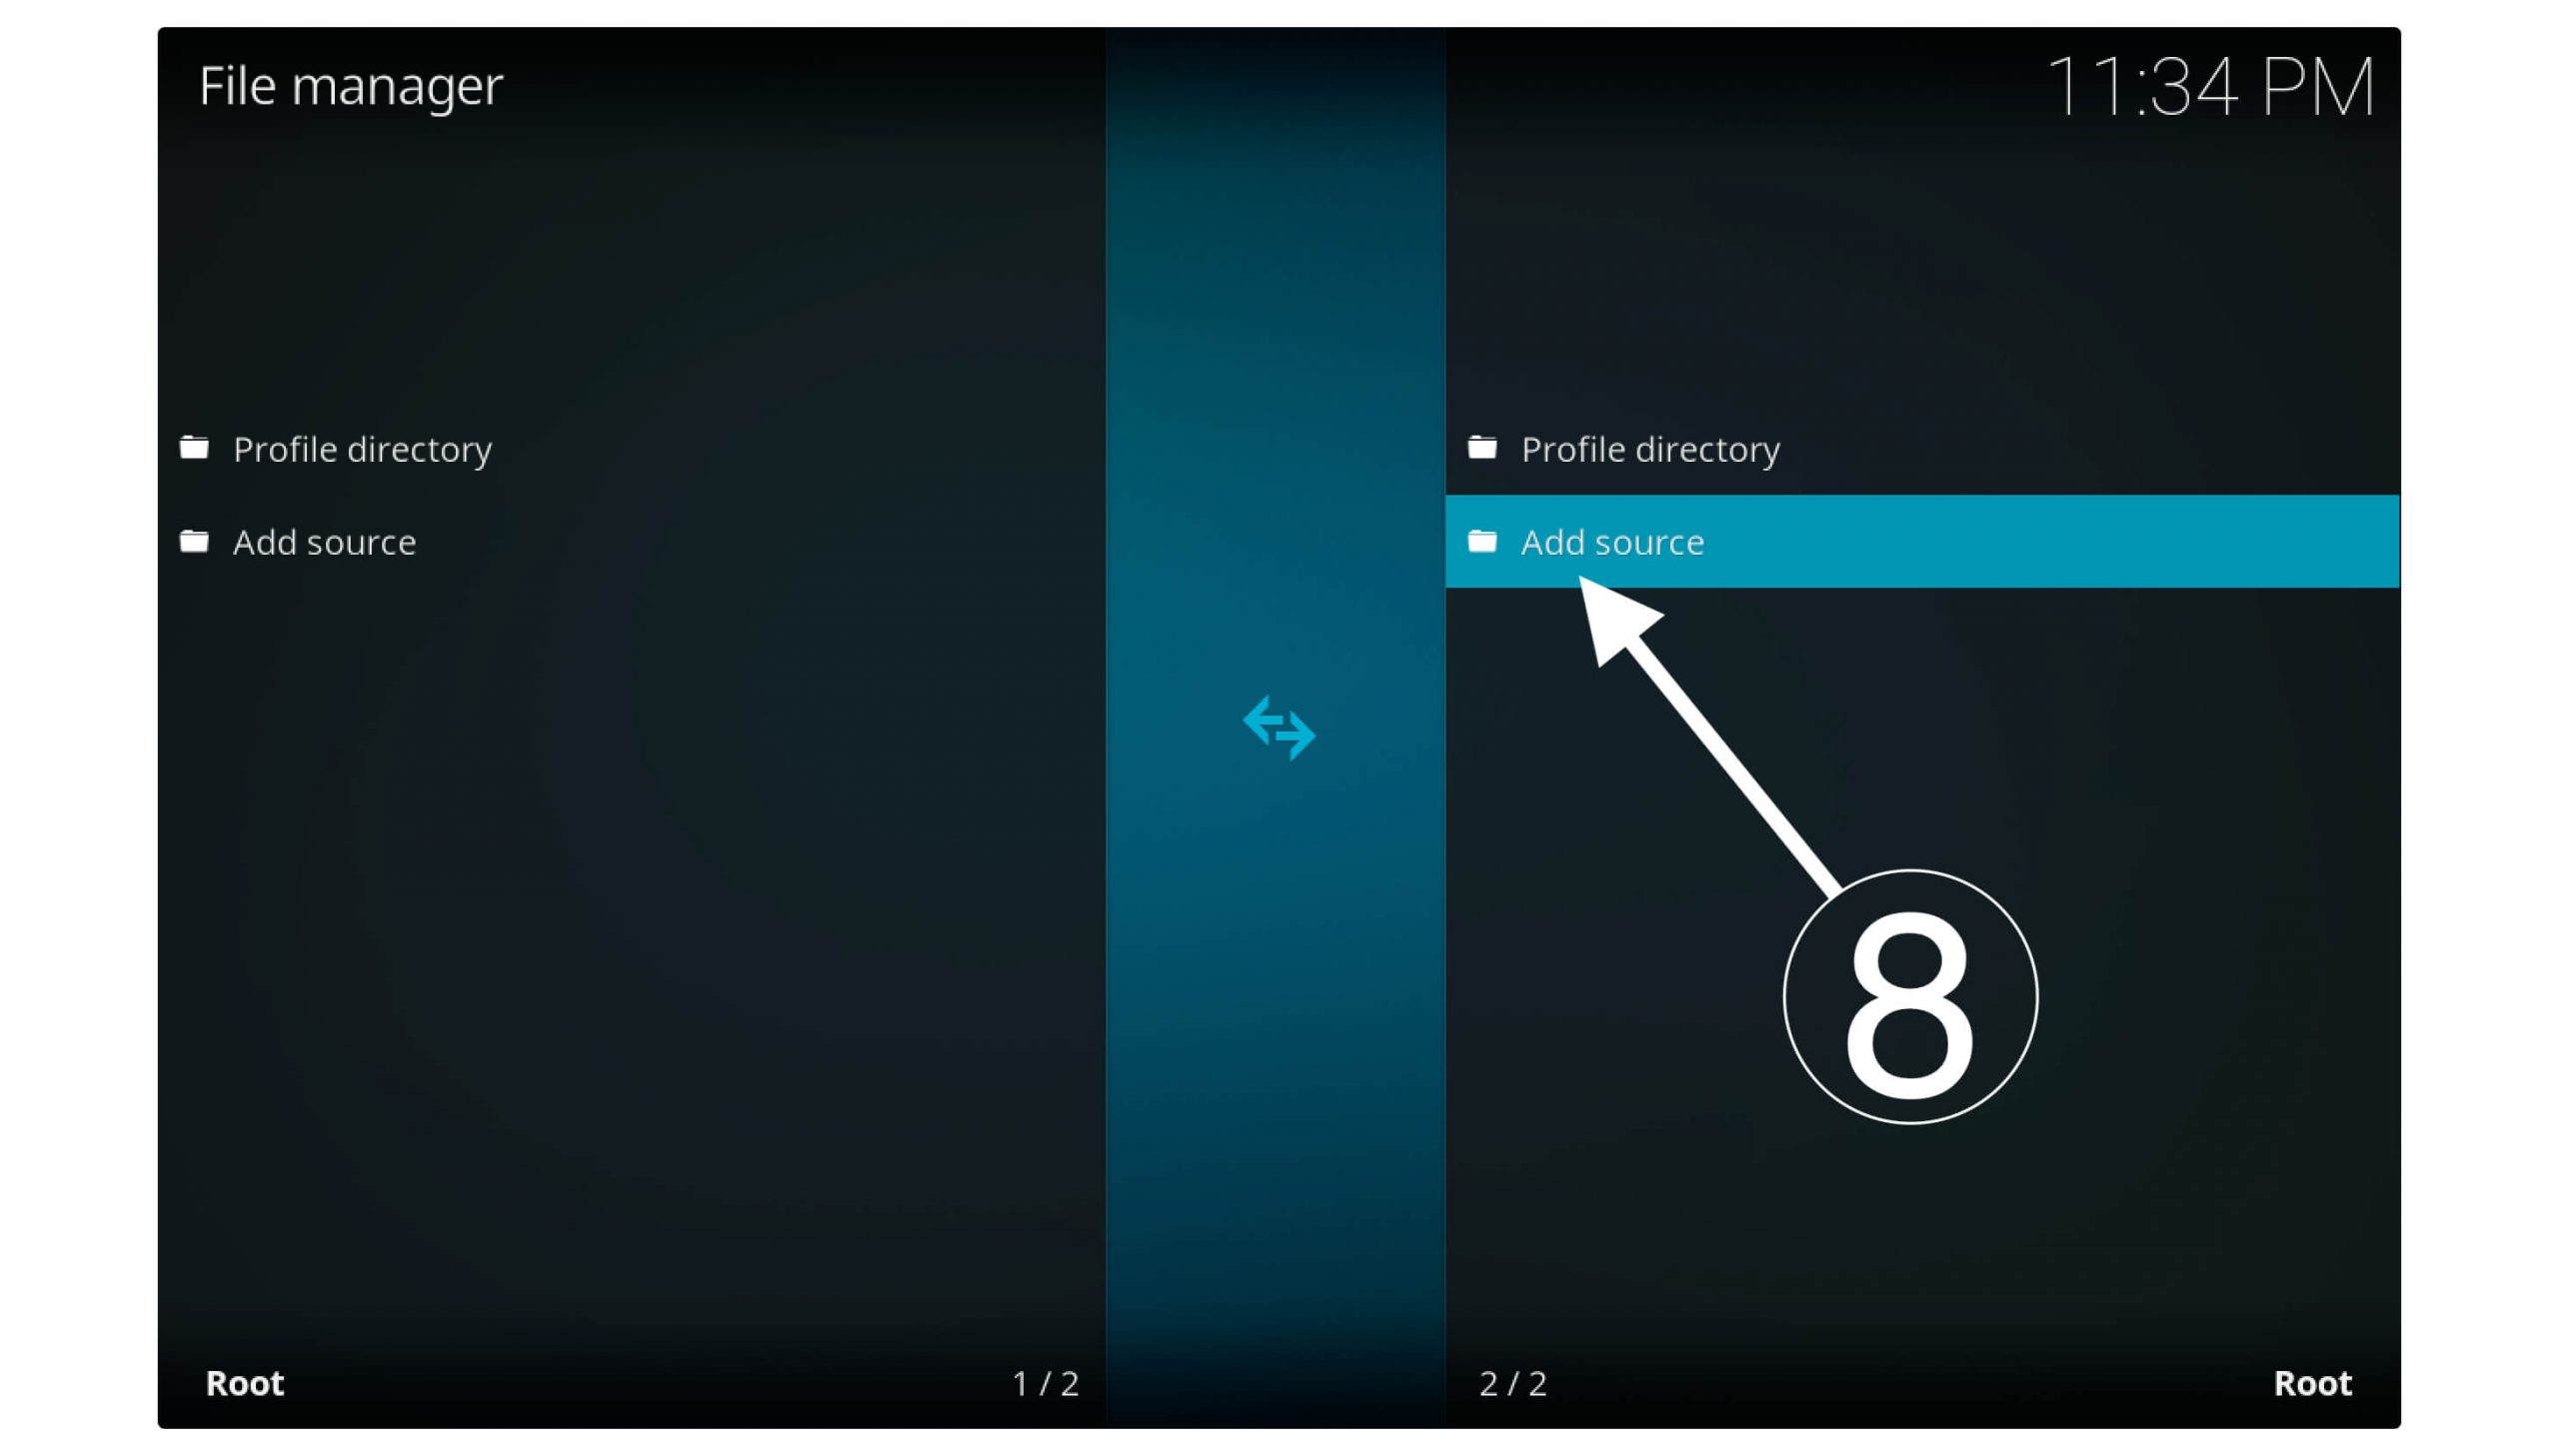
Now in the File Manager section, hove-to Add source and press the Ok button.
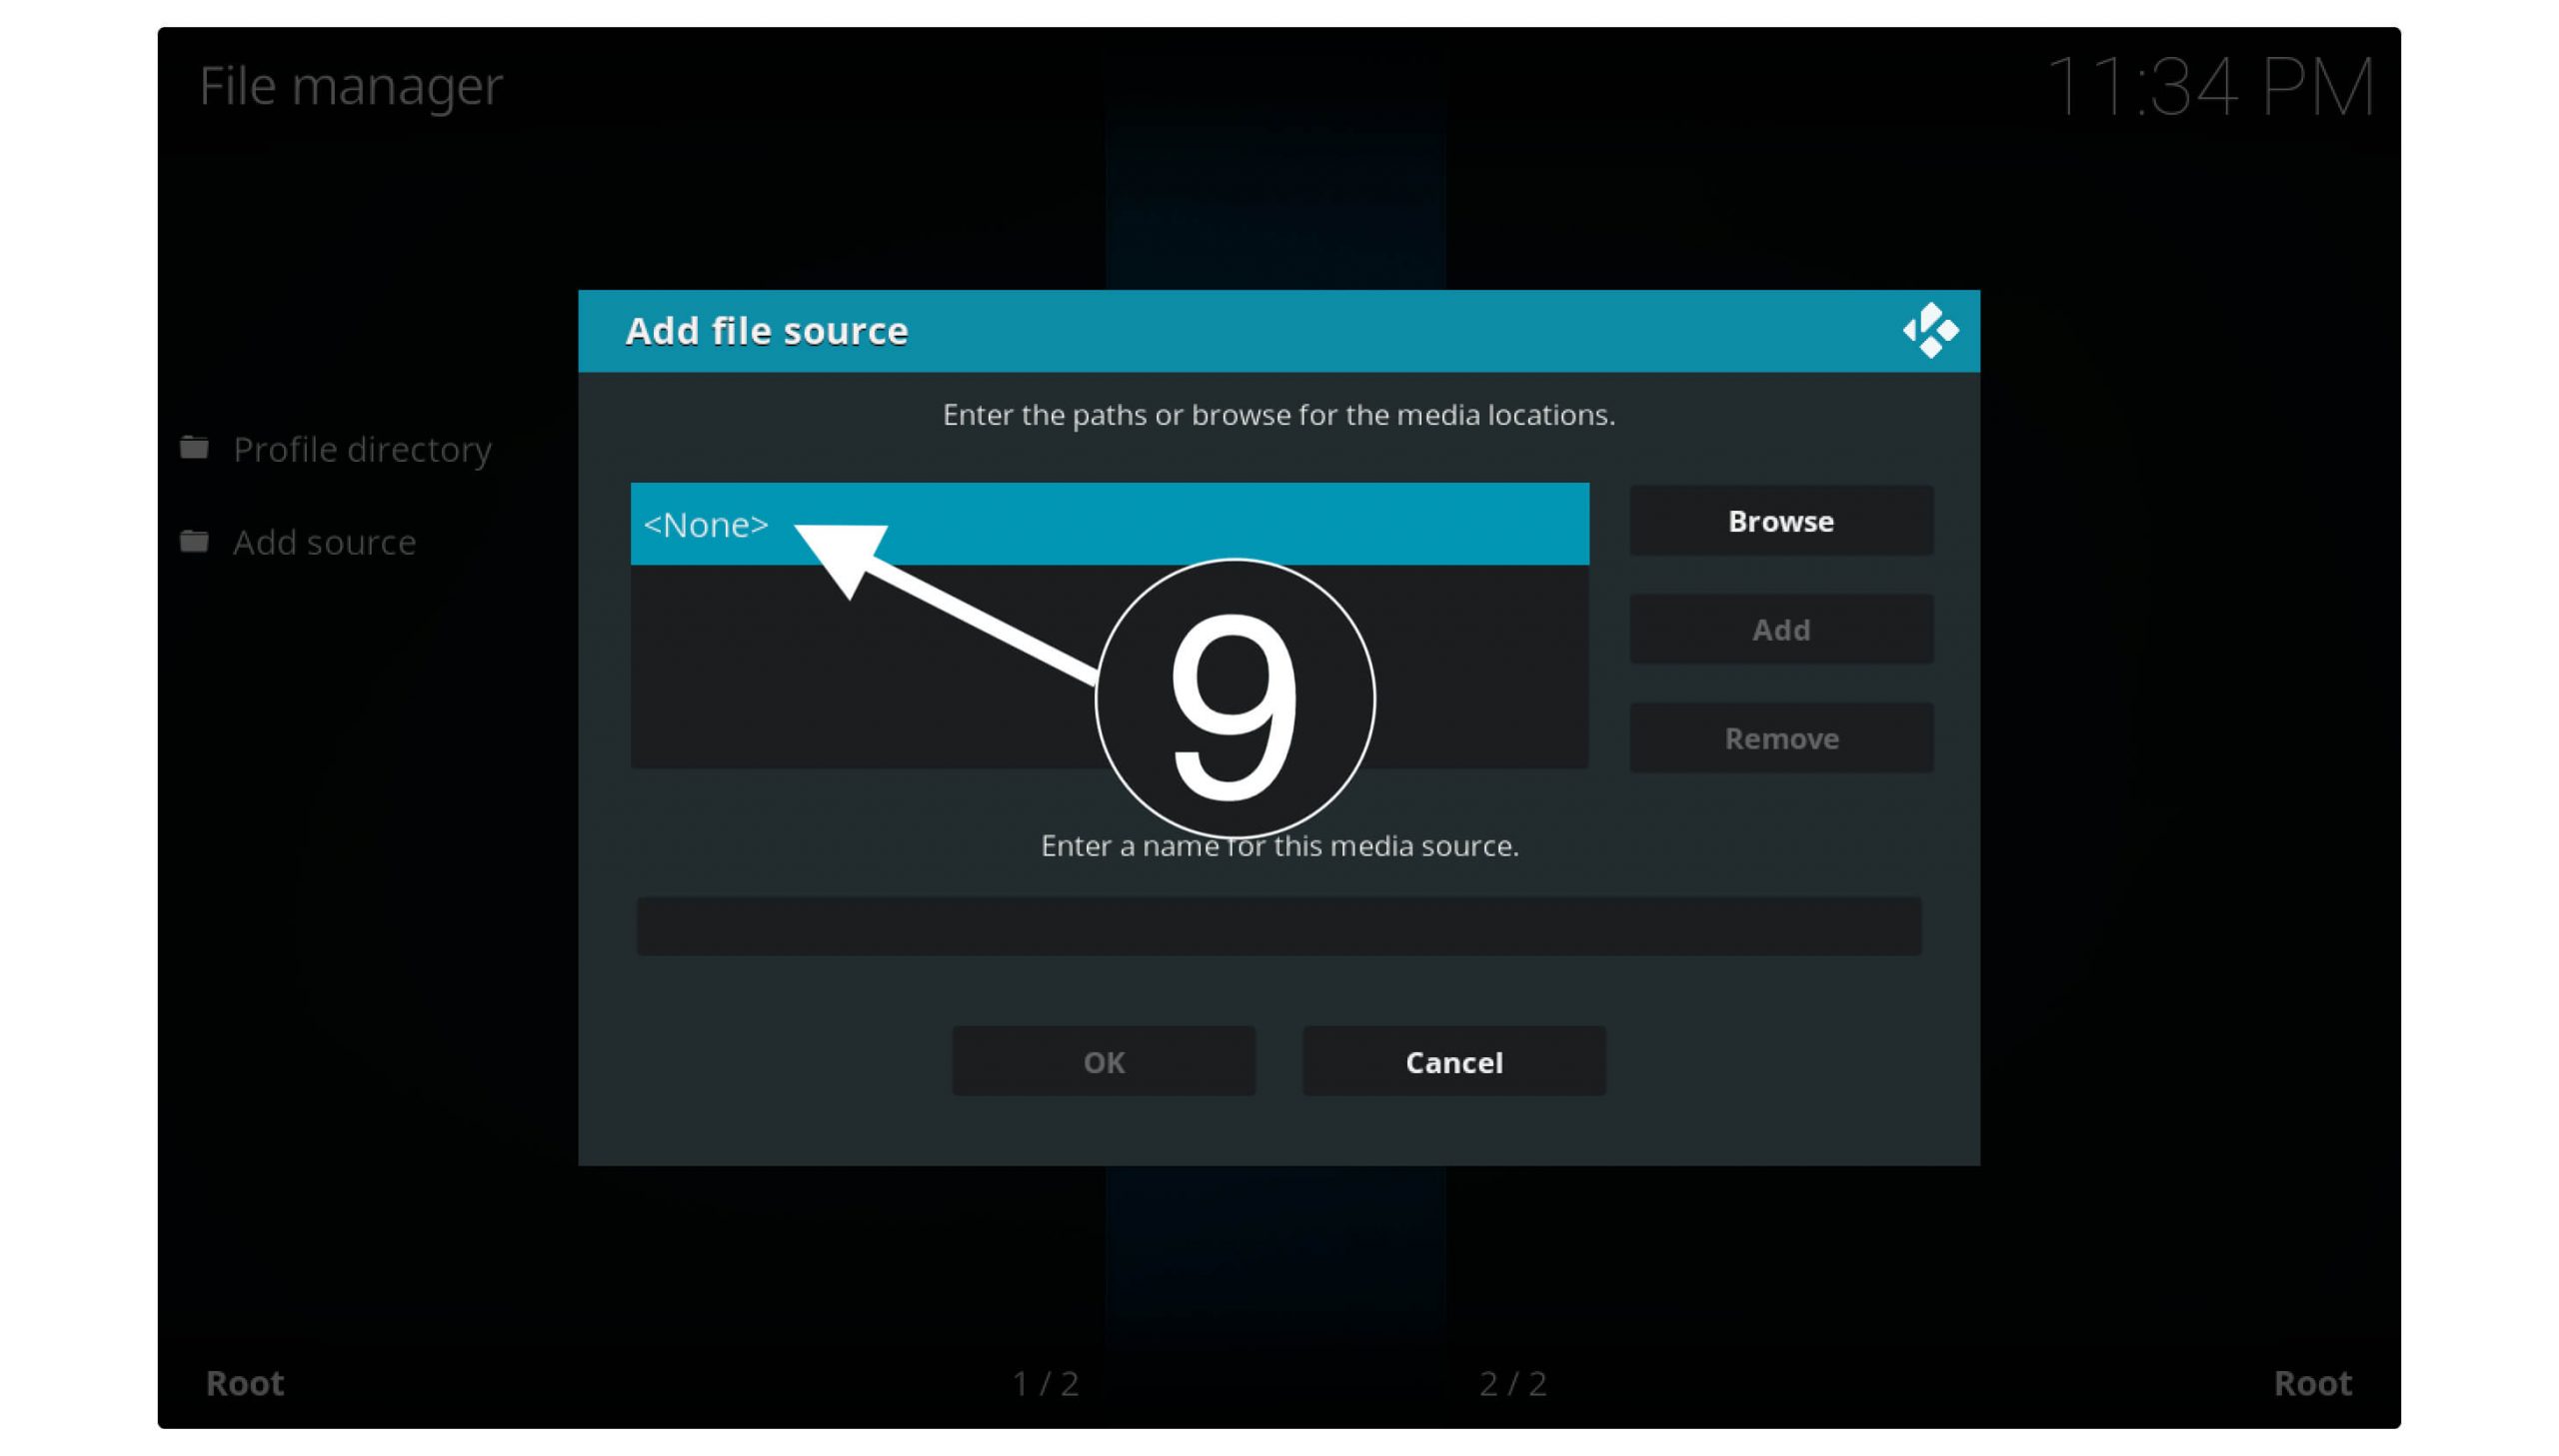
It will then launch a new window where it asks to add a source, so simply select the None- option.
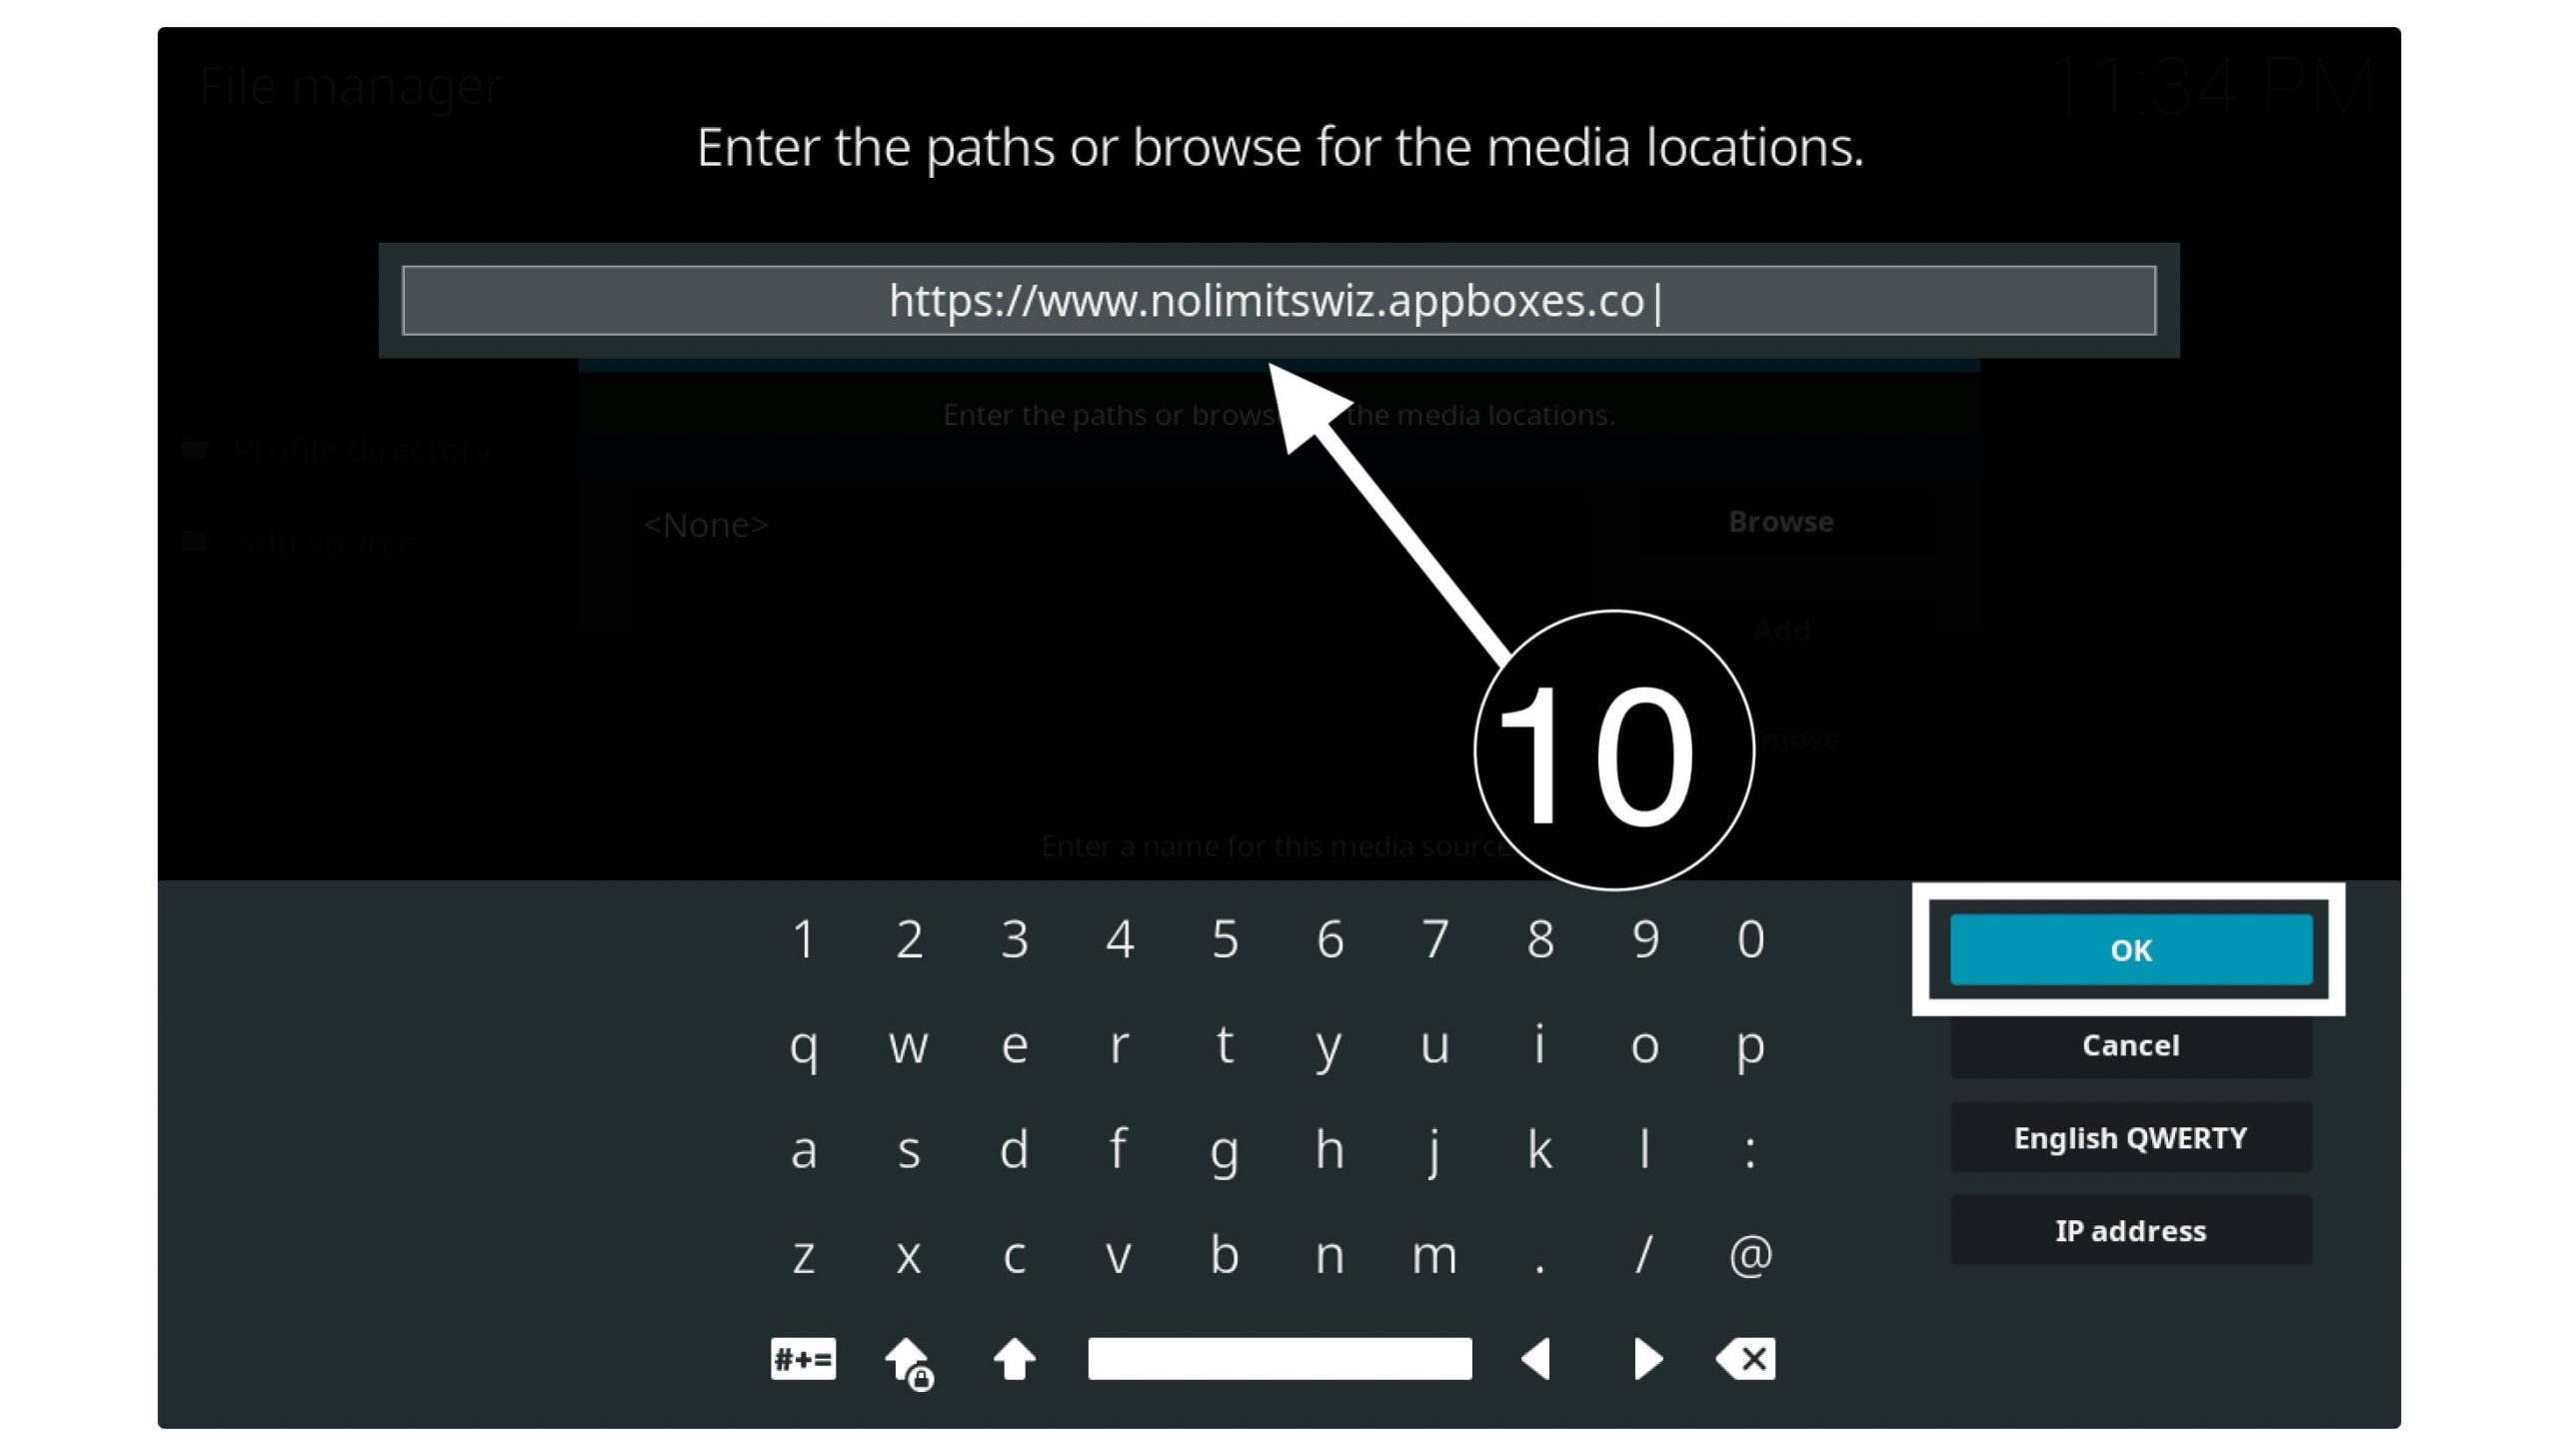
At this time, it will ask to add the URL in that Box, so the virtual keyboard just types https://www.nolimitswiz.appboxes.co and press Ok to add.
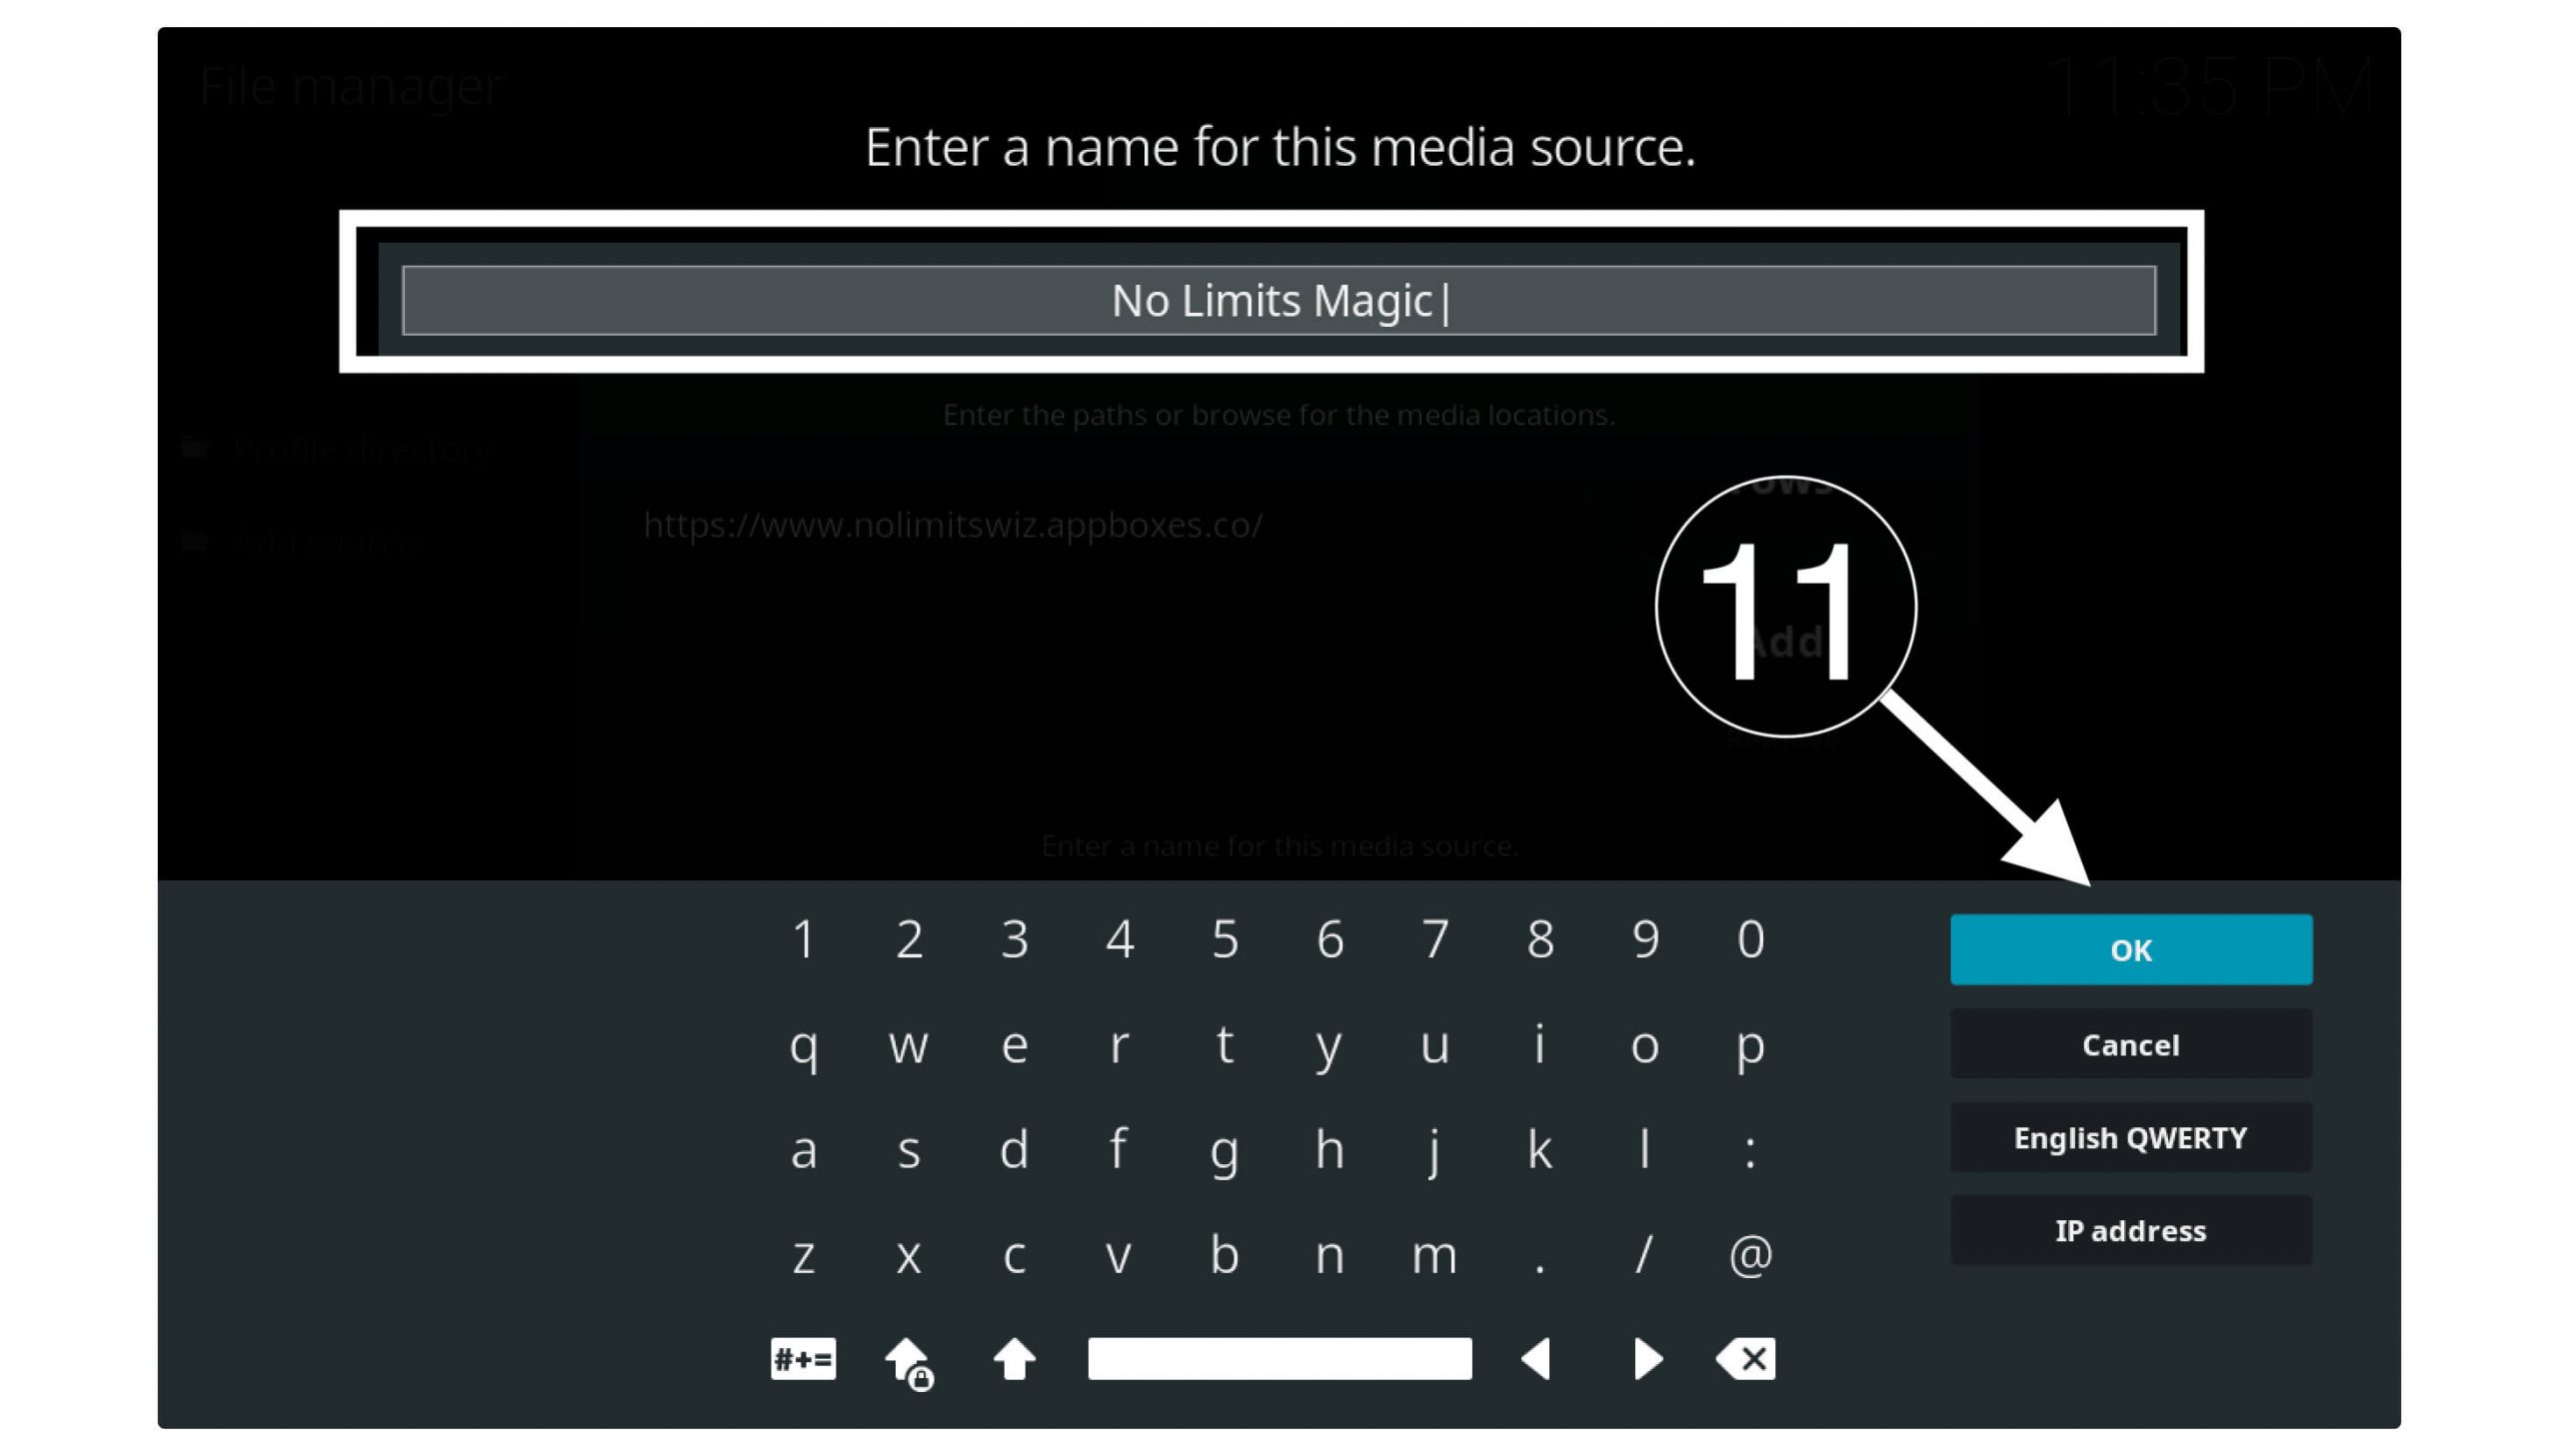
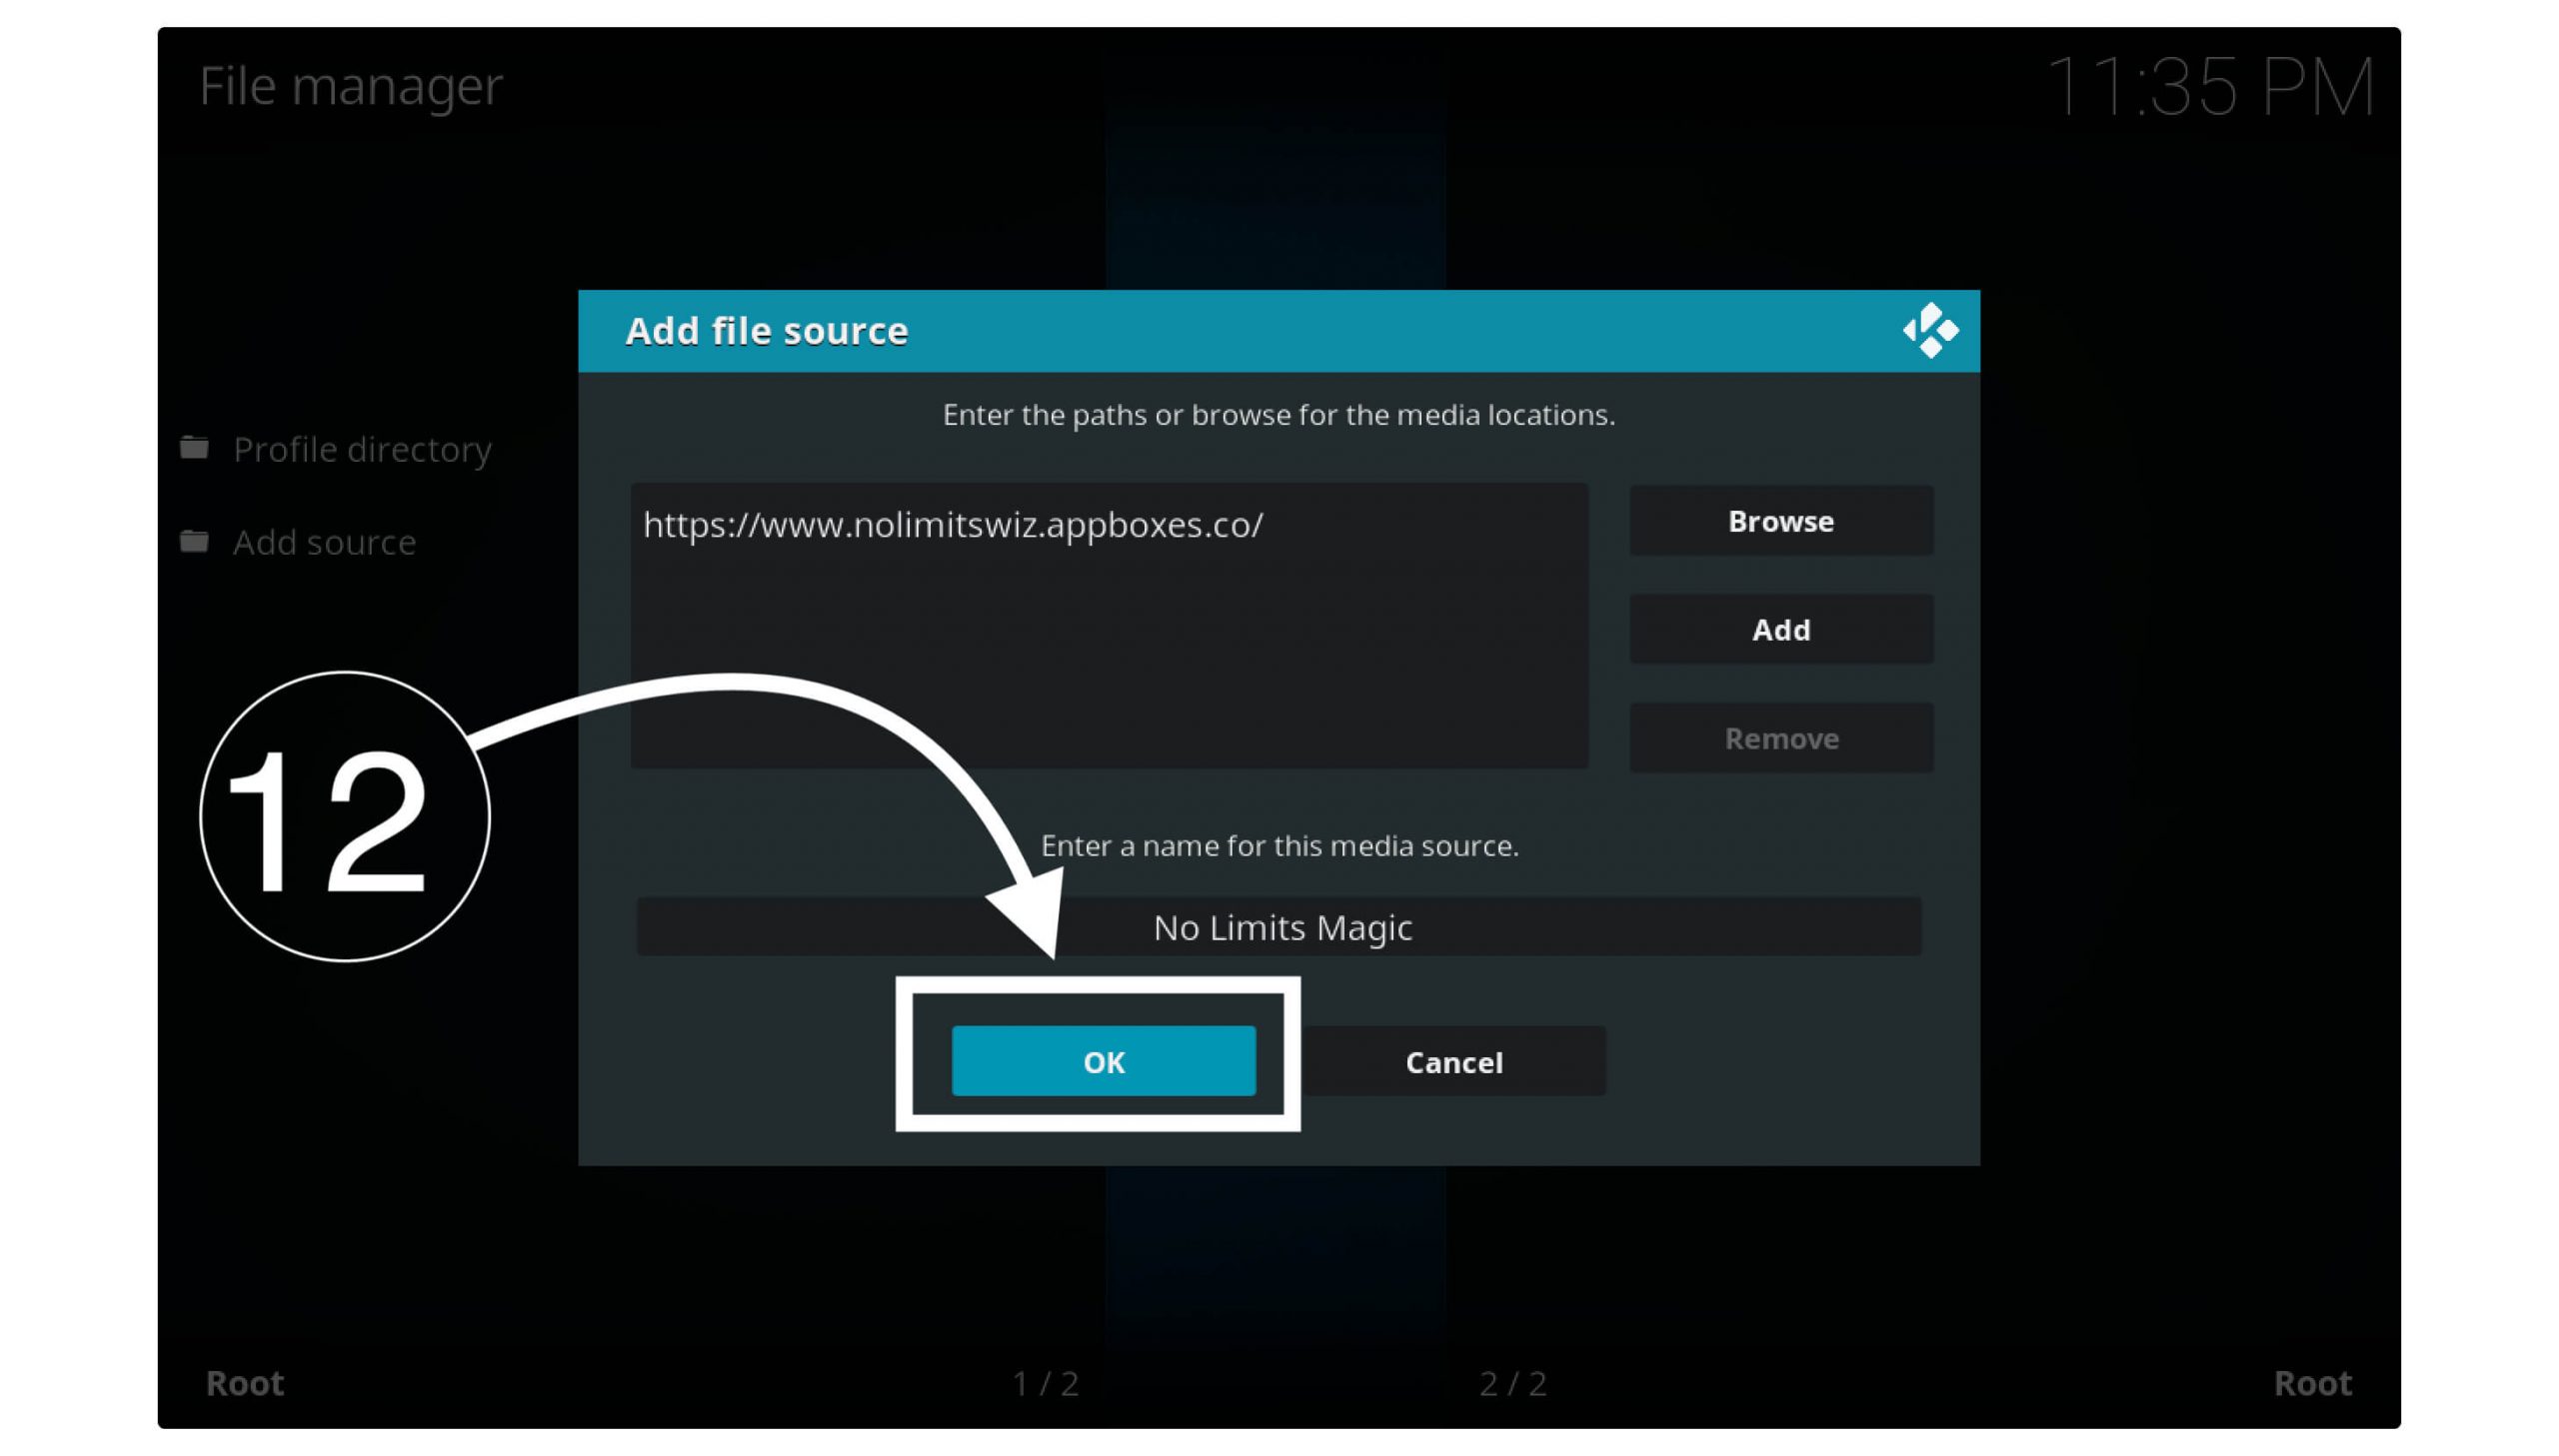
After this, in the below Box, you have to type the name of that source. You can type any name you want, but I will save it as No Limits Magic so I can remember it.
Ok, now just select the Ok button from there, and you can see the source is now successfully added. The name of it will be visible in the list if it is not there then follow the same steps again.
Now, as we are done with this step as well, so we have to now move to the installation section, to do so, just follow the steps that are provided below and don’t forget to recheck it before performing.
STEP #3: Now Install No Limits On Kodi
These wizards come with different variants like in full and in lite. The full variant is for those having 2GB of Ram or 32GB of memory. And the lite version is for those who have less storage and 1GB of Ram only.
In this way, I would recommend going with the lite version as the Firestick comes with only 1GB. Also, by doing this, it will save your storage as well because having storage full can cause many problems like Overheating, Slow Performance, Unexpected Shutdowns, etc.
But if you are downloading it on a PC, Mobile, or any other device instead of Fire TV, then you can go with the full package. Ok, so without wasting any more time now let’s check out our step-by-step guide given below:
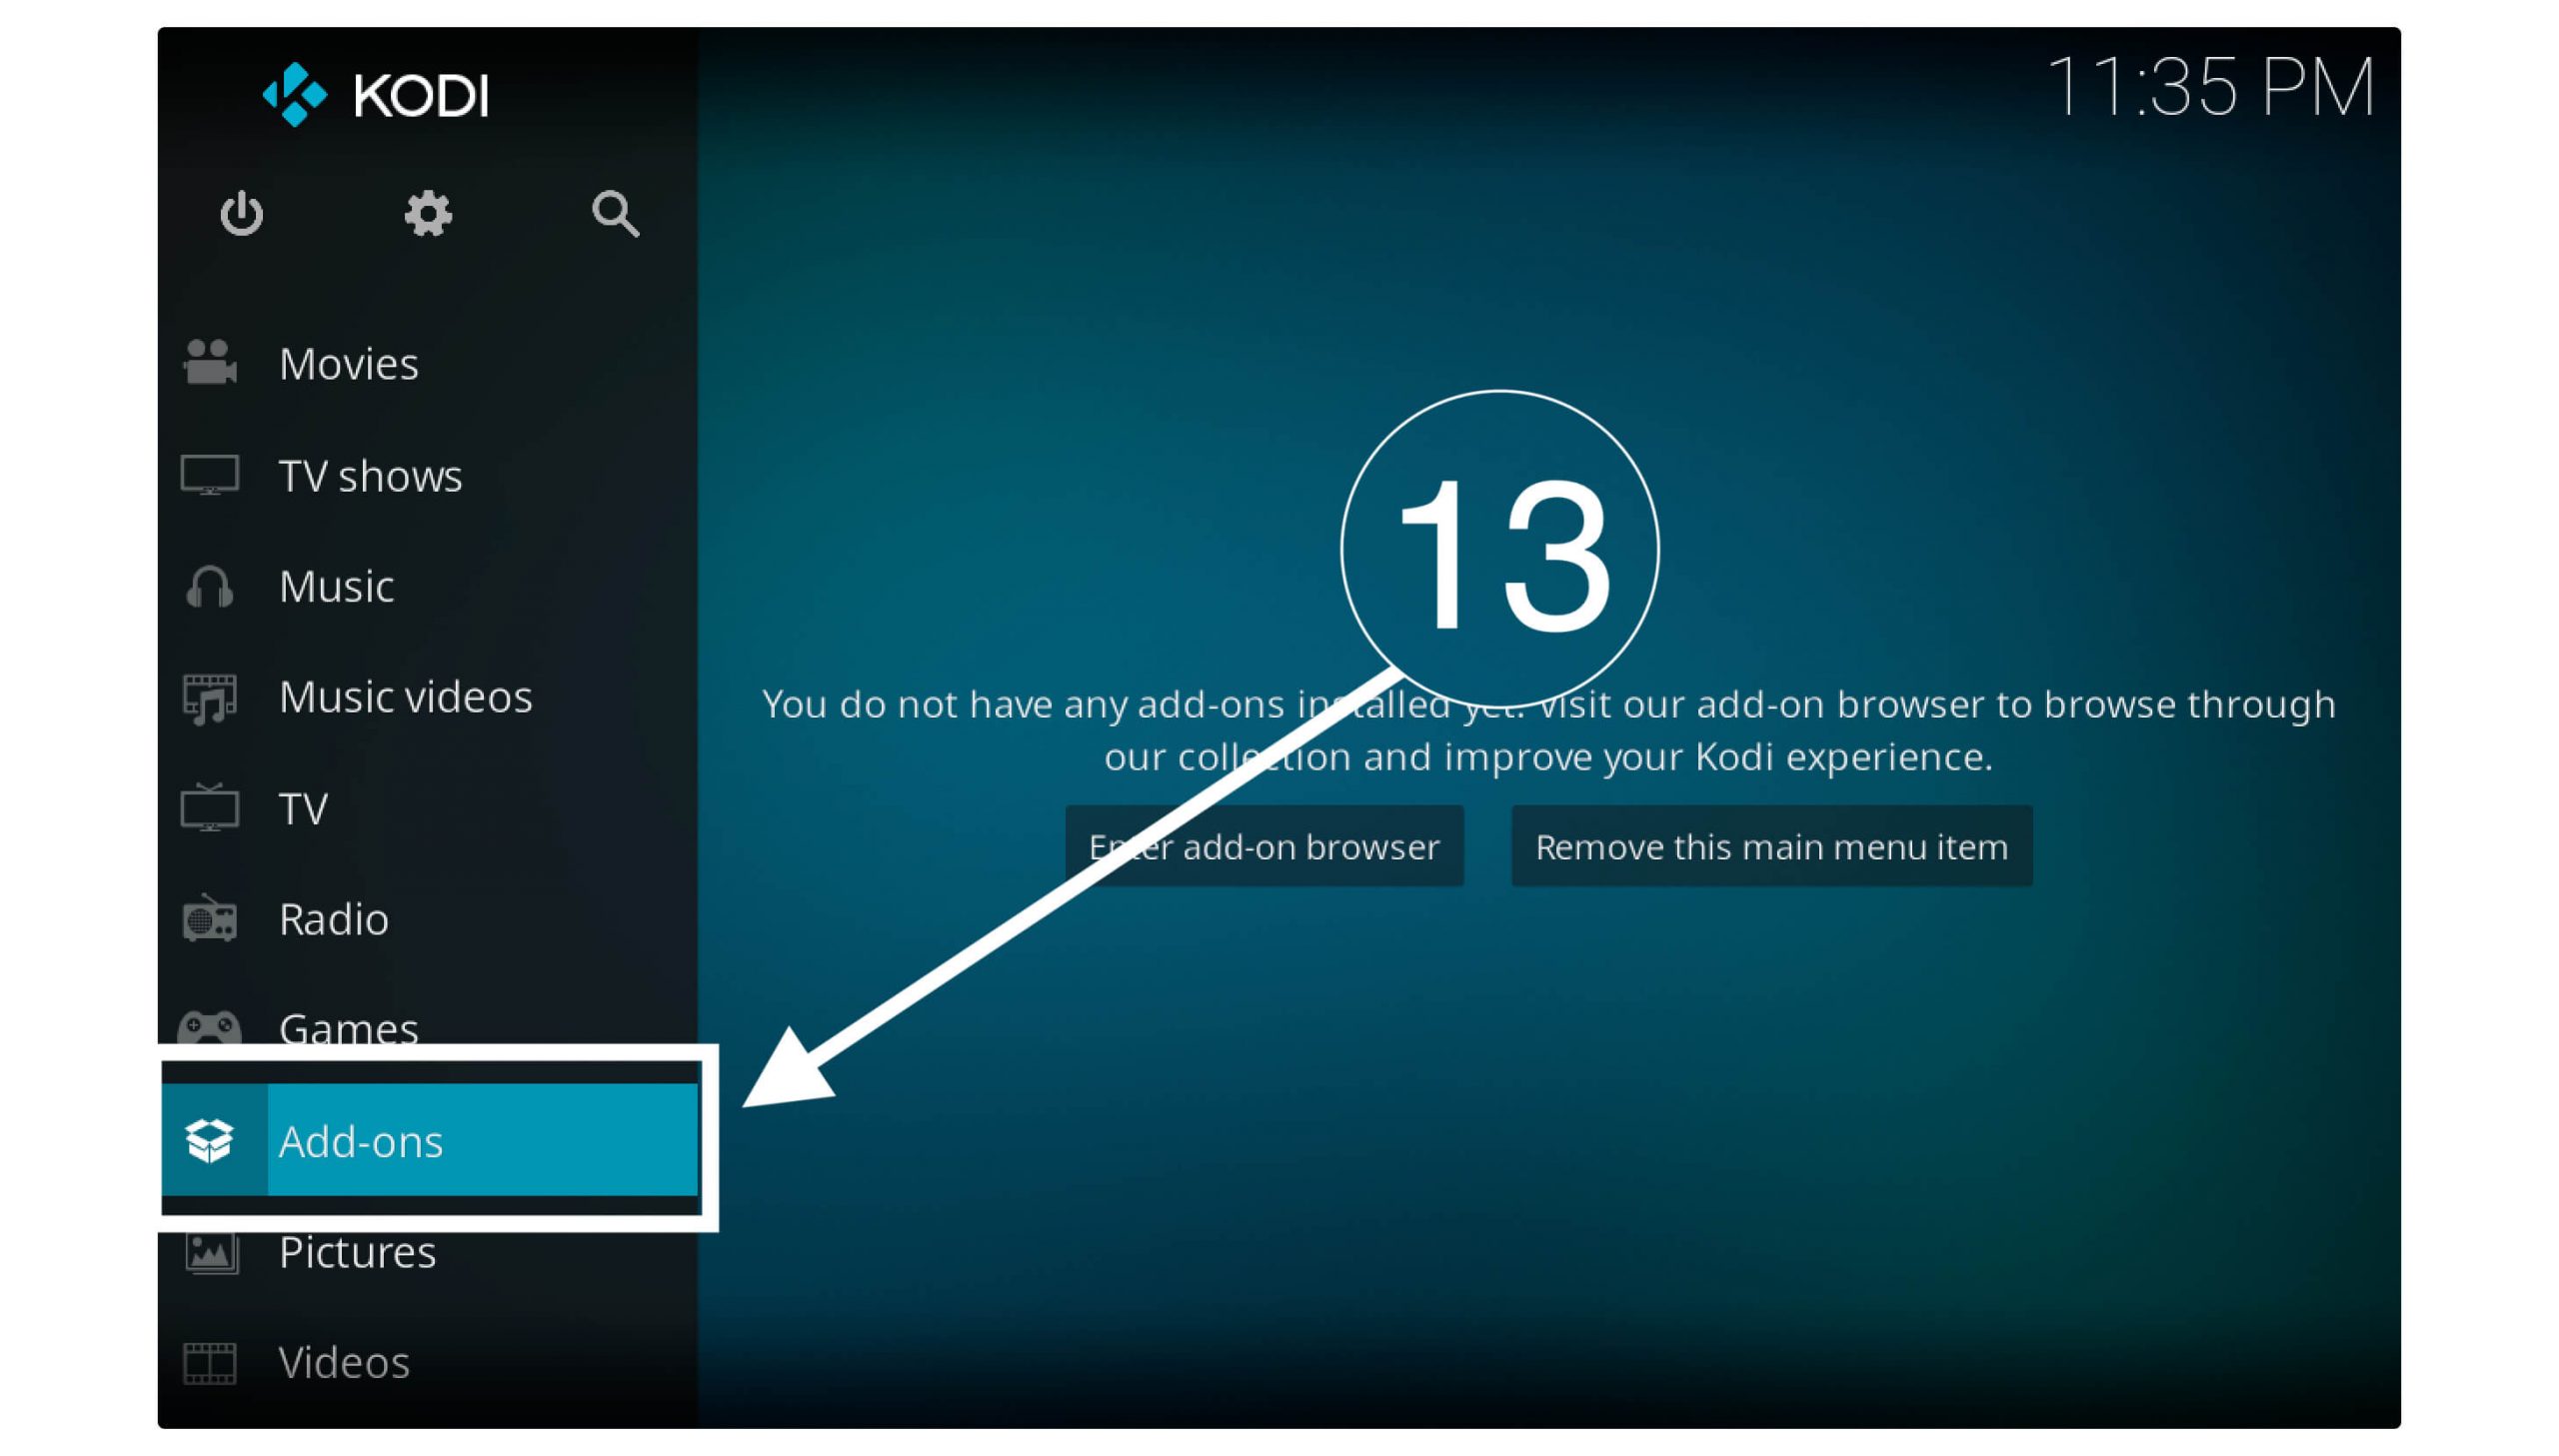
After adding the source now, Restart Kodi and then select Addons from the left-side menu on Home Screen.
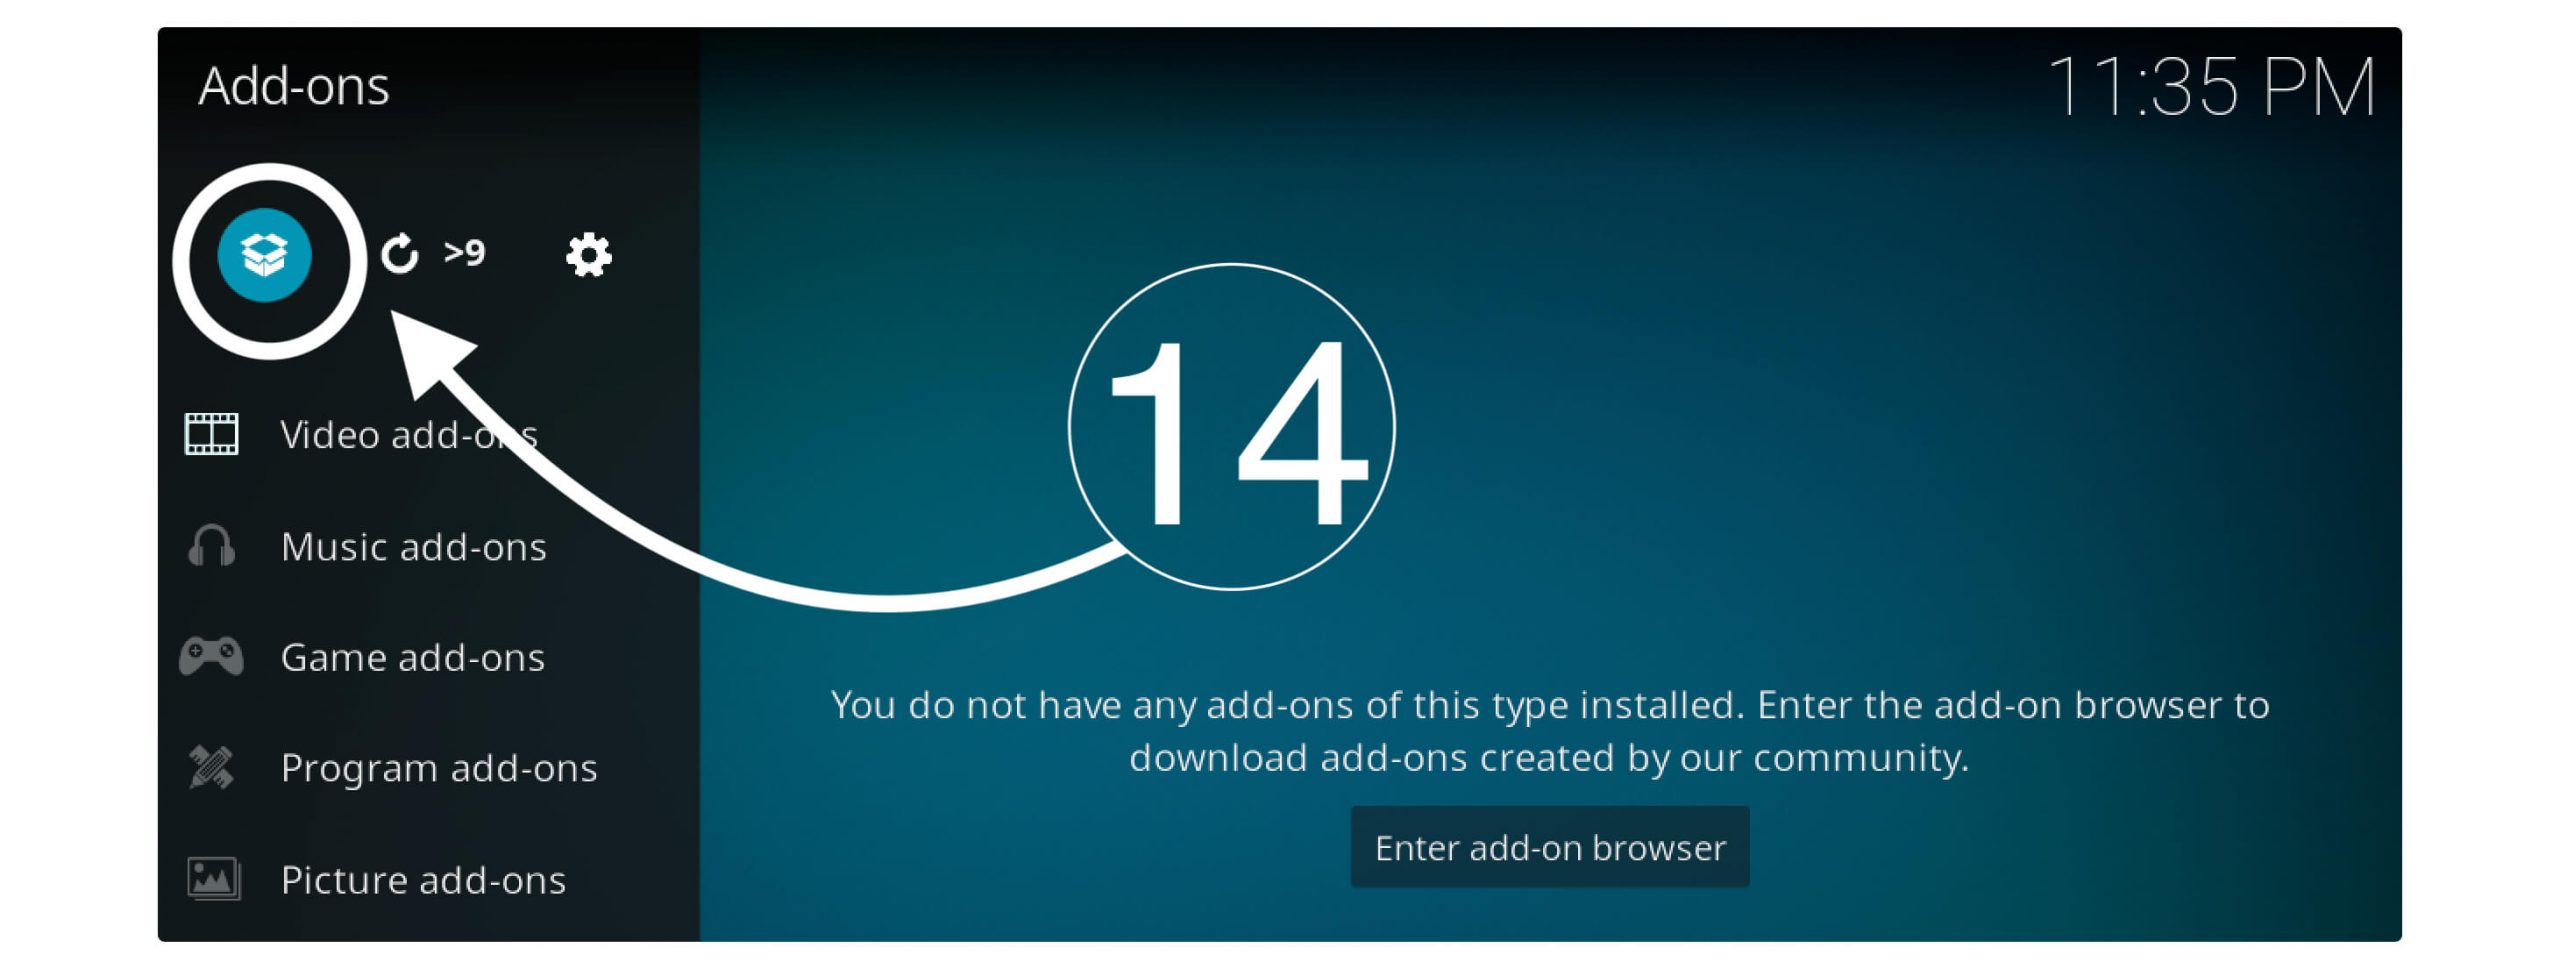
At this time, click on the Addon icon or Box near the Settings icon.
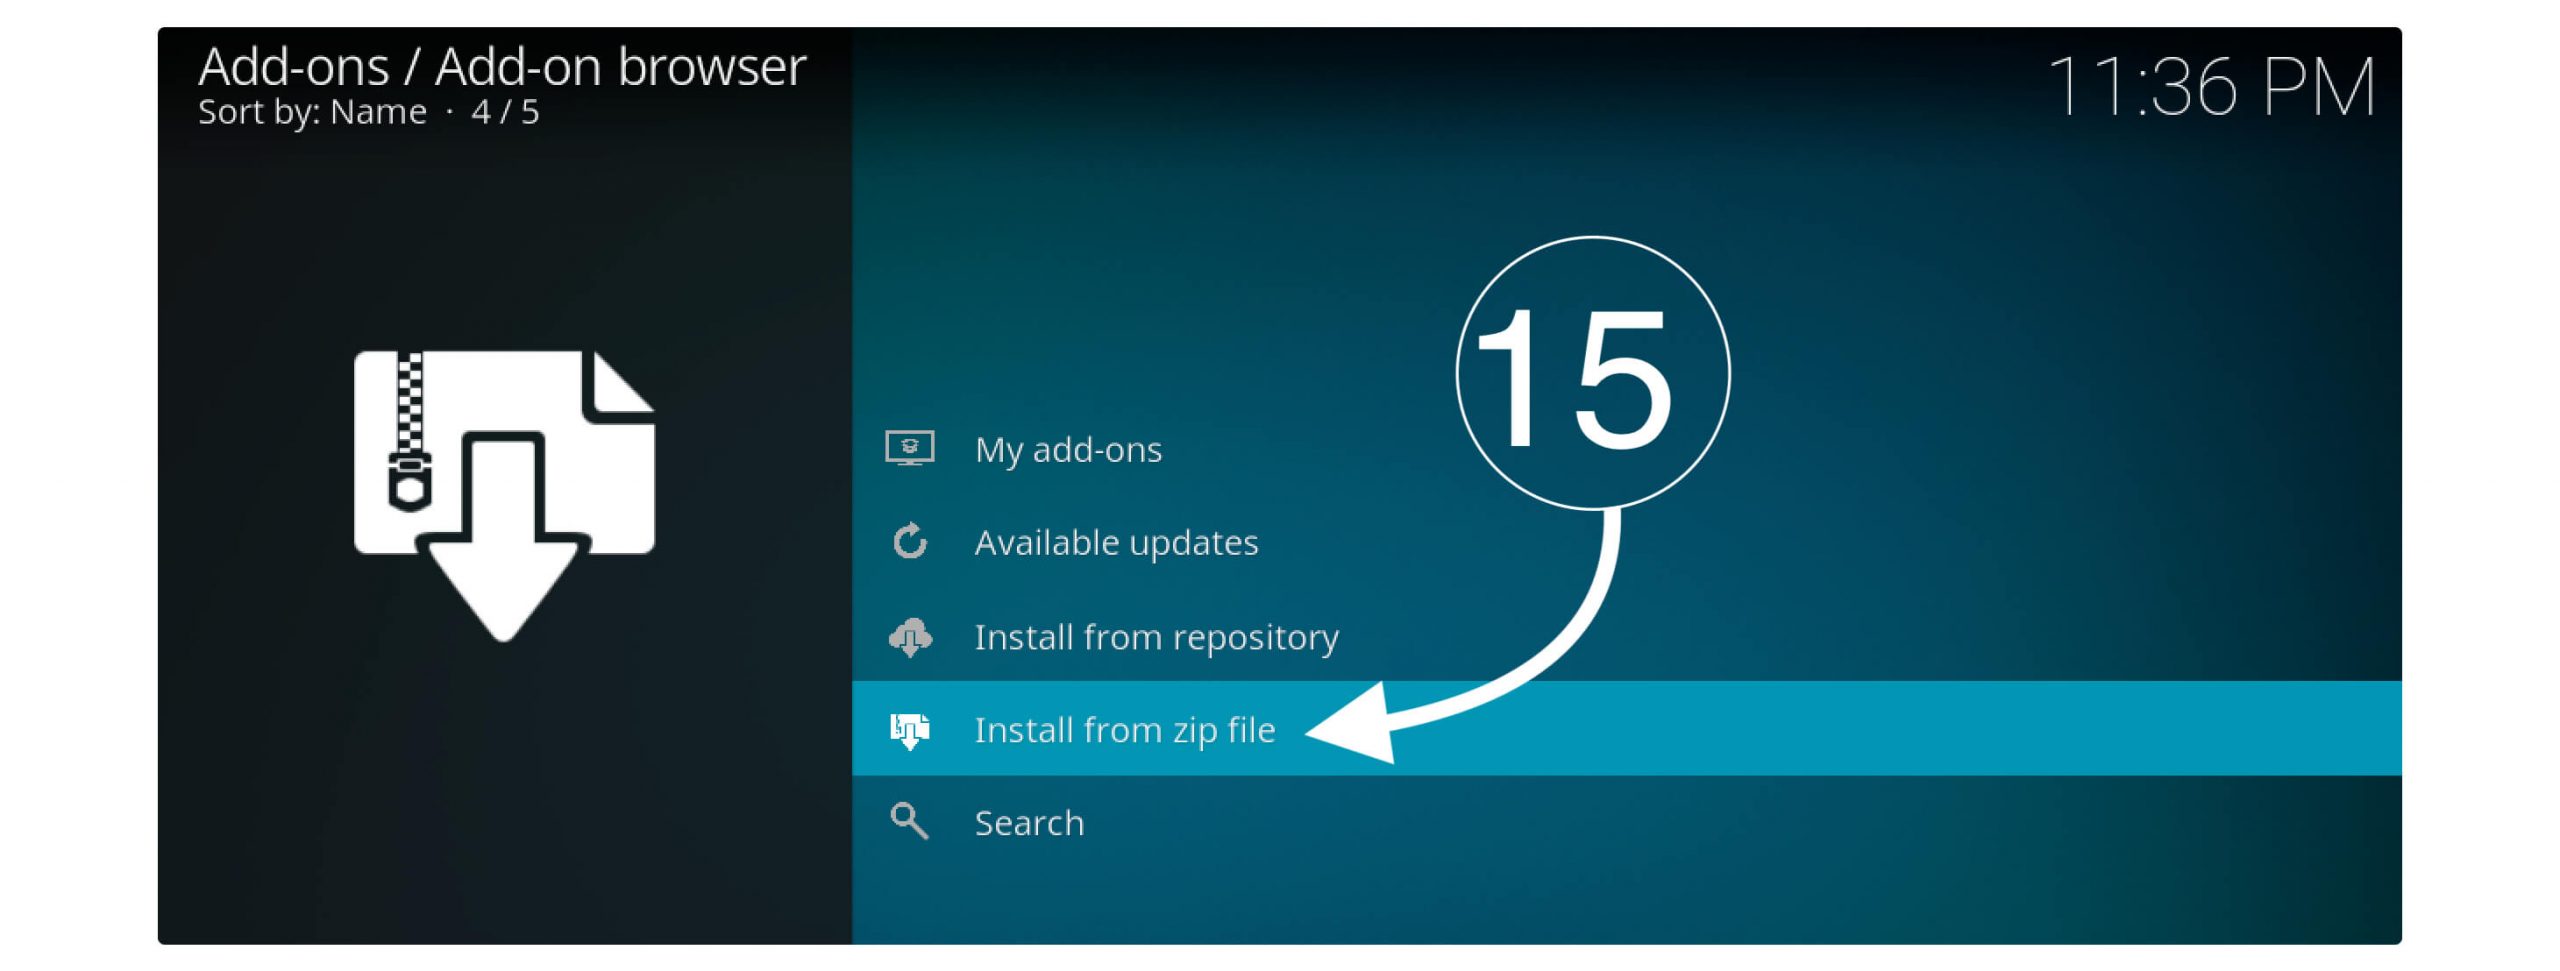
Here, you will find many options, so from there, we just need to click on Install From Zip File.
Now, you will see a small window appears, so, from this list, you just need to select that source name. In my case, I will select the No Limits Magic and the Ok button.
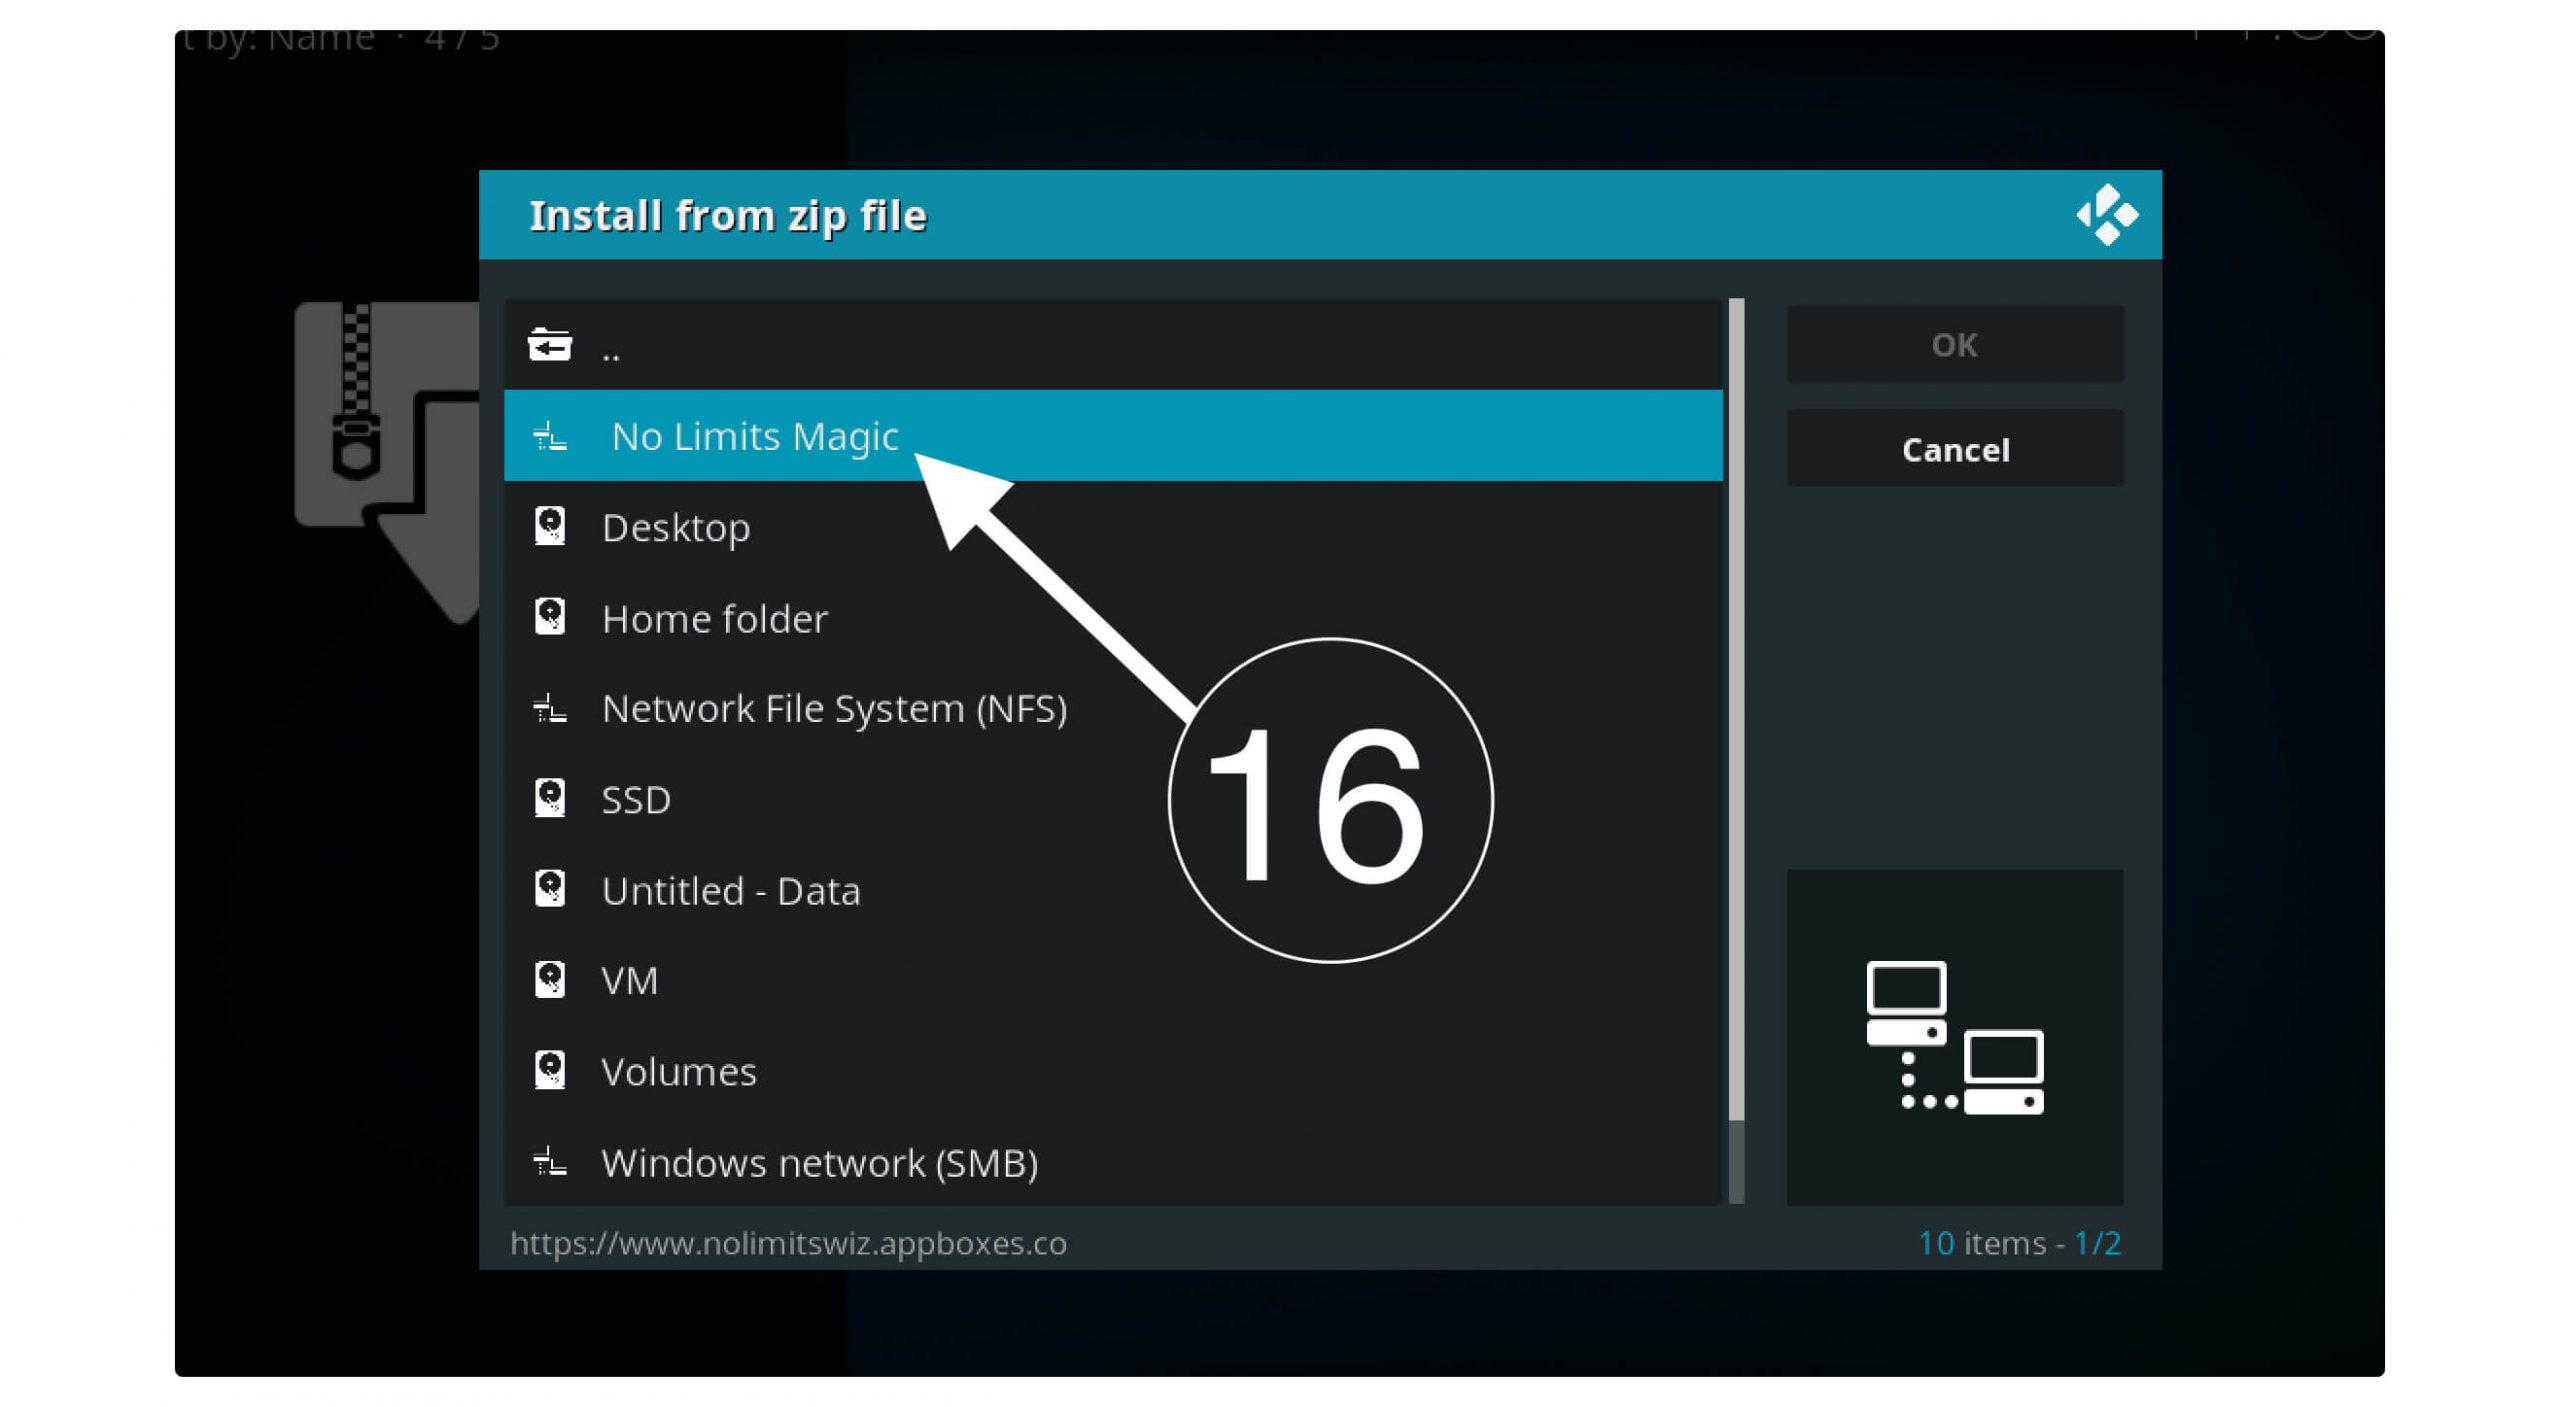
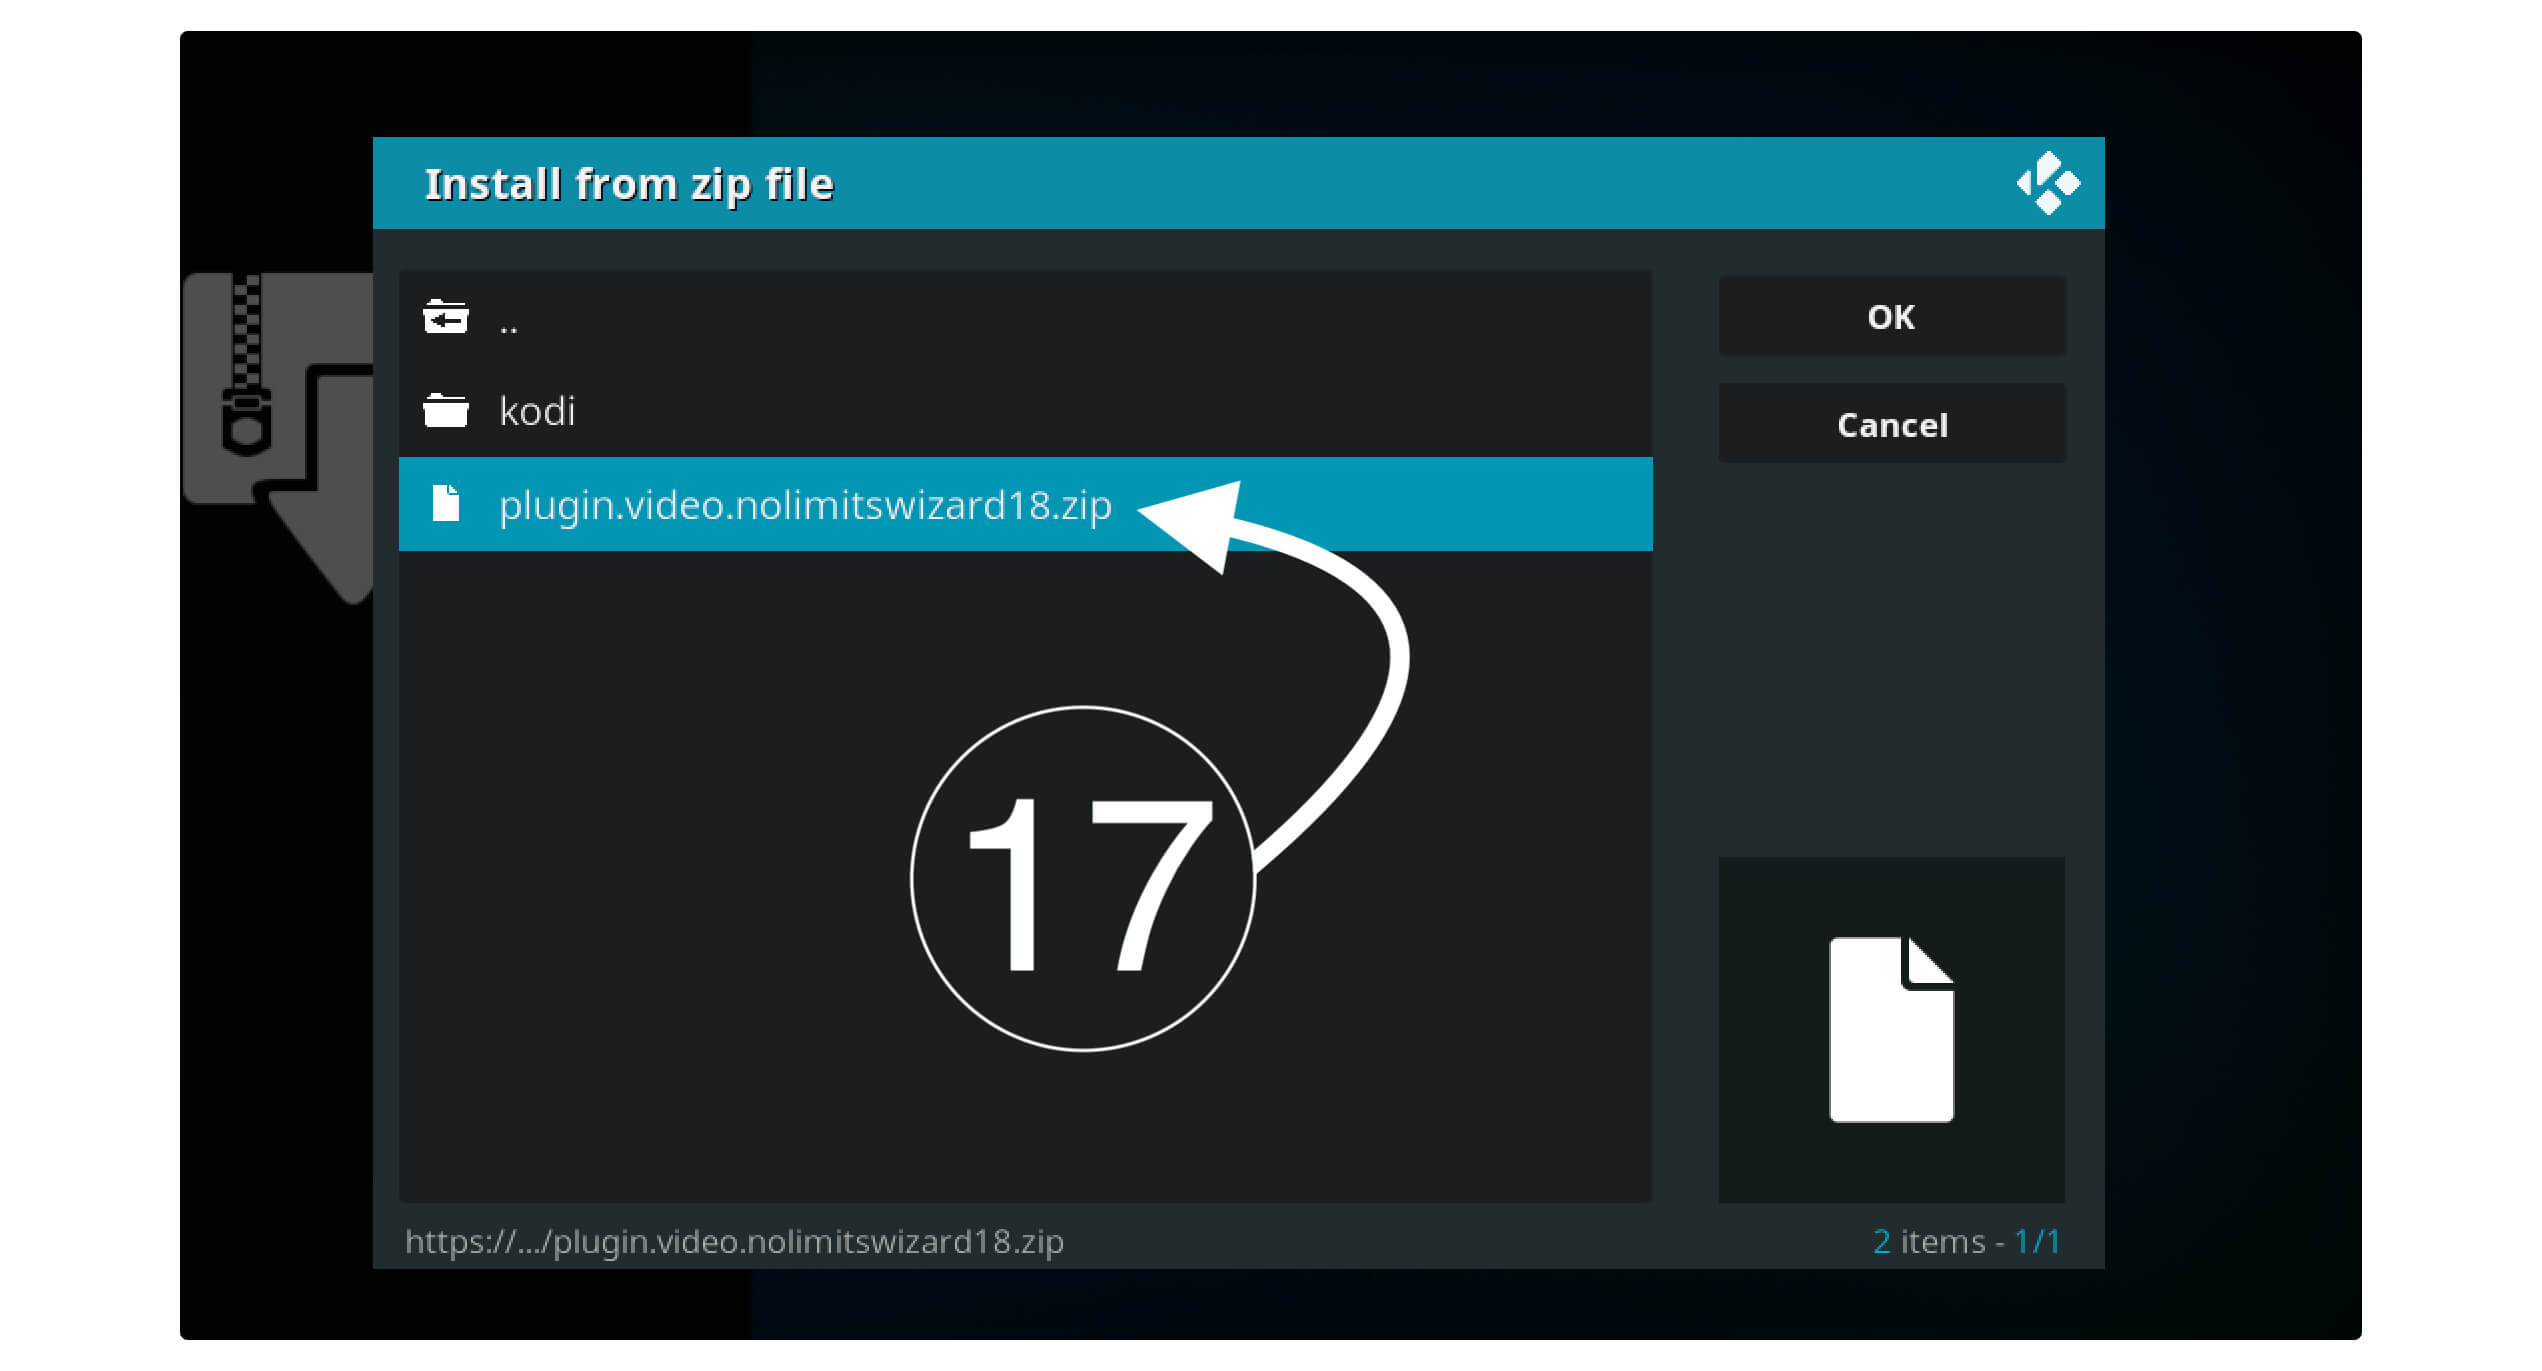
After this, you will see all the available plugins and folders there, so we just need to select plugin.video.nolimitswizard18.zip.
If you wanted to download the 17.6 Krypton, then you will see the name plugin.video.nolimitswizard.zip.
Now, wait for some time until you see this notification on the right side above the No Limits Wizard Installed.
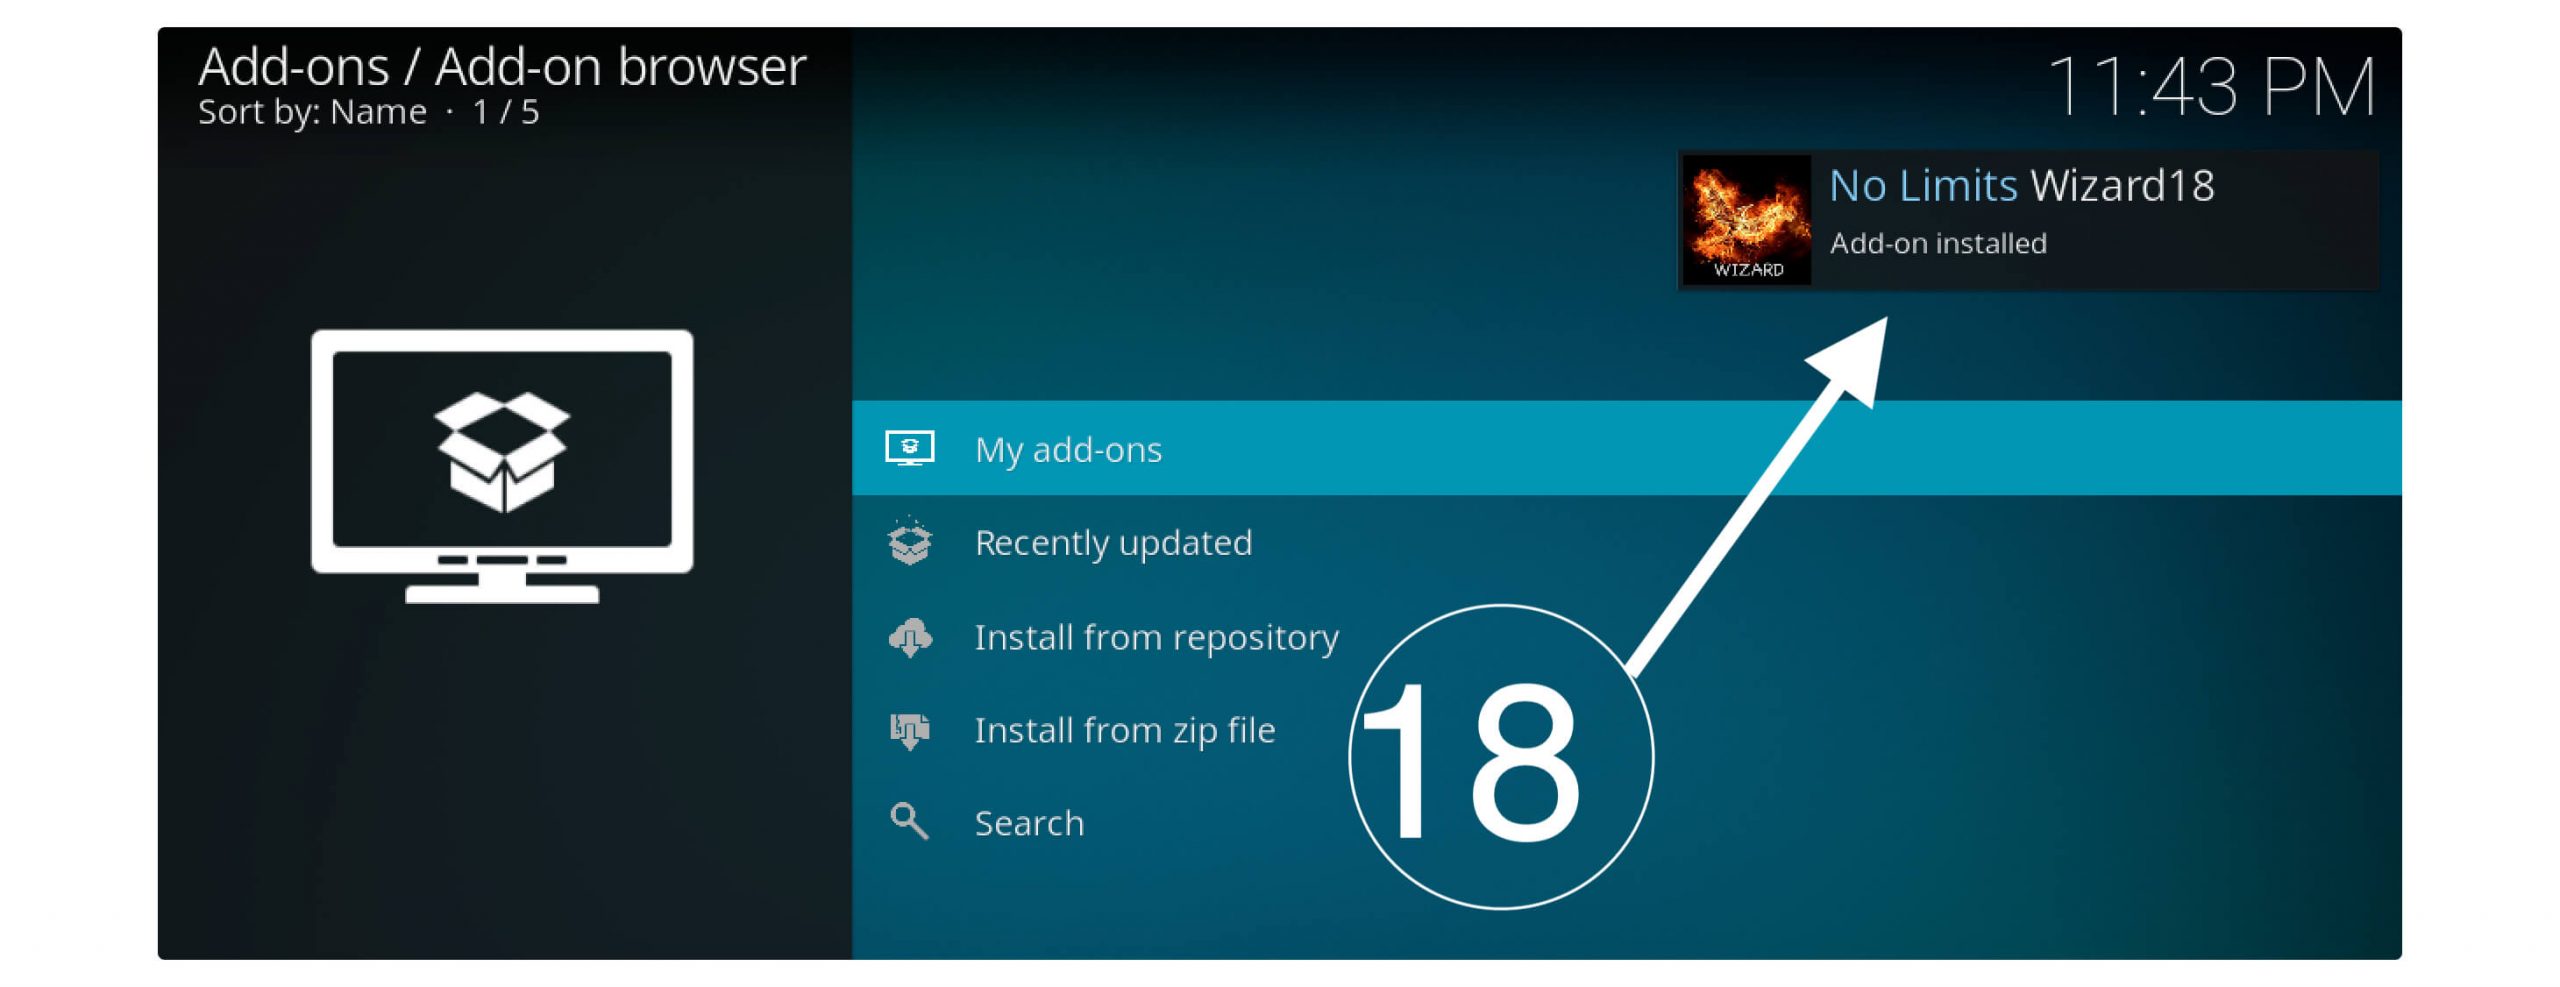
This Wizard is now installed successfully, so after this, we just need to follow the below steps to set up this Wizard. As there is something that you need to know, which is very important if you are a newbie, so just keep following the last step of this guide.
Setup No Limits Magic Wizard on Kodi
This Wizard is divided into two categories the first category contains some Adult content like Porn etc. And in the second category, you won’t find any type of these things, so we are only going to install Wizard with no adult content.
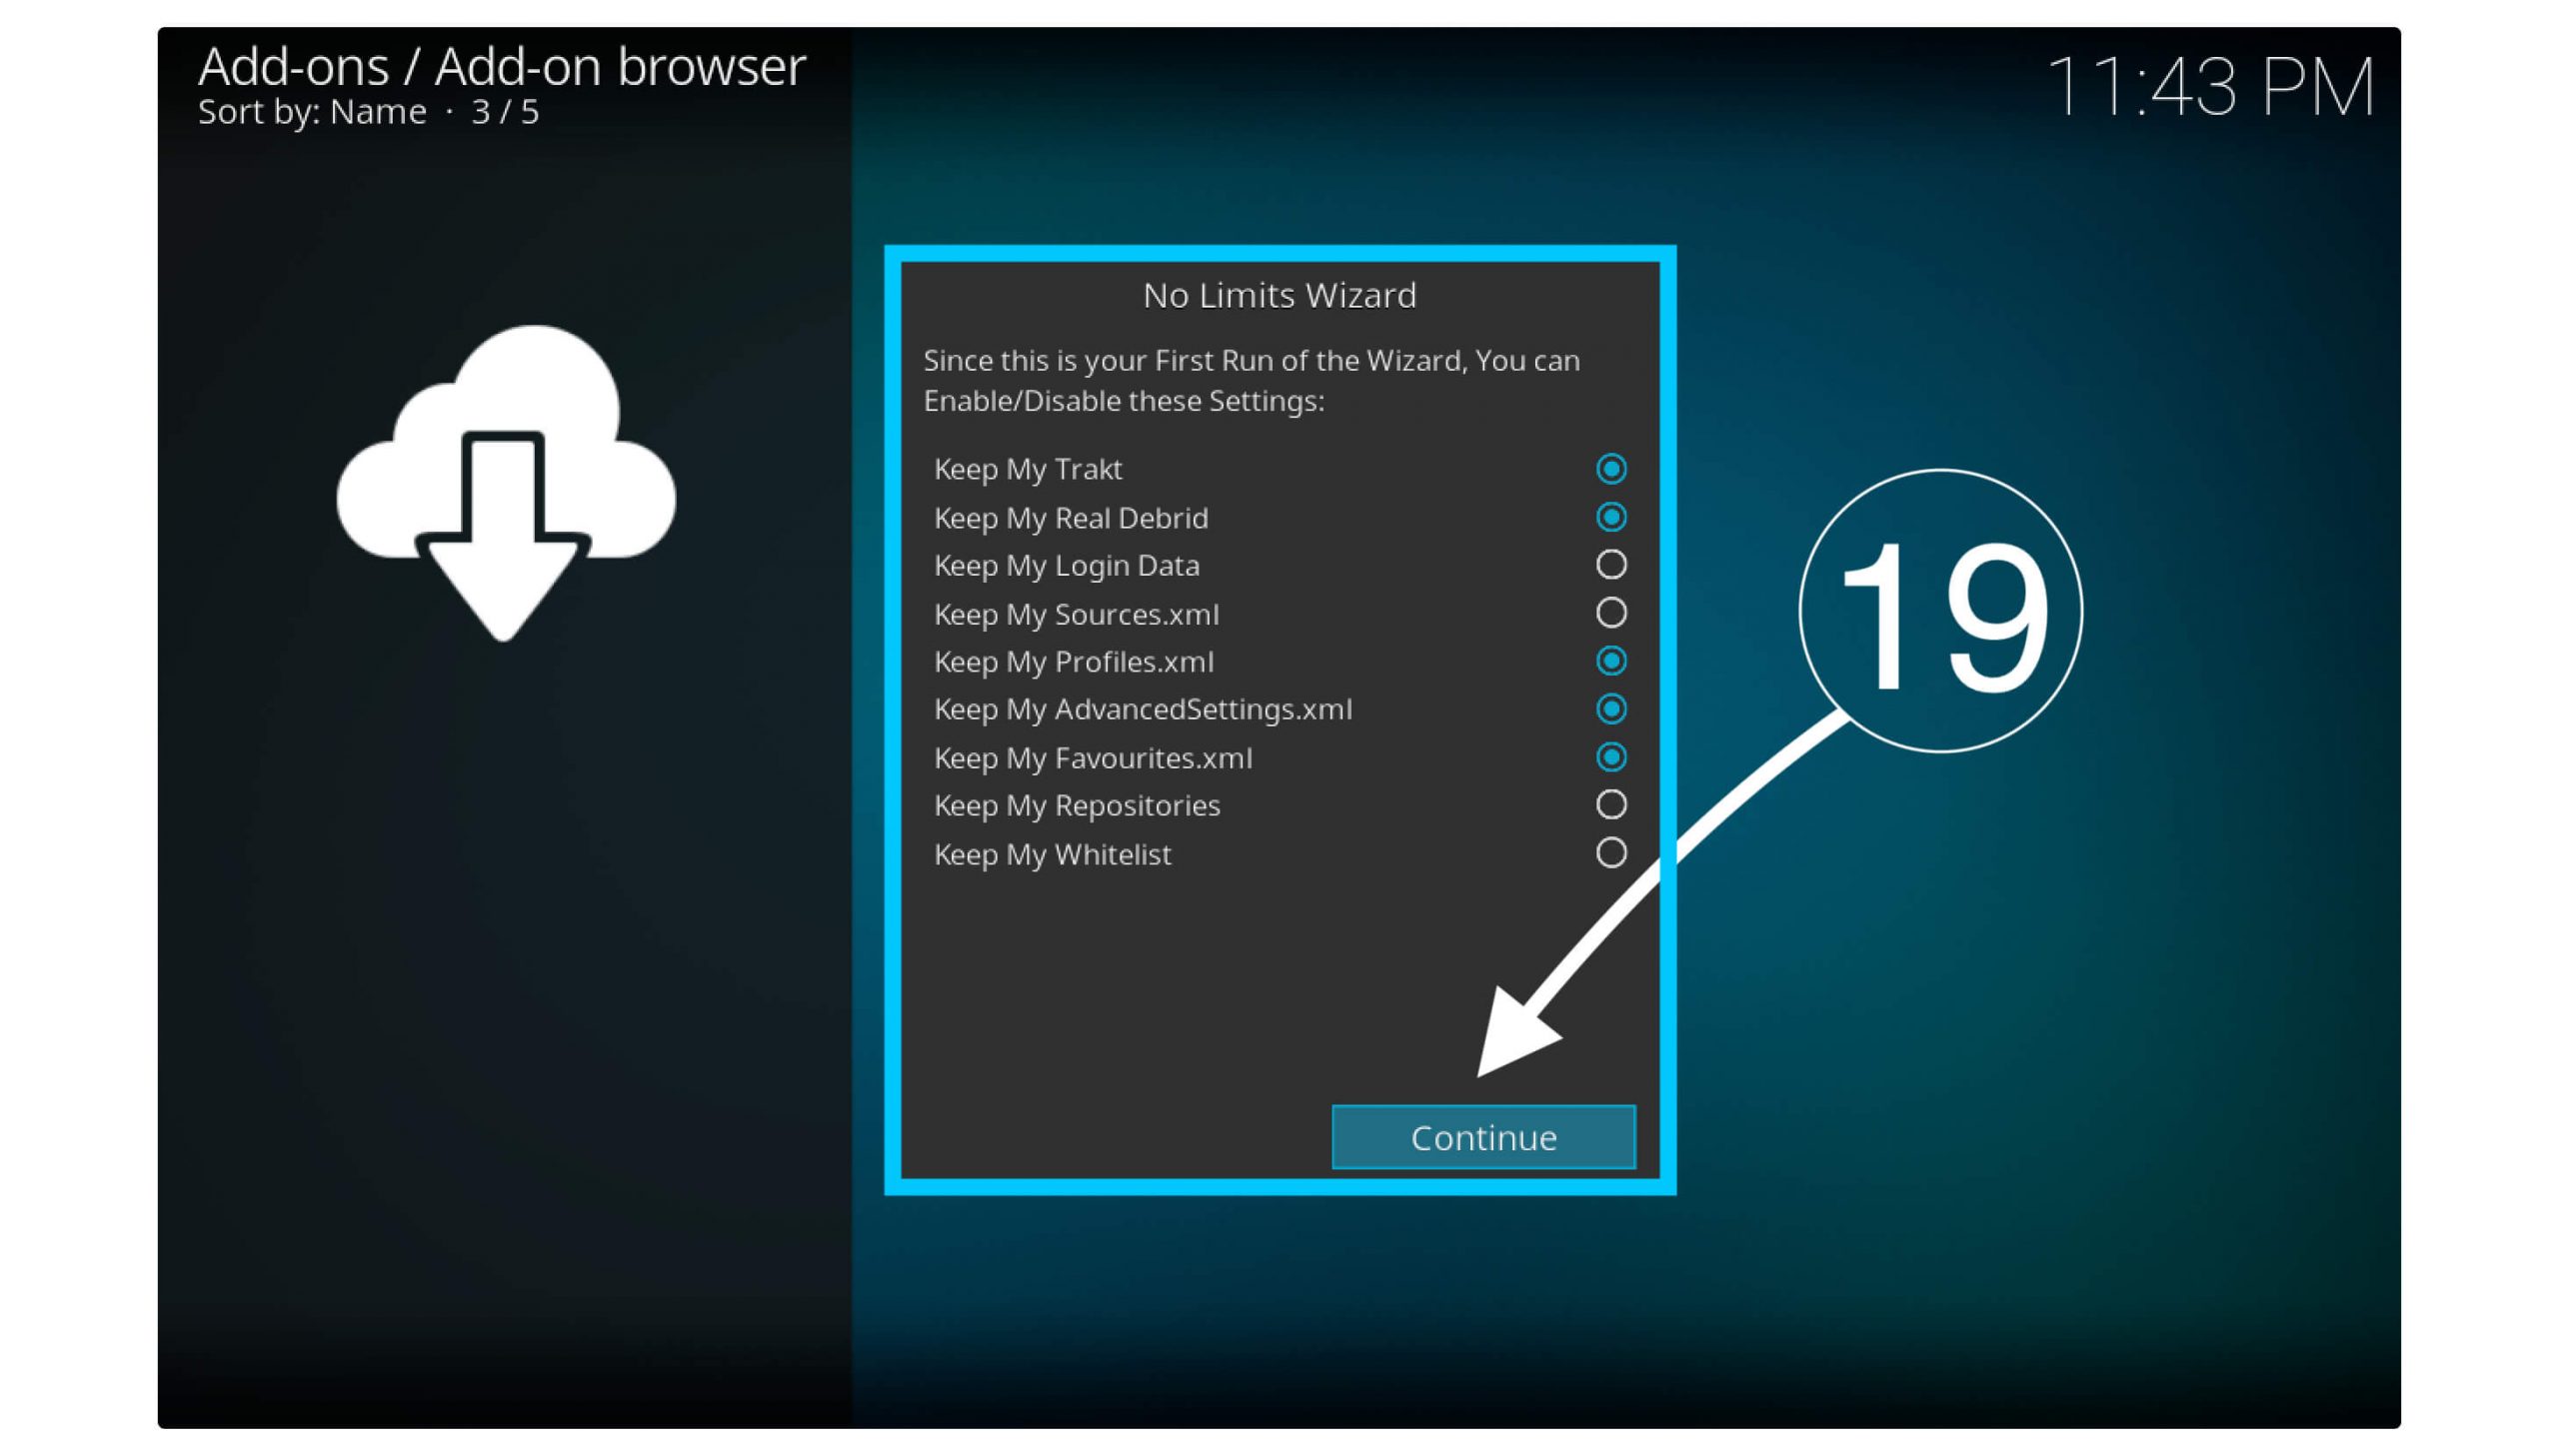
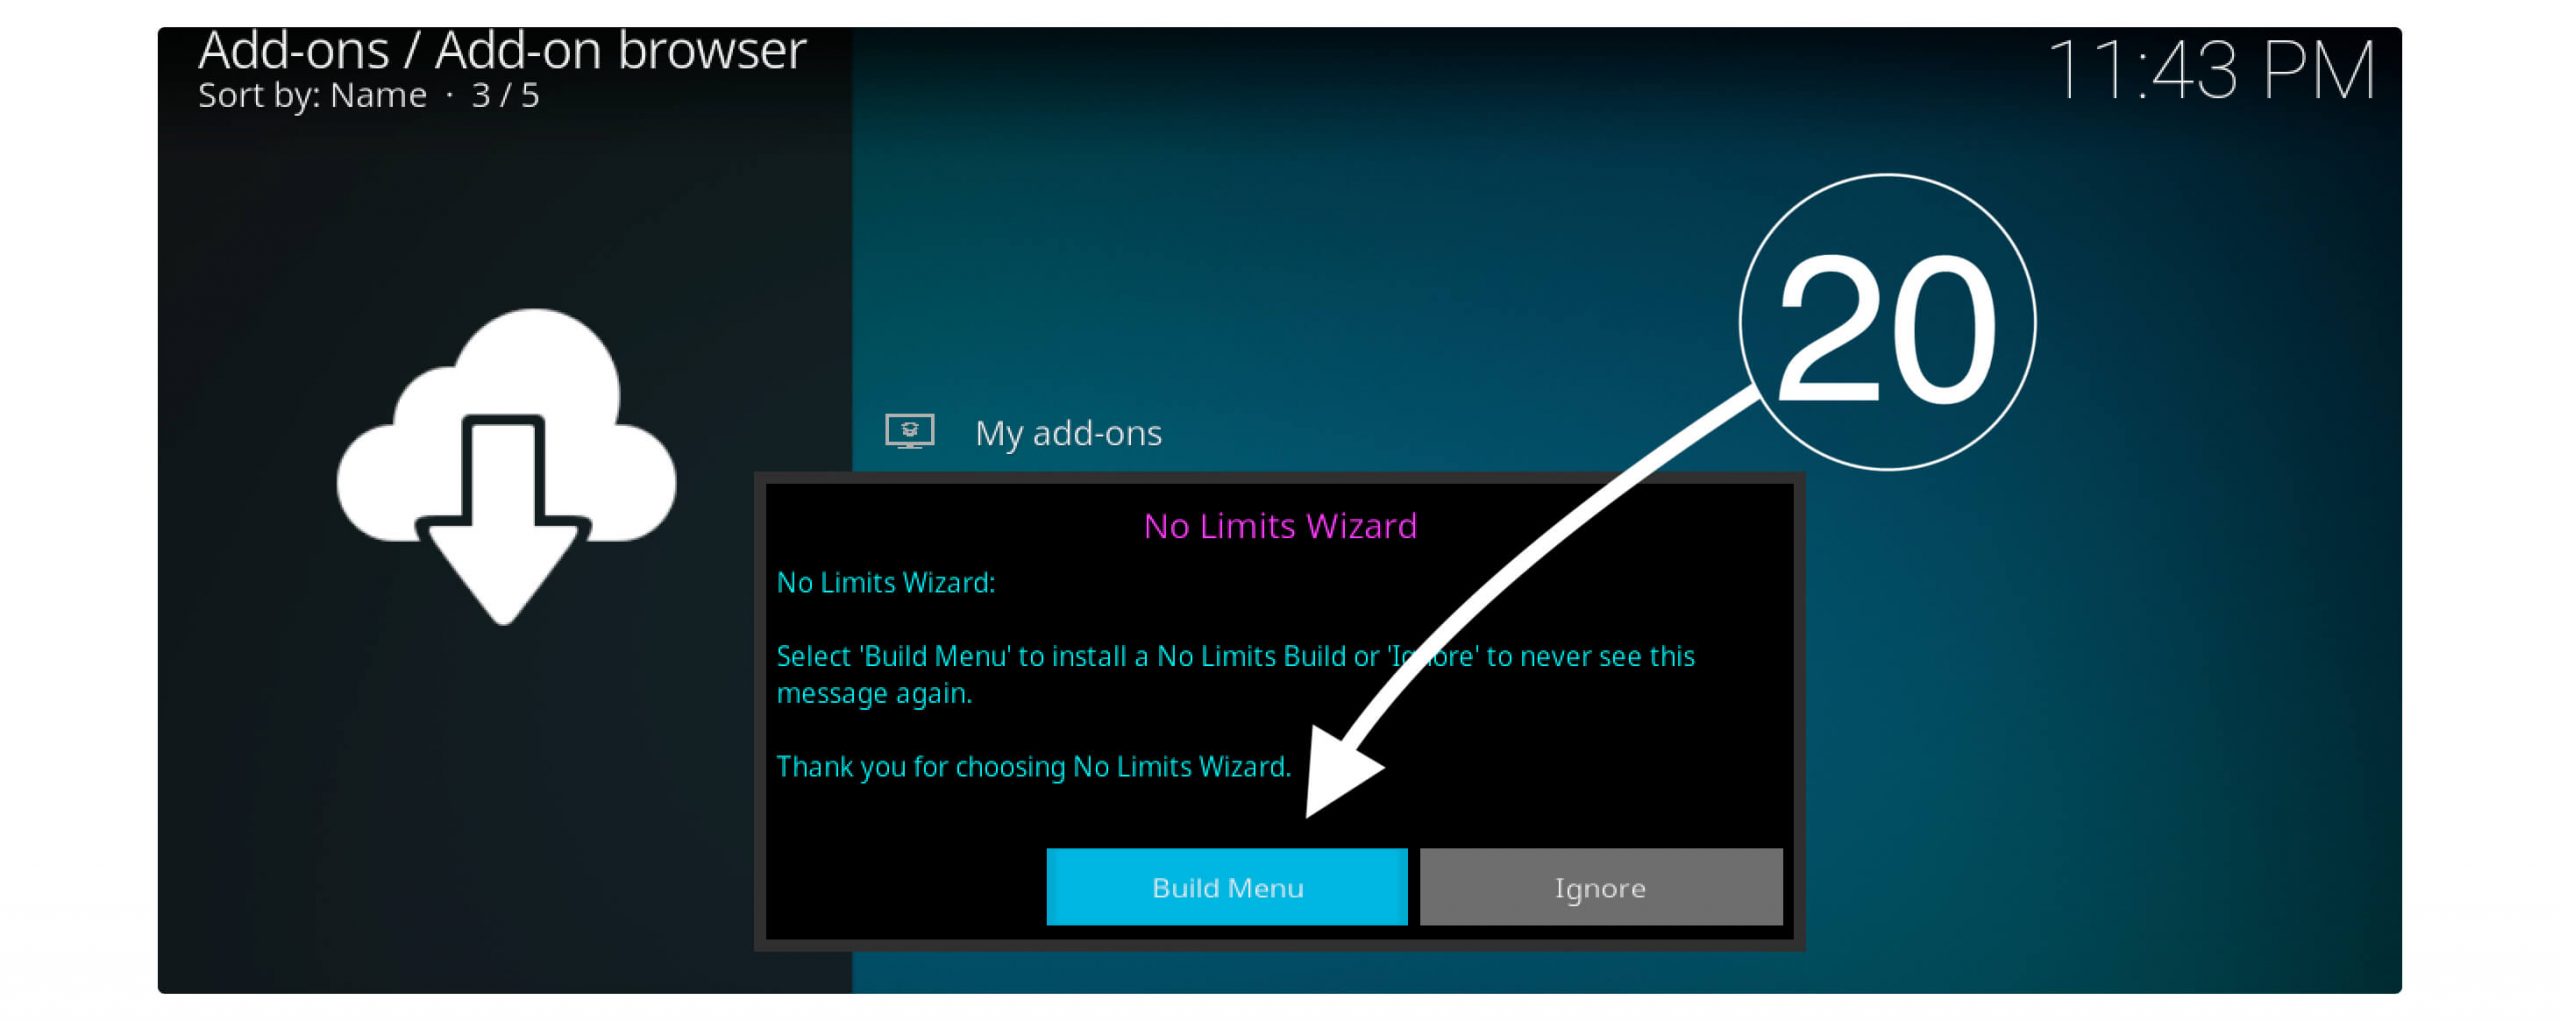
At the time you see No Limits Installed Wizard on Kodi, then just wait for a few seconds there, and it will give you another. Now choose all the options that I have chosen and then click on the Continue button.
After this, it will open another small window, so from there you need to click on the Build menu option.
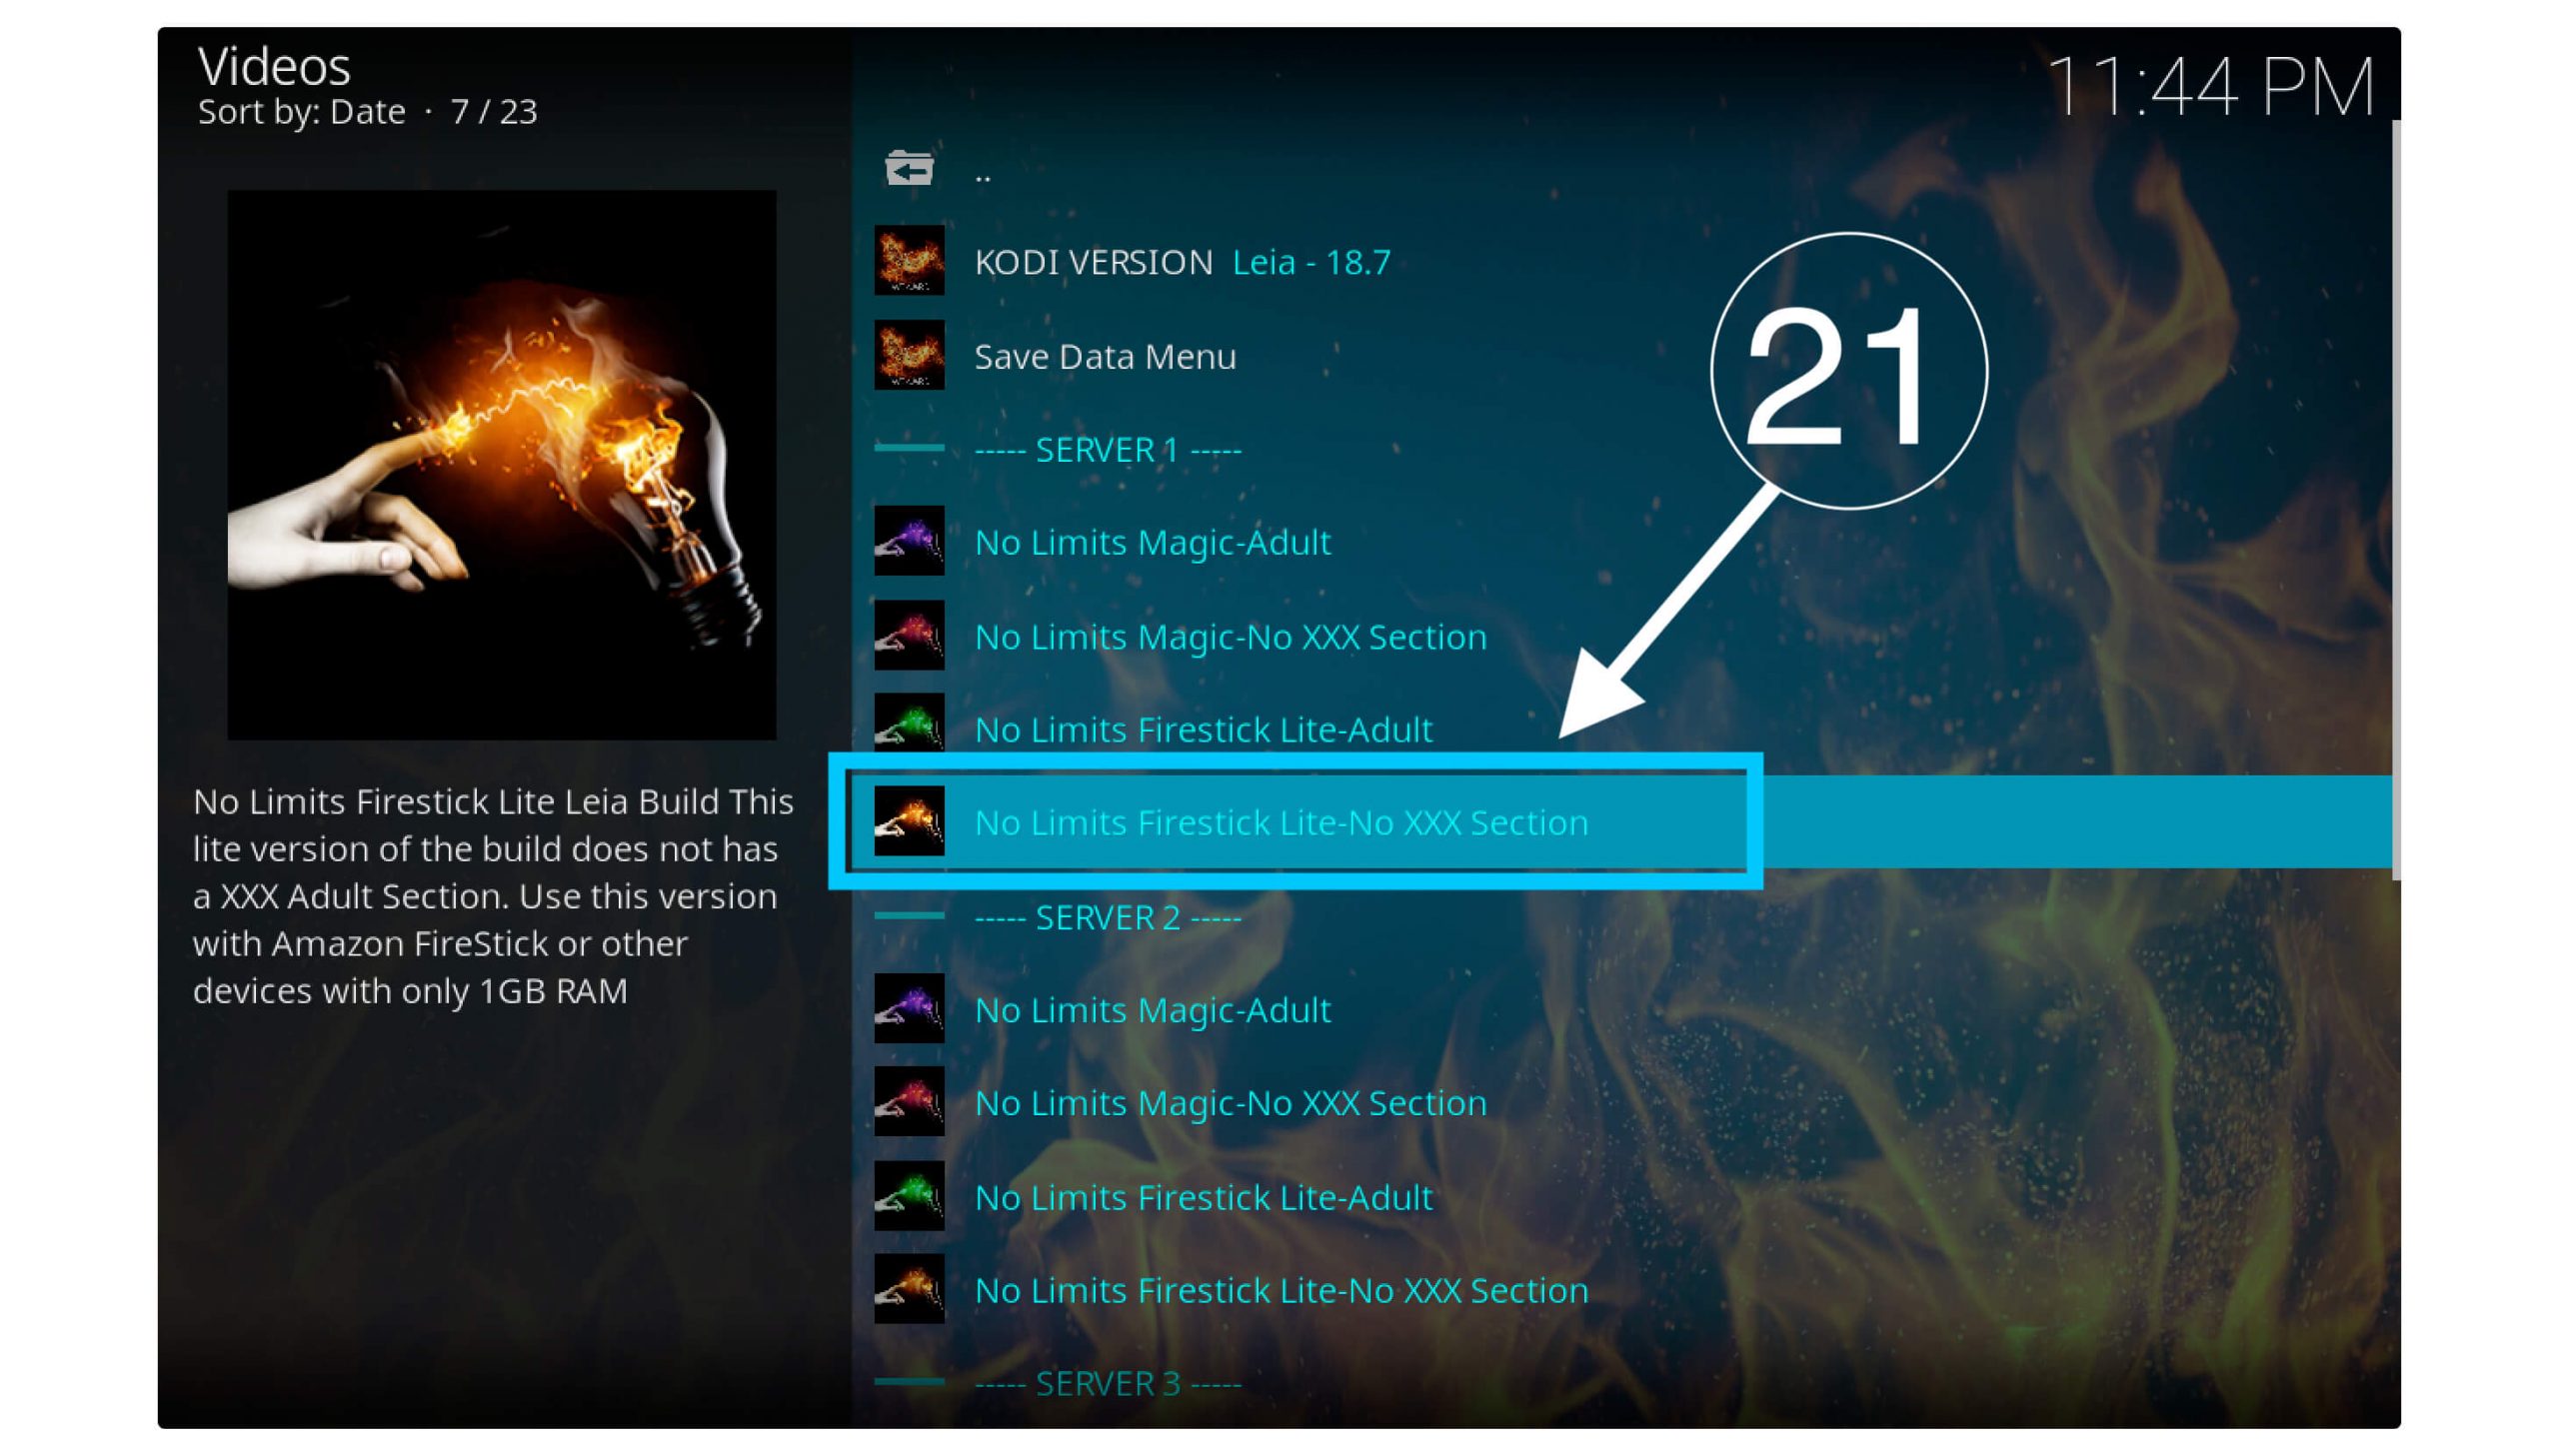
Here you will find all the options for installation, and these are categorized into three different servers. So just choose the package (full or lite) depending on the RAM from the first server.
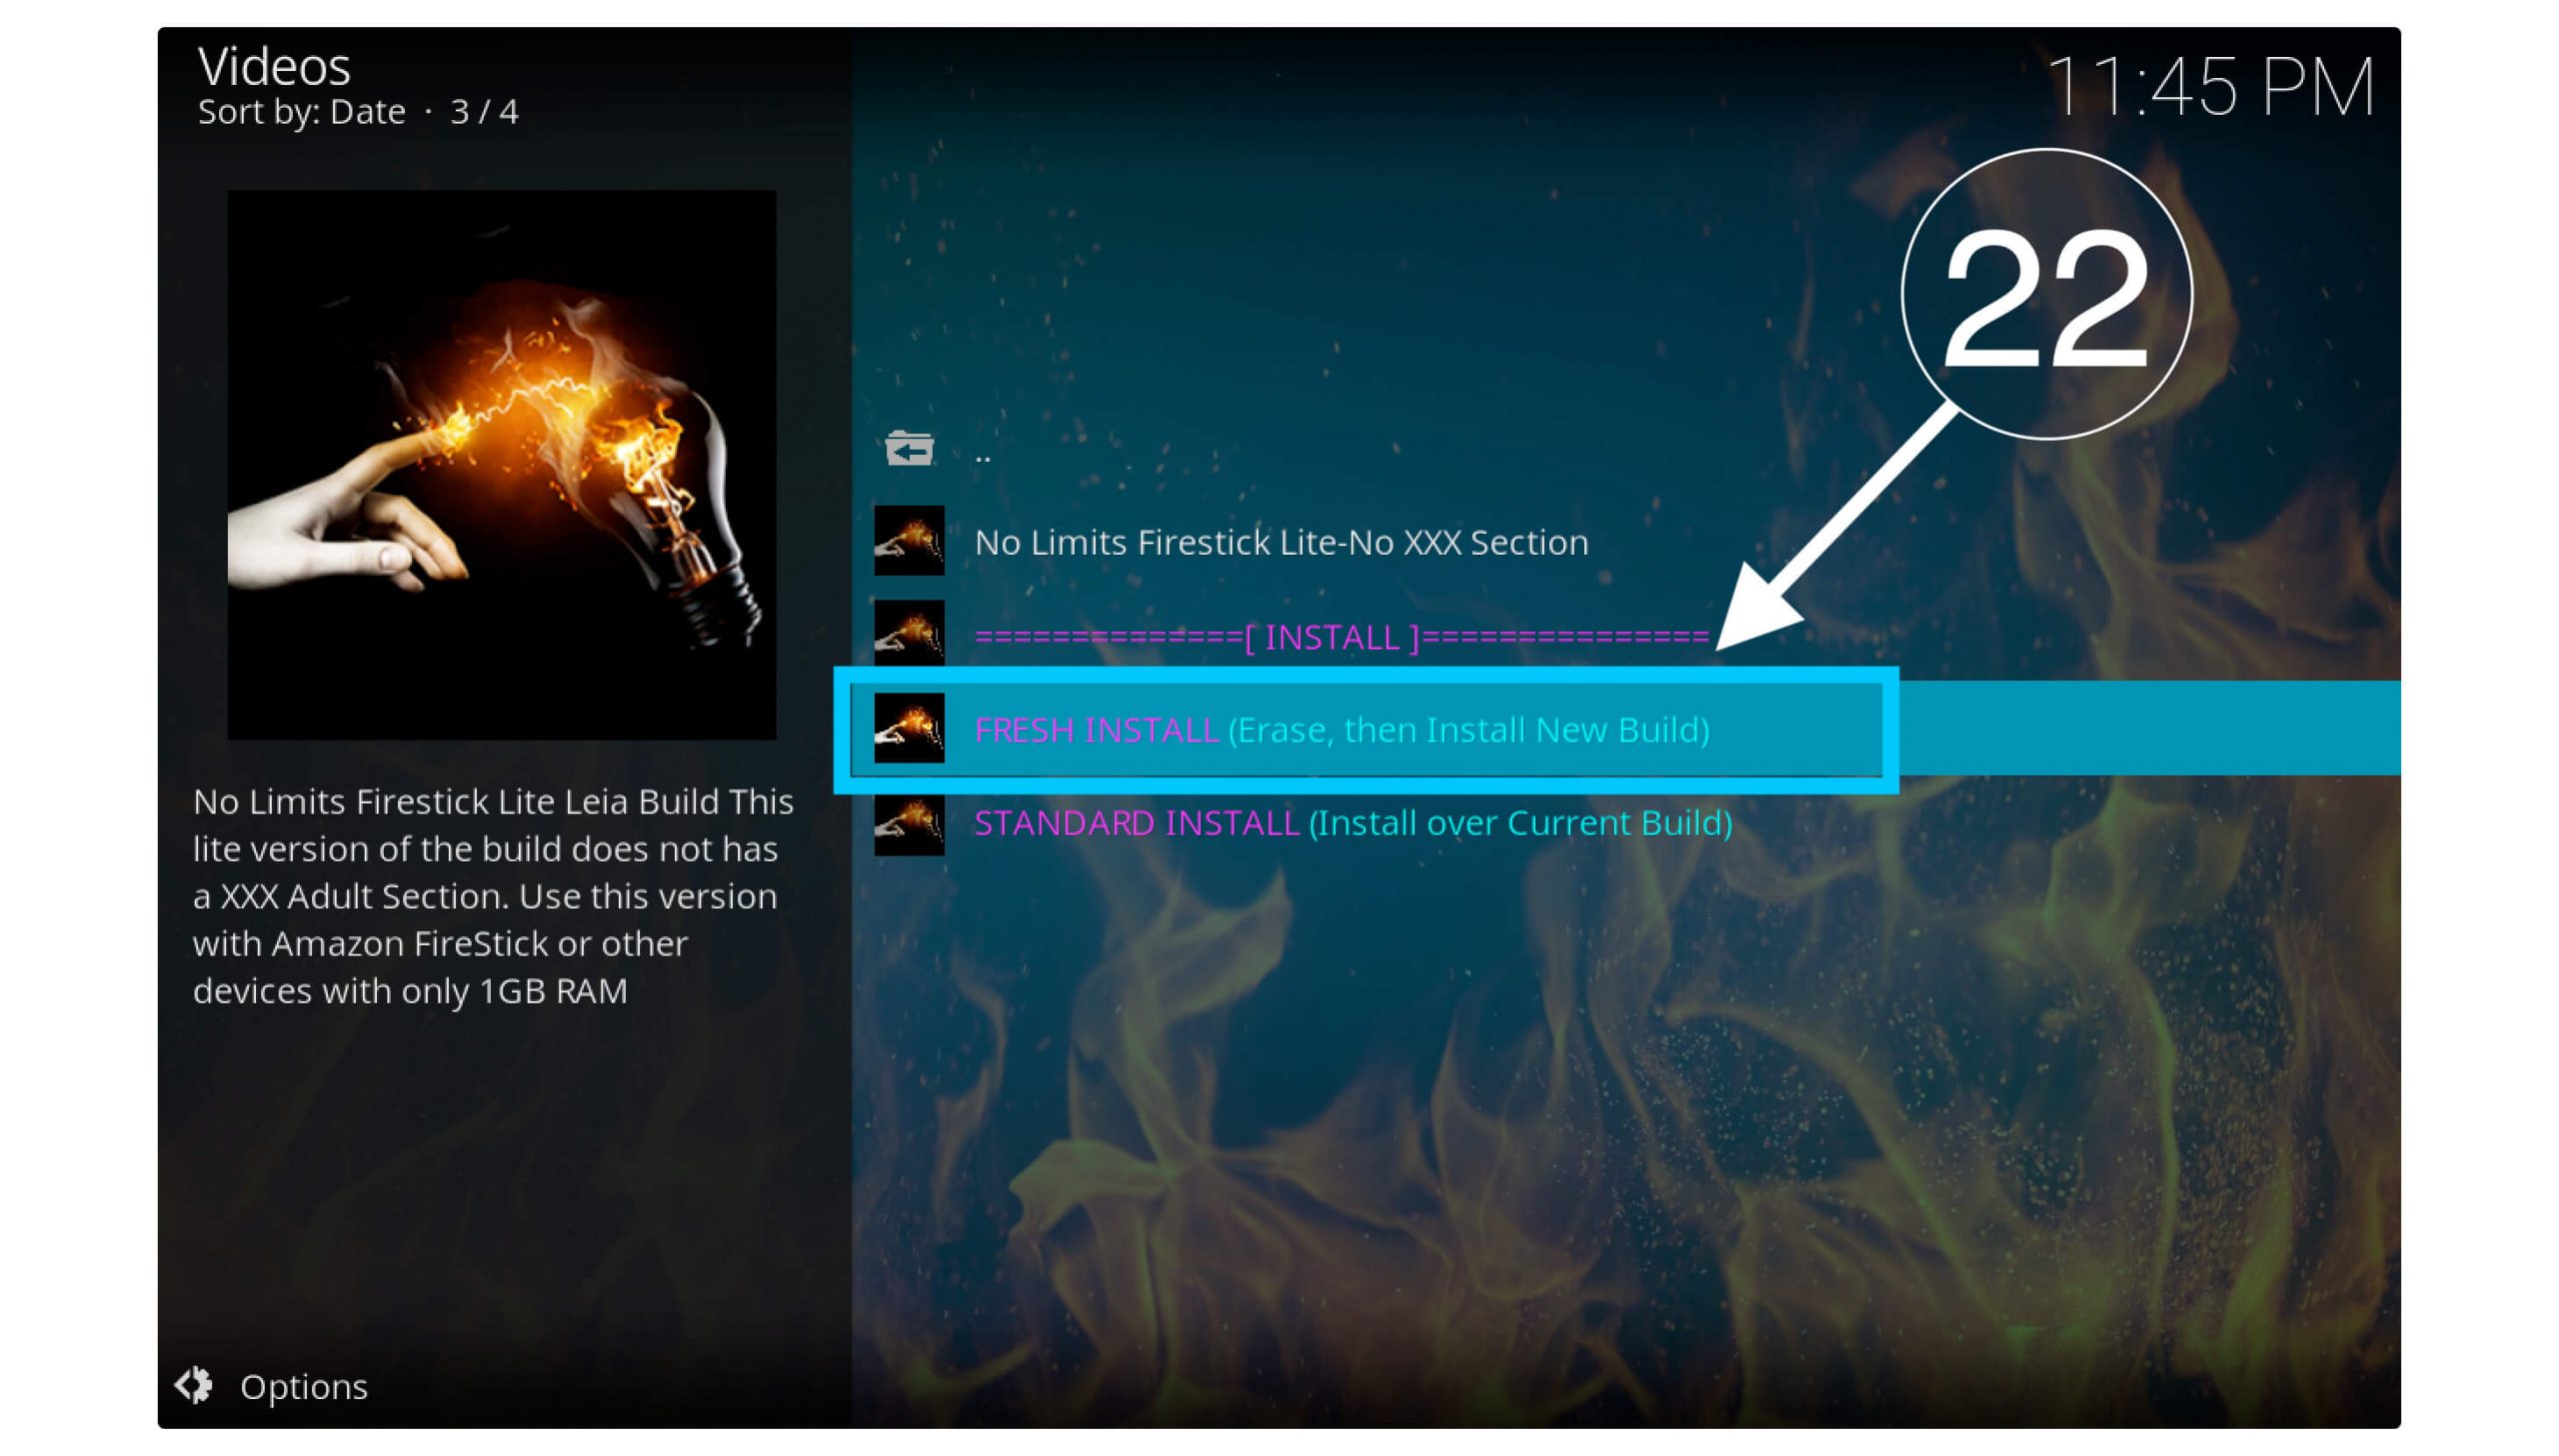
When performing this action, it will then open another page where you will be required to select Fresh Install (Erase, then Install New Build).
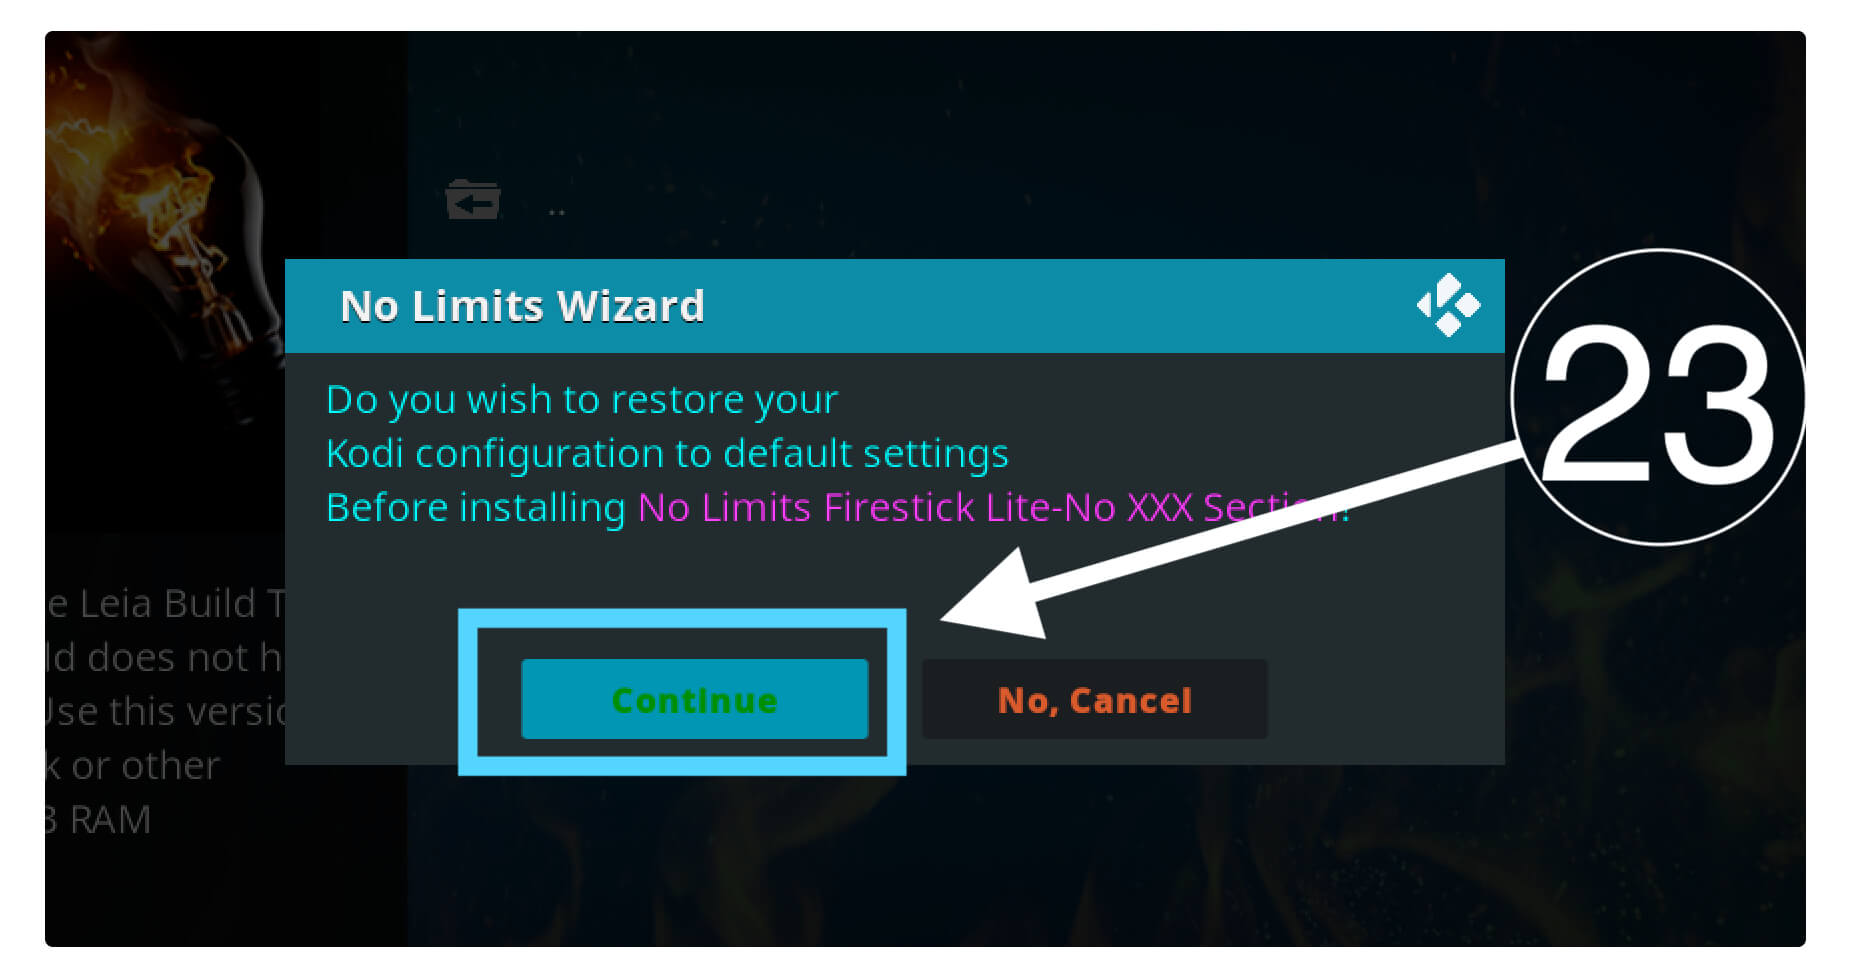
It will open a warning message, so select Continue.
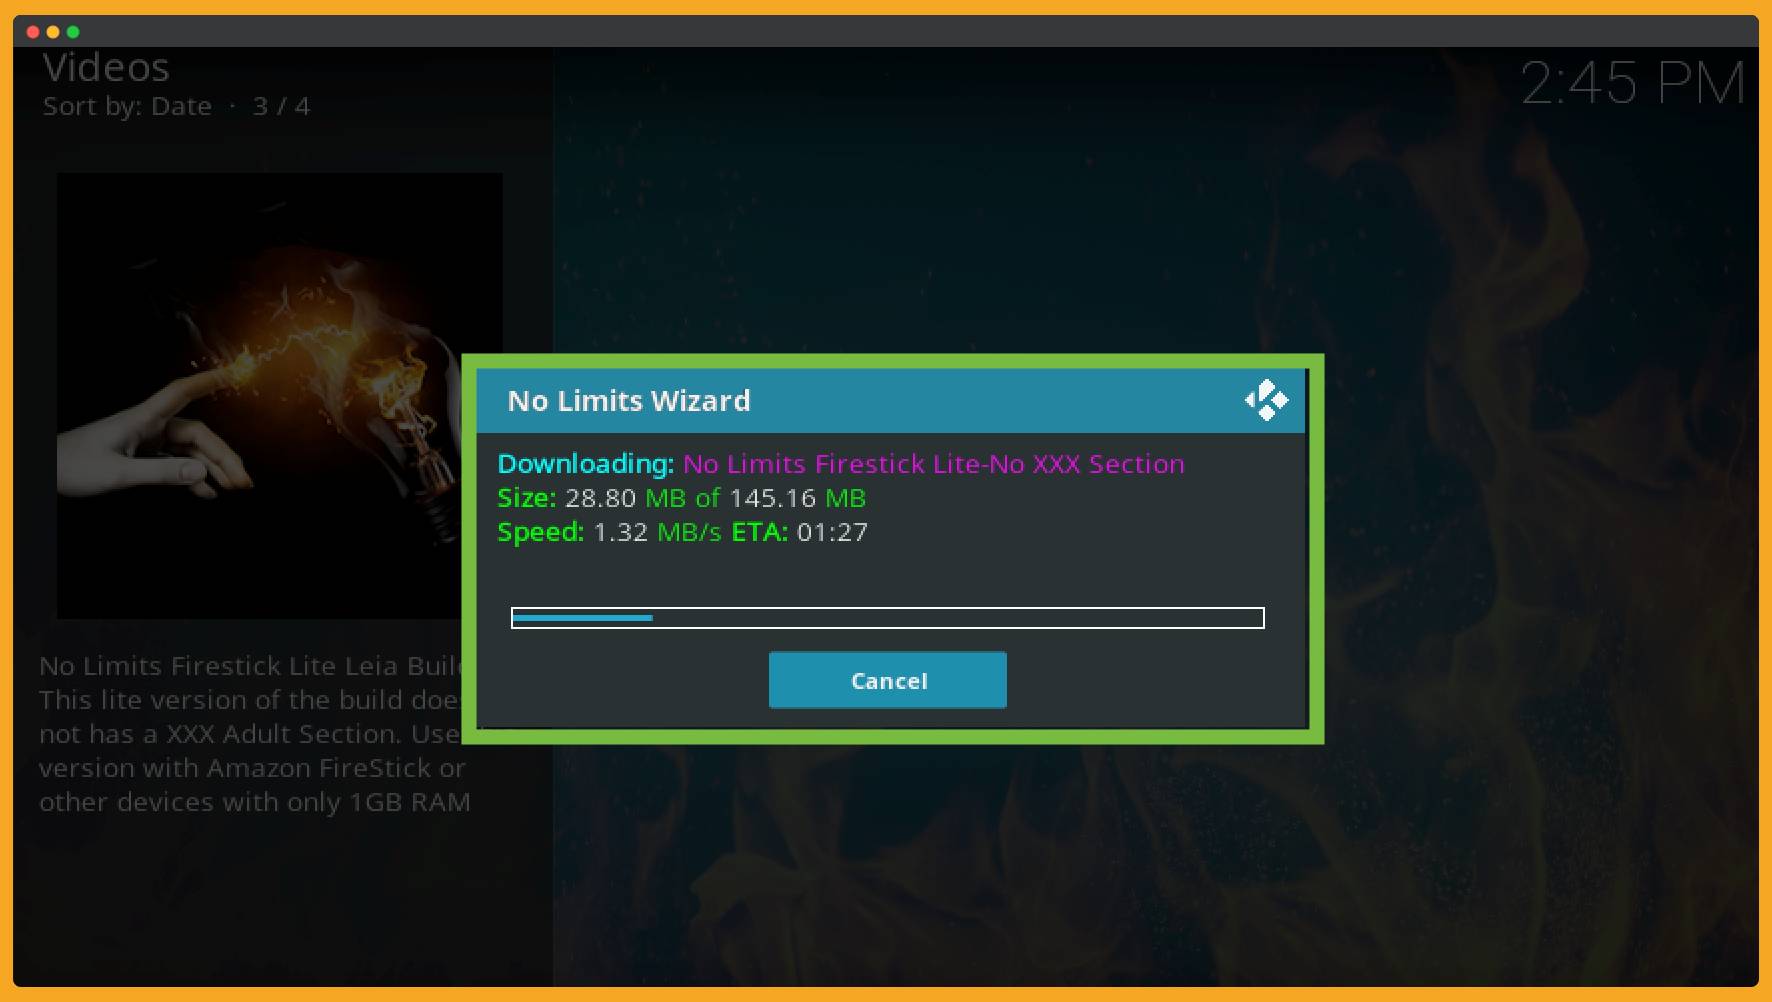
The downloading will be started now. Just wait for some time until it completes, and then you will see the installation menu.
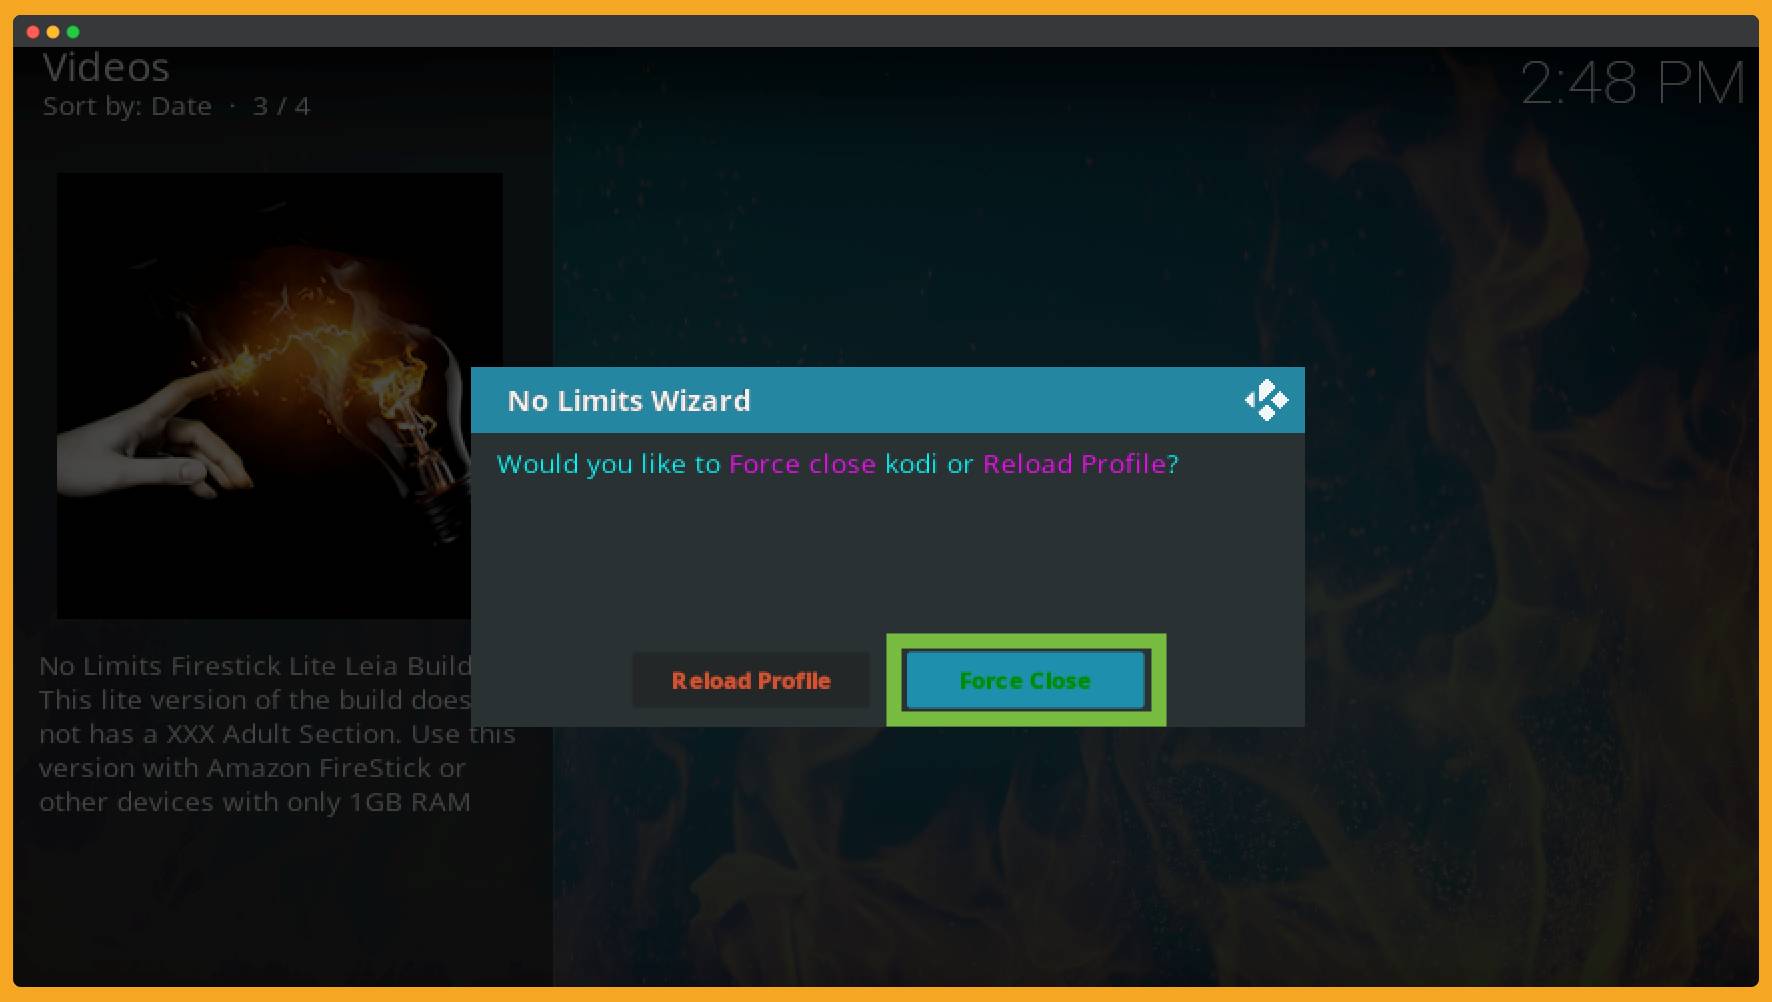
When the Wizard is downloaded and installed successfully, then from the new short window select Force Close instead of reloading the profile.
Now the Kodi will be Shut Down, so you have to just relaunch it from the menu, and it will then start loading skins and some Addons.
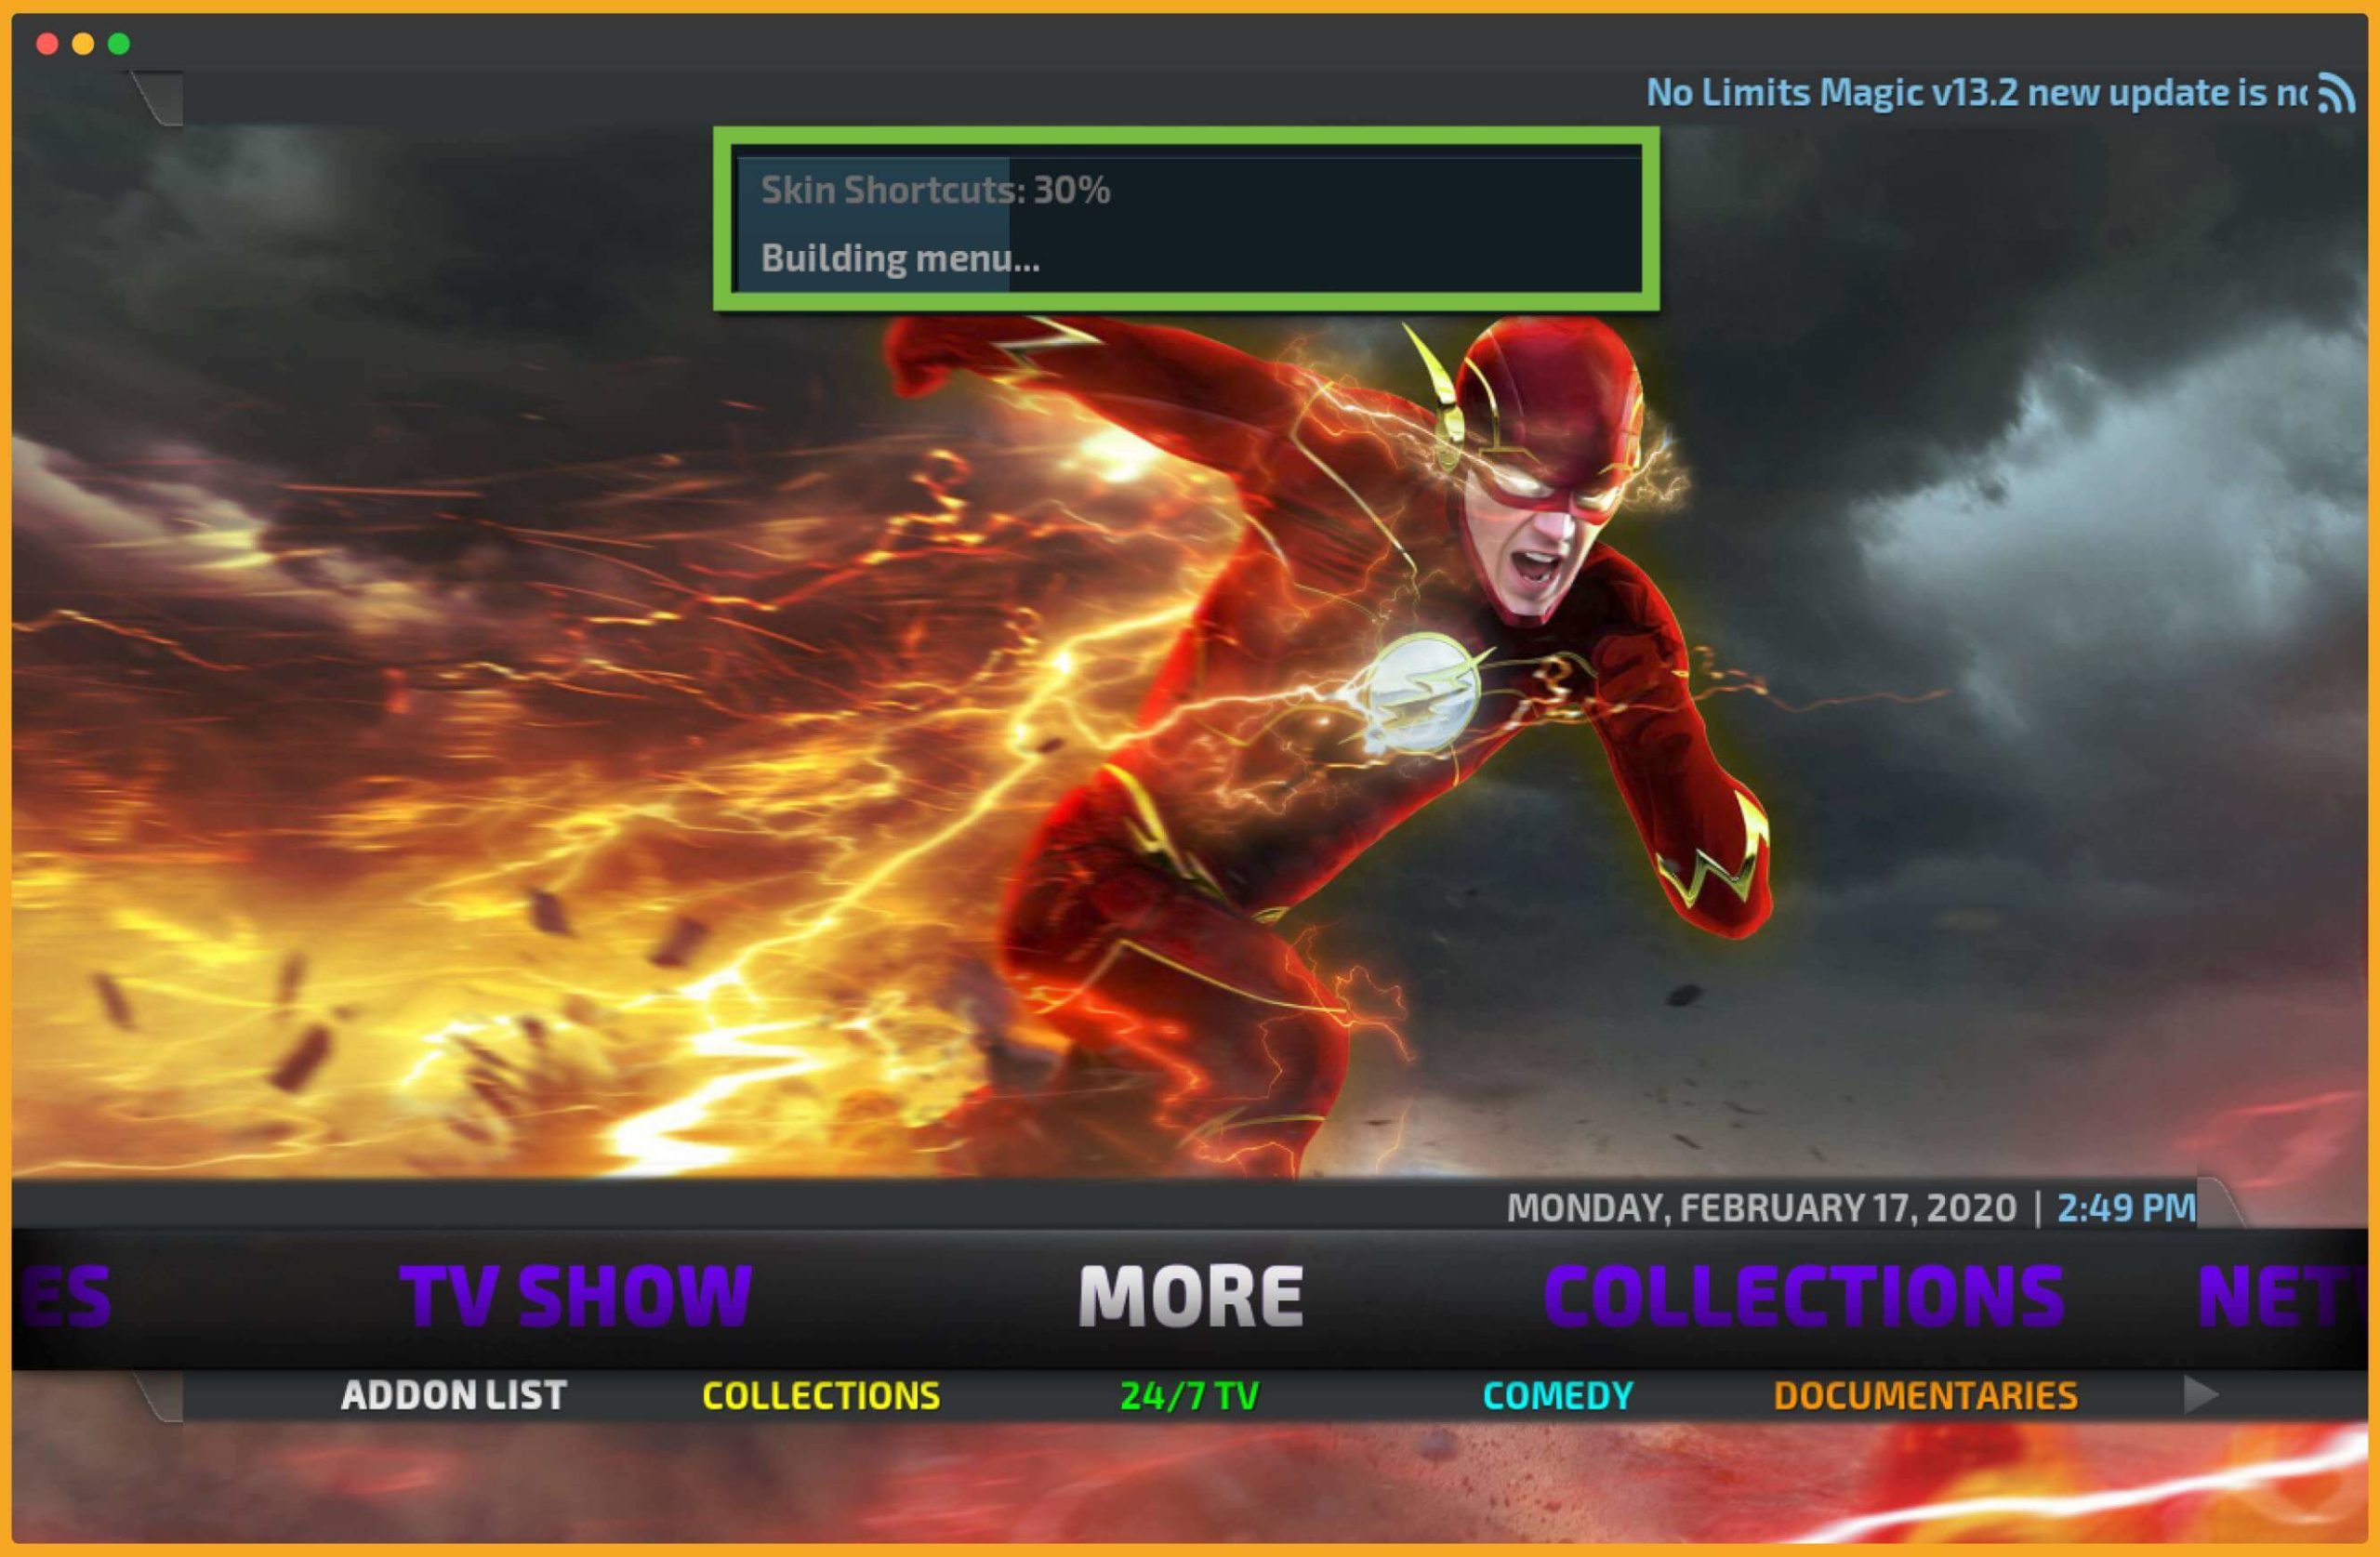
That’s it No Limits is now installed successfully on your device enjoy the simple and unique interface of this program and enjoy watching favourite Shows, and dramas directly in it.
What We Get in Wizard
Since this is the Build, so it means you will get too much content in it. I am listing some significant features that you will get after using them and will surely change the experience of using Kodi.
Movies
Everyone loves to watch movies of all sorts, whether it is action, Sci-Fi, Science Friction, or even romantic. But finding the right addon is a major problem that is now solved as well because this Wizard provides us with some best Kodi Addons that help to watch movies in HD, FHD, UHD, and even 4K.
Shows
Similar to the Movies, most people prefer to watch TV shows as well because they have new content daily or even weekly. That keeps us entertained and easily passes our time and avoids getting bored. It has a variety of Addons that also provides these TV shows without having a cable network.
Sports
Almost every 9 out of 10 people loved sports and are curious to watch even the highlights. If you are also interested in it, then you would love this Wizard. It has a separate list of the Sports in which we can watch live events, highlights, live Sports, and many more.
Music
Tired of listening to the same music again and again? Wanted to discover some new music and change the playlist? Well! This is the Build that you need because it has too many music collections from both the UK & the USA. These are free to use with no restriction on streaming hours etc.
Live TV
So many people don’t watch the same content as TV Shows or Movies, and they wanted some new things daily.
And this is only possible while having a Live TV so now with the No Limits Magic we are also getting some live TV channels for our device. These can be useful while you are living in the UK or the USA because these are geo-location restricted.
How To Remove No Limits Build From Kodi
Just in case you used this build a lot and now wanted to remove it from Kodi? Then don’t worry as this is the guide that will help to remove No Limits Builds easily.
Open Kodi, and you see the new layout, so using the remote button move toward and select the System.
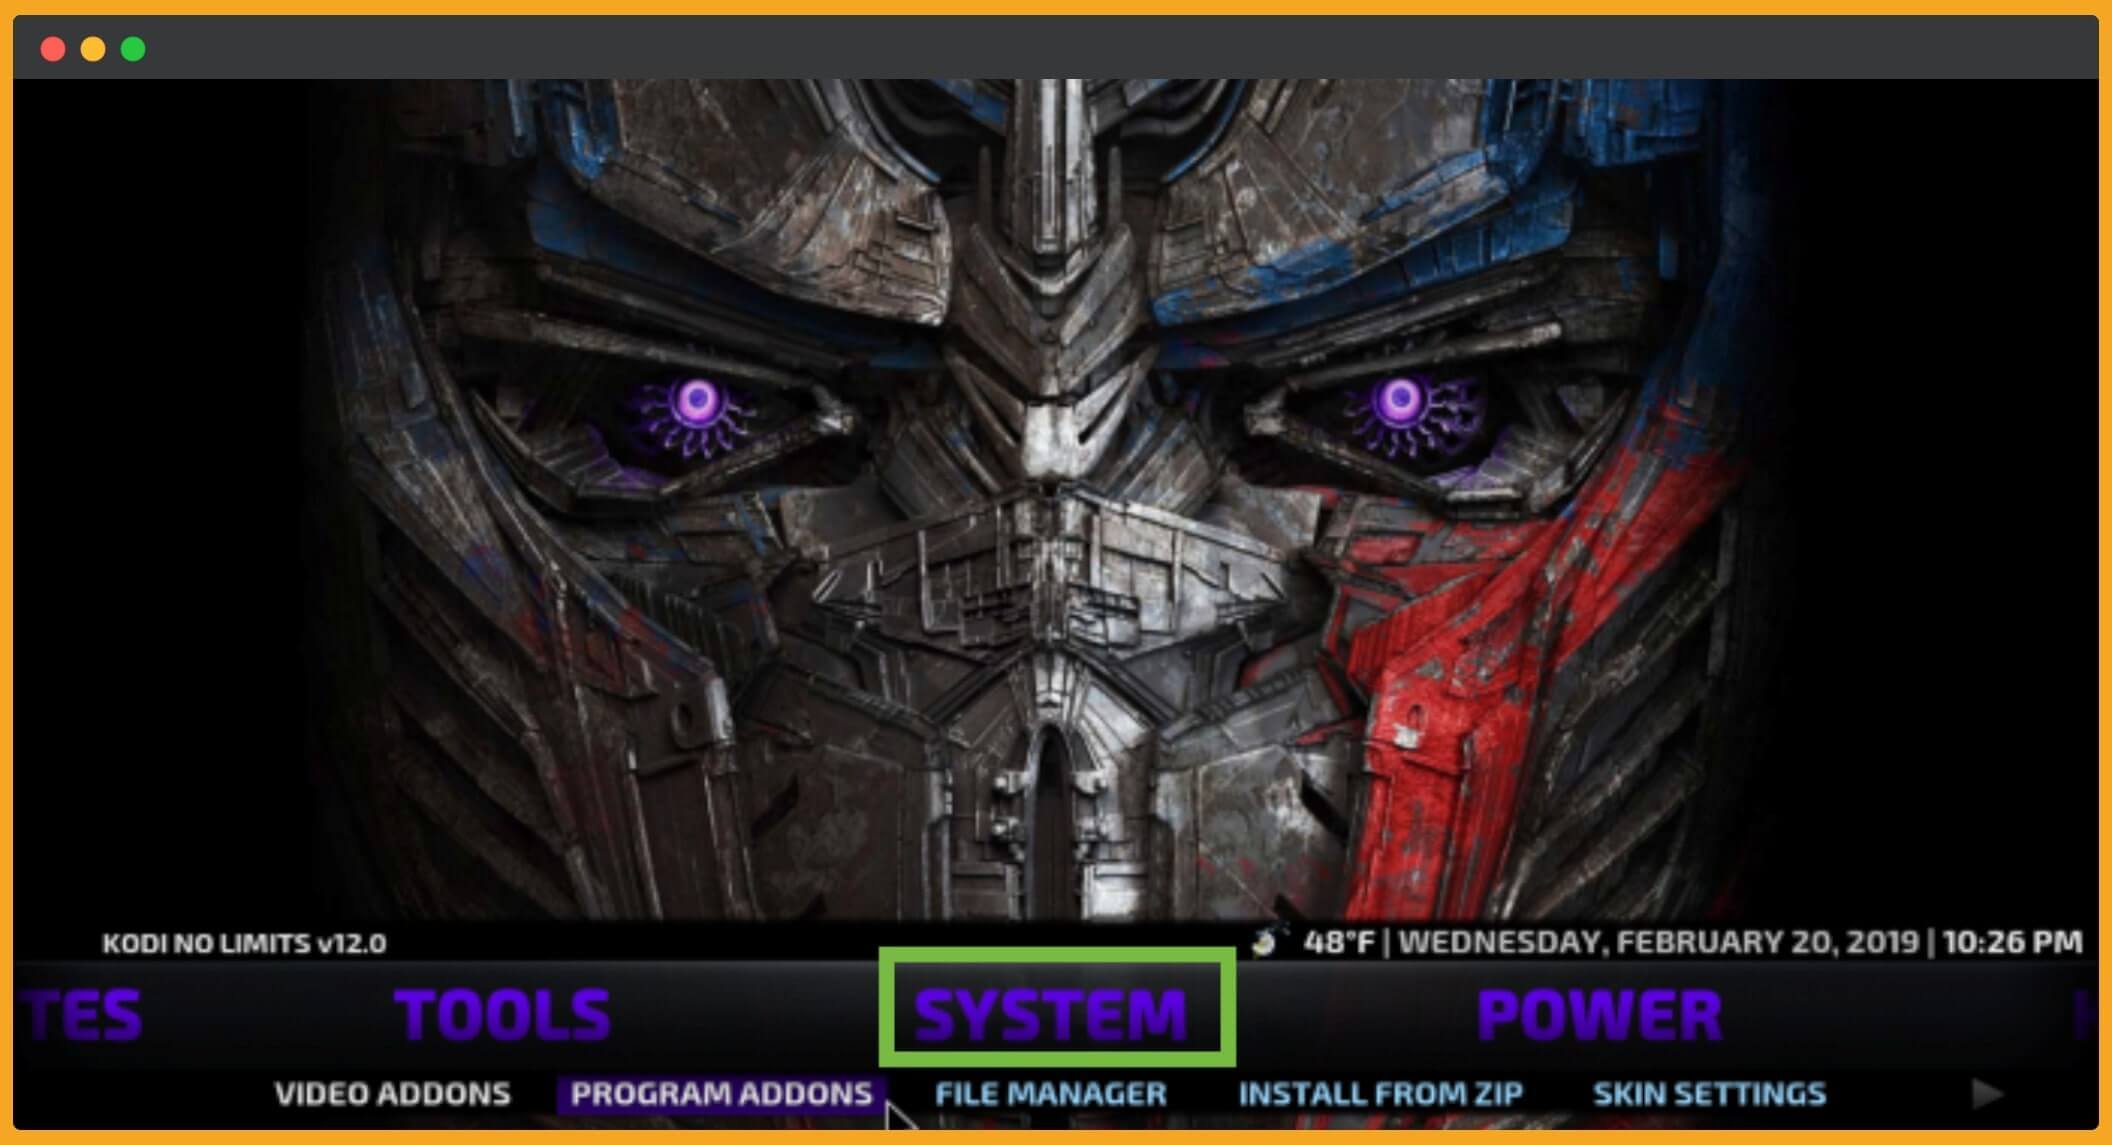
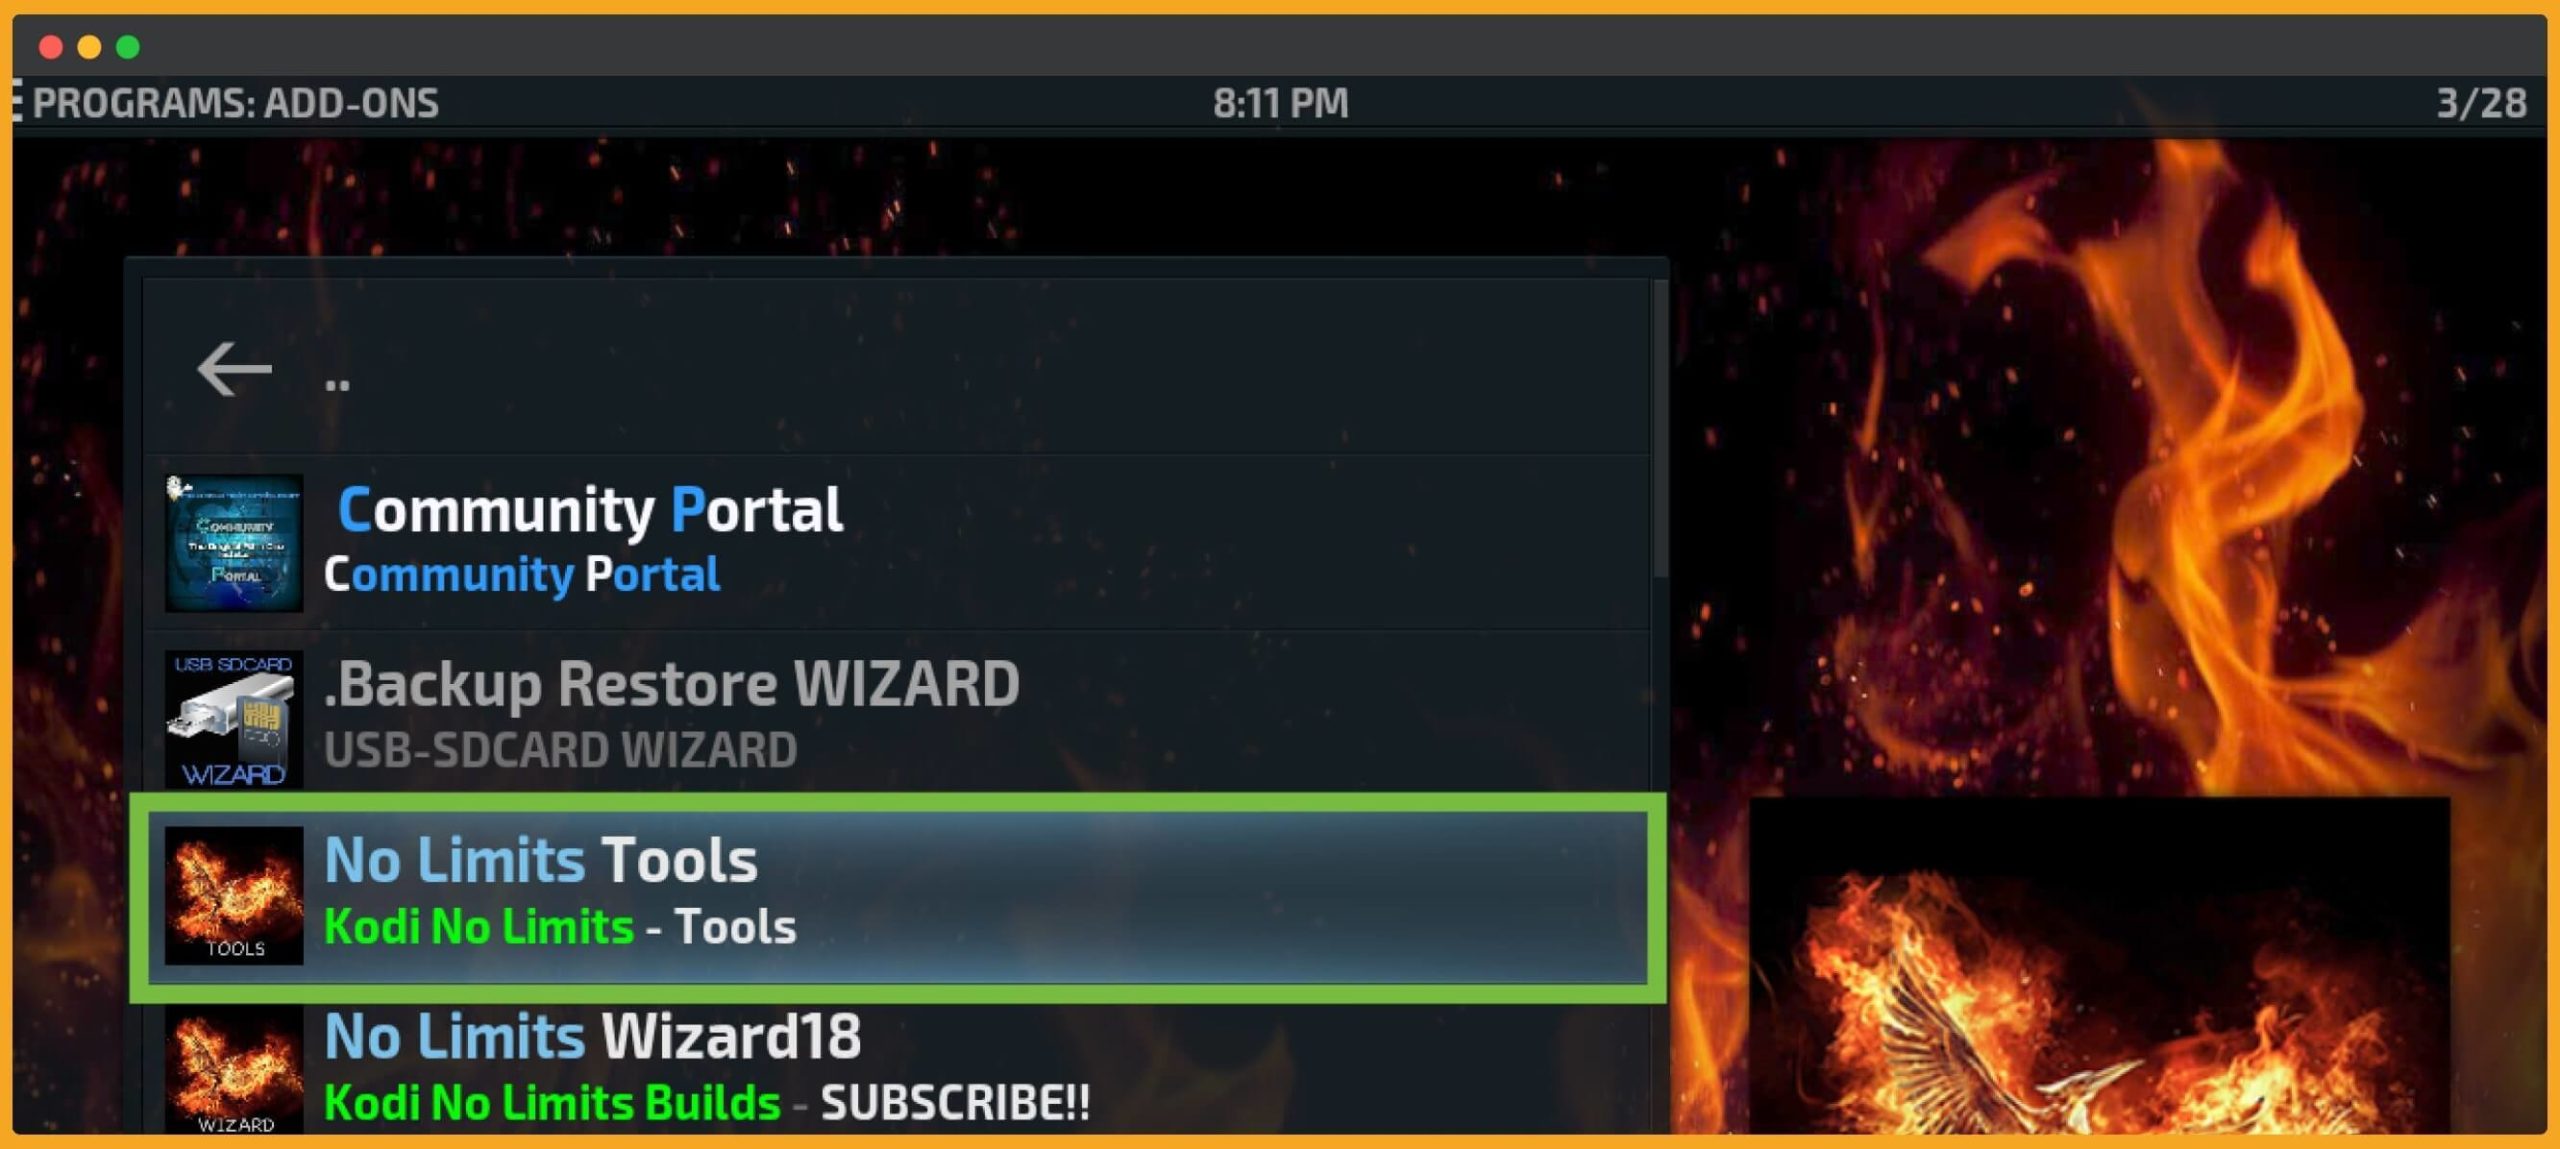
From this list, scroll down and select No Limits Tools.
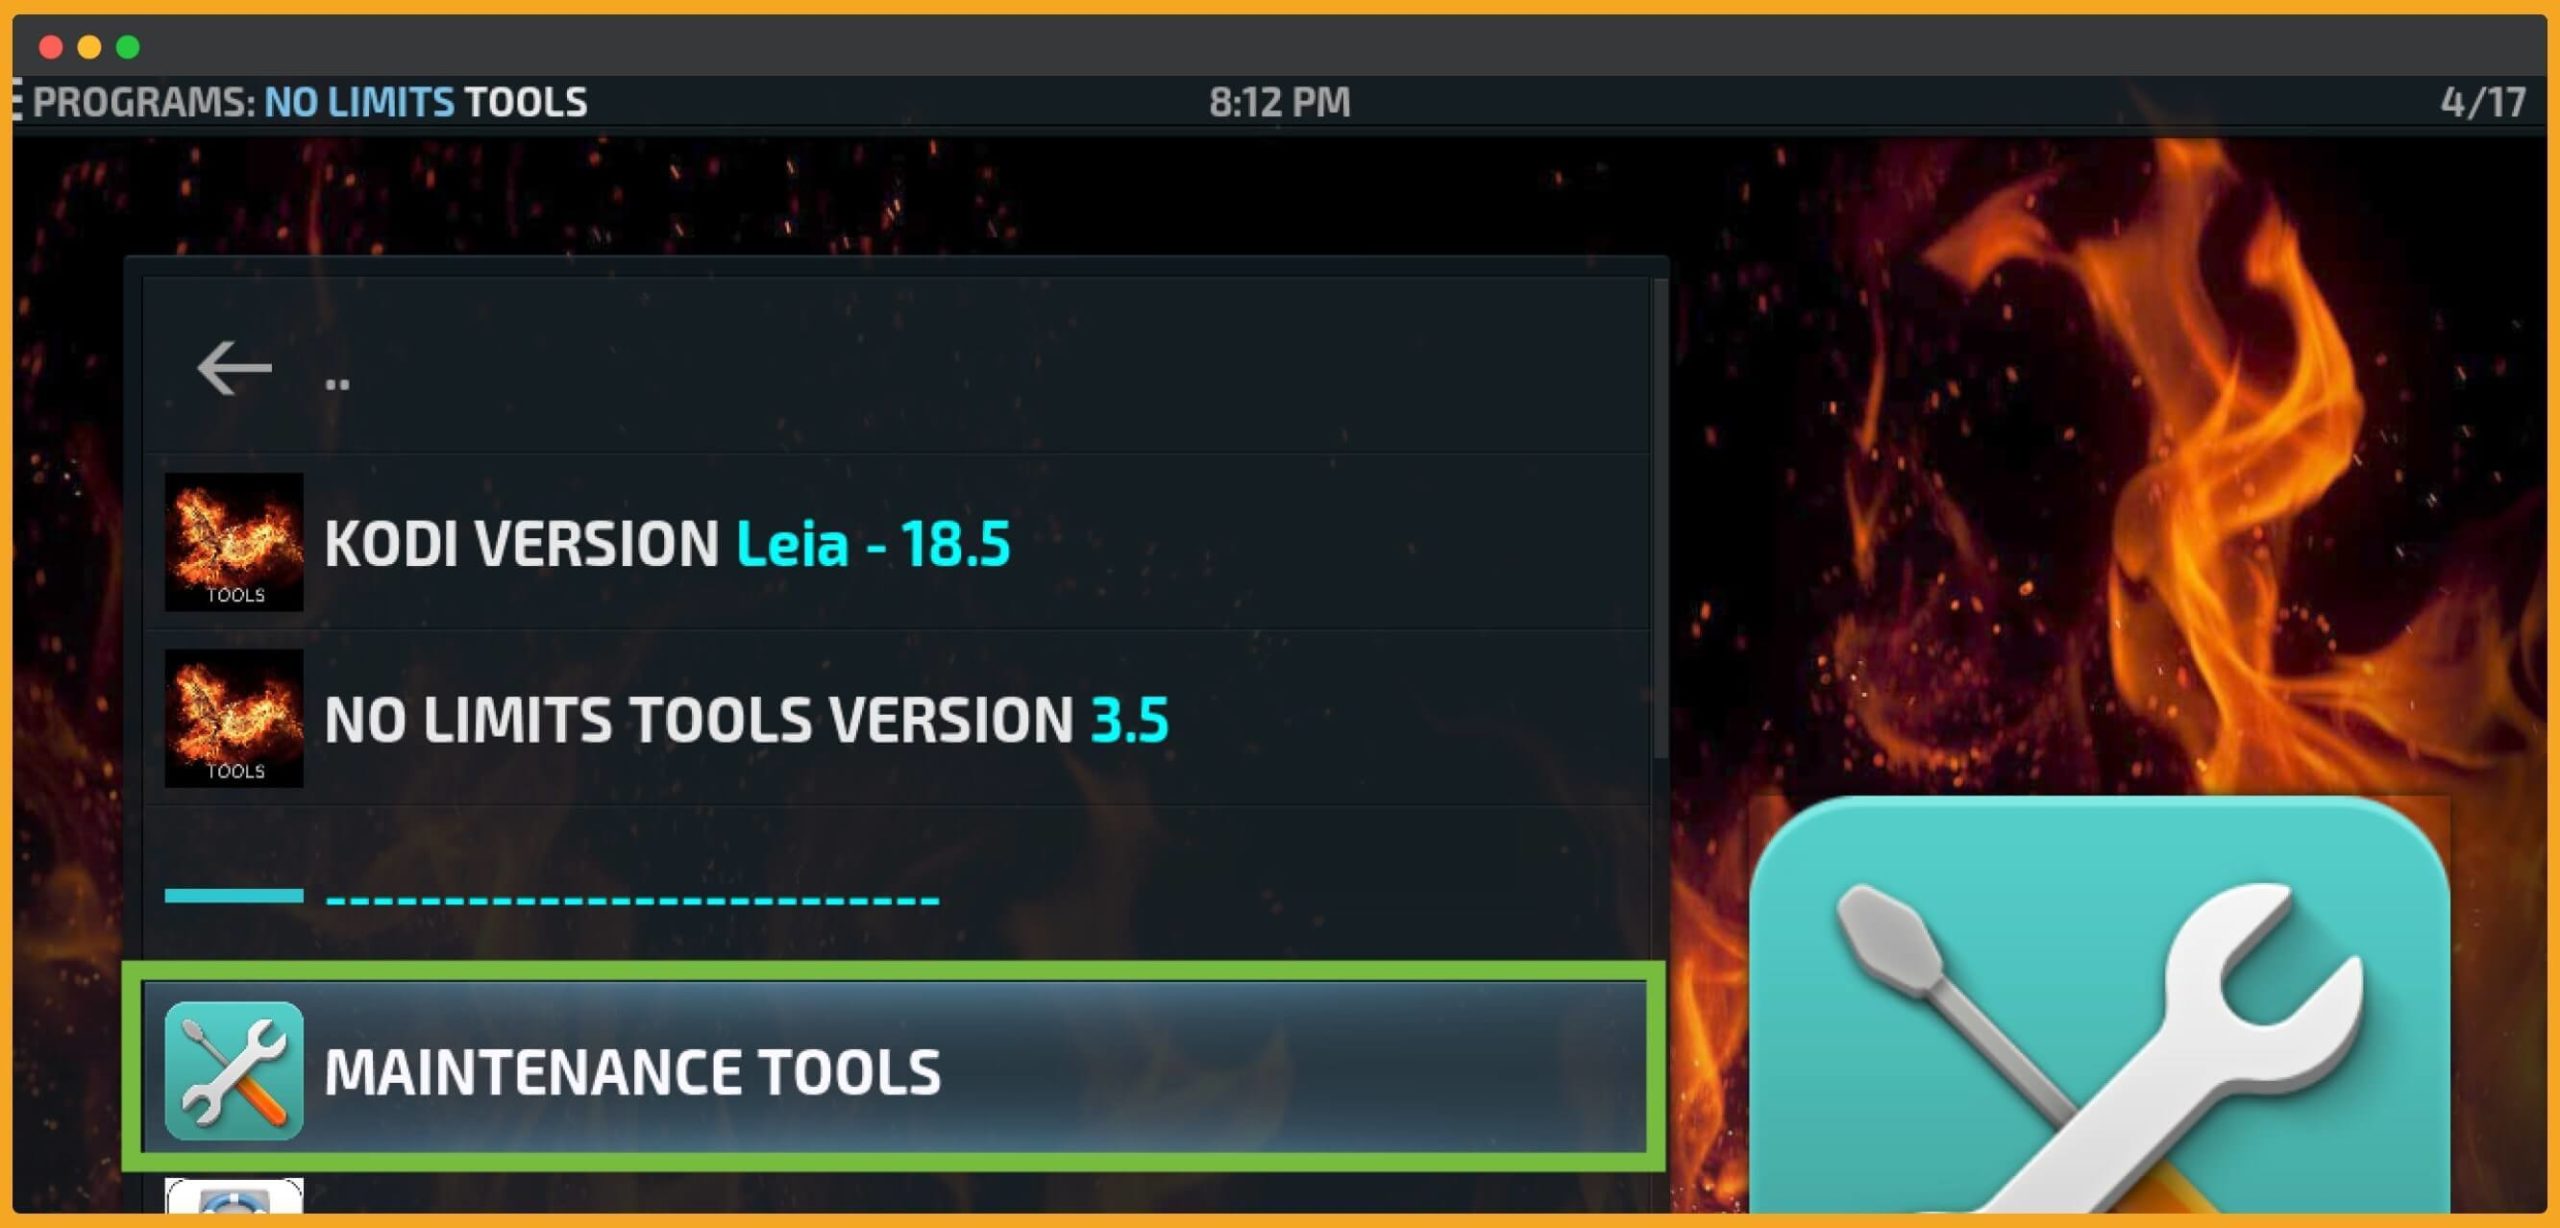
After this, you need to select Maintainance Tools.
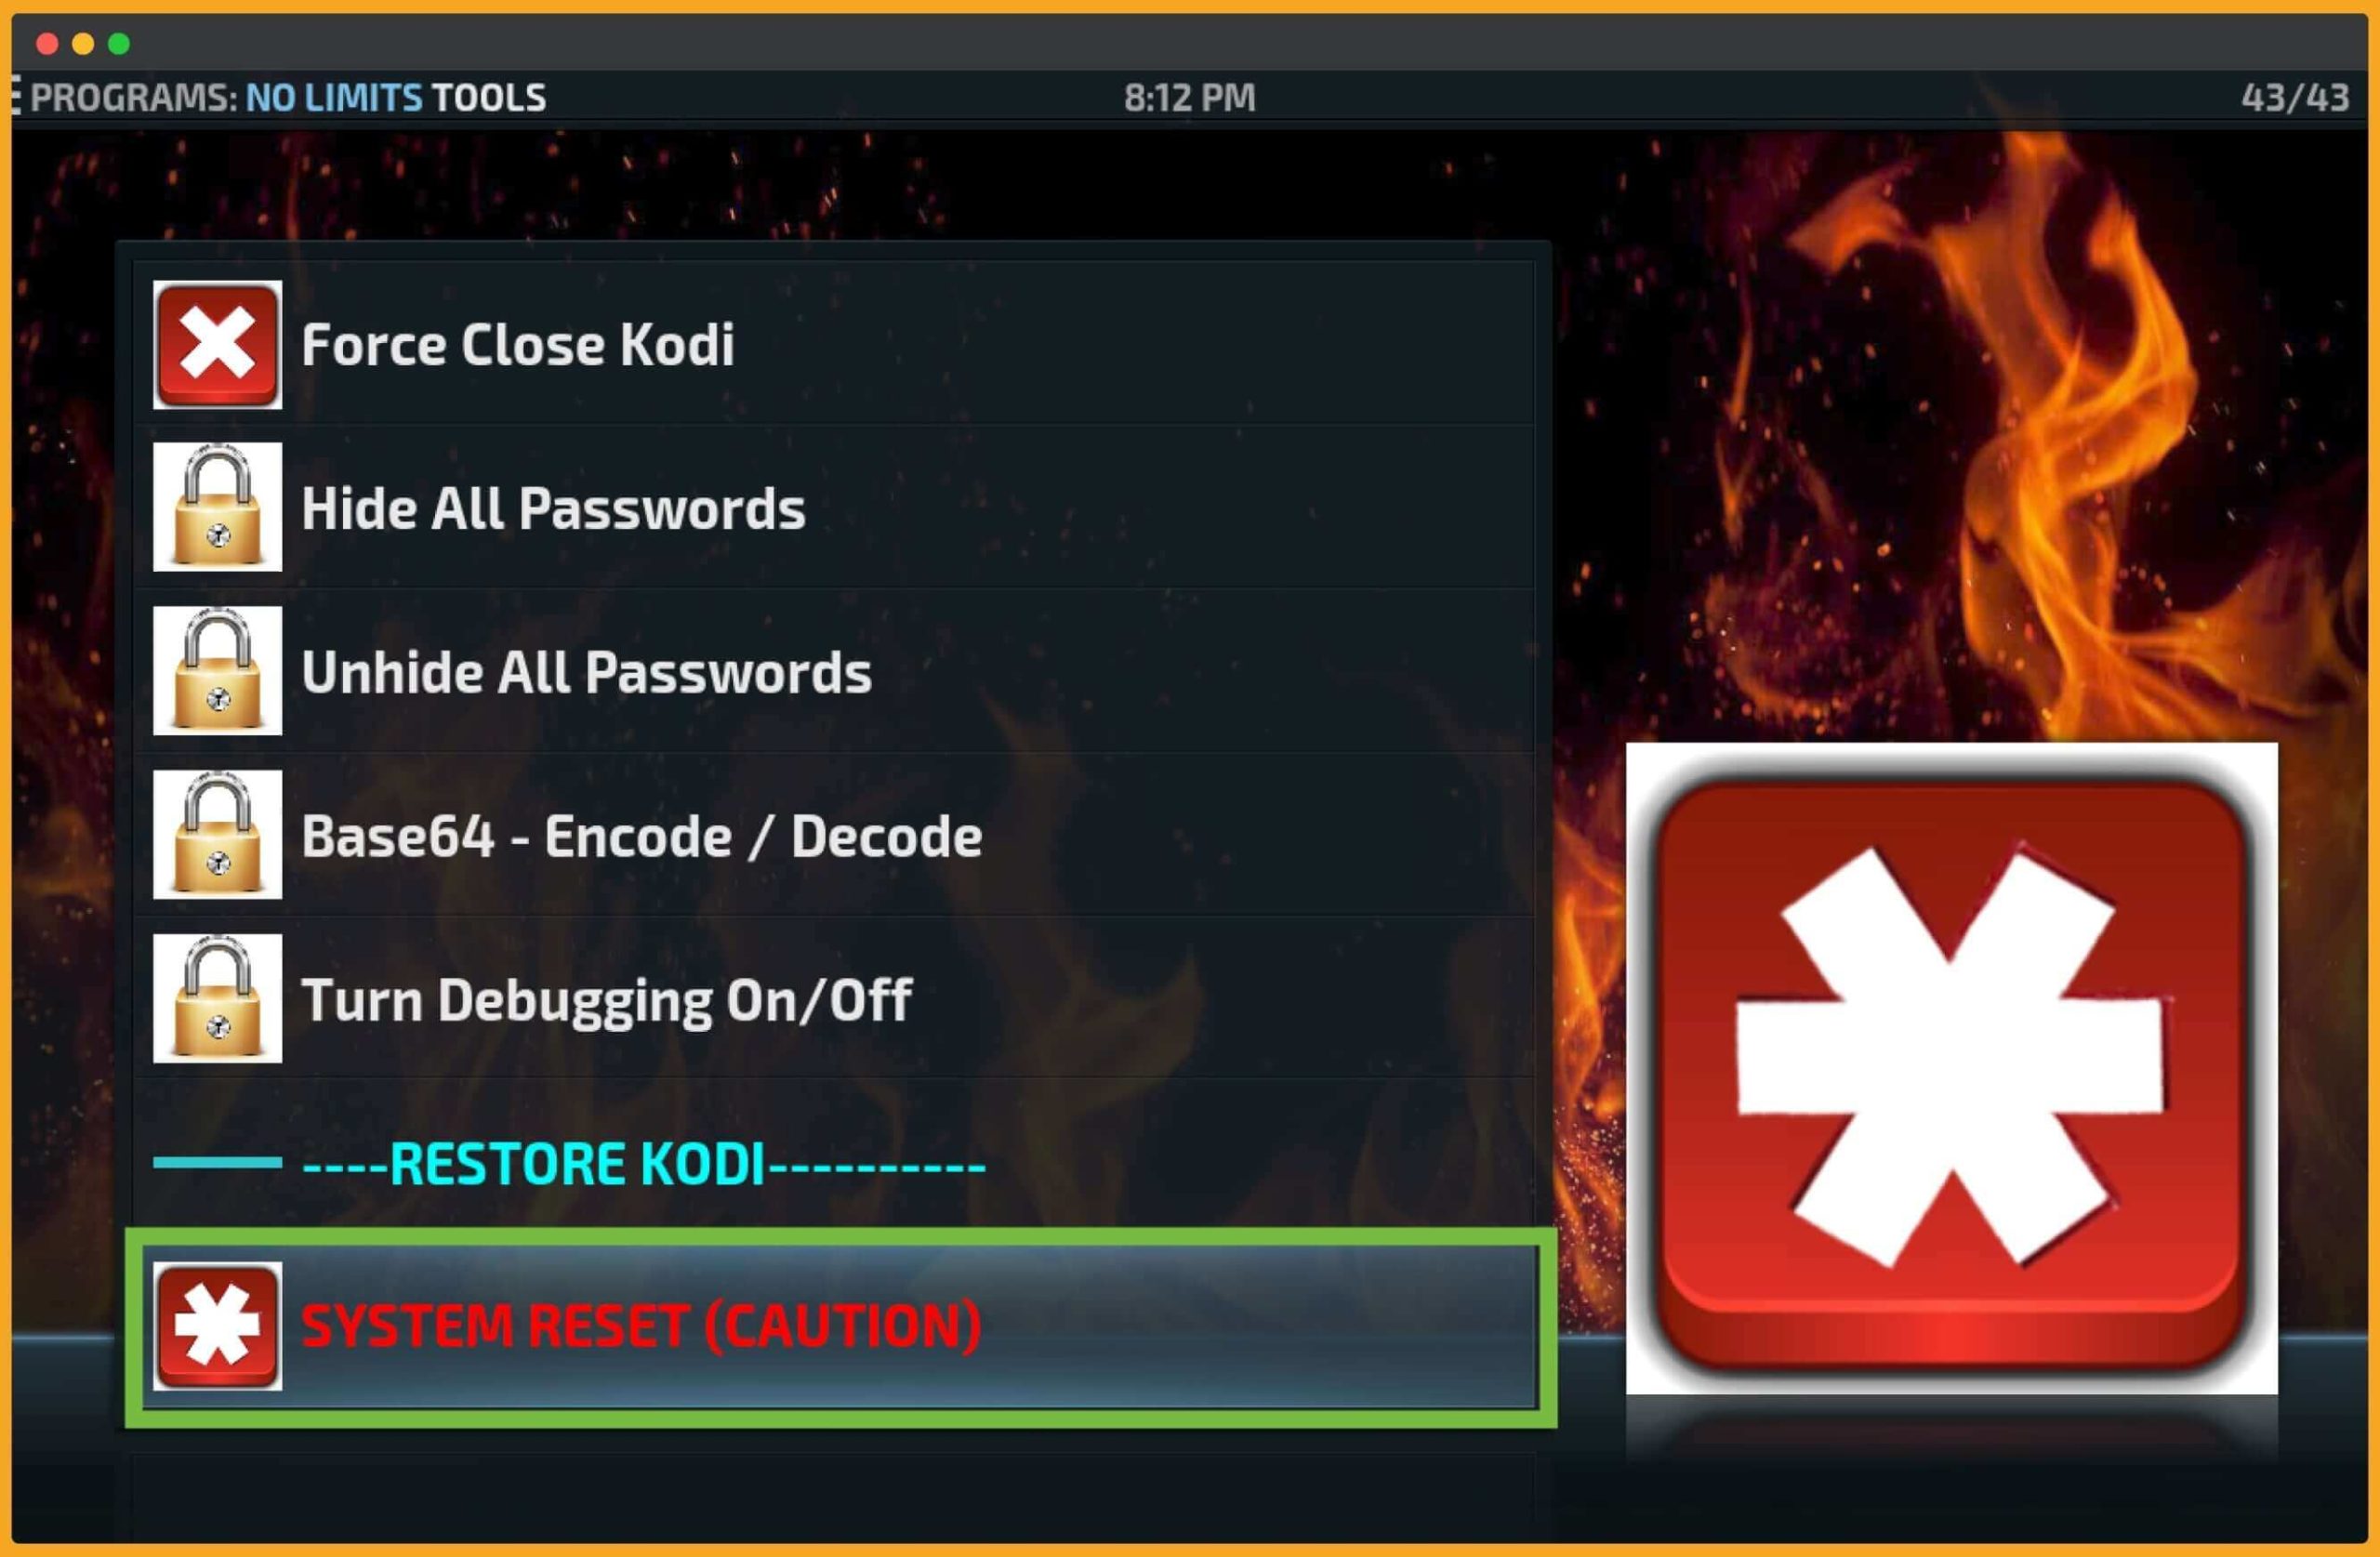
Now simply scroll down to the bottom until you find SYSTEM RESET (CAUTION) there and press the Ok button.
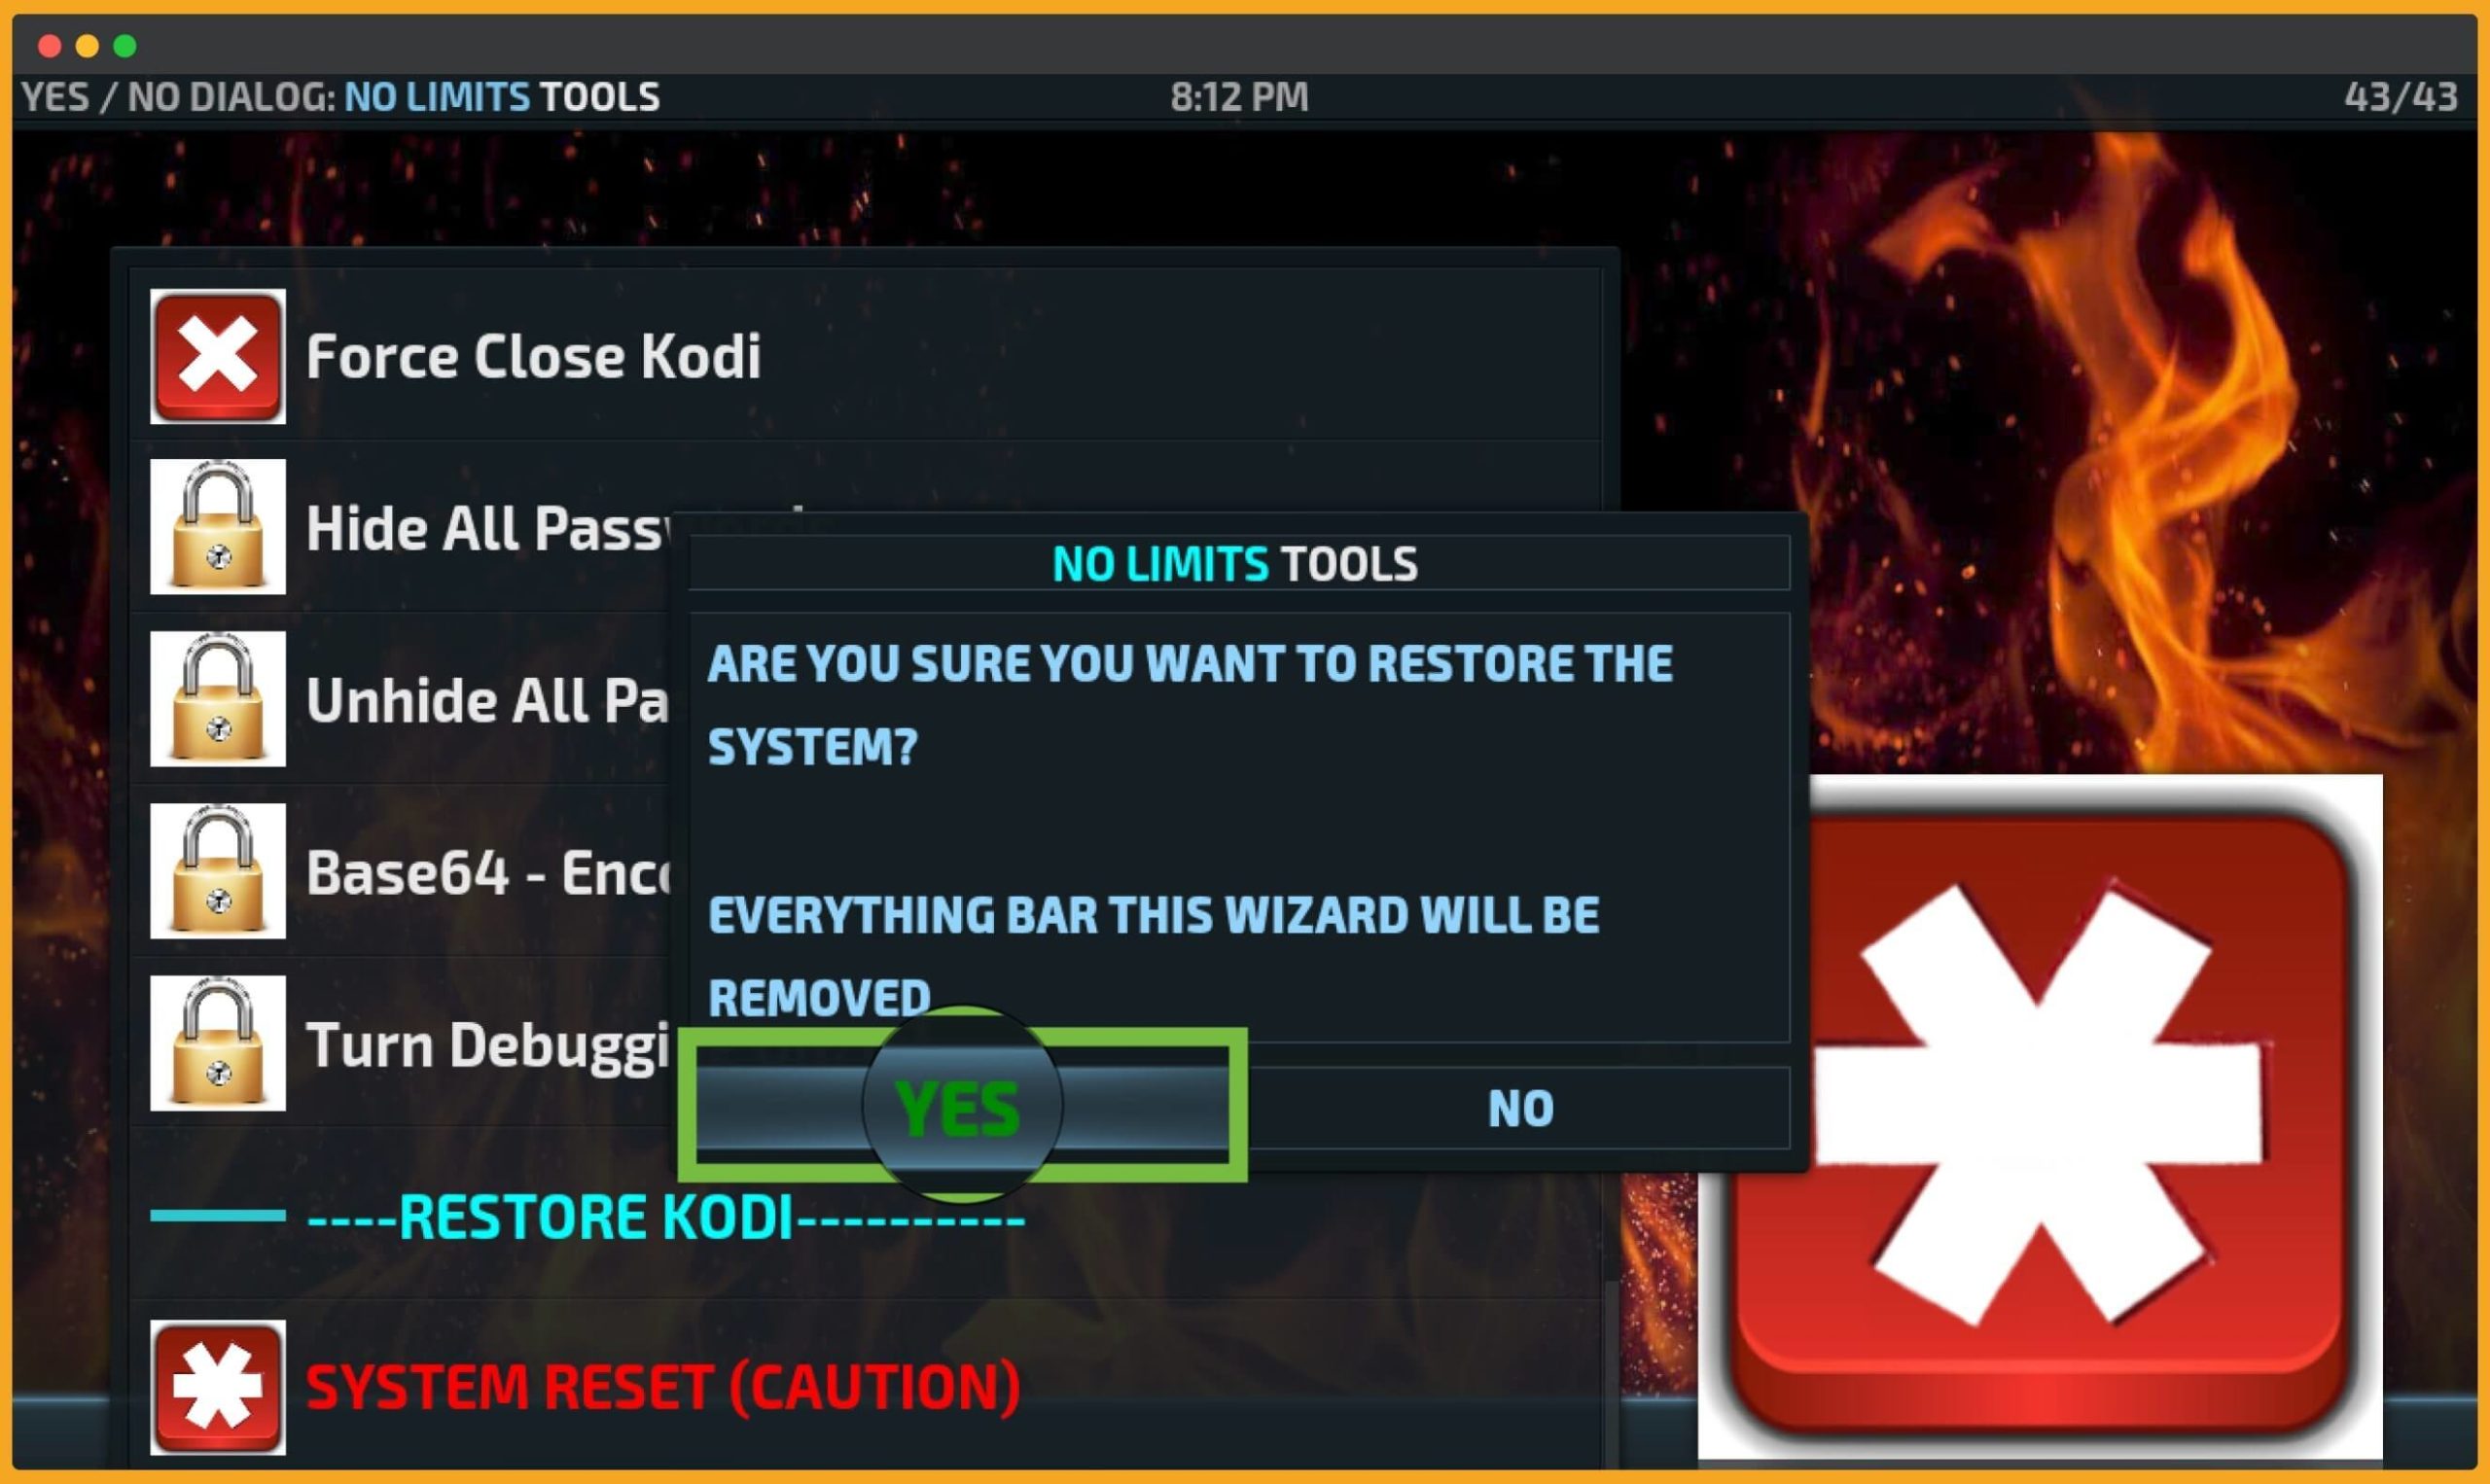
At this time, you will be asked for confirmation, so ignore it and select Yes.
The program will start deleting everything forms Kodi, and after this, you will see an option asking to restart. So, you just need to select the Yes close option.
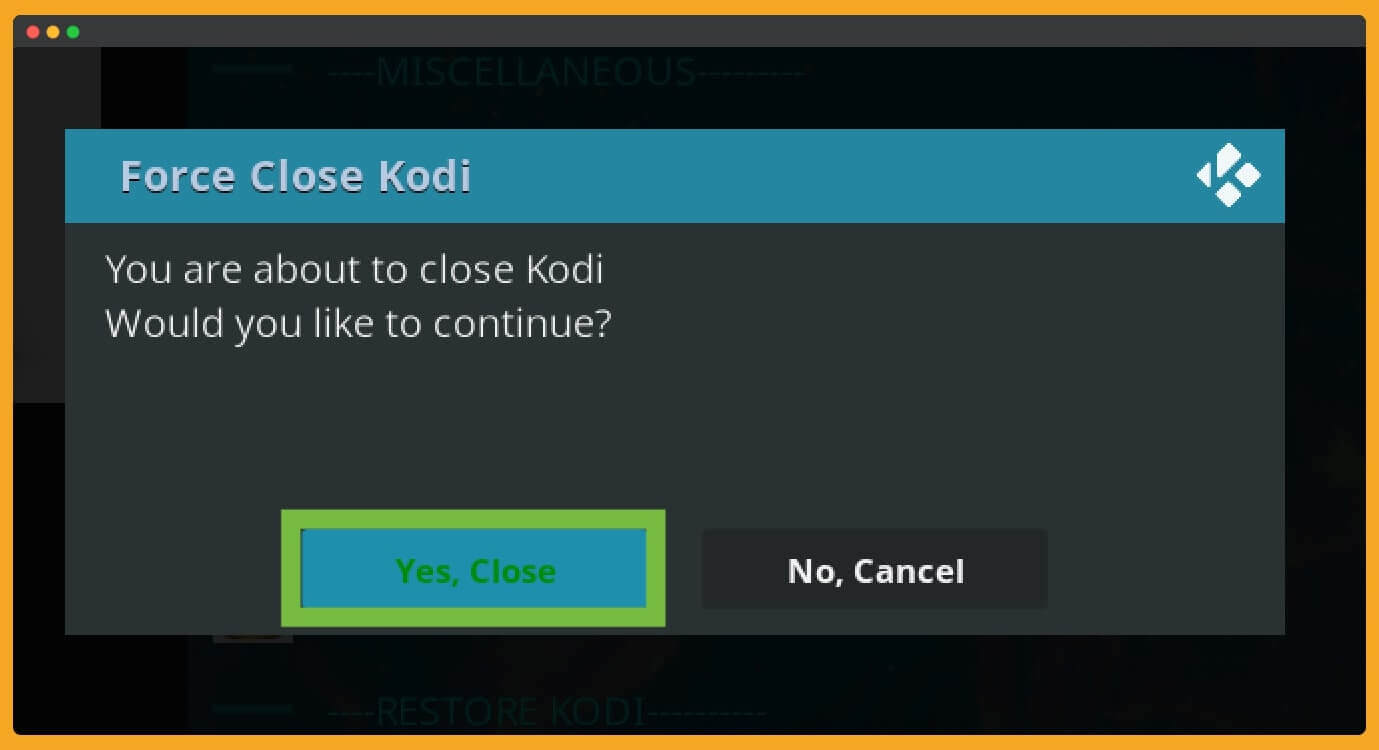
That’s it. The program is now closed, so at this time, relaunch the program, and here you can see the old layout. Now we have to remove this addon from the list as well, so to do this, you have to follow the below guide.
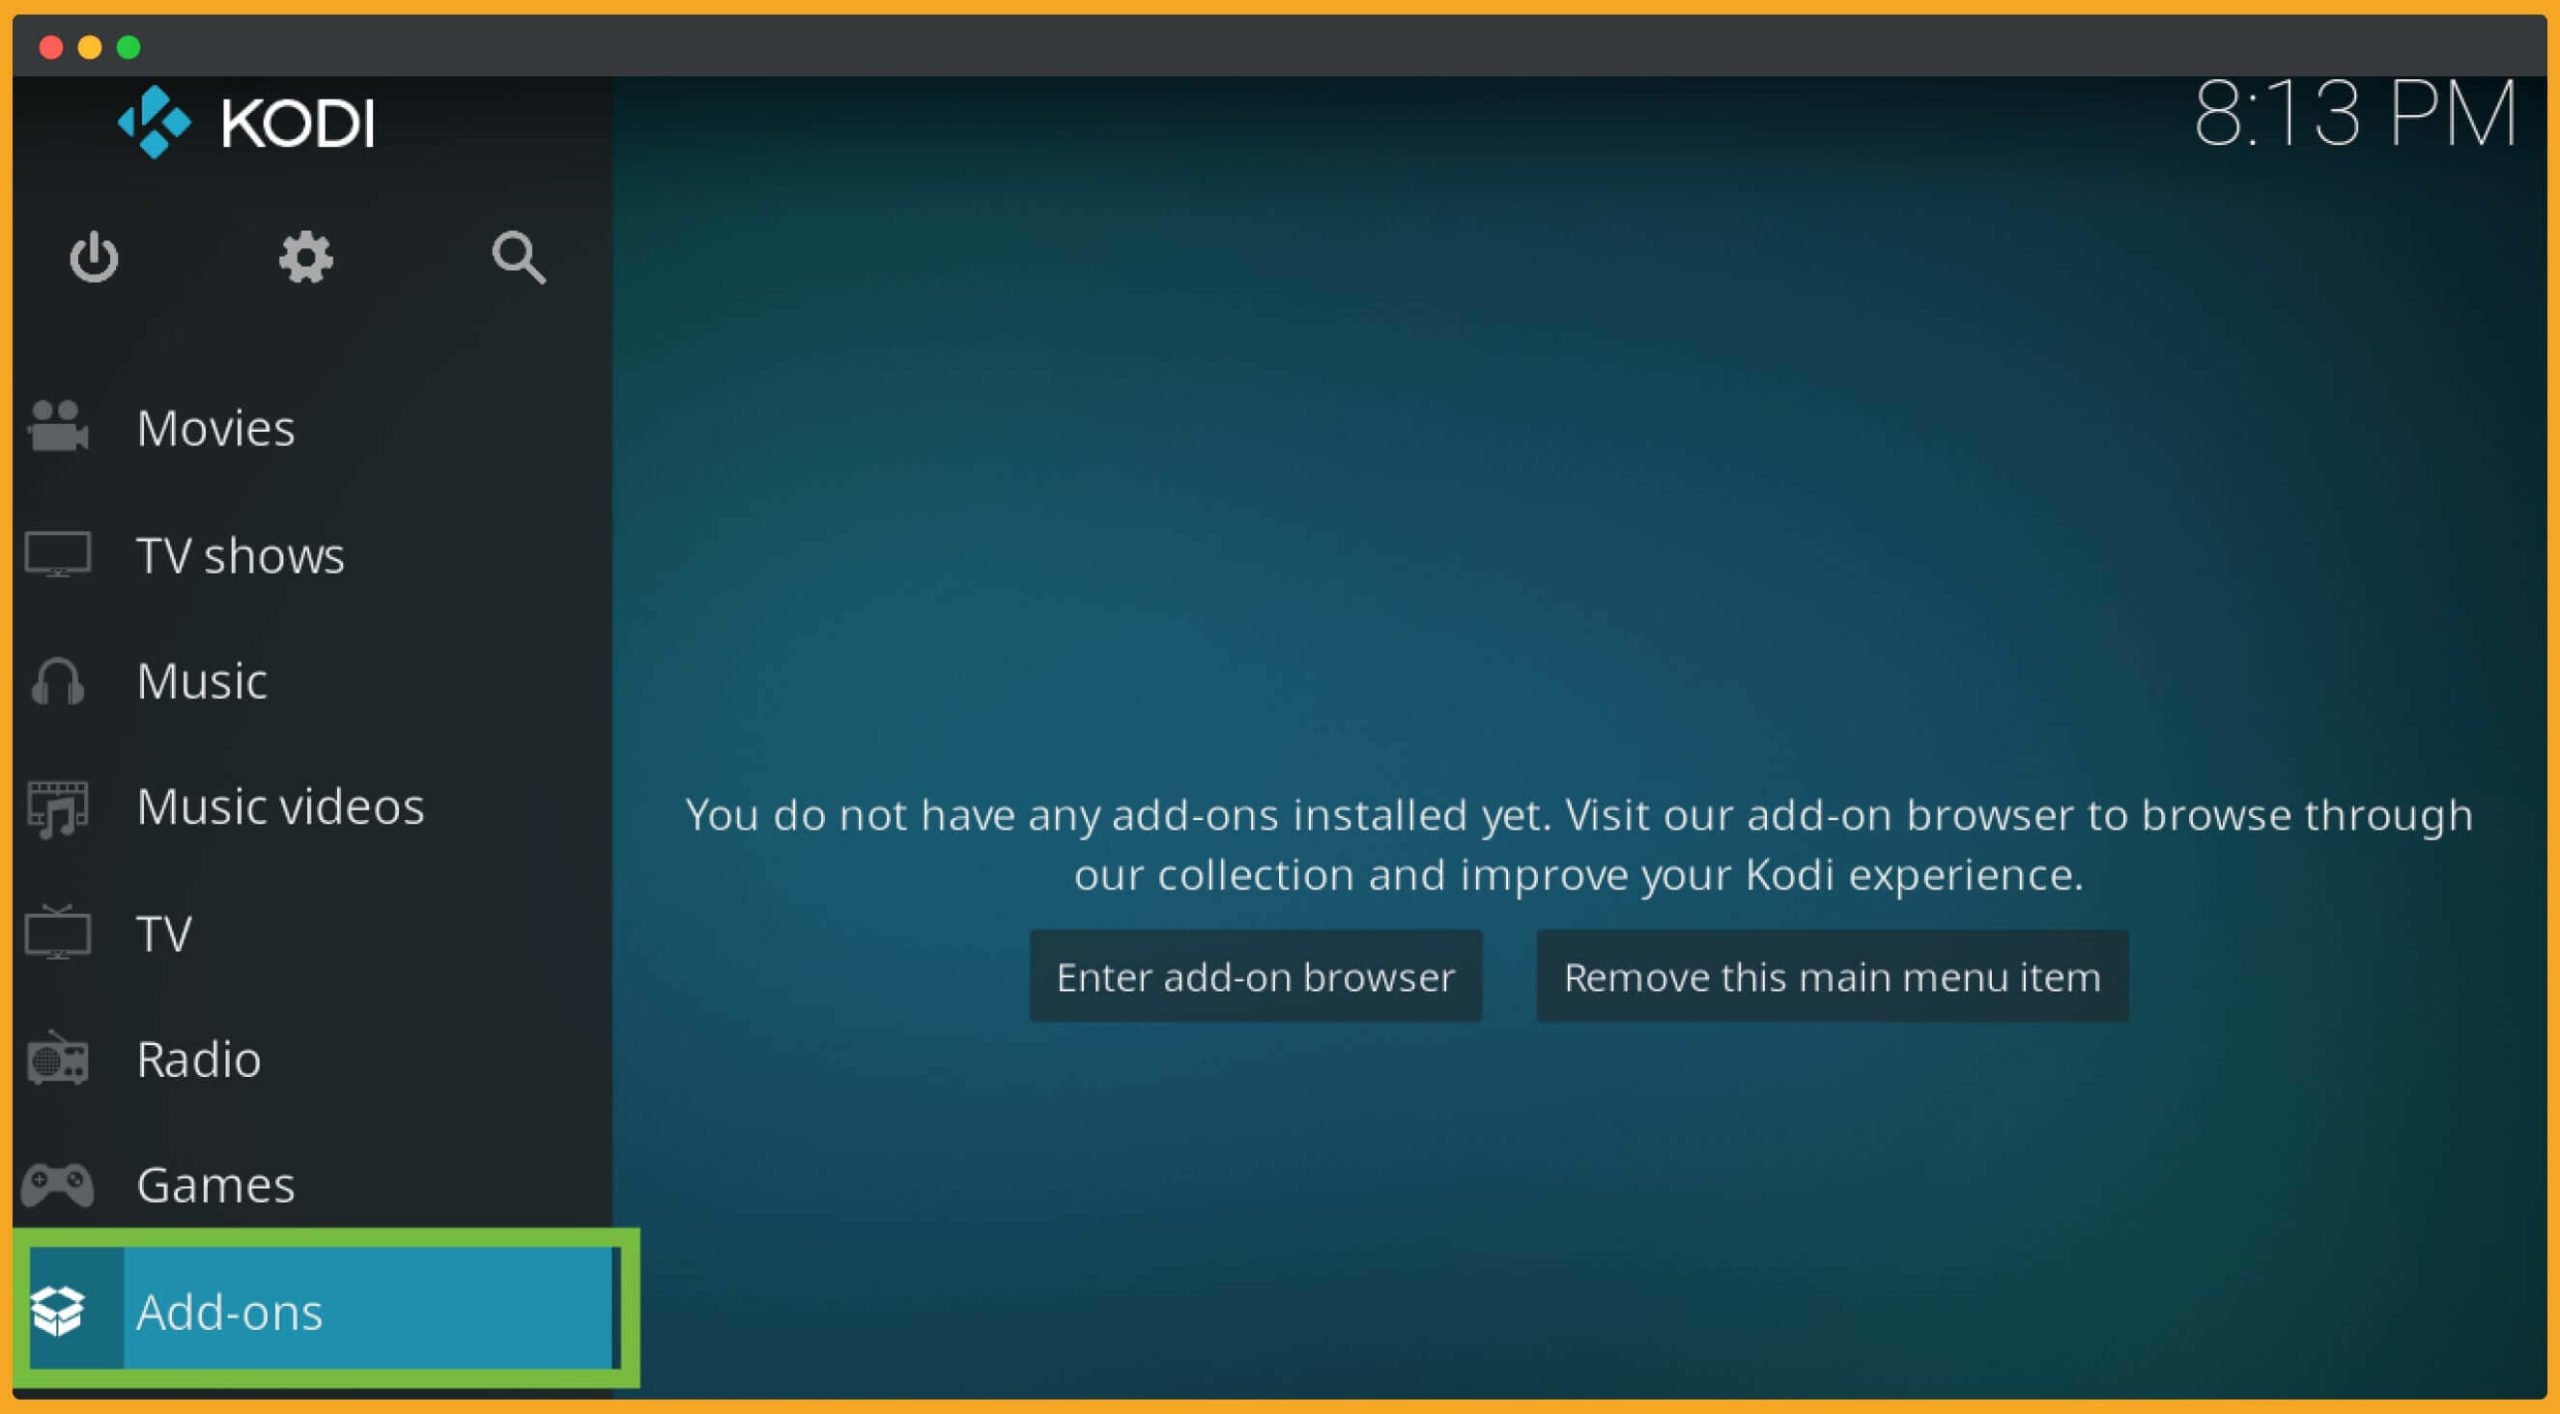
From the Home Screen, you need to select Add-ons.
At this time, you need to select My Addons.
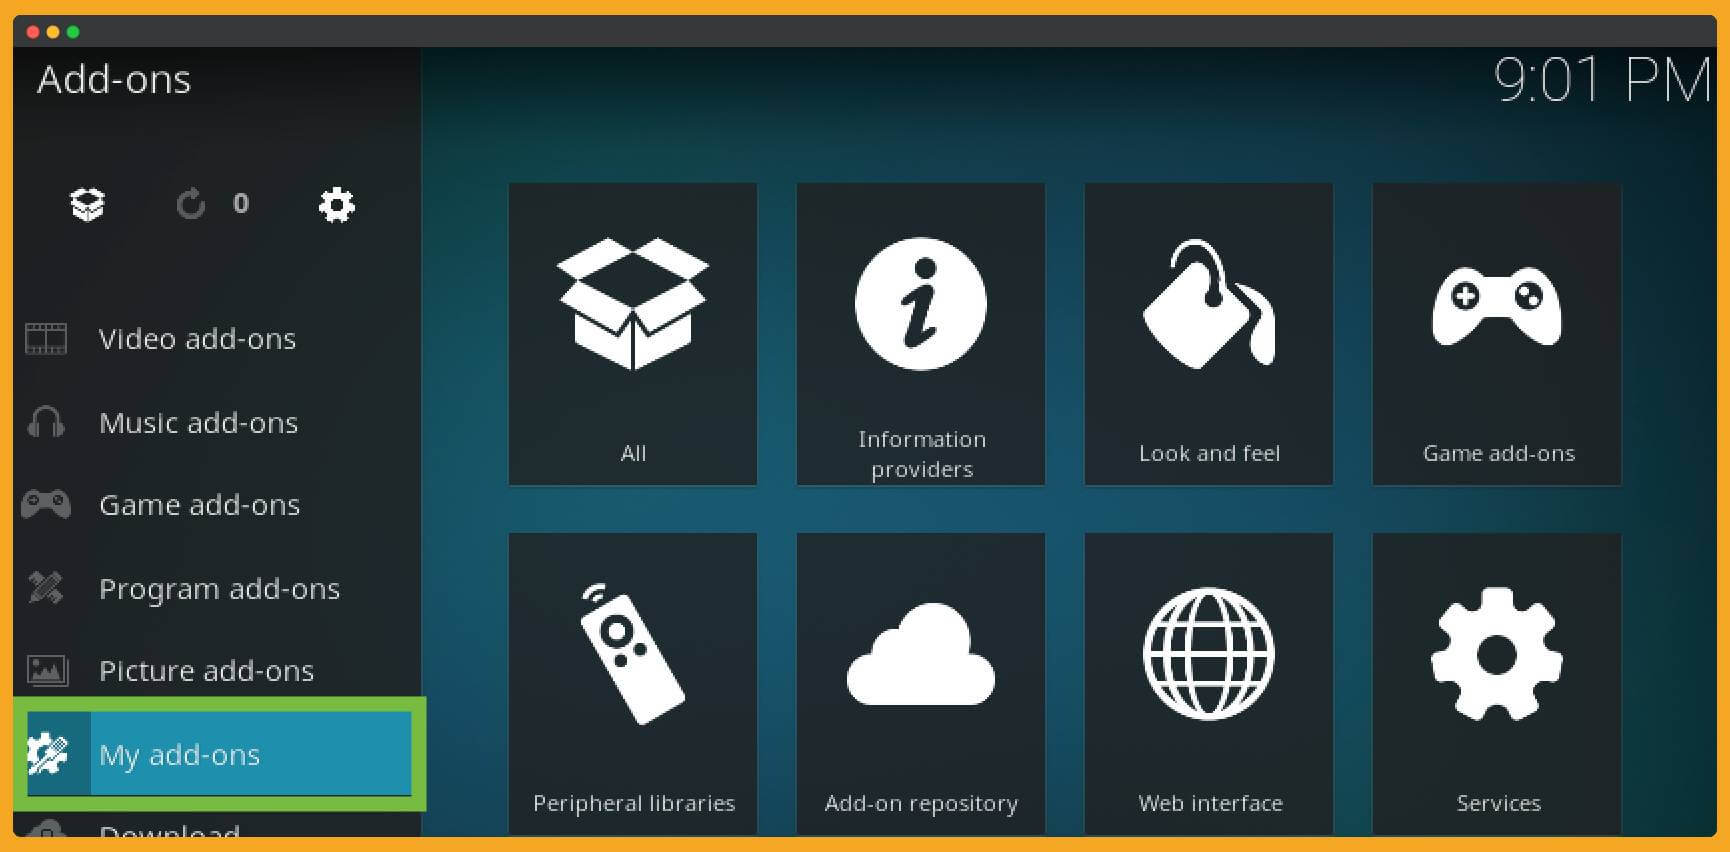
Now it will show you all addons in categories, so simply select All.

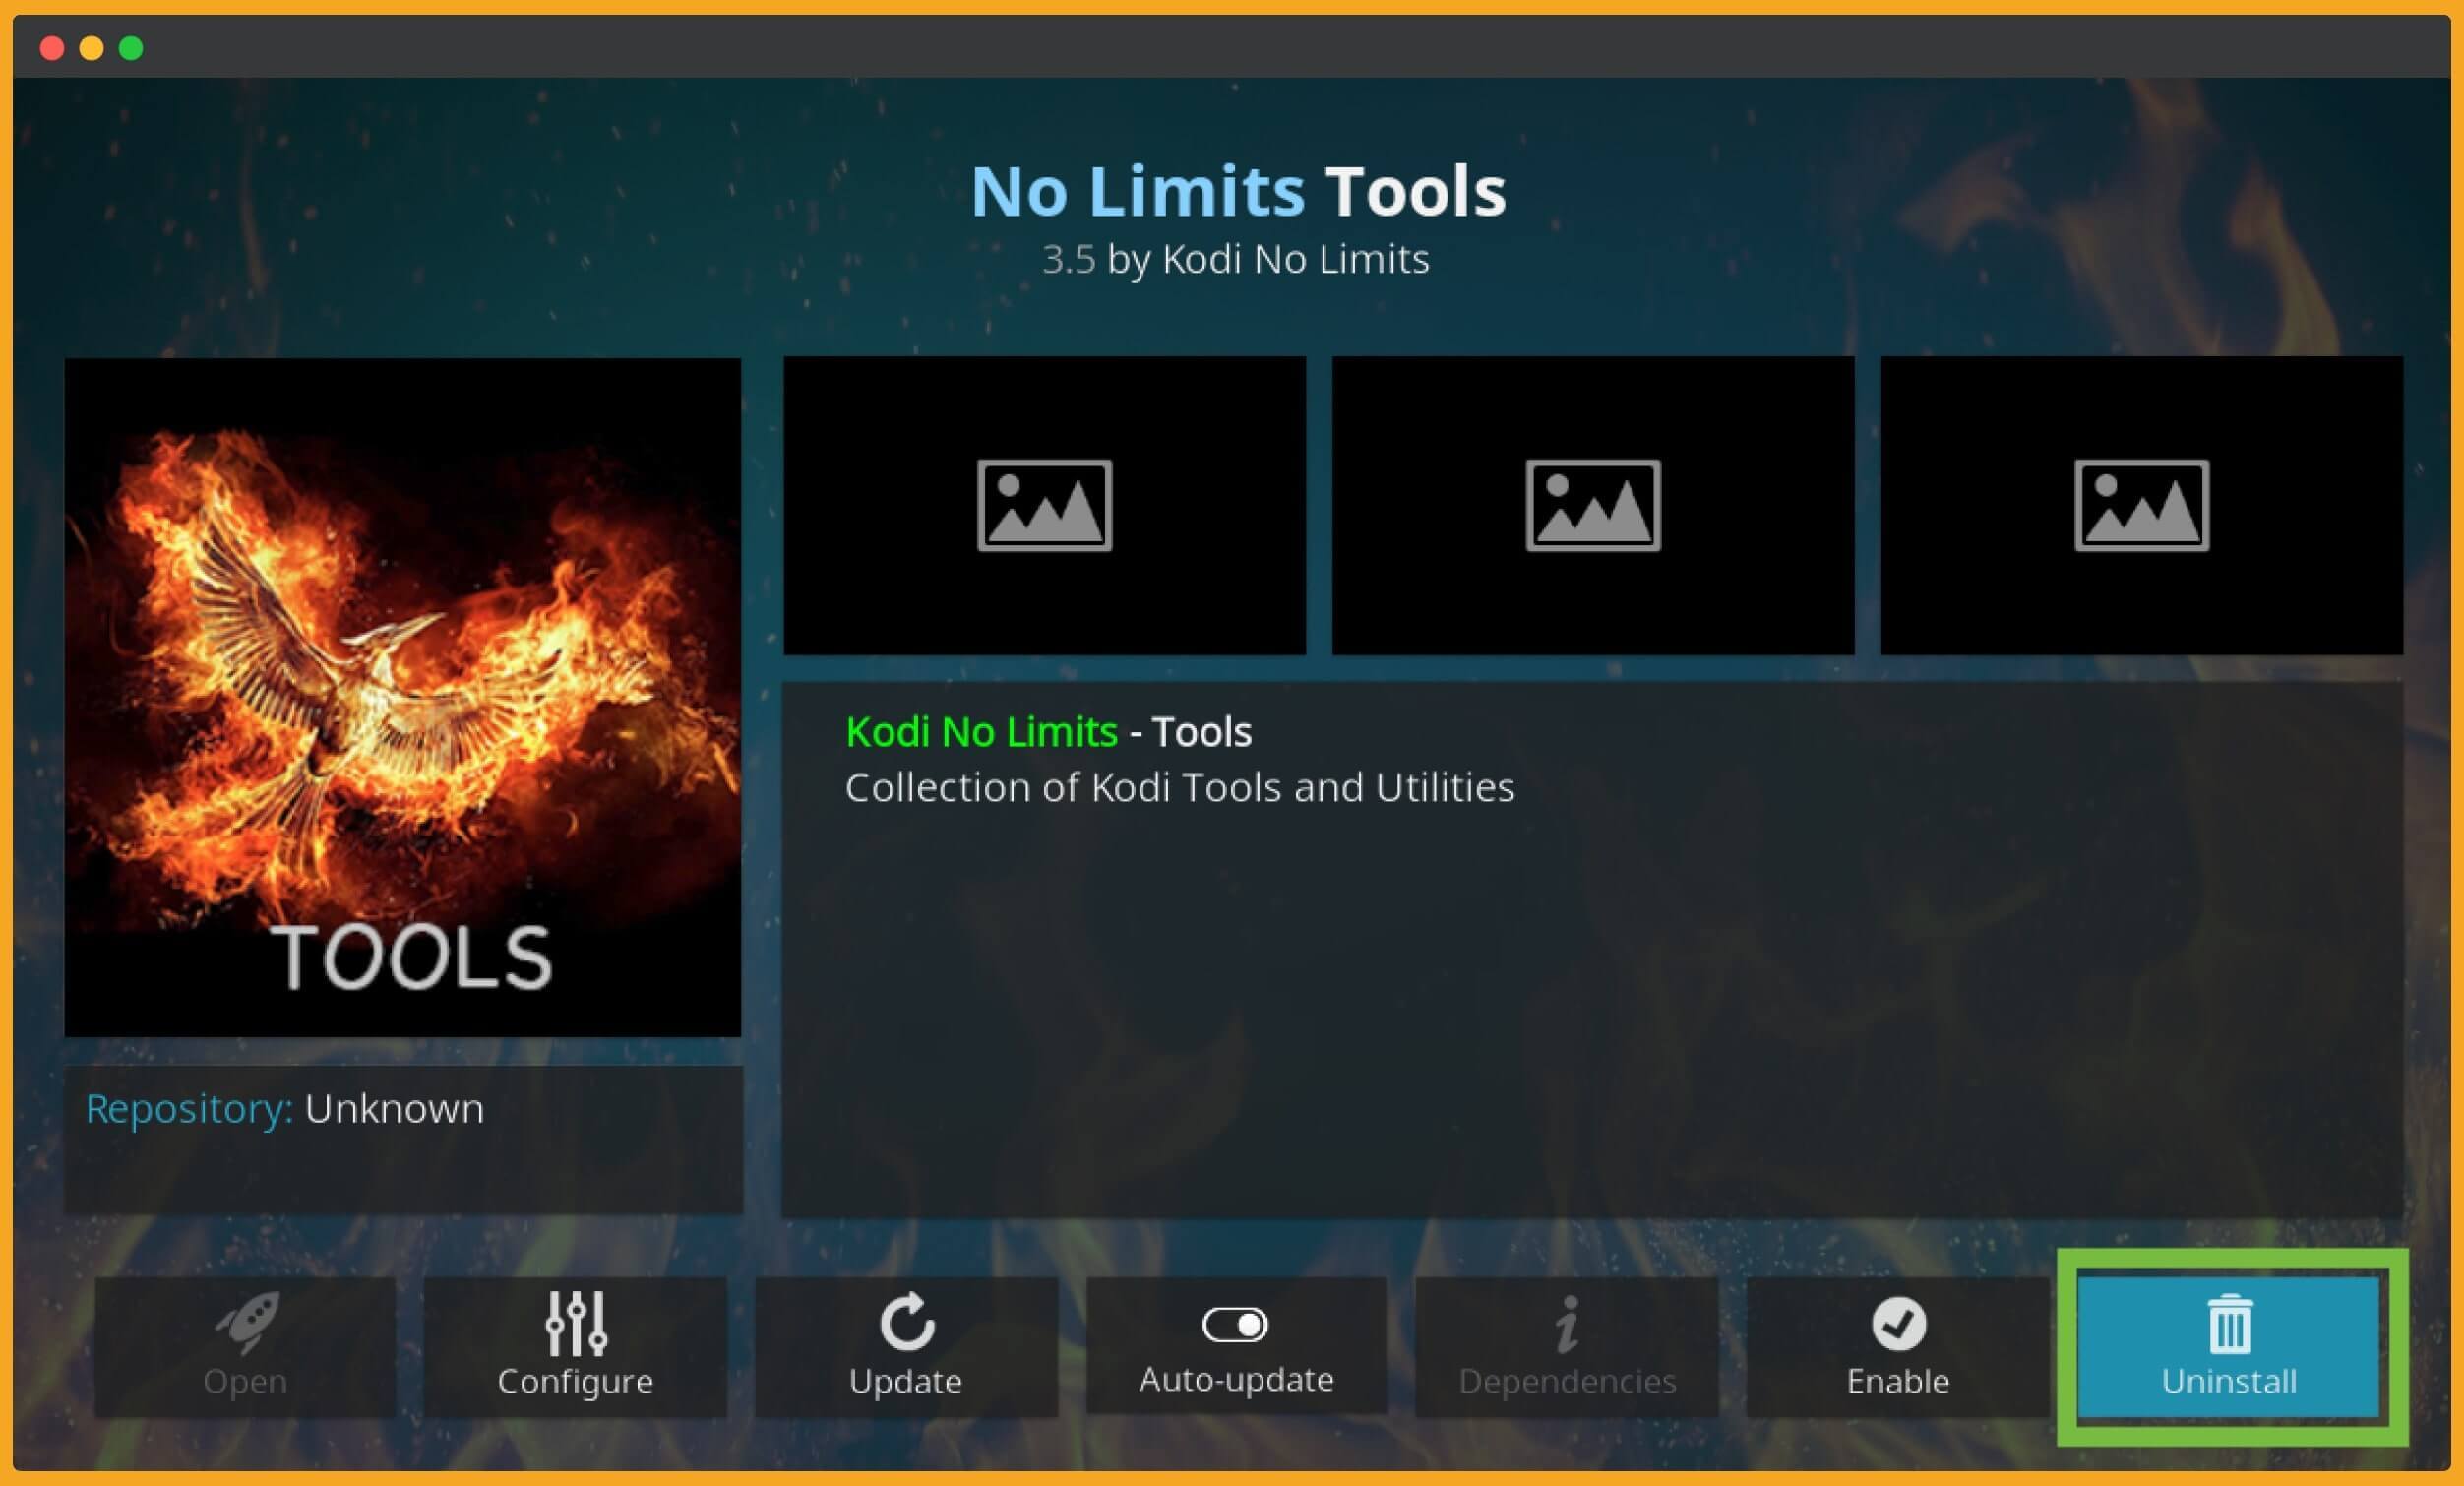
After this, you will find the No Limits Tools listed at the top. Just select it.
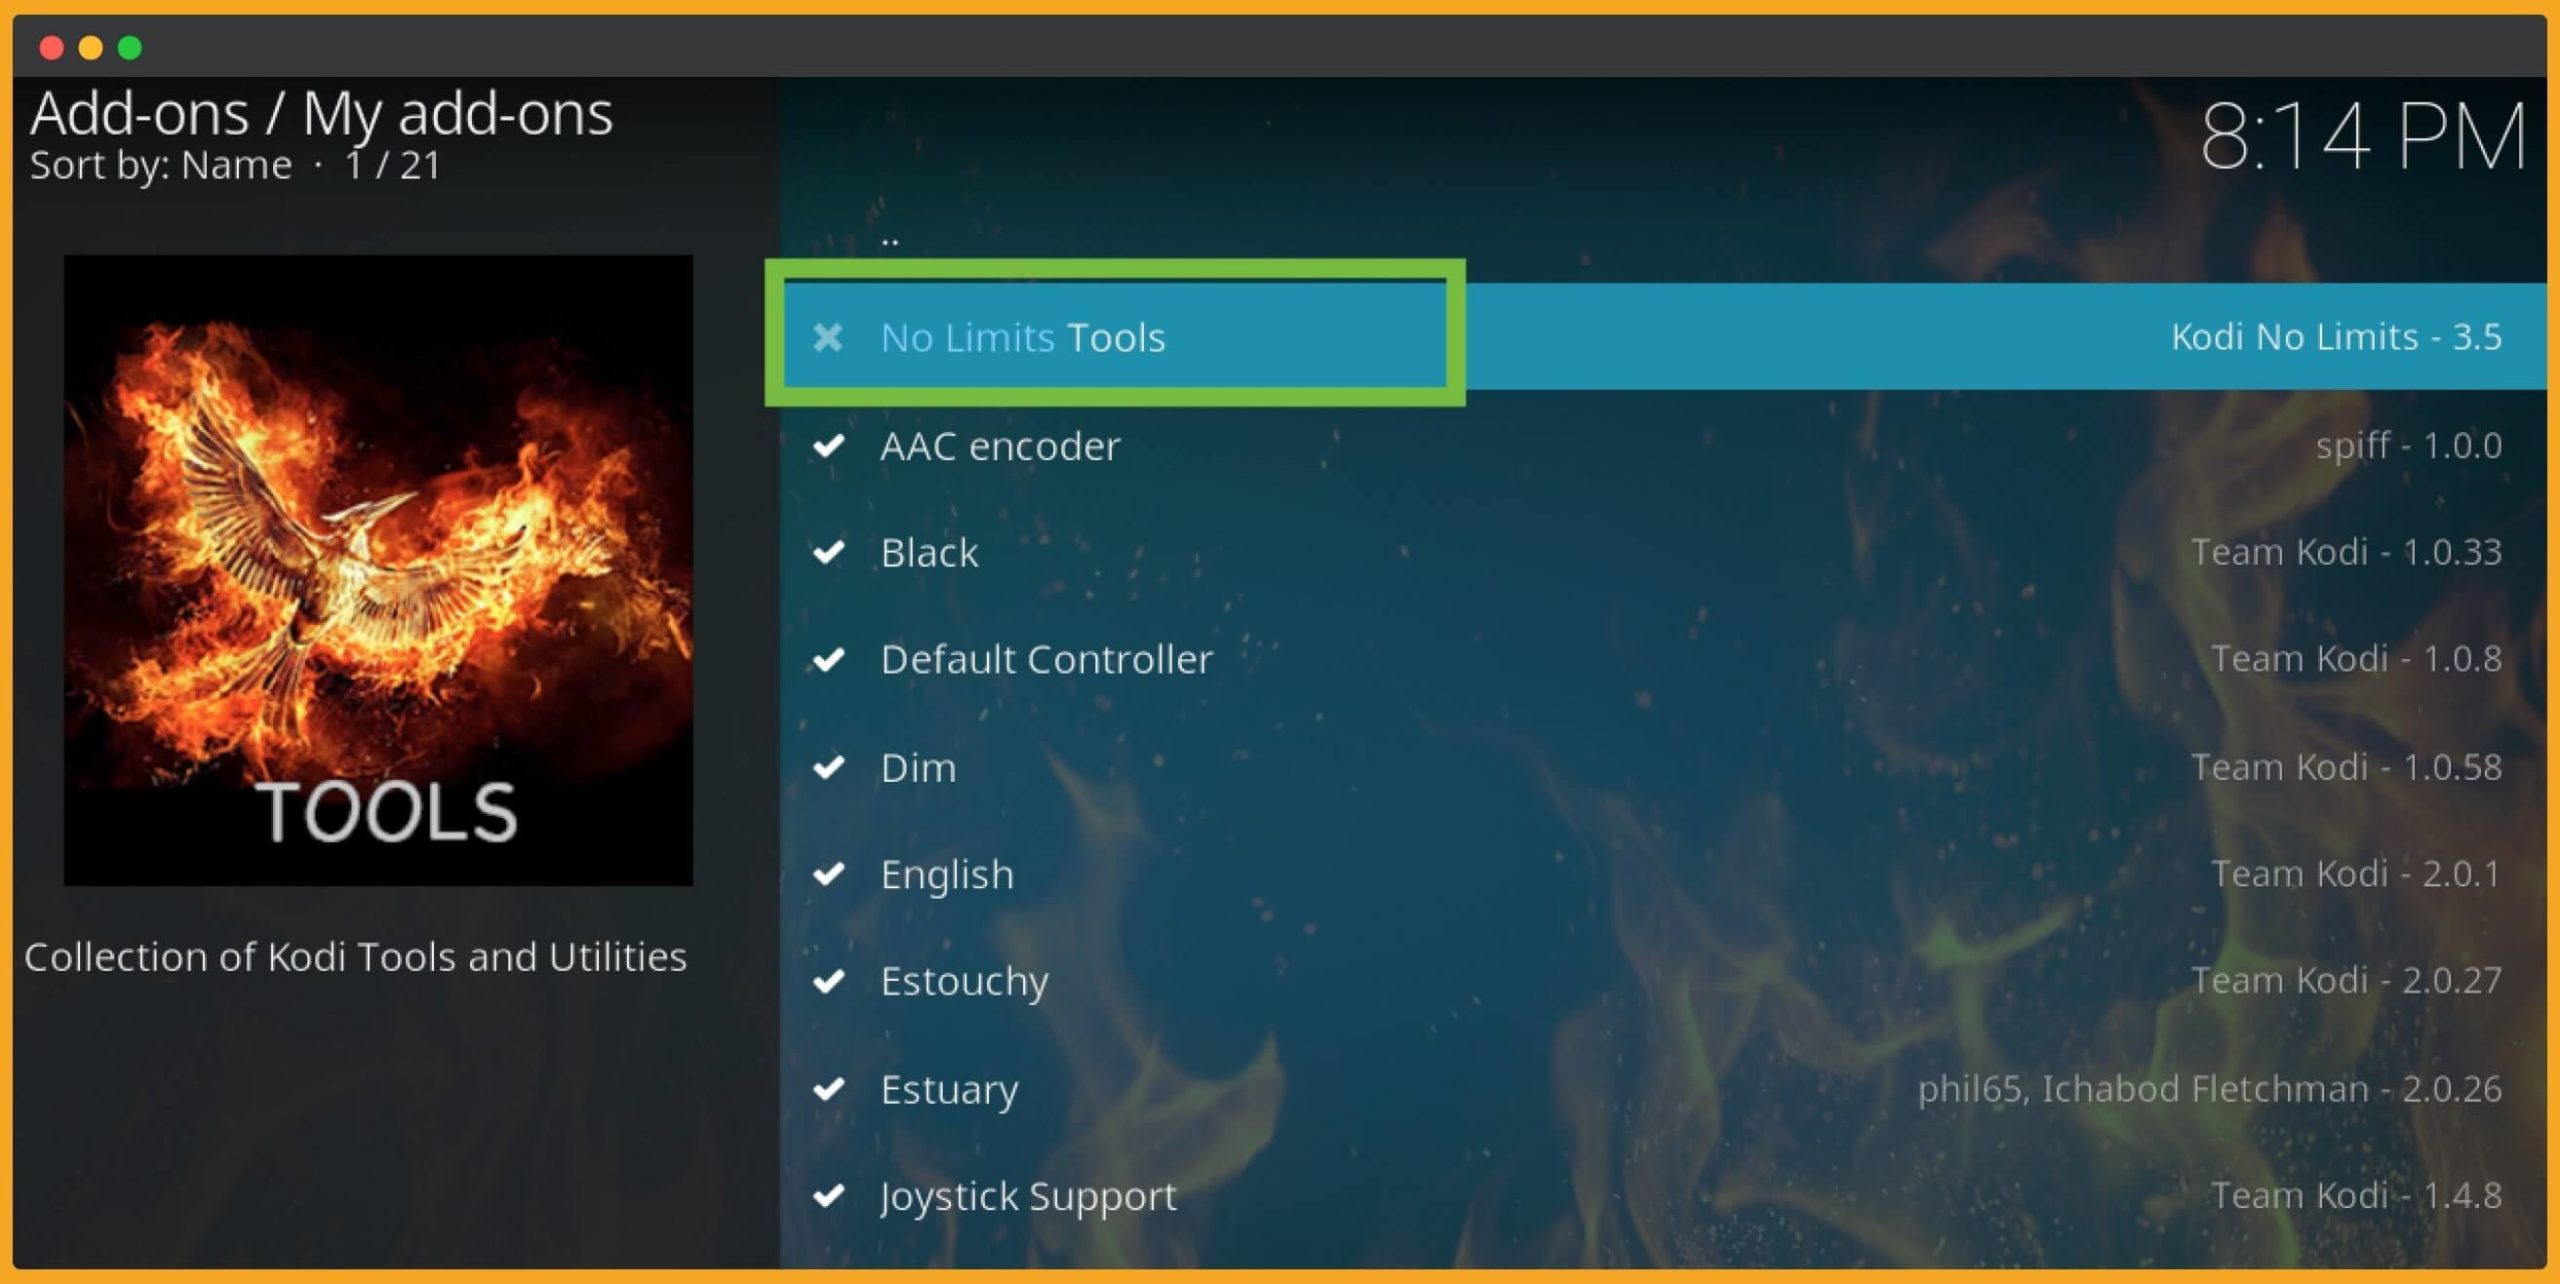
Here it will show you the Uninstall button, so highlight this feature and press Ok.
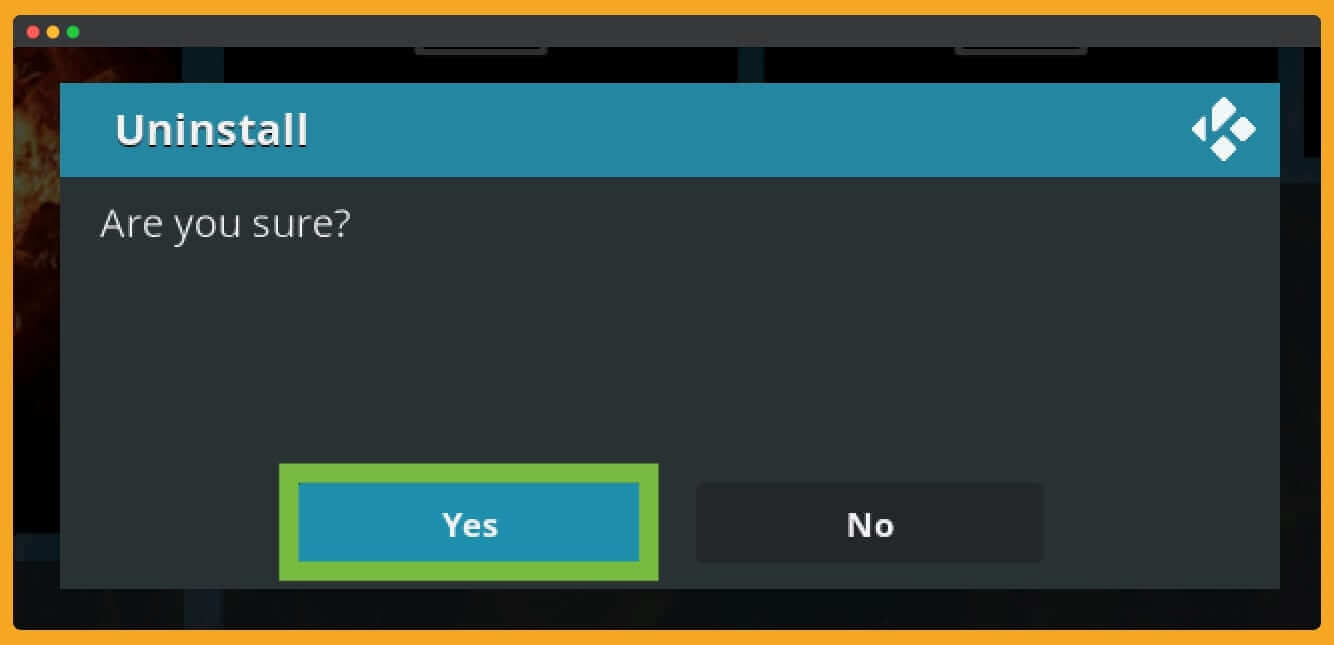
A prompt message will appear, so select Yes.
That’s all now. It is completely removed from your list, and you have an old system back.
Frequently Asked Questions (FAQs)
Read the whole guide? Still, have some questions that you are looking for. Well, then you should read this FAQ list to find the most common and frequently asked questions on the internet.
It will surely solve the problem, but if not, then make sure to comment down below and let me know what problem you are facing.
How To Update Kodi No Limits Build?
If you are updating Kodi or downgrading it, then you just need to update this Build by going to Add-ons > Programs > No Limits. Most of the time, it automatically gets updated with the built-in add-ons, so don’t worry about this thing anymore.
What Do Kodi No Limits Do?
With the help of Kodi No Limits you will get some most famous Addons to watch Live TV, Sports, Movies, TV Shows, and other sorts of entertainment. This also changes the user interface of Kodi and makes it look more attractive.
How Do I Load Kodi No Limits On Firestick?
You can follow the above guidelines and easily load Kodi Limits on Firestick as this Media Player works the same on every platform.
So don’t worry. By following this single guide, you will be able to get it on Firestick, Android, iOS, Mac, Windows, and even for Linux.
Conclusion
No Limits Magic on Kodi is just a gift from its developers as we are getting almost everything on Firestick without any effort.
Like we are getting many latest, old, and most-watched movies free of cost. It provides TV Shows, Live TV, Sports, and many other entertainment pieces of stuff.
What else do we expect from any other build? Of course, it has everything that normal users required in their daily life.
I hope you understand the steps carefully and followed them and got succeeded in the installation. But if you didn’t get succeed, then make sure to comment down below and tell me the problem that you are facing.
I would love to hear from you and will try my best to solve the problem as soon as possible. Also, another thing that I would like to recommend is always using the VPN Service to protect privacy. Because streaming movies or other content in many countries is restricted, so make sure you are using a VPN.

