Have you purchased Firestick 4K device recently and you are wondering if you can use Firestick on Laptop or Macbook? If so then you came to the right place as this is the question that I have been asked by many of my visitors.
Even though when I bought it for the first time I was also thinking about it but never give it a try. But when I saw too many requests from my visitors I thought to make a complete guide on it. In this way, I start searching for possible ways to connect my FireTV on Windows and even on Macbook.
After searching for several hours I finally found different methods that can be used to connect FireTV, share FireTV Storage, Mirror screen, and so on. If you want to learn how to perform these different methods then don’t forget to read this article until the end.
This may be useful for you: How To Cast To Firestick Windows, Android, iPhone/Mac
Can I Use FireStick on My Laptop/Computer
This question is quite complicated because if you are asking if you can use Firestick directly using the HDMI port on the laptop then the answer will be no, you can’t. The reason is simple FireTV works like a small computer having an output HDMI itself.
Similarly, most laptops and computers have the same output HDMI ports that are used for external monitors. In this way, if you connect an output to an output HDMI you won’t be able to see any response from there and it won’t display anything either.
However, there is an alternative way that you can use to display a Firestick screen on a laptop or PC using HDMI Splitter. This splitter works as a screen mirroring tool between your TV and your computer which means you cannot directly use this device yet.
Perhaps to use the FireTV without even using your TV then you should use the HDMI video capture instead. This is used to convert your output HDMI port into an input so you need to connect it using the USB port and then you can boot Firestick 4K on the laptop instantly.
How To Use Firestick on Laptop
As I mentioned earlier that there are two ways to use Firestick on a laptop that is using an HDMI splitter or HDMI Video Capture. These both are different tools Splitter is used to display the same screen on two monitors while Video capture is used to convert Output to Input.
This is why you should be careful while choosing your device and make sure to read the review below. By reading this you will get an idea if these devices are worth buying or not.
Ok, so without wasting any further time check out the below review of HDMI Splitter and Video Capture:
HDMI Splitter
HDMI splitter is a device that is used to connect two monitors at the same time and display the same screen on both. There are many splitters available out there but POWLAKEN is one of the best that supports 4K@30fps and 1080p etc. Powlaken supports various devices including Firestick 4K, Roku, Apple TV, Windows, Mac, and so on.
This device is way faster as compared to any other and the best part is it supports Dolby Atmos audio. Furthermore, it shares both audio and video on both devices simultaneously without any issue. Another thing that I loved about this product is the price which is quite affordable.
HDMI Video Capture
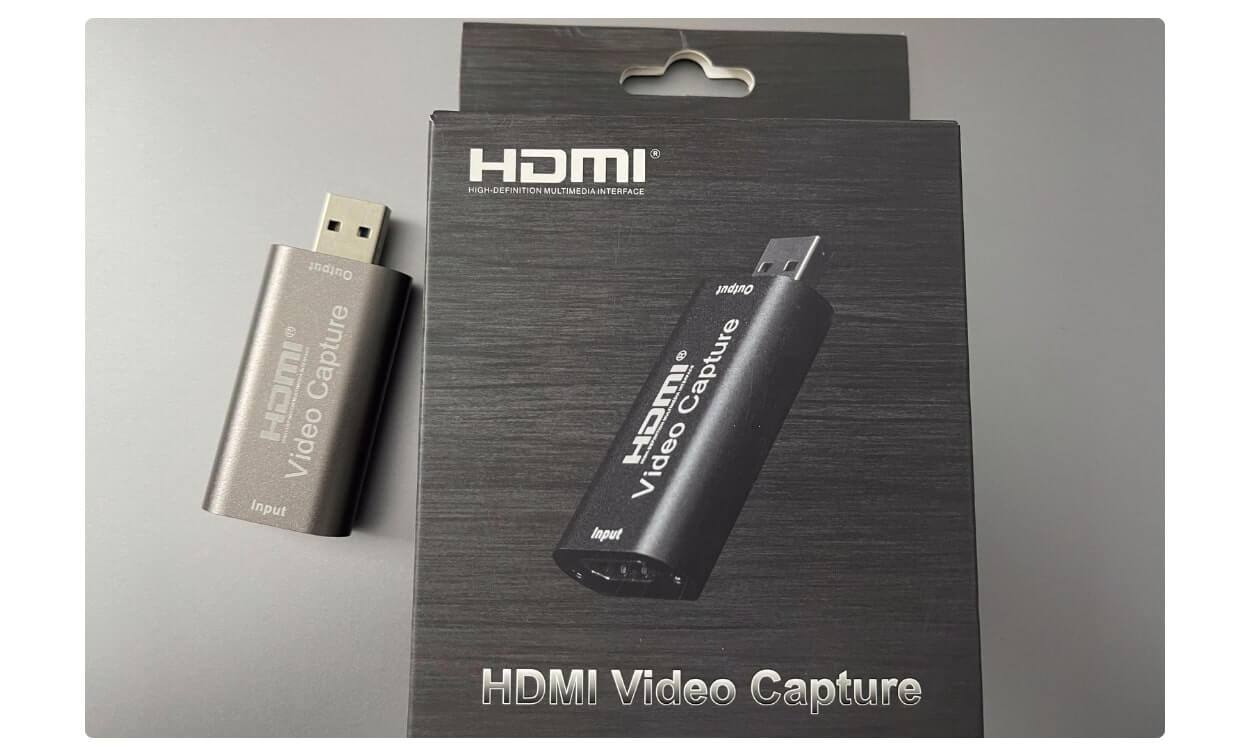
Now let’s talk about another option to use Firestick on a Laptop or Macbook using an HDMI Video Capture. This product is made by Panoraxy and is my favourite device of all time. Just like an HDMI splitter this device does support various platforms including Windows, Linux, Mac, etc.
To use this device you just need to plug USB into your laptop’s USB port and then plug Firestick into the HMDI port located on the backside. After this, you can boot your Firestick using Remote and then you will notice the boot screen and now you are good to go.
If we talk about other features of Video Capture then you can use your DSLR as a WebCam, Stream Videos, Record Videos, and so on. The price of this device is even cheaper as compared to the HDMI splitter so I would rather recommend you go with HDMI Video Capture instead.
Check Price HDMI Video Capture
How to Set Up Video Capture To Use Firestick on Laptop
Now as we talked about earlier that with the help of HDMI Video Capture we can use Firestick on the laptop. In this way, if you have purchased this device and now want to learn how to set it up then here is the complete guide for you. The process is a little bit difficult so I would suggest reading the steps carefully and also checking the attached screenshot below.
So, just like most people, I was also curious about it and then I made an order for Video Capture after hearing about this. However, I just received my parcel today and then tried with my Macbook Pro as if it really works or not. After trying for a few hours I also search on YouTube and found some useful tutorials there.
Now as I understand this completely I am completely ready to provide you with the simple steps that you can follow. It is because when you search it online you may get tutorials but they use the complicated method. This is the reason why I first tried it by myself so I can tell you in simple steps.
Before beginning here are some requirements to use Firestick on Laptop:
- Purchase HDMI Video Capture from Amazon (or from a local store).
- Download Open Broadcaster Software (OBS).
- Micro USB Cable to Power up Stick.
- An Adapter for Powering FireTV (Optional)
Ok, so here are the steps that you can follow to Set up Video capture to use Firestick on the laptop:
First, plug Firestick in the HDMI port of the Video Capture and connect Micro USB as well.
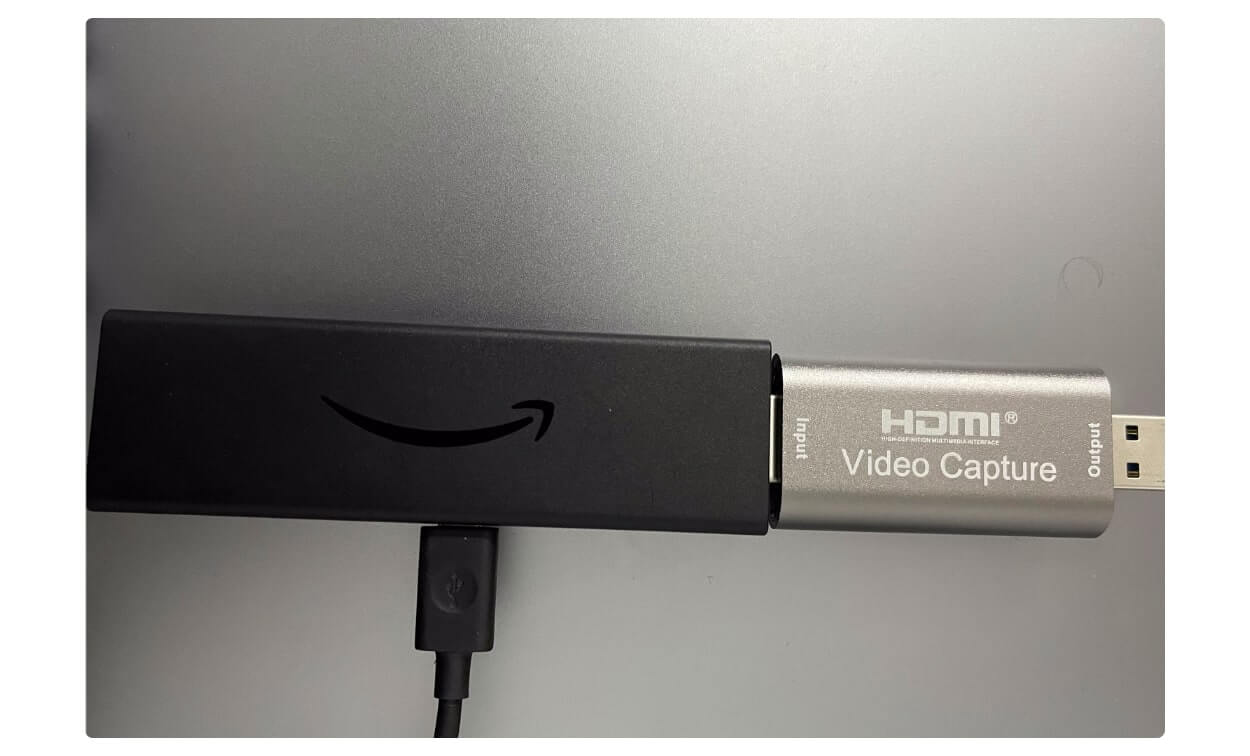
Now connect HDMI Video Capture to your Laptop and also connect USB to the Adapter or Laptop to power it up.

Once this process is done now simply Download and Install OBS software on your machine and launch it.
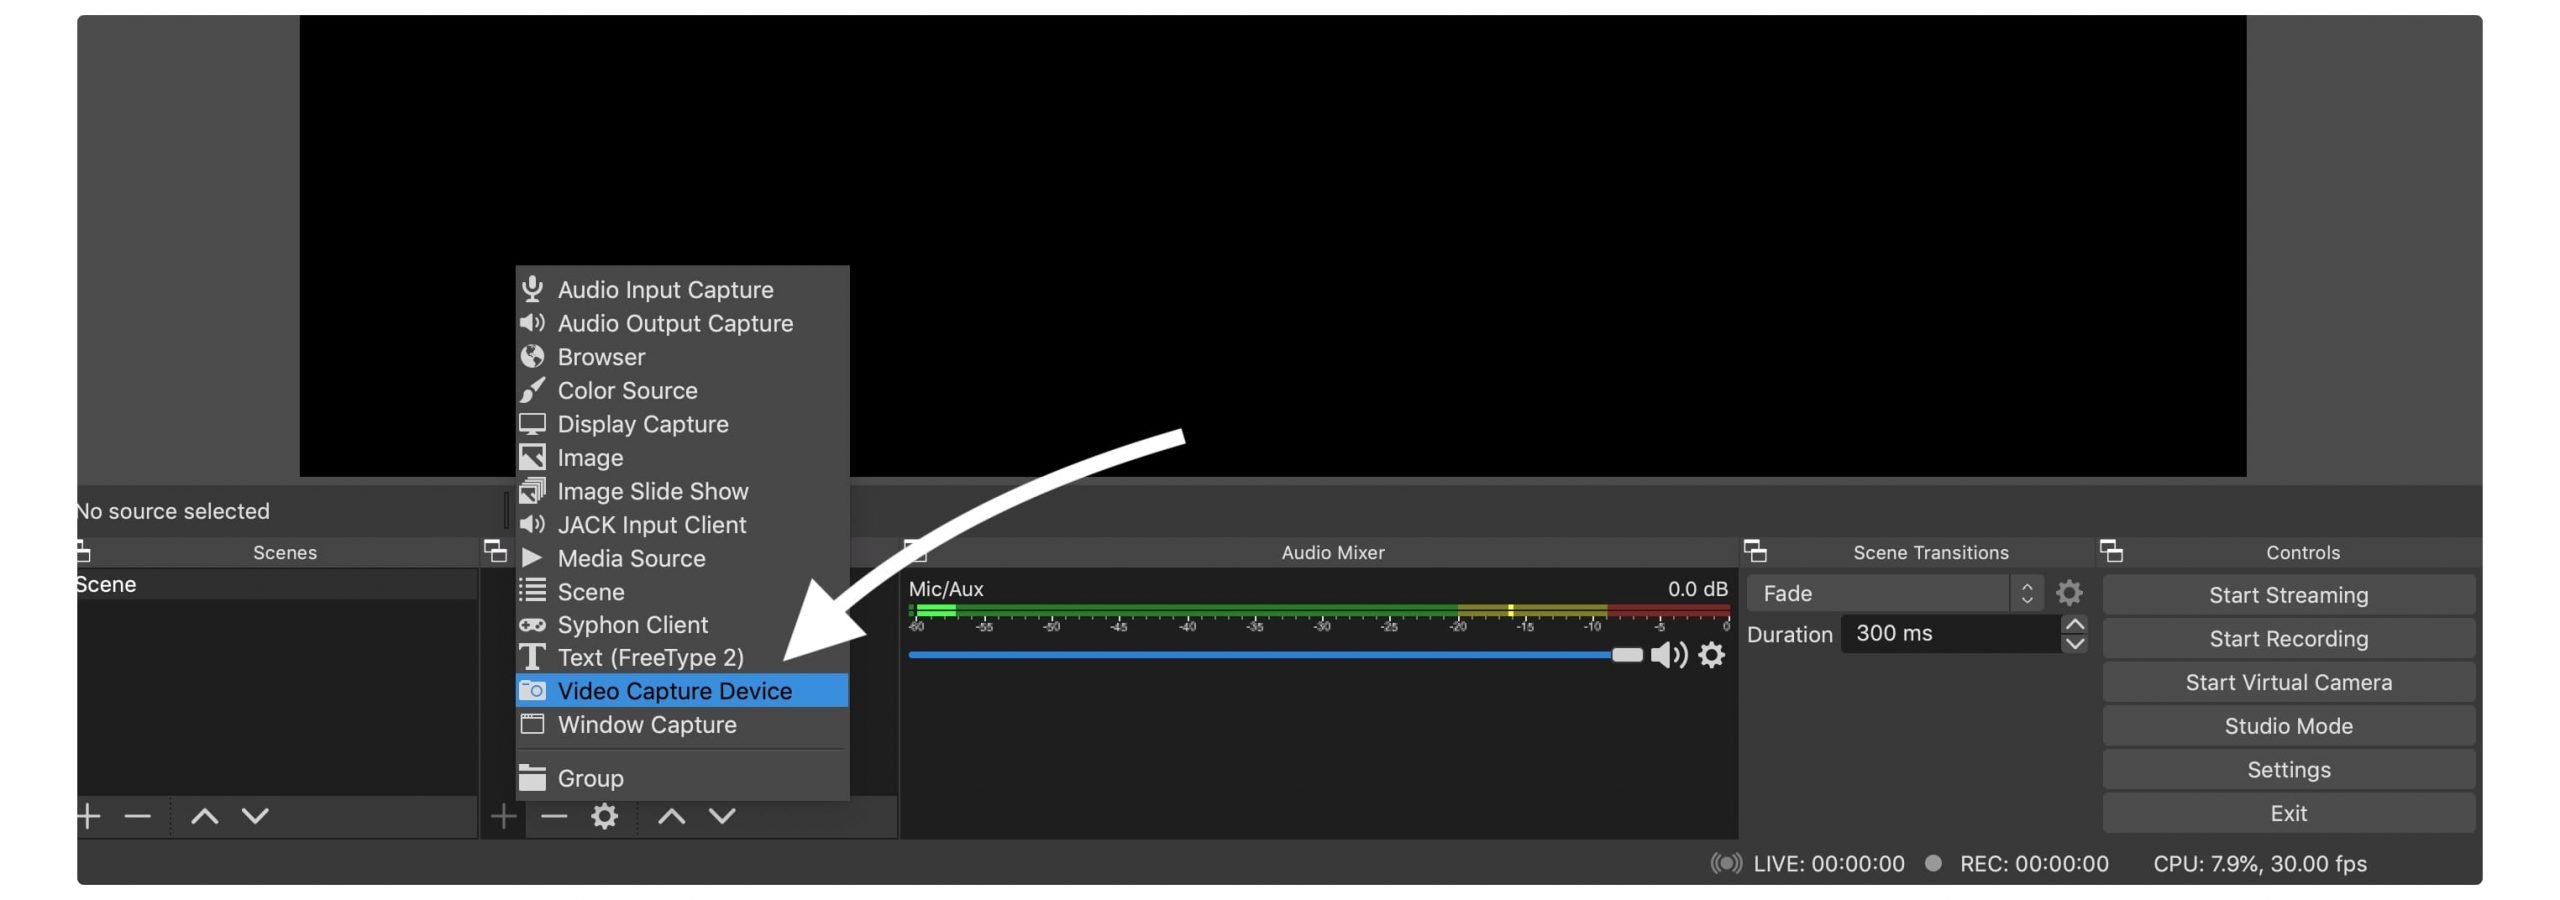
After launching you will be asked for several permissions just Set up on your own and when Home Screen appears to click on the Plus sign under Sources.
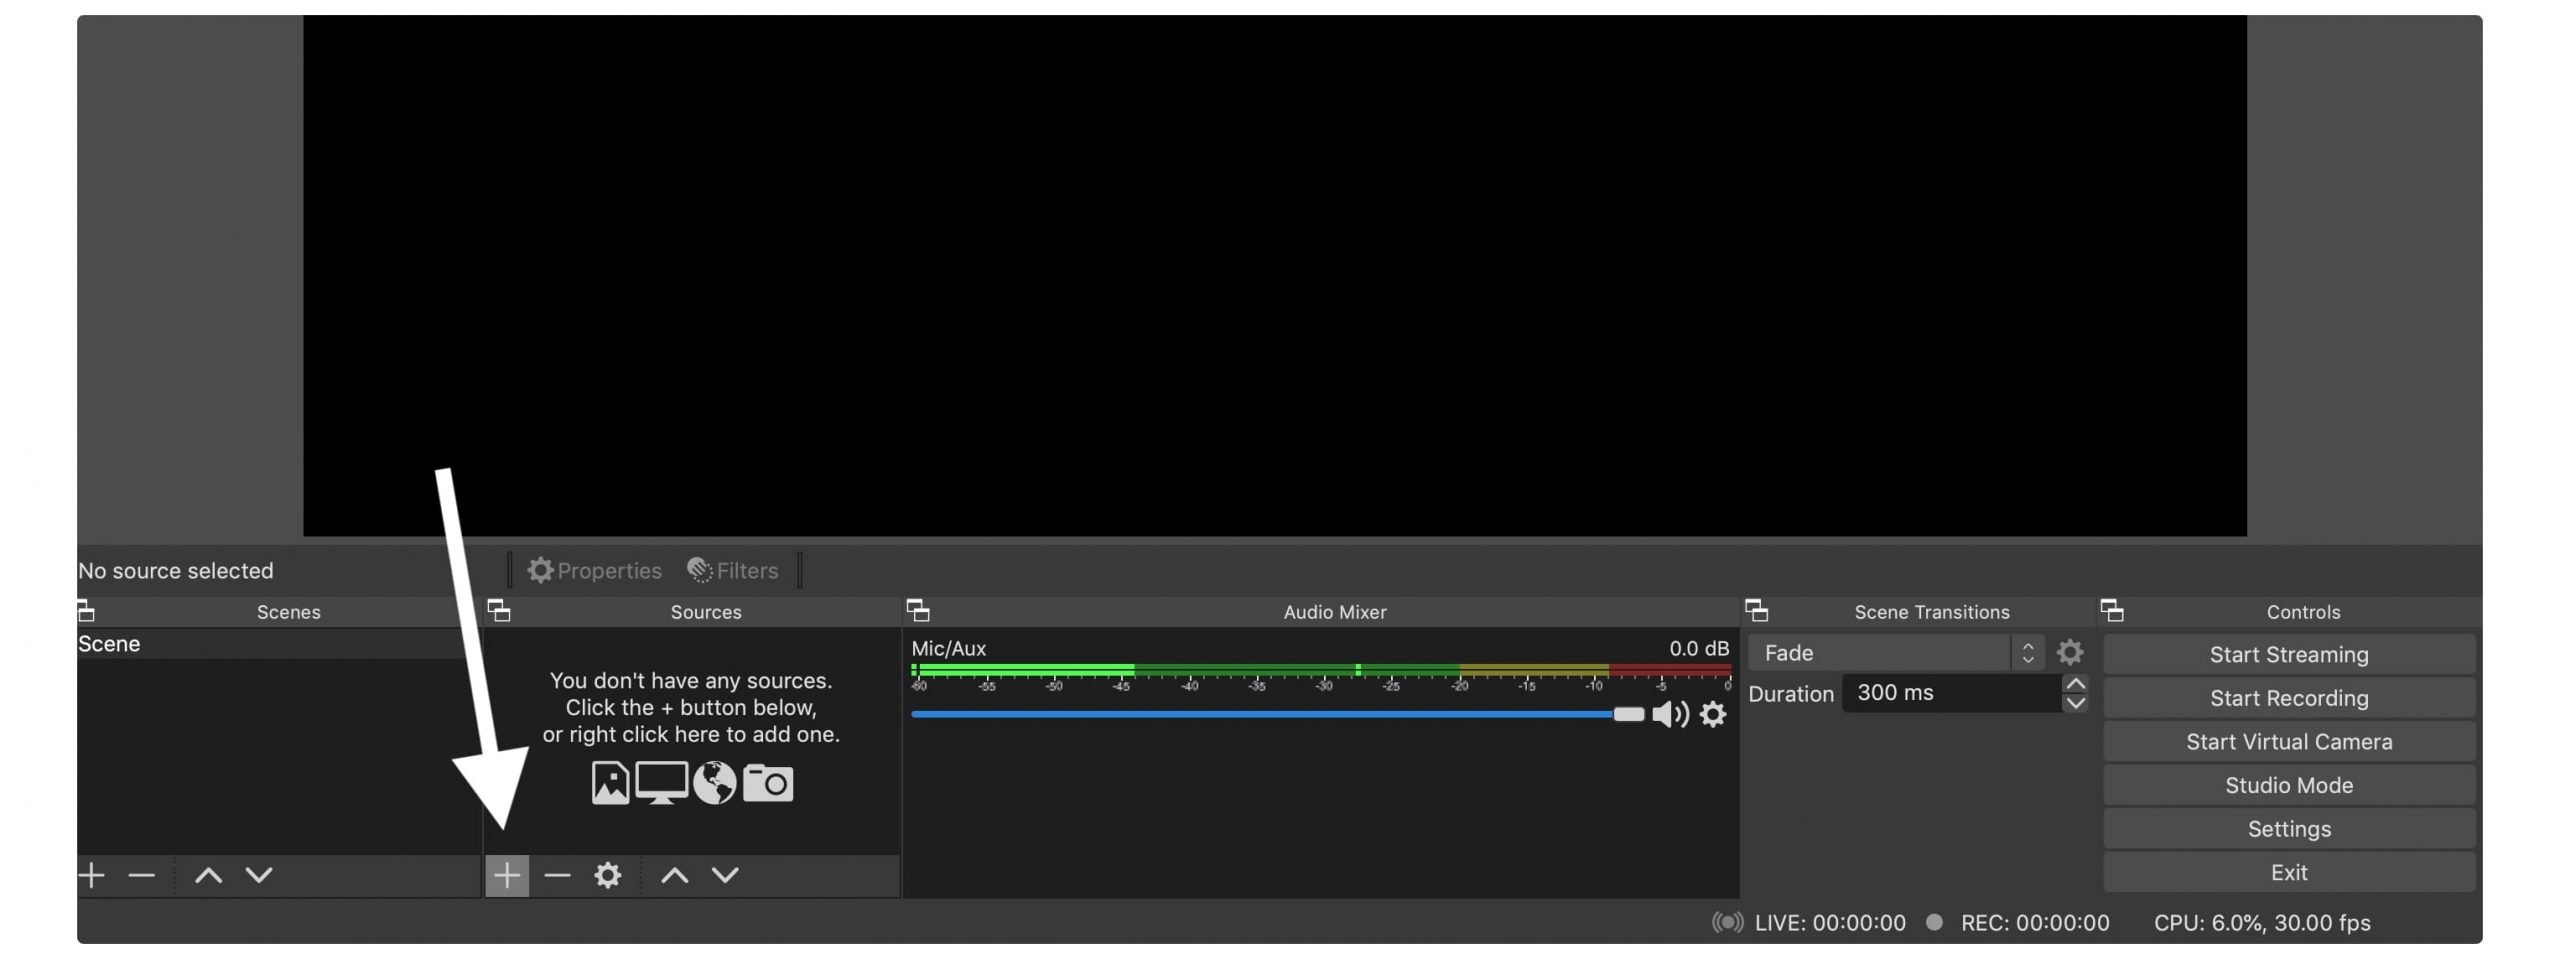
It will show various options available there just ignore them and click on the Video Capture Device.
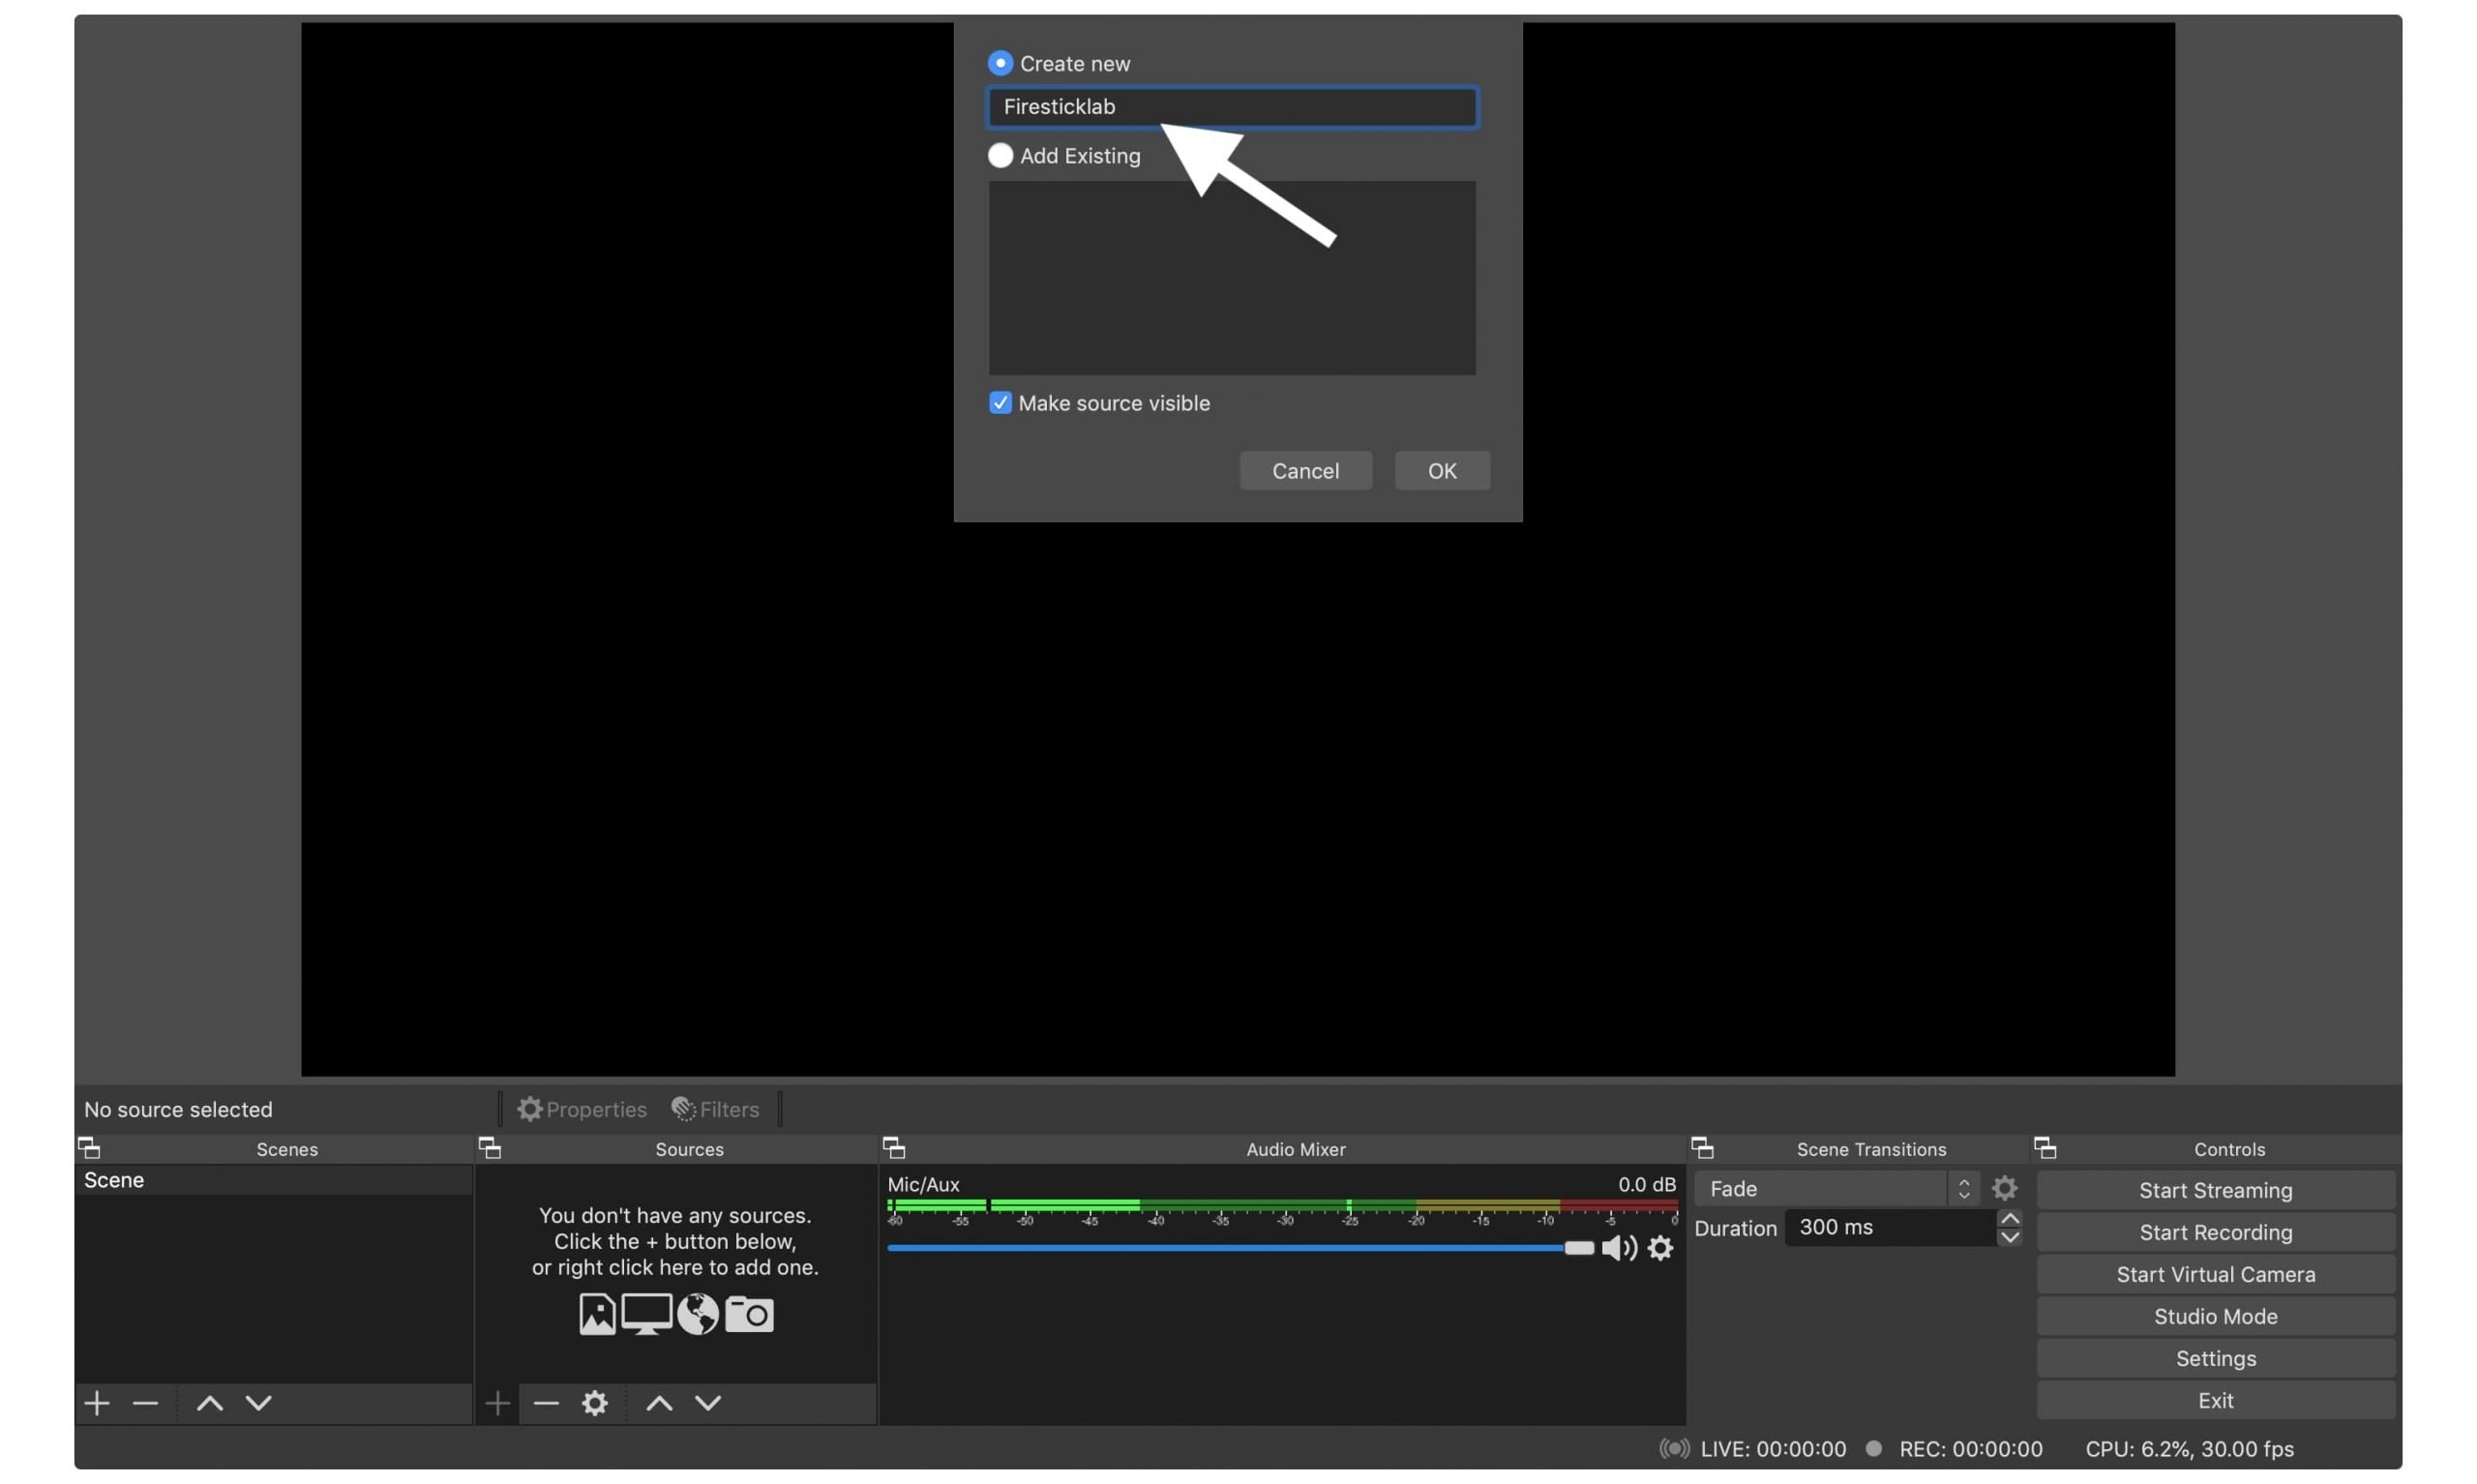
From the next screen, you will be asked to type the name of Source so type anything you want in my case it is Firesticklab and then selects Ok to save it.
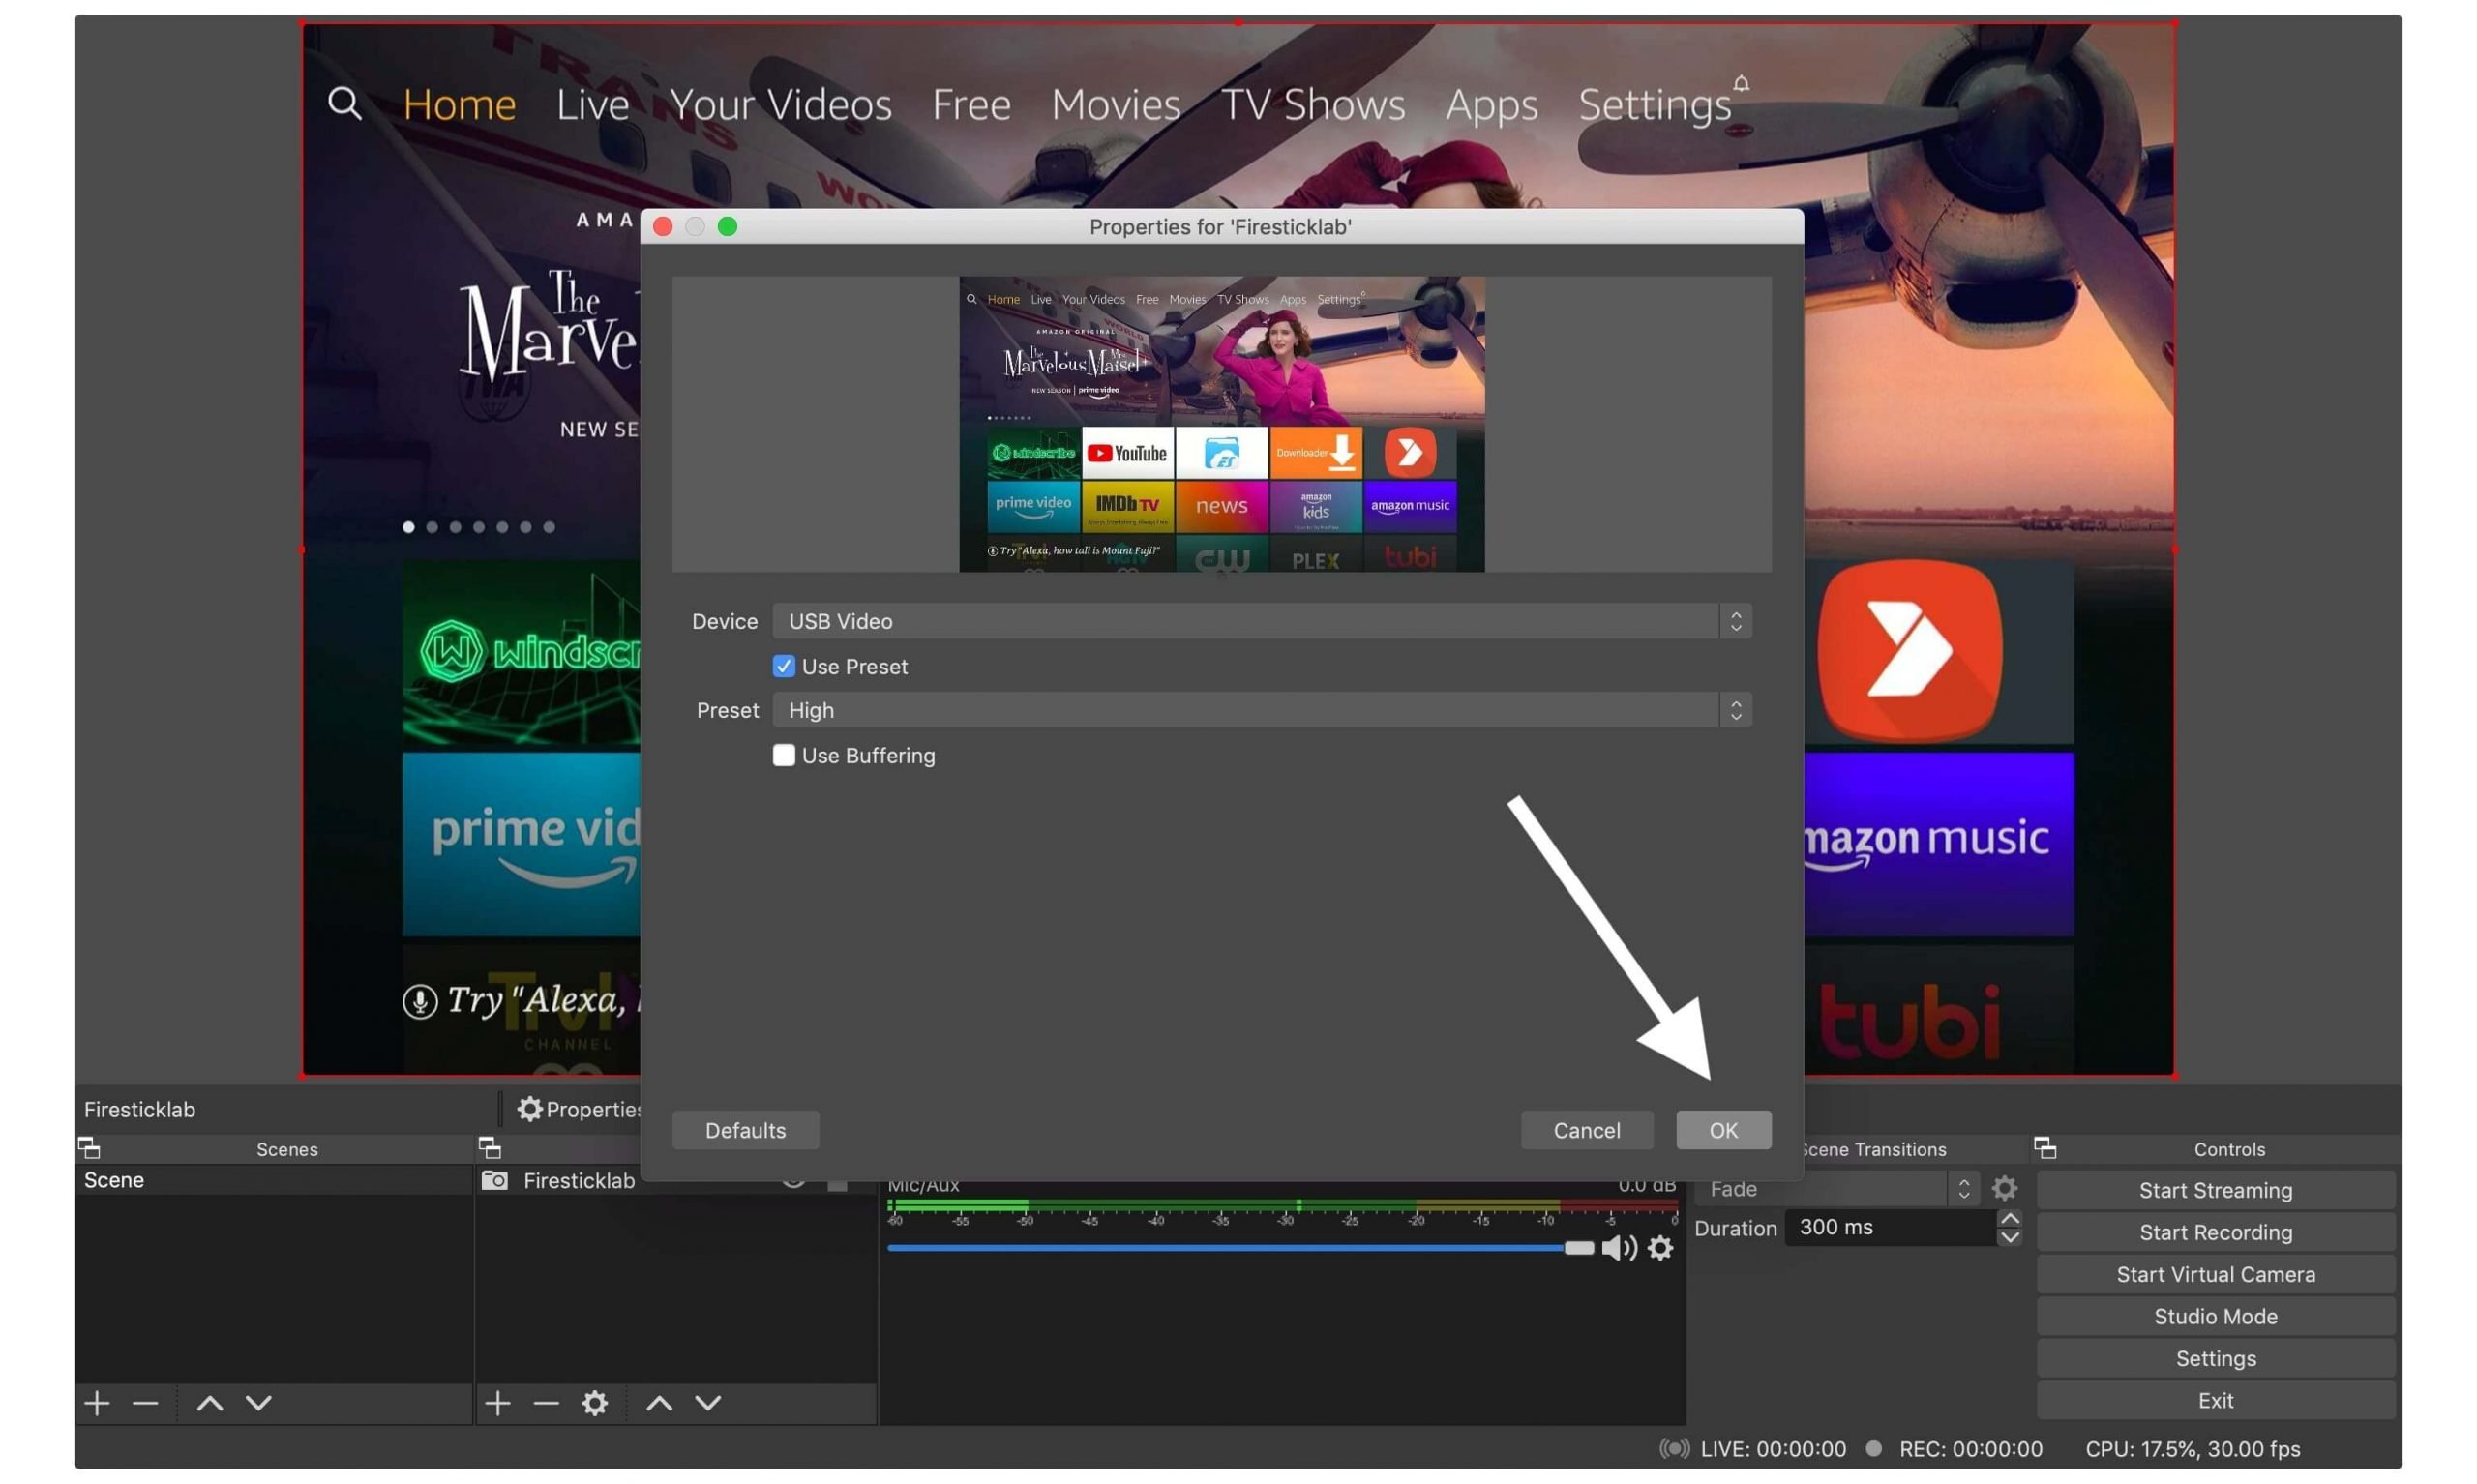
At this time you just need to click on the drop-down menu near Device and then select USB Video from there.

After this check the Use the Preset option located under the device and choose Preset as High and then click Ok to save it.
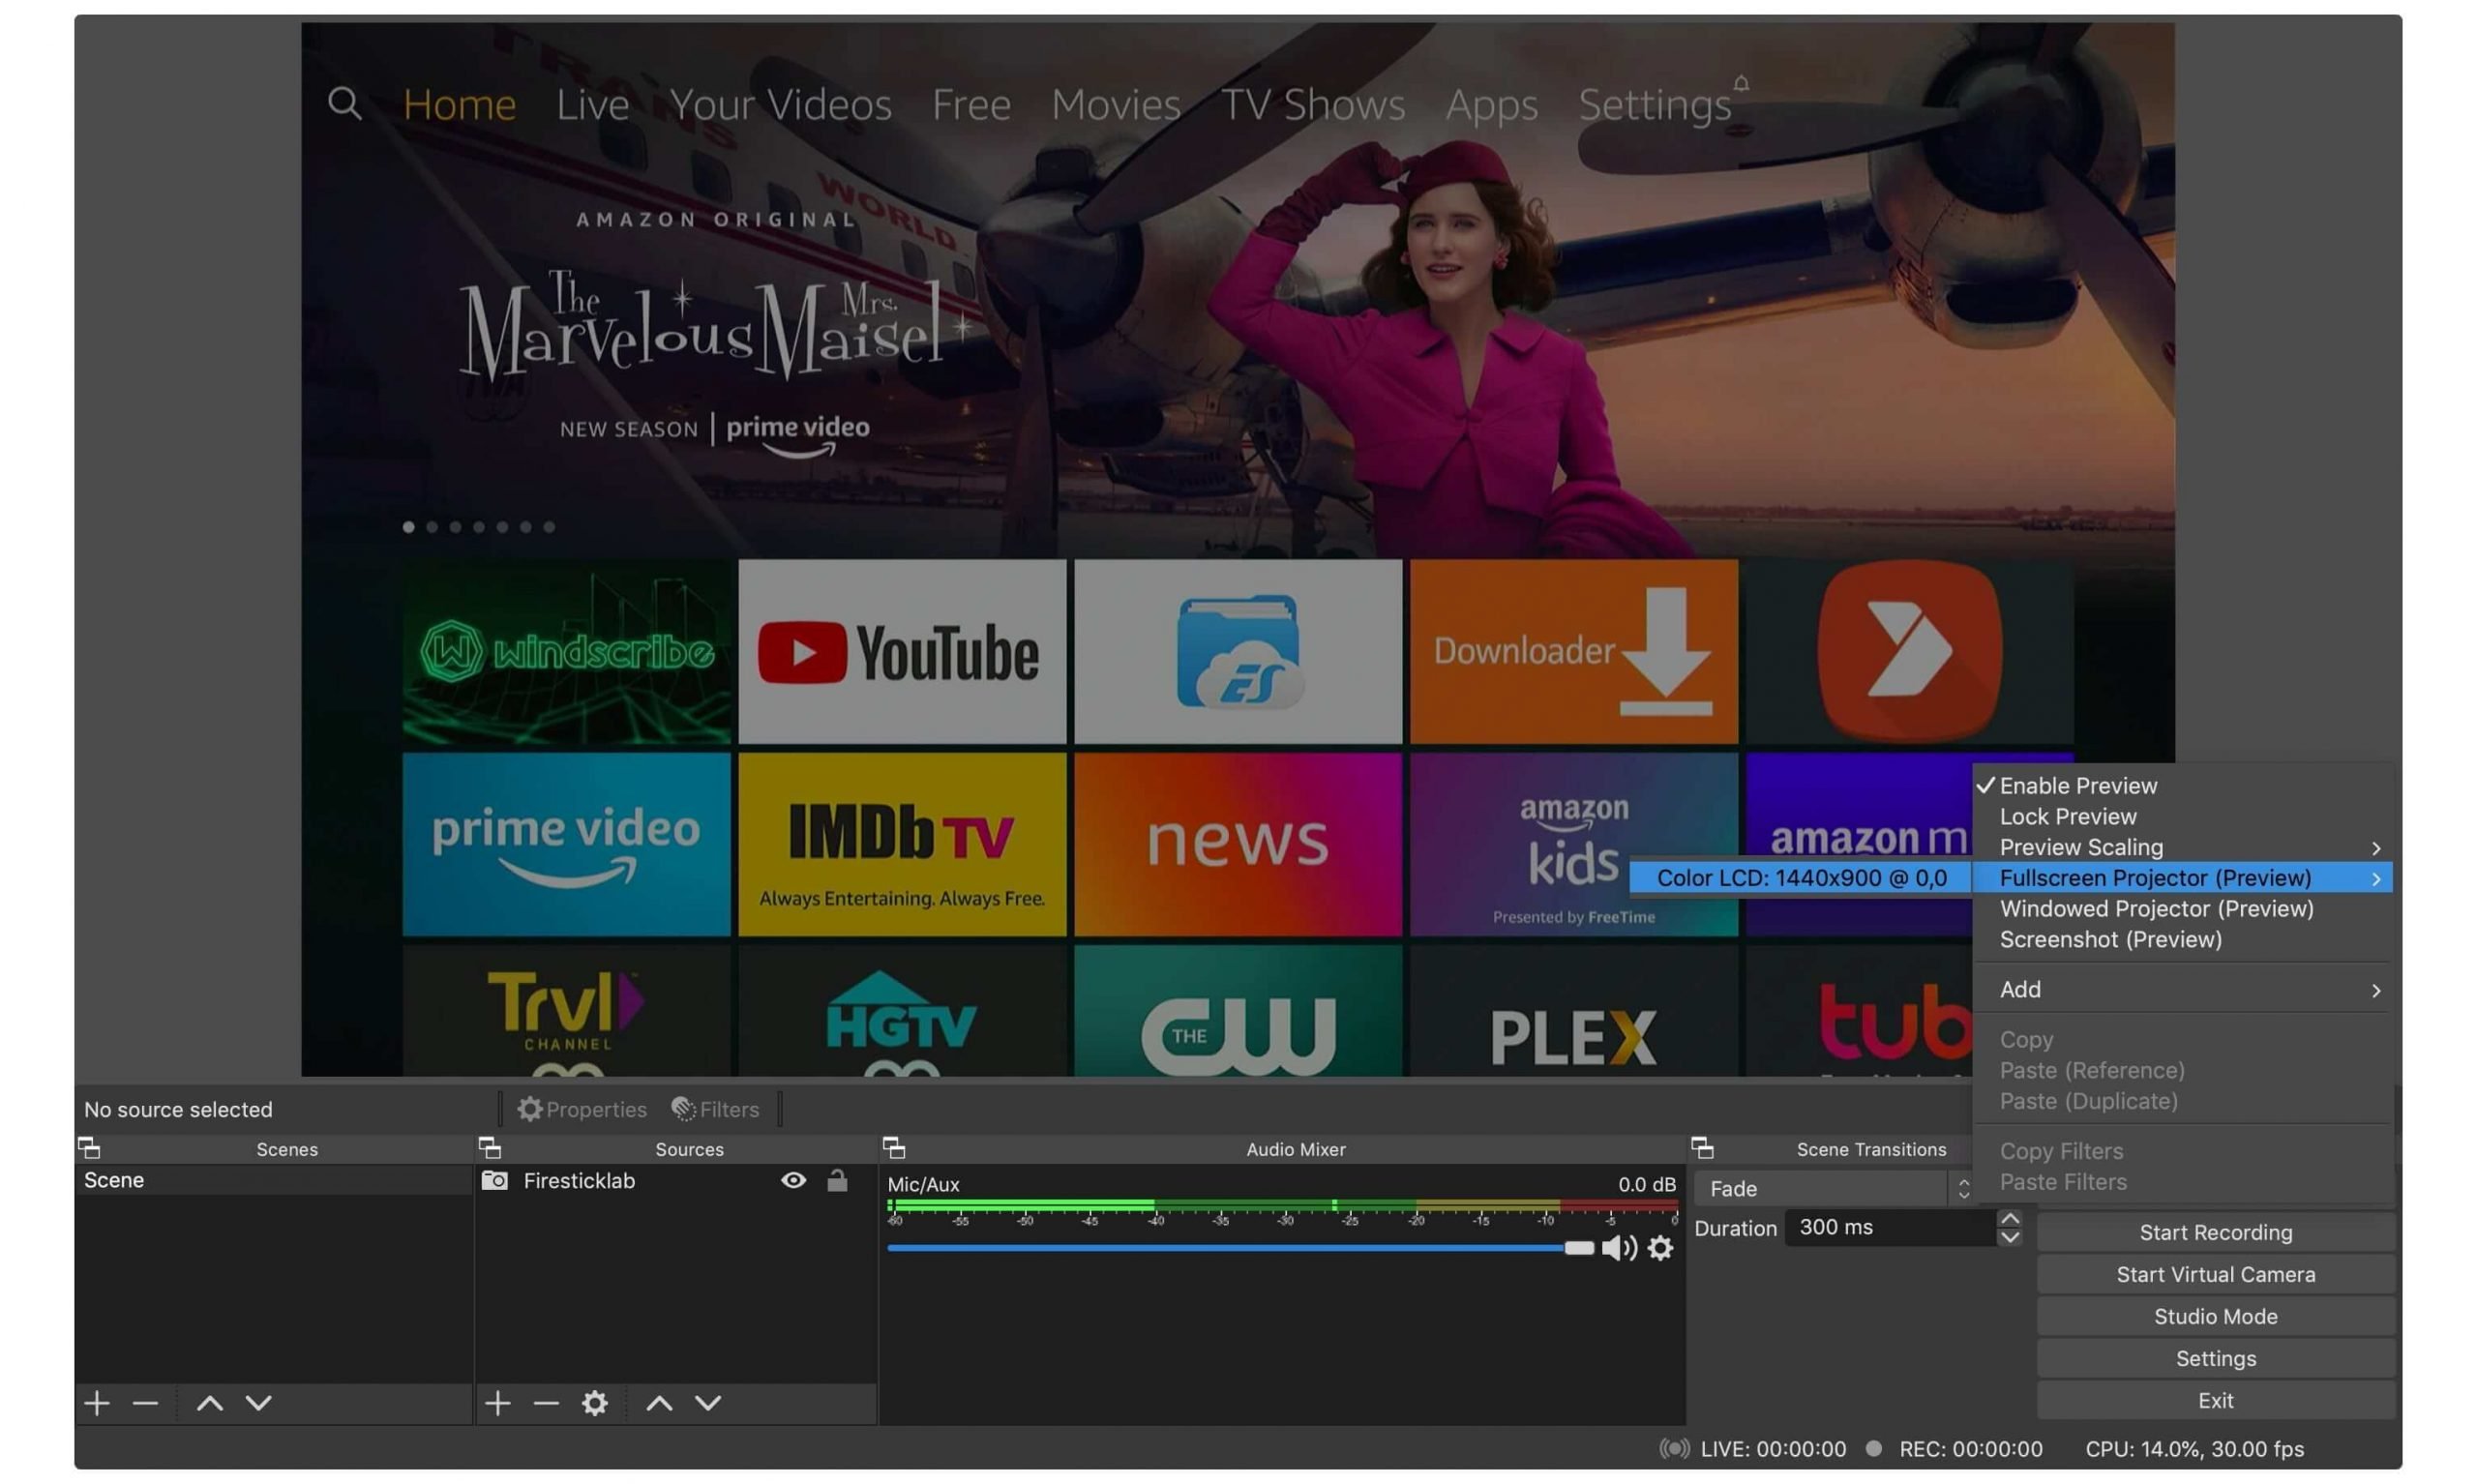
You will notice Firestick is showing on your laptop so to view it in Full-Screen right-click in the black area and go to Fullscreen Projector (Preview) > Select your LCD from there.

Now Fire TV Stick will appear in Full Screen and using a Remote you can control this and open any of Your Apps from there.
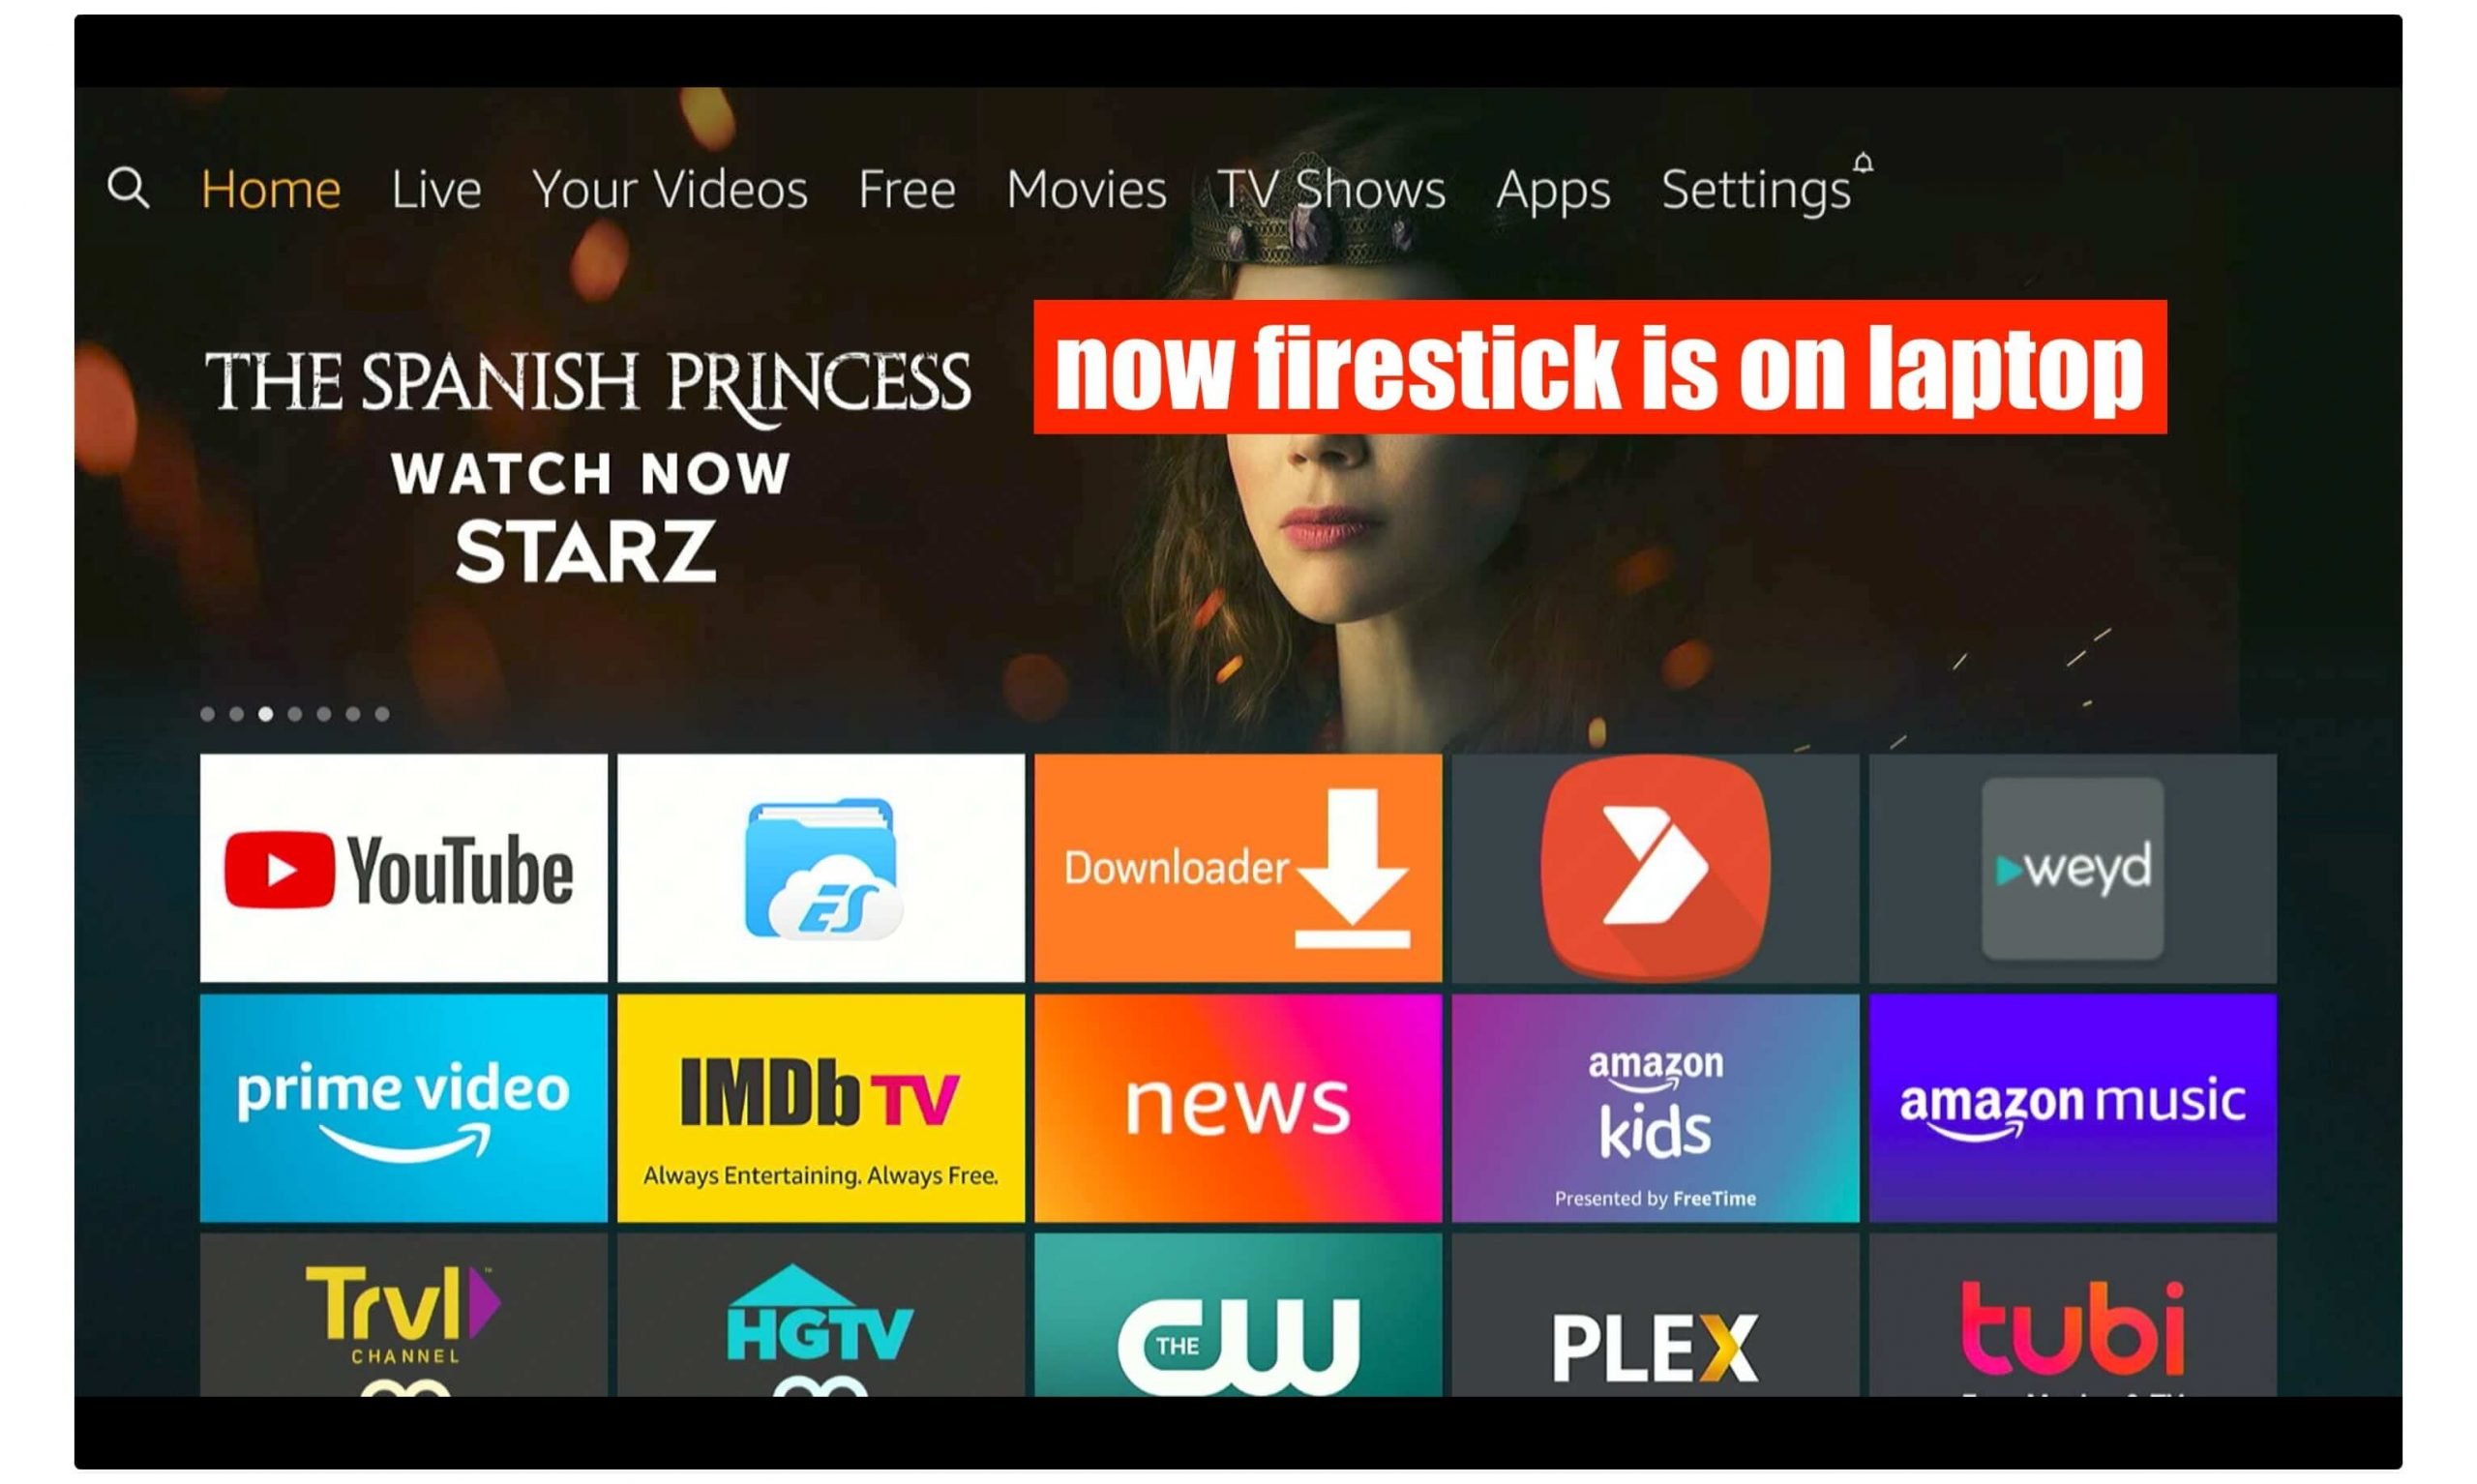
That’s it now using the above guide you can easily use Firestick on a laptop in under two minutes. By following this article you will be able to use it on macOS, Windows, and even on Linux. HDMI Video Capture is simply an awesome application that helps us to watch our favourite shows on the laptop even if we don’t have a TV.
Connect Firestick With laptop/Windows
In the above section, we learned how to use Firestick on Laptop or Computer but if you want to see FireTV Storage on your computer then you should check this article instead. It is an easy task where you can simply connect FireTV using an FTP server and then you will be able to access files from there.
This could be helpful for those who already have a TV but want to share their storage to copy or paste Downloaded Movies, Apps, Games, etc. To connect to the FTP server you will be required an app called ES File Explorer.
If you haven’t installed this app yet then you can follow this step-by-step guide: Install ES File Explorer On Firestick
After the app has been installed you need to follow the below steps to connect firestick with the laptop:
- Launch ES File Explorer on your device and then from the Home Screen scroll down and select View on PC.
- After this, you need to click on the Turn on the button and it shows the FTP server so stay on this screen.
- Now connect your Laptop (Windows) with the same WiFi network and then open My Computer.
- At this time type the FTP address into the address bar that you get in the above step and then press Enter.
- You will then notice some folders appears on your screen and these are the folders of Firestick storage.
The Firestick has been connected to the Laptop successfully and you can easily copy files from the laptop to fireTV instantly. This is the best way to share files between PC and you can also sideload 3rd-party apps by copying them on internal storage.
If you are facing a problem with any steps or want to learn steps properly then you should check this article: How To Transfer Firestick Files & Apps To Your PC
How To Use Macbook Screen on Amazon Firestick
This is another guide in which we don’t use Firestick on the laptop instead, we use a Macbook screen on a FireTV. However, if you are familiar with screen mirroring on FireTV then you already know how it works in windows as with the new version casting feature is available.
Although this process is completely different as compared to Windows because it doesn’t connect directly with the MacBook. Instead of this, we need to use an application called AirScreen that is used to cast MacOS to the TV.
AirScreen is already available on the Amazon App Store which’s why you can download it easily. Although if you don’t know how to do it then you should check this guide instead:
Once the AirScreen is installed now follow the steps that are given below:
From Home Screen go to Your Apps & Channels and then select See All. It will then show the list of all installed apps so from here move down and launch AirScreen.
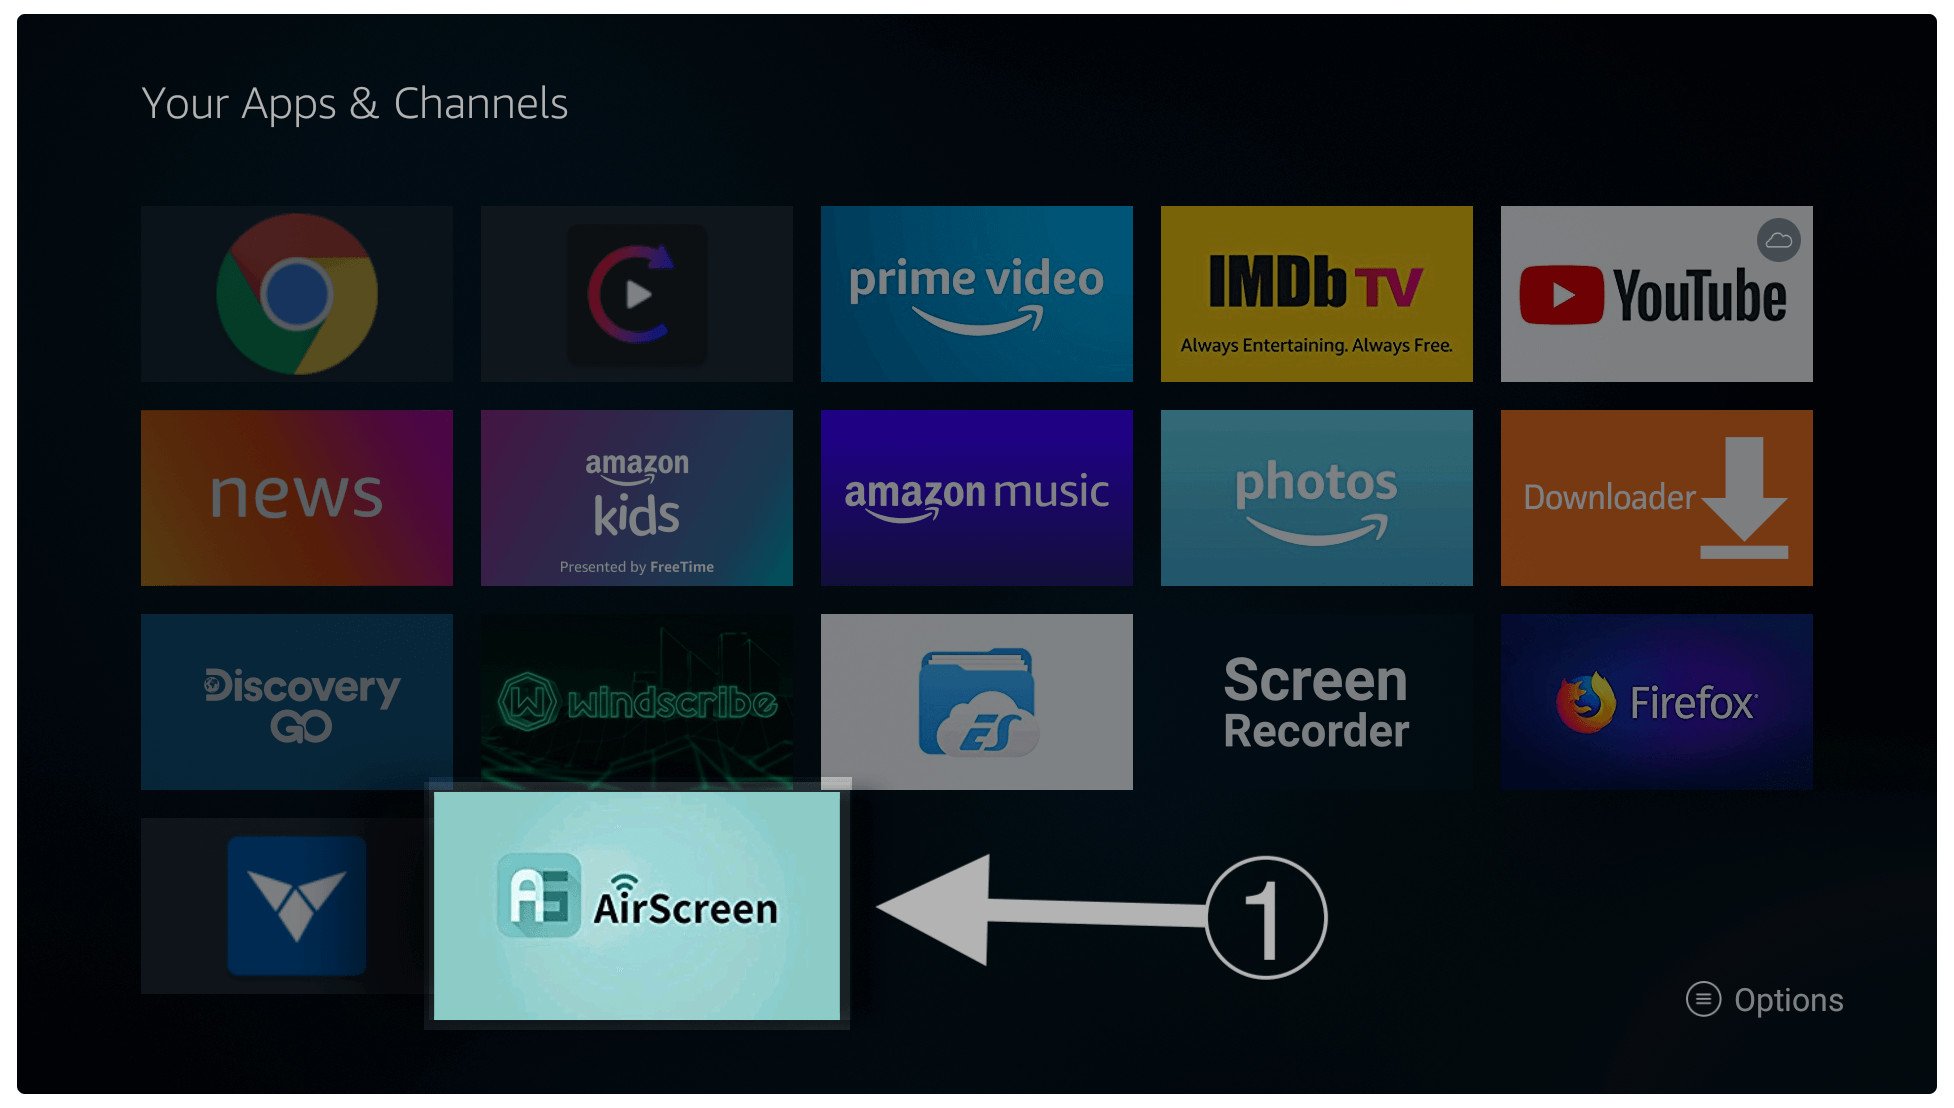
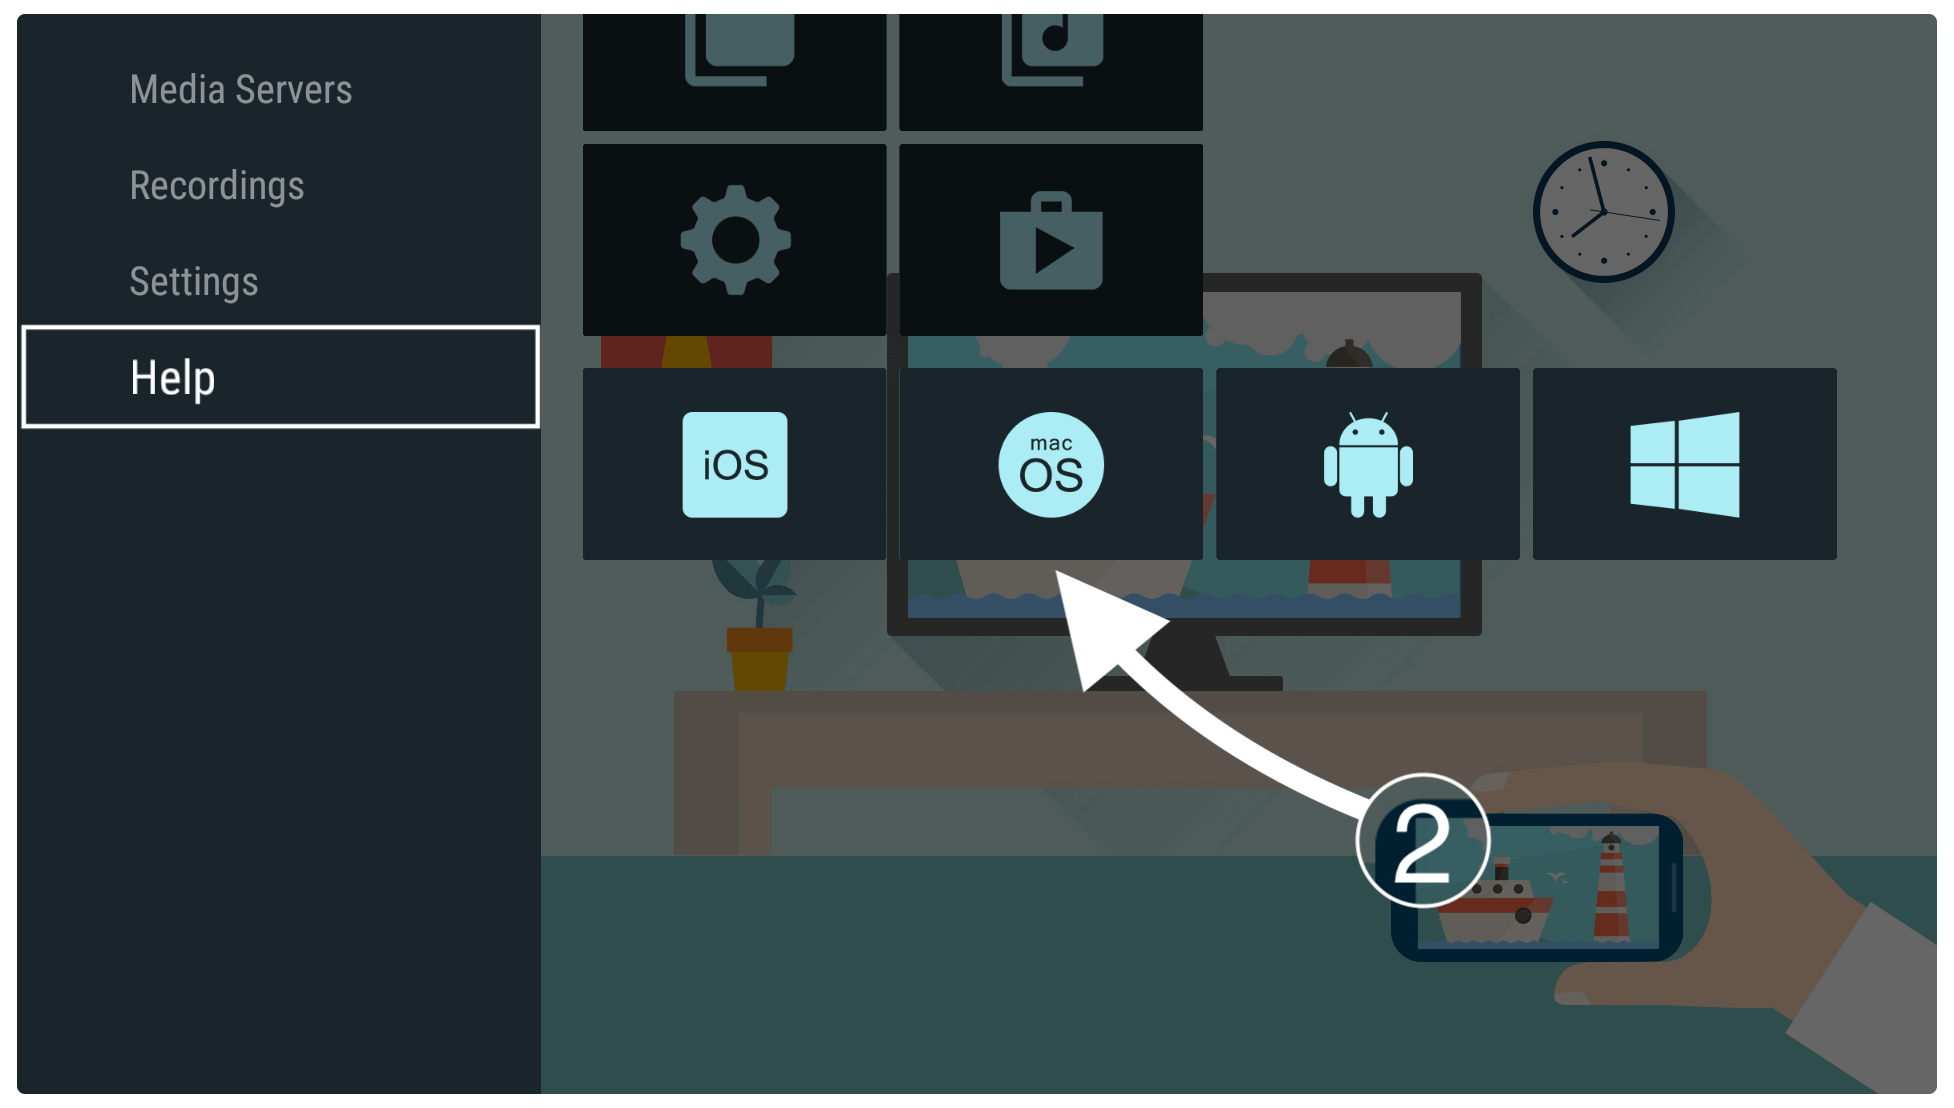
Once the app is launched now click on the Help from the left panel and then from the right side select MacOS.
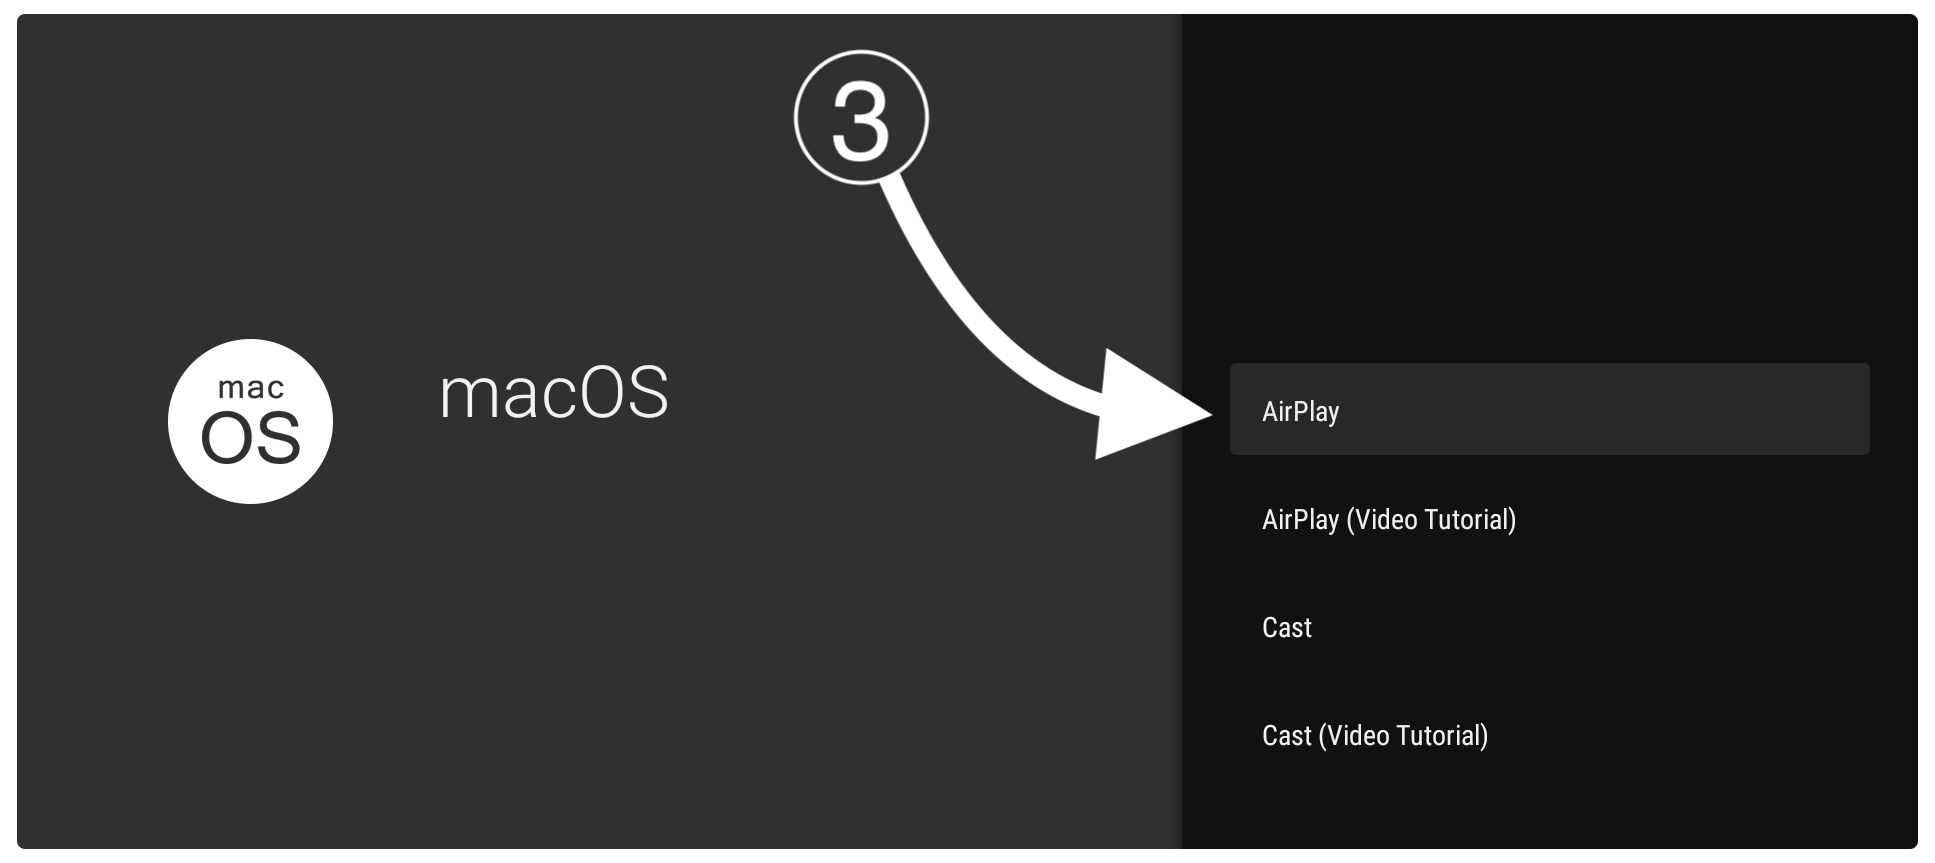
After this, a new window appears then simply select AirPlay from the list.
You will then see the name of your device on TV just remember it and from Macbook click on Control Center and then select Screen Mirroring. (for Big Sur)
Or just wait for a while until the AirPlay icon appears at the top menu (for Catalina or older).
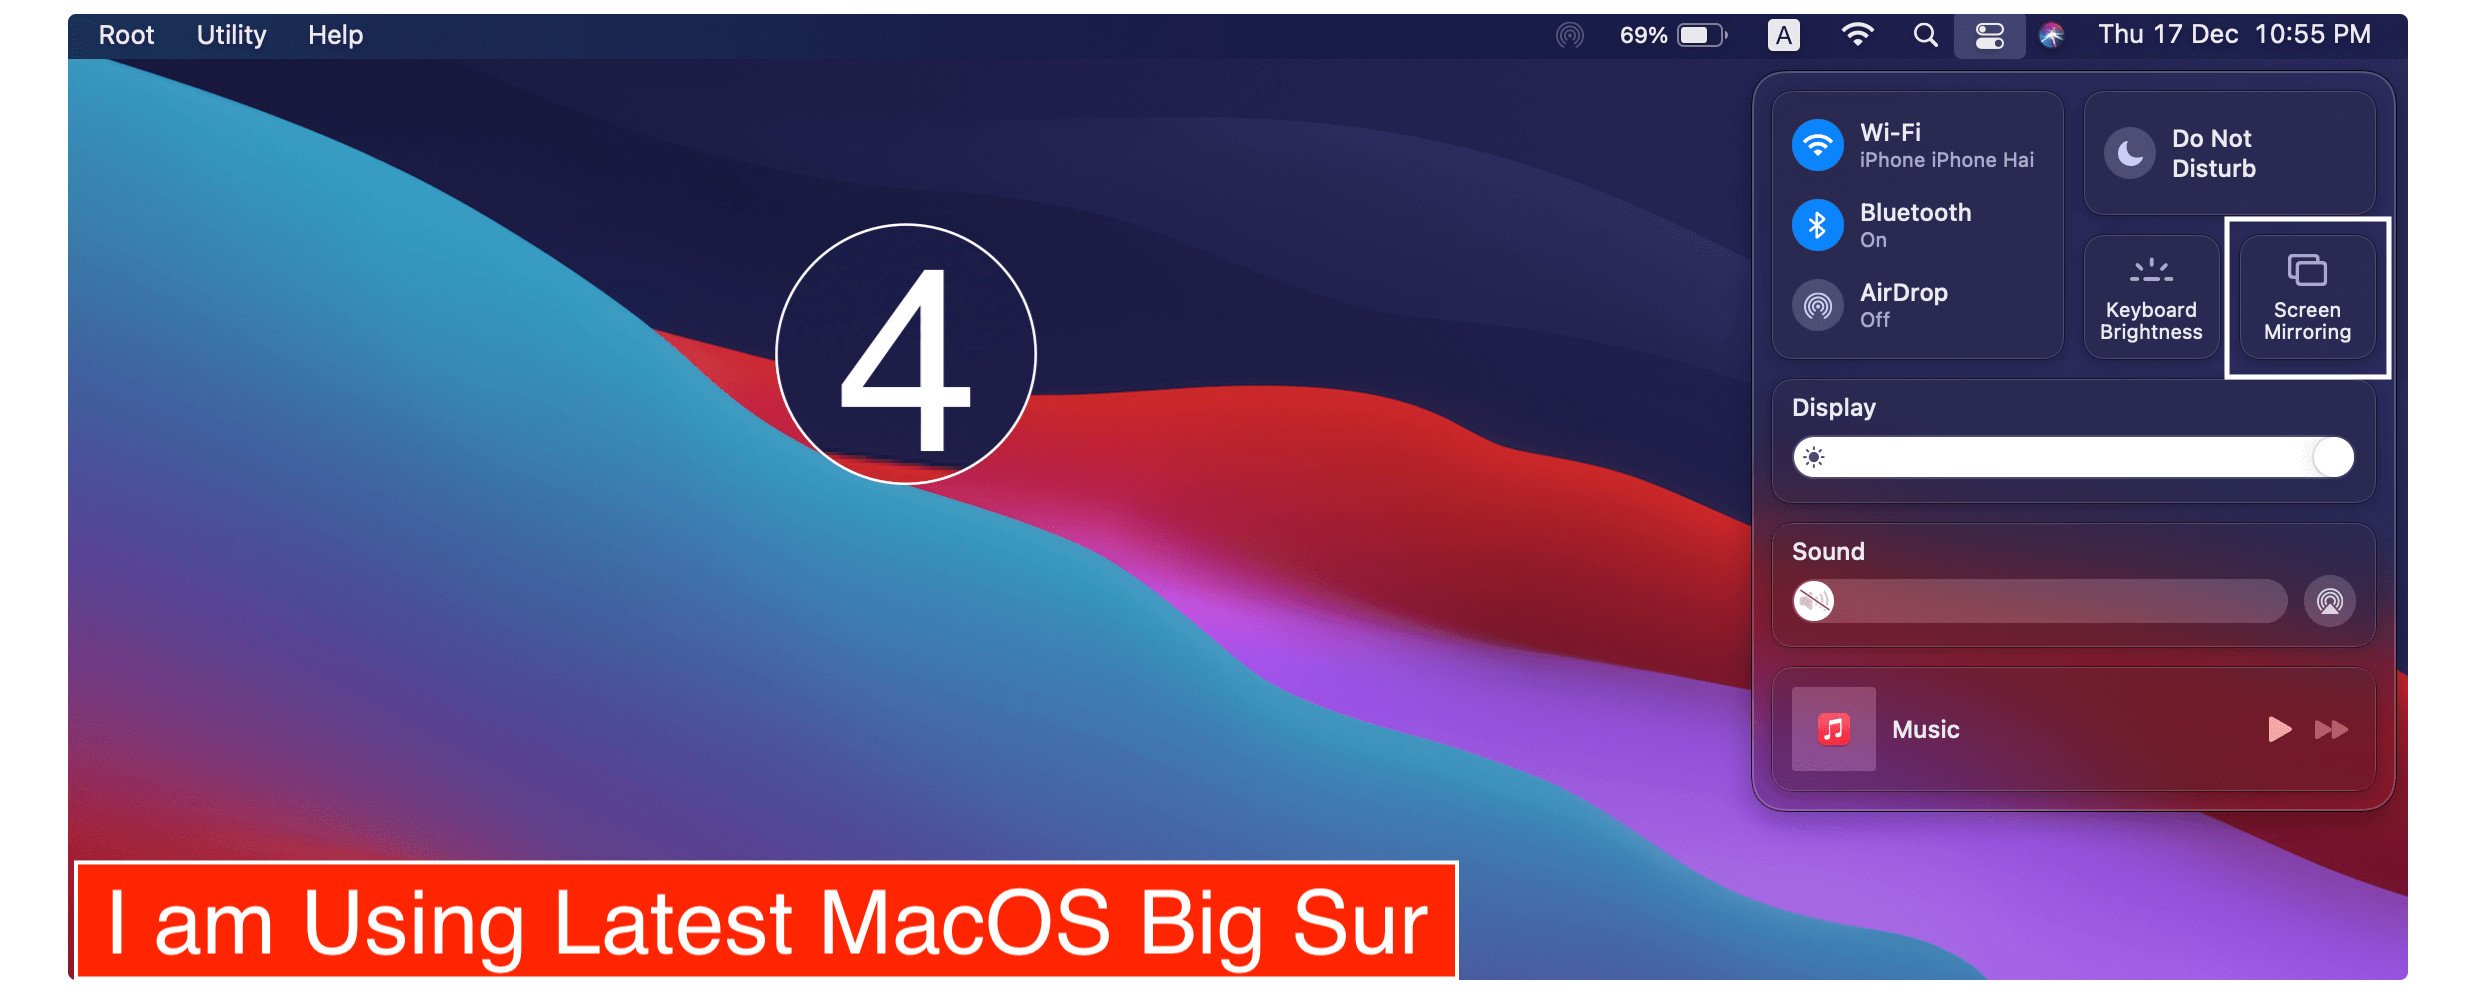
From here under Screen Mirroring click on the name as shown on your TV.
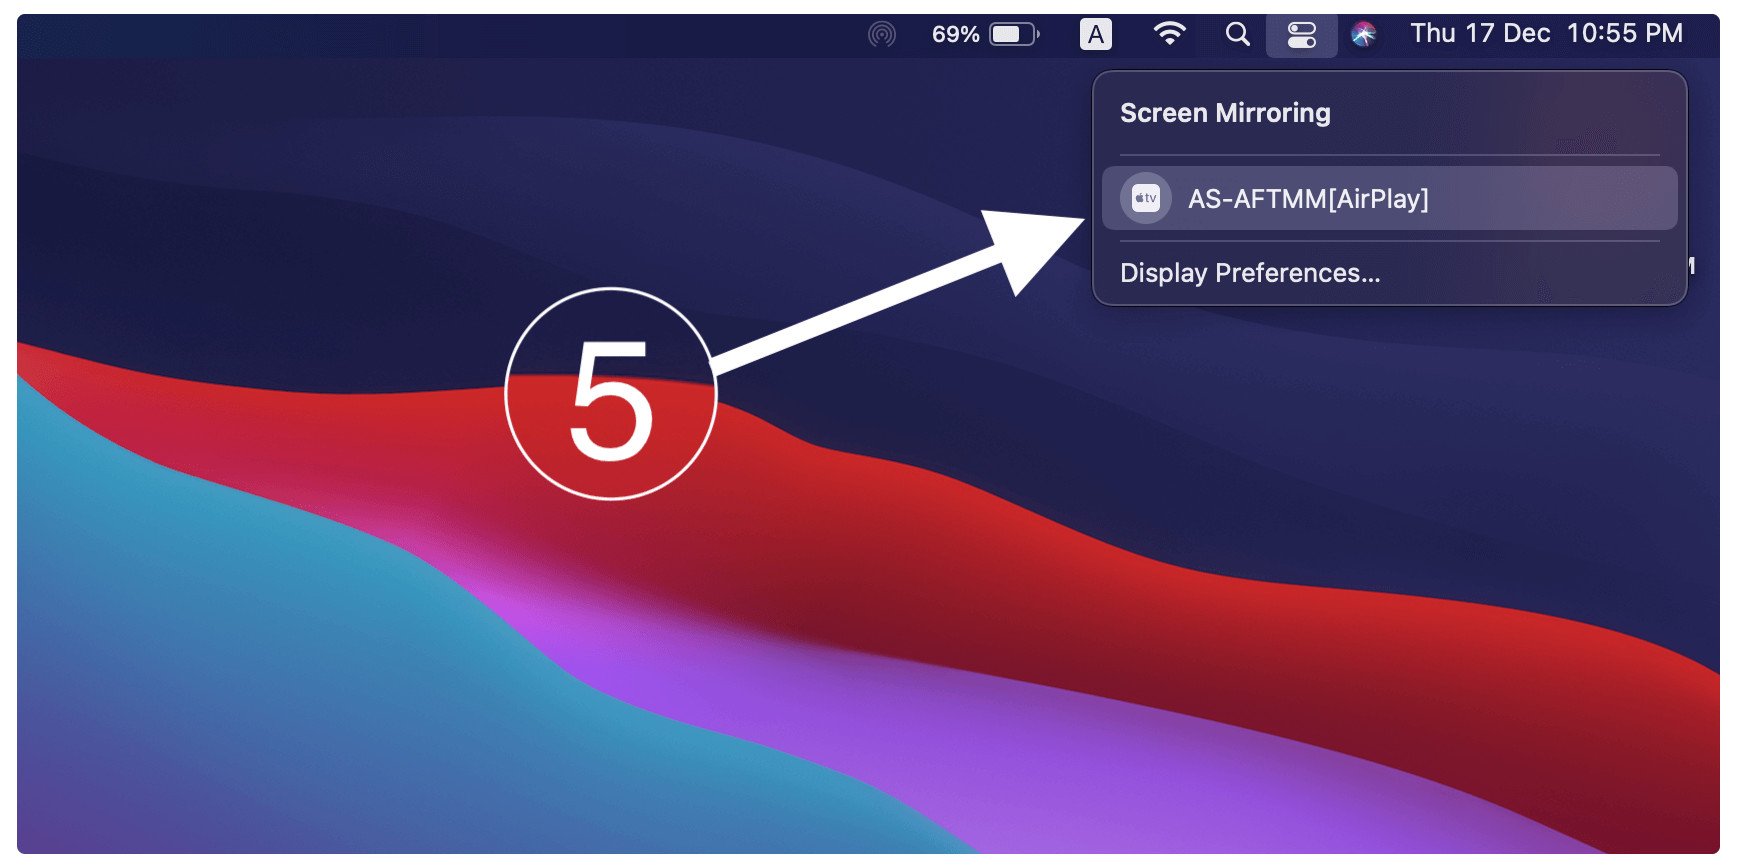
Once you click on the name of your TV within a few seconds Macbook Screen will be available there.
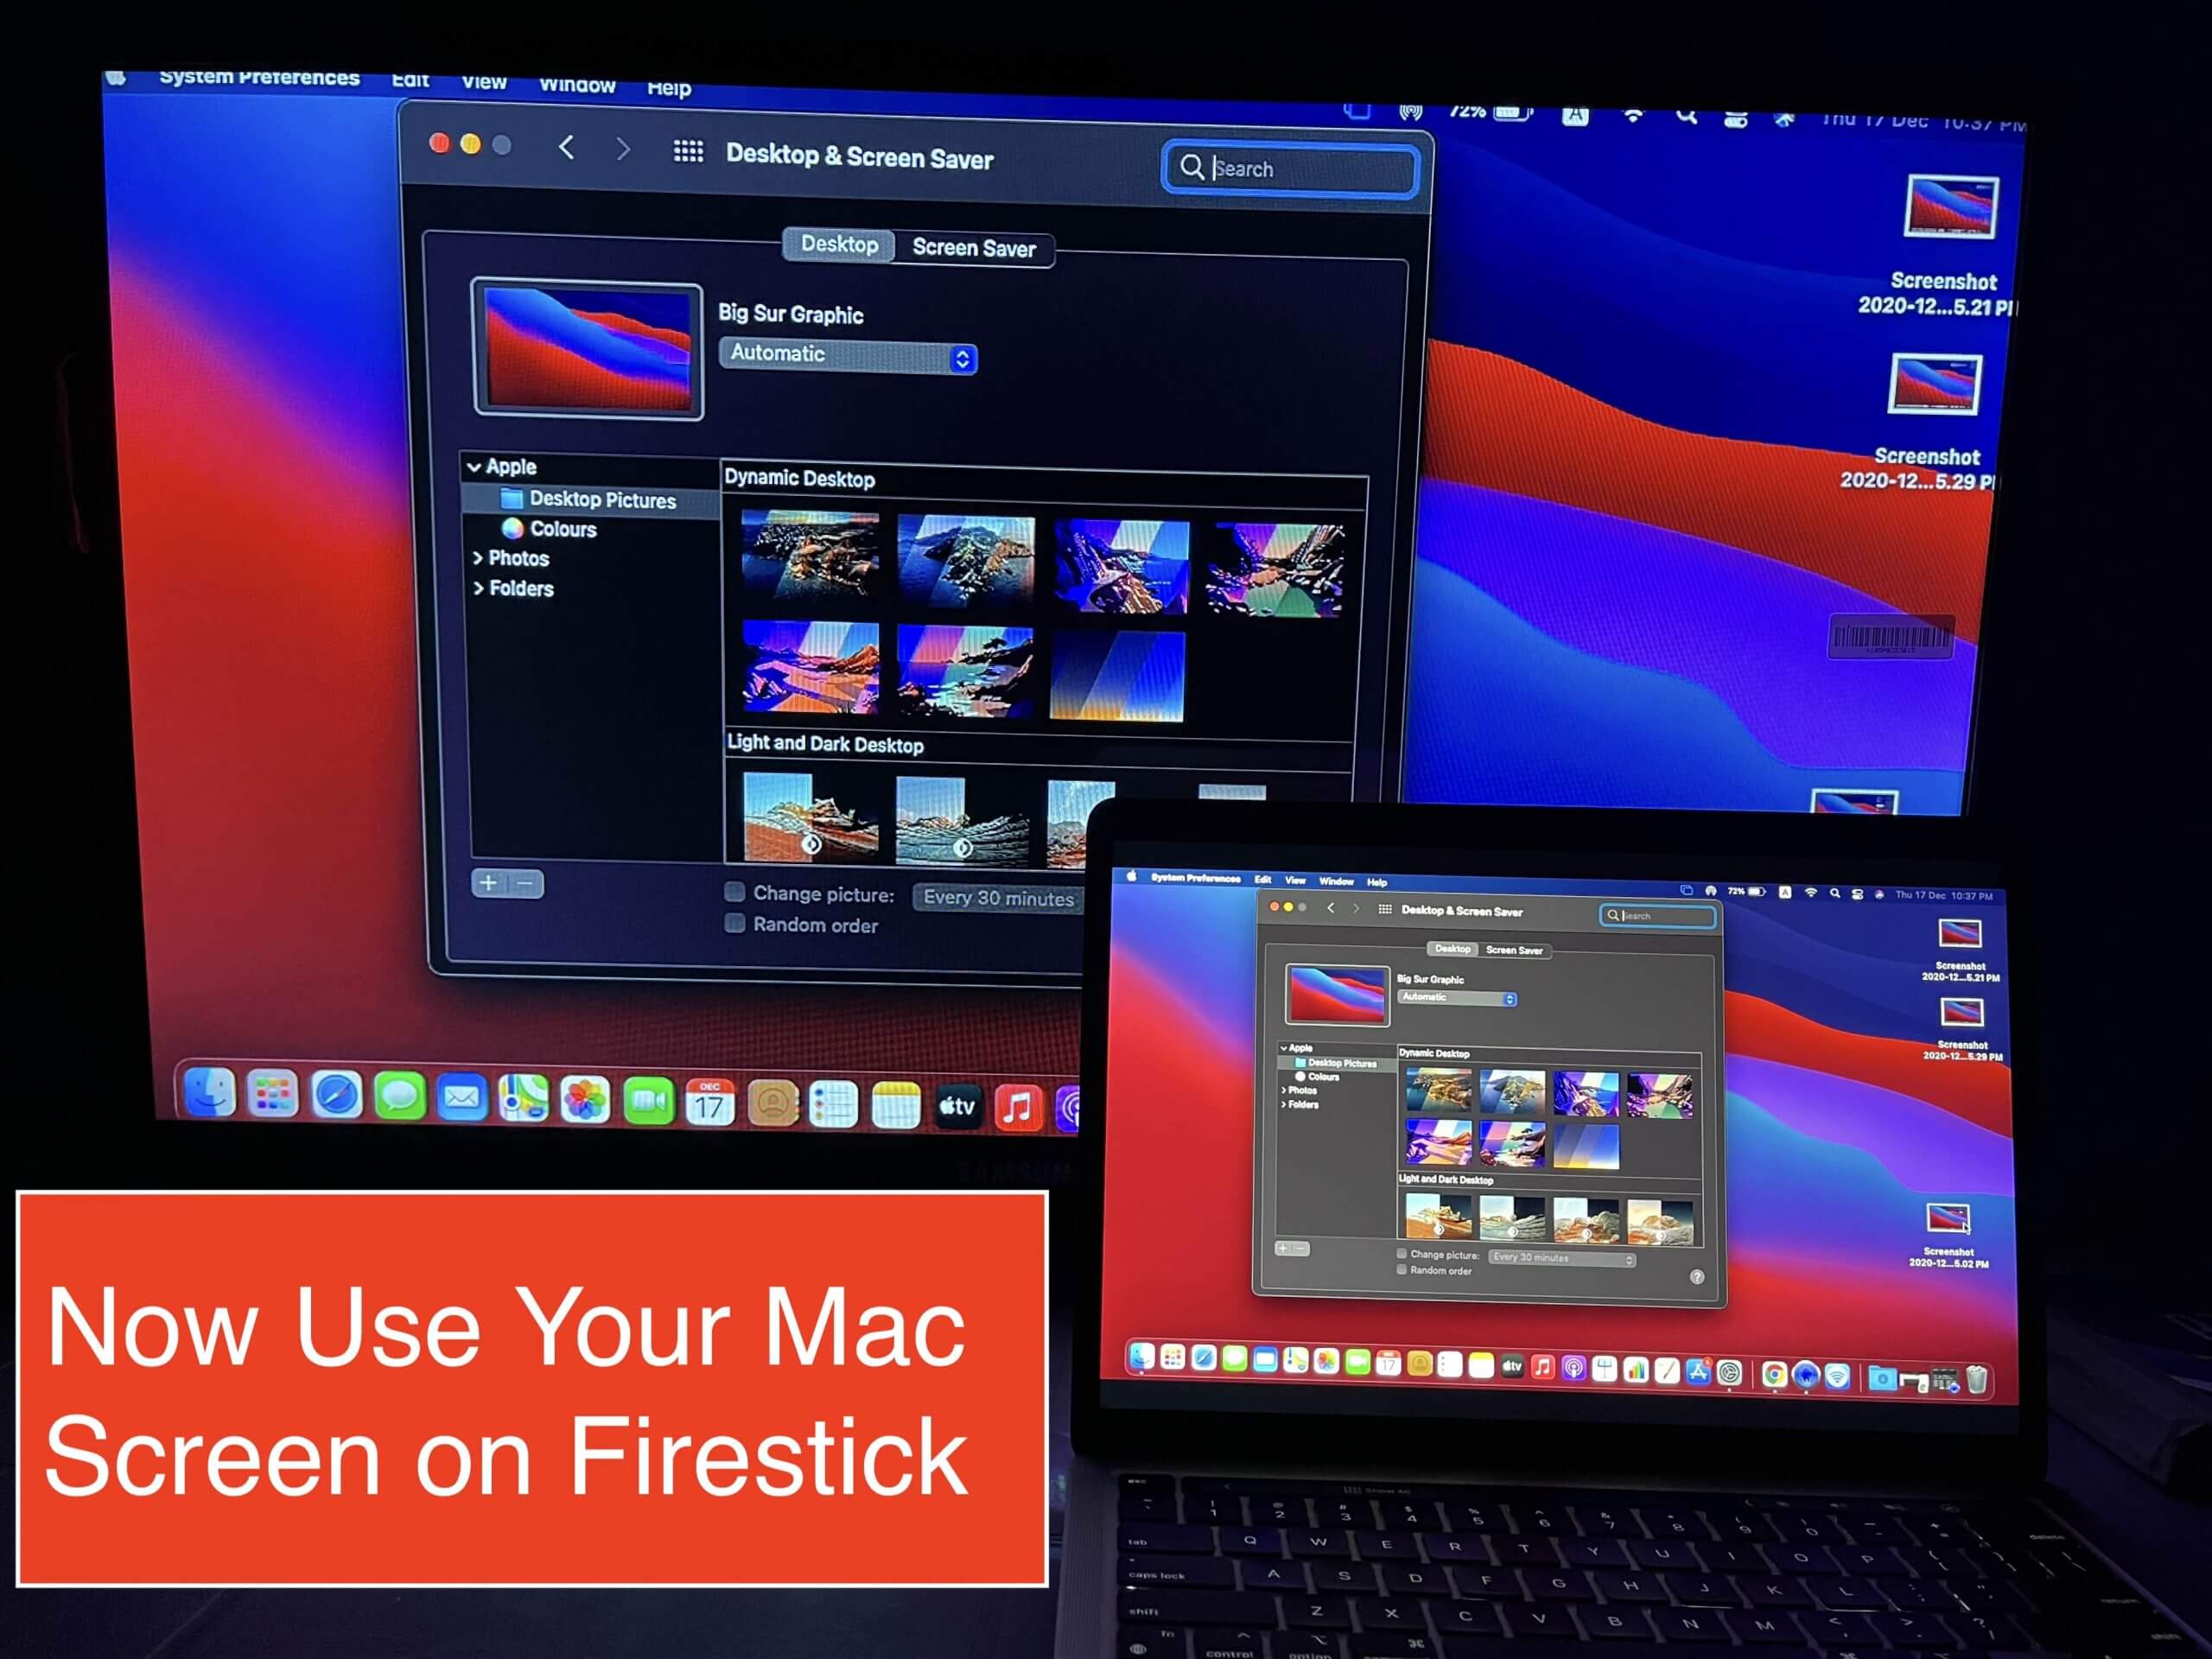
That’s it by following the above steps you will be able to share a MacBook screen with Firestick and watch most of your content on a bigger screen.
The steps are quite simple and easy to use but if you don’t understand then make sure to check the screenshot attached to each step.
Other than this if you are facing any issue while connecting then make sure you are using the same WiFi network on both (TV and Macbook). As it requires both devices to be on the same network that’s why check this out before proceeding to the guide.
Conclusion
No doubt FireTV Stick is the best device to use on a TV but since most of you wanted to learn how to use Firestick on Laptop that’s why I shared some possible ways above. I hope by following the above methods you will be able to connect your device to Laptop or MacBook.
However my favourite method is to use the HDMI Video Capture as this device is handy and can be used for different occasions like Streaming, Recording using a DSLR as a webcam, and so on. If you have skipped that section then goes above and make sure to read the whole section again.
Furthermore, you can easily connect your FireTV storage to a computer or laptop by creating an FTP server using ES File Explorer. Other than this you can share Macbook or Laptop screen on FireTV by using its own Screen Mirroring or through a 3rd-party application.
At last, I would like to say if you find this article helpful in any way or help you to connect your device to the laptop then make sure to share it with others. Also, don’t forget to share your experience here about which method works for you. It will help others to understand that this guide is worth reading and also you can share your precious suggestions in the comment section below.

