Last Updated on 7 months by Amelia Johansson
Are you searching on the internet for a tutorial to install BeeTV on Firestick but can’t find any helpful guide? If so then here is the complete instructions guide where we will talk about how to download BeeTV on our Fire TV device. To learn the whole process I would simply suggest keep reading this article until the end.
It is because there are several things that I will tell you during this process that will be useful for you. Other than this we also learn how to use this application. It is quite simple to use but yet many people don’t know much about 3rd-party apps as if you are already familiar with these apps then you surely know how these apps work.
Although few people have reported that BeeTV is not working for them that’s why we will also learn the fix for this. However, this article will be useful for various devices like Fire Stick 4k, Fire TV Stick 2nd, 3rd Generation, FireTV Cube, and even on lite. If you have any other device then you should probably check out another guide instead.
Is BeeTV APK Legal?
Before we move towards the installation section there is a most asked question throughout the internet that is, Is BeeTV legal? The answer is simple yes, BeeTV is completely legal to use because it doesn’t offer anything on its own. Instead, it works like a Google that searches for links from different websites throughout the internet and provides them in one place.
But the problem with this app is the link that it provides might be illegal as we don’t know the source. In this way streaming from such links could be illegal as you may end up streaming copyrighted or pirated content. This is the reason why BeeTV is not available on the Amazon App Store rather it is used to be sideloaded to install it.
Although the best practice for such an application is to use a VPN service that is used to hide your IP address. Instead of just hiding a VPN is very helpful for all Firestick users as it allows them to watch Geo-Restricted apps like Netflix. This can be used to avoid ISP throttling because your Internet provider checks your usage and if you are using it a lot they may slow your internet bandwidth.
Even though there are several other benefits of it so I would simply suggest buying ExpressVPN. Because it is a fast and secure VPN network as compared to others. It provides users with Kill-Switch, a No-log policy and it is supported by Netflix and is compatible with Kodi as well. This is also listed as the Best VPN for Firestick and if you want to learn more about this then you should simply follow this link: Install VPN on Firestick
How To Install BeeTV on Firestick

After reading the above section if you have purchased ExpressVPN or are still willing to install BeeTV on Firestick. Then this is the section in which we are going to learn the whole installation process. But as I talked earlier that this app is not available on the Amazon App Store which means downloading is a little bit difficult.
It is because downloading apps from the internet and installing them is prohibited by Amazon. But don’t worry this can be undone as we just need to enable the installation of Unknown Source. This is the same option found in the Android device that is used to avoid installing unknown apps due to security.
However, if you enable this feature then please keep in mind that never download the application from an unknown website. It is because they might provide you with an app with malware or virus. That could steal your personal information or damage your device, if you do so then I am not responsible for anything.
To enable apps from Unknown Source you need to follow the steps given below:
- Press and hold the Home button for a few seconds and select Settings from the next screen.
- Now move forward and then open My Fire TV.
- From there scroll down and go to Developer Options.
- After this hover to Apps from Unknown Source and press the Select button.
- A warning message will pop there just ignore it and select Turn on.
So, this will enable the apps from an unknown source option which means we are now ready to install our app. Although if you are having an issue with the steps then you should probably check this article: Enable Apps from Unknown Sources
Once completing the above step now we need to install an application called Downloader. This is used to download and sideload 3rd-party apps on all FireTV devices. It is completely free to use and offers a neat user interface that works with a remote and also features a built-in web browser.
So, let’s just follow the steps to install Downloader and get BeeTV on Firestick:
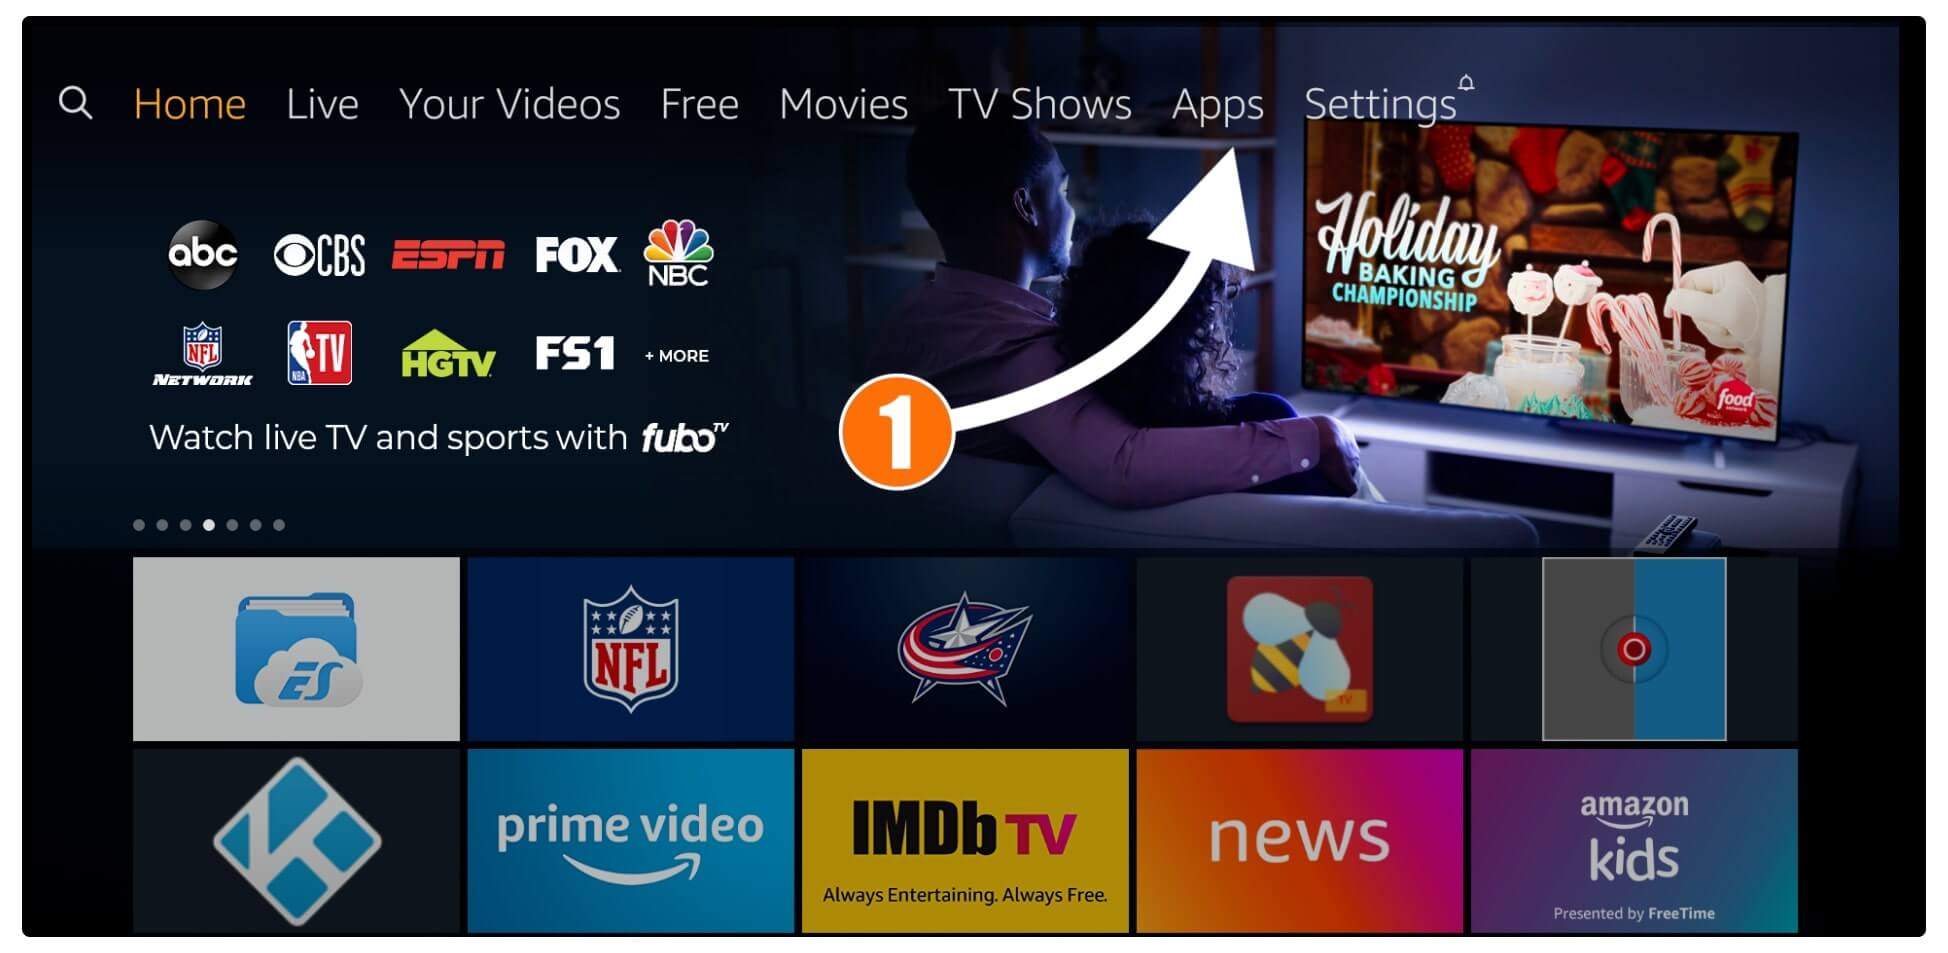
From the Home Screen on FireTV hover to the above menu and select Apps.
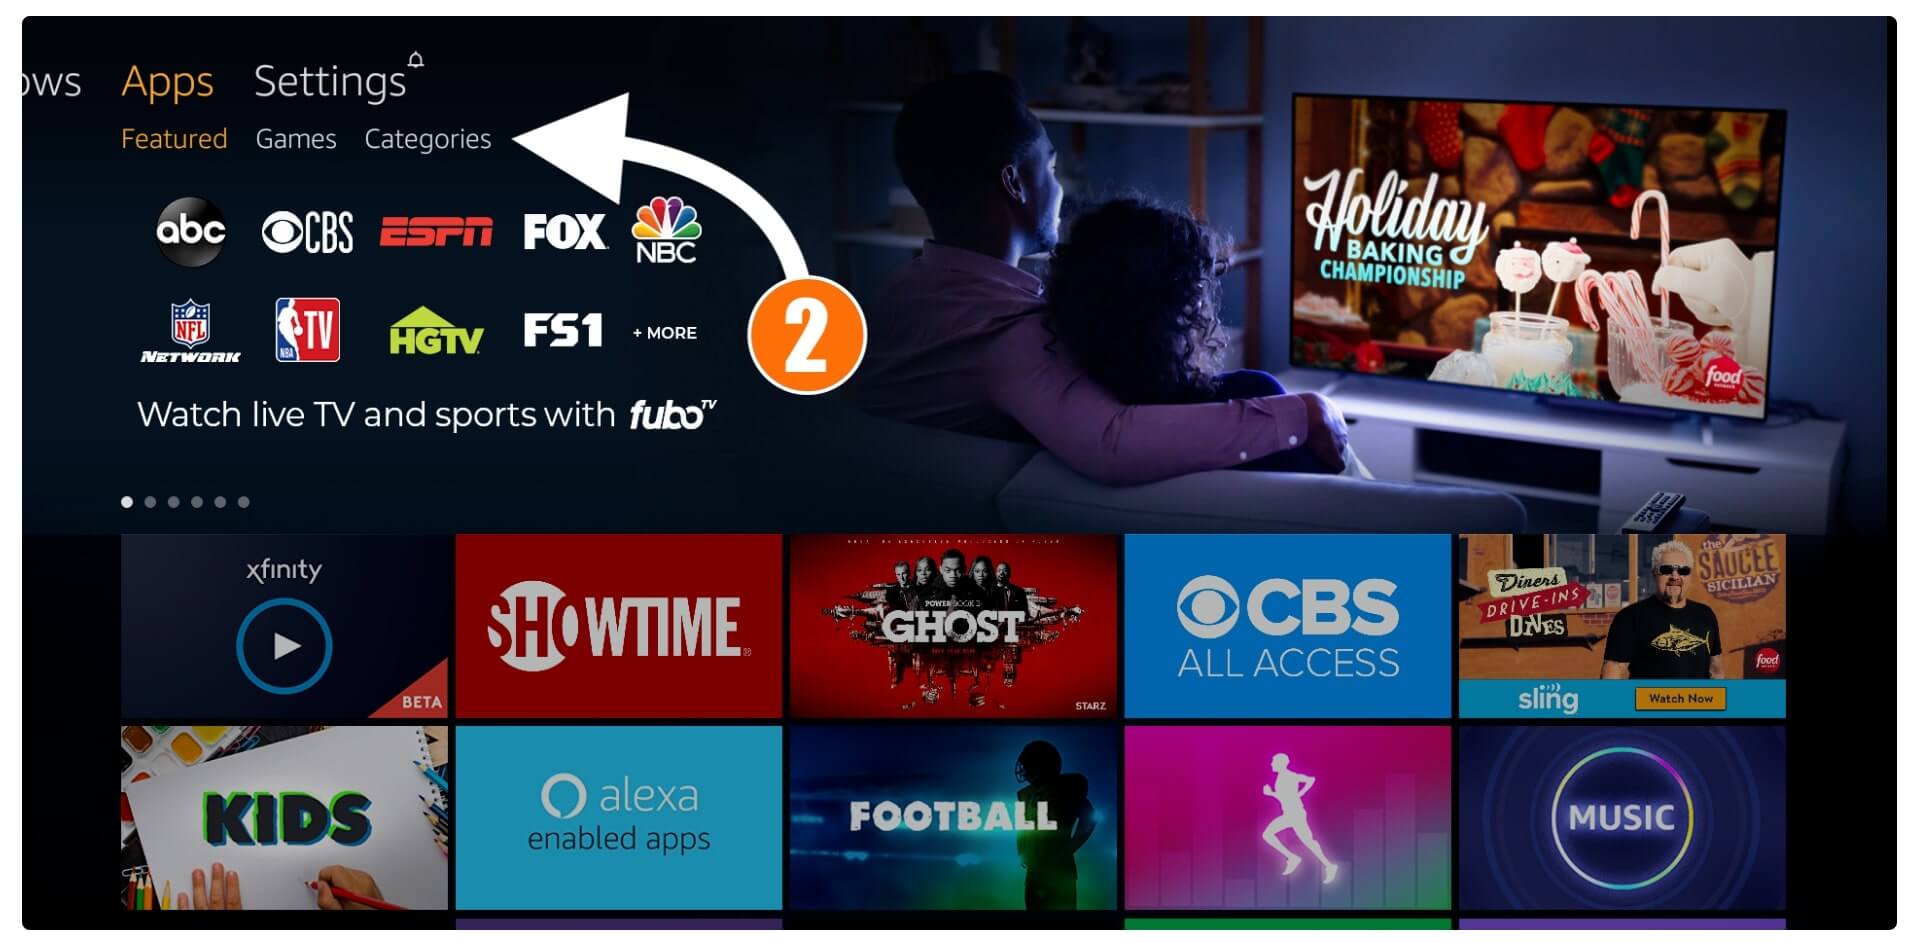
After going there select the Categories from the sub-menu.
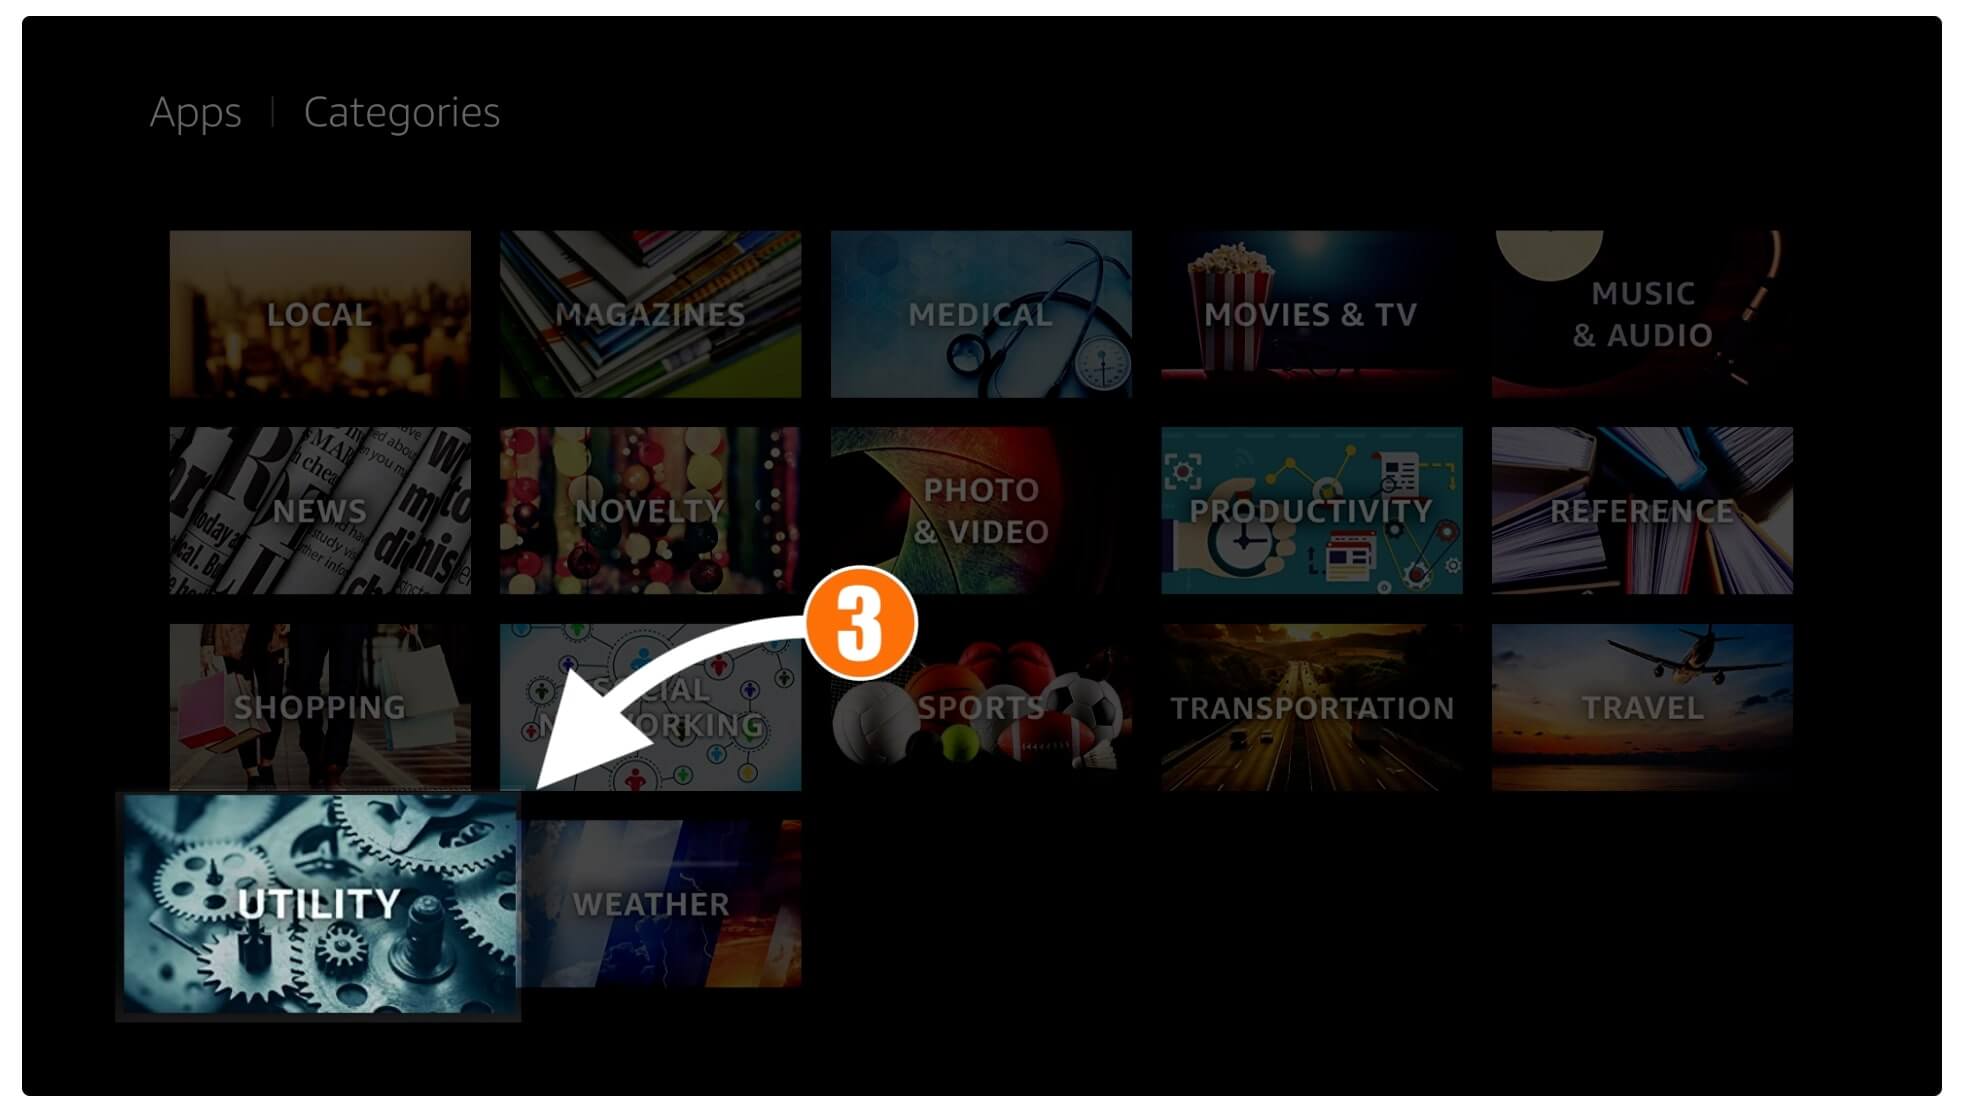
You will see the list of all available categories then scroll down and select Utilities.
This will show you apps related to this category then simply select the Downloader that appears at the Top.
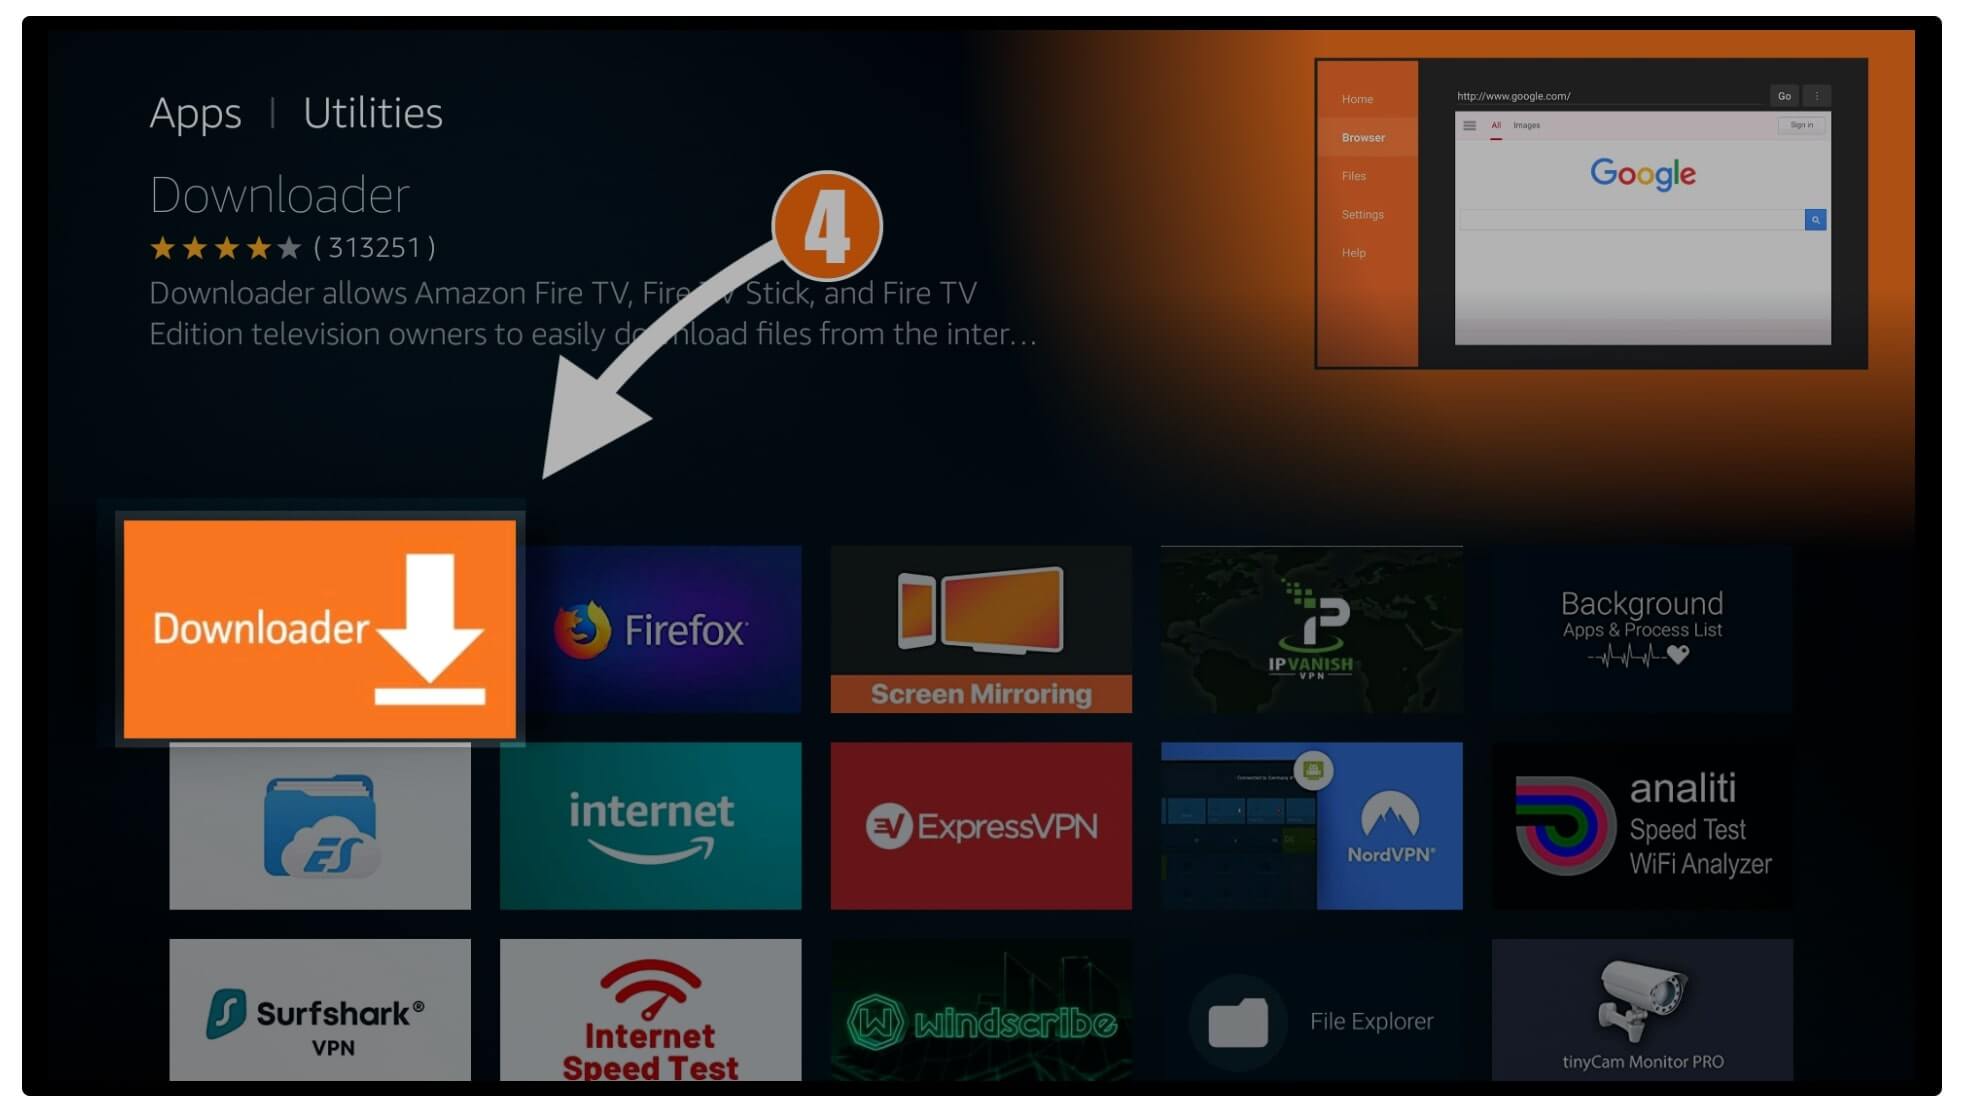
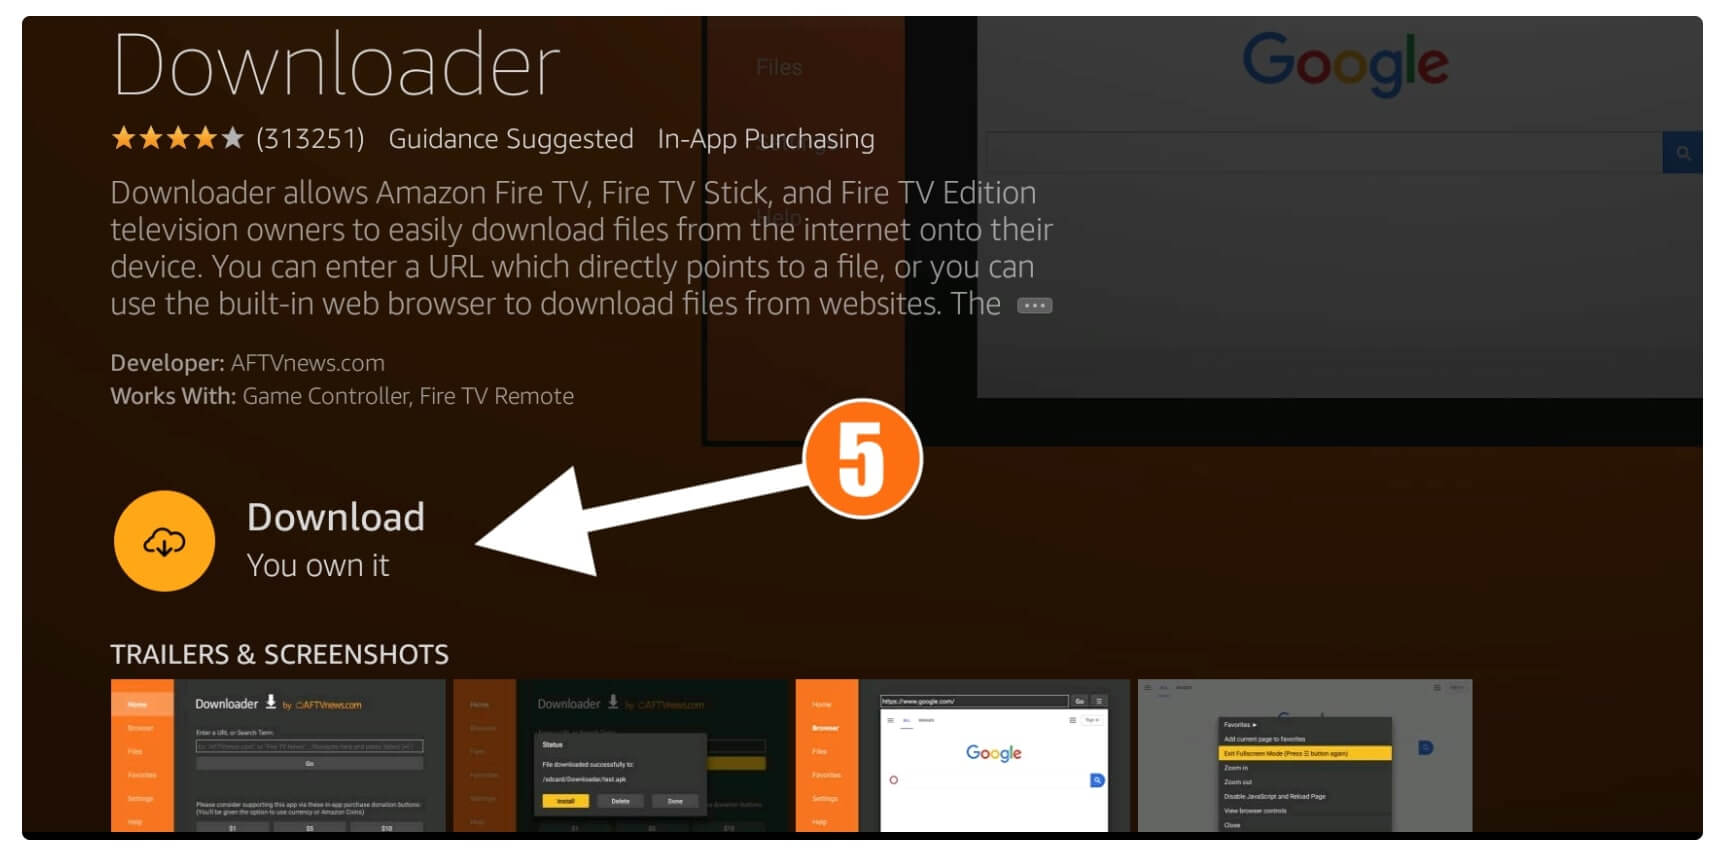
From the next screen, you just need to click on the Download (You Own it) button and the downloading will start.
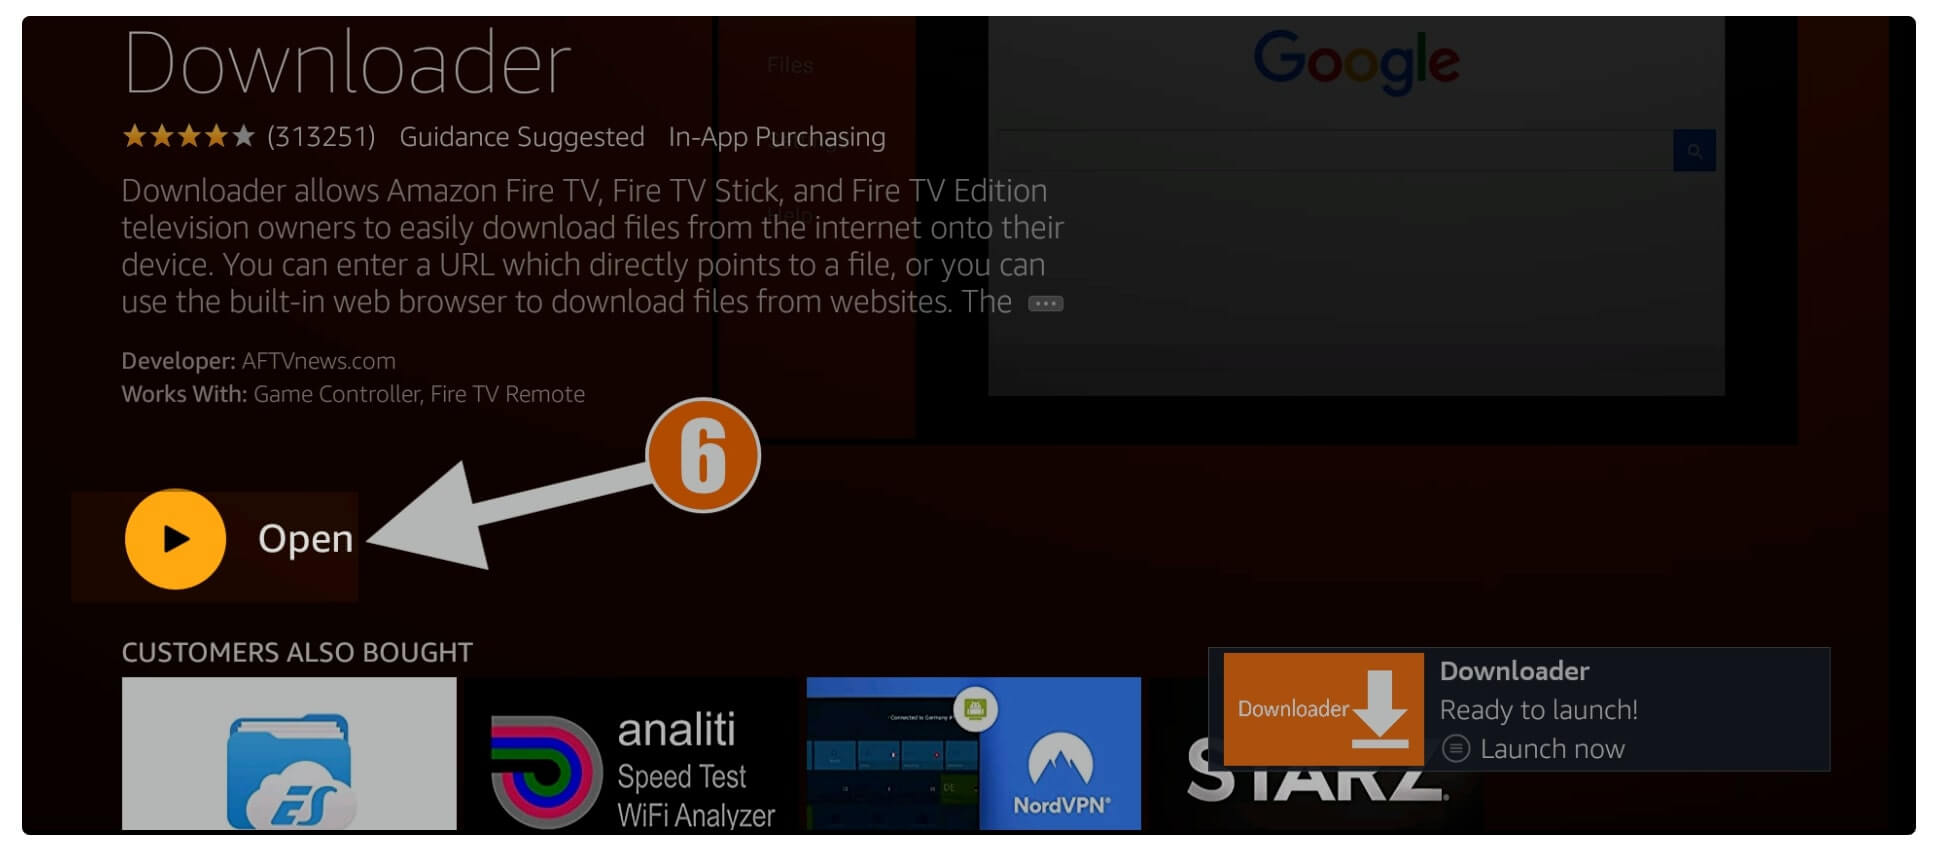
Just wait for a while until this is downloaded and it will be installed automatically as well when it is installed just select Open to launch it.
When you launch this app for the first time a dialogue will appear asking permission to access Photos, Media & Files just select Allow as if you deny it you won’t be able to download anything.

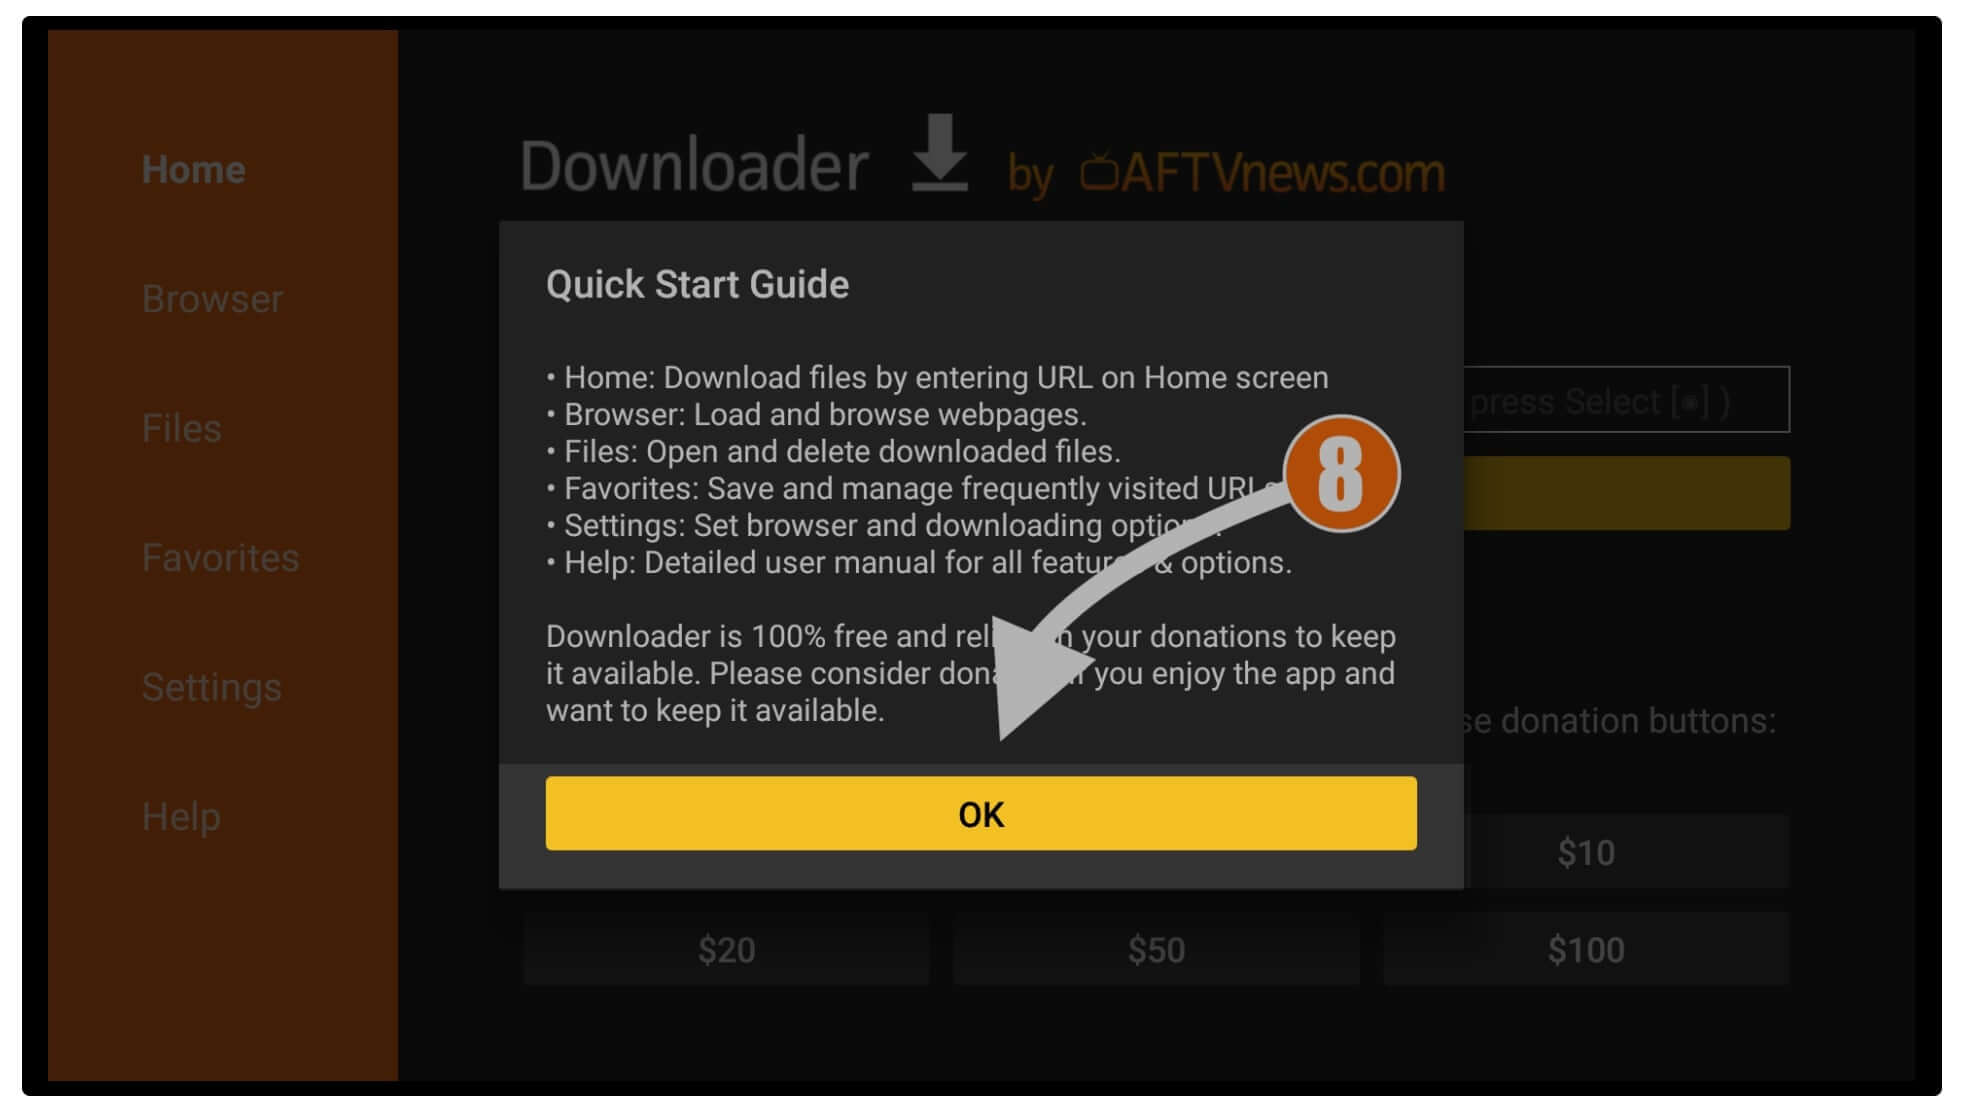
Ok, so after you click on the Allow you will then get a Quick Tour Guide dialogue box there just ignore it by clicking on the OK it.
Now, this is the Home Screen of the Downloader app that only has a simple box there and some menus on the left side. At this just hover over the small box that appears there and presses the Select button to launch the keyboard there.
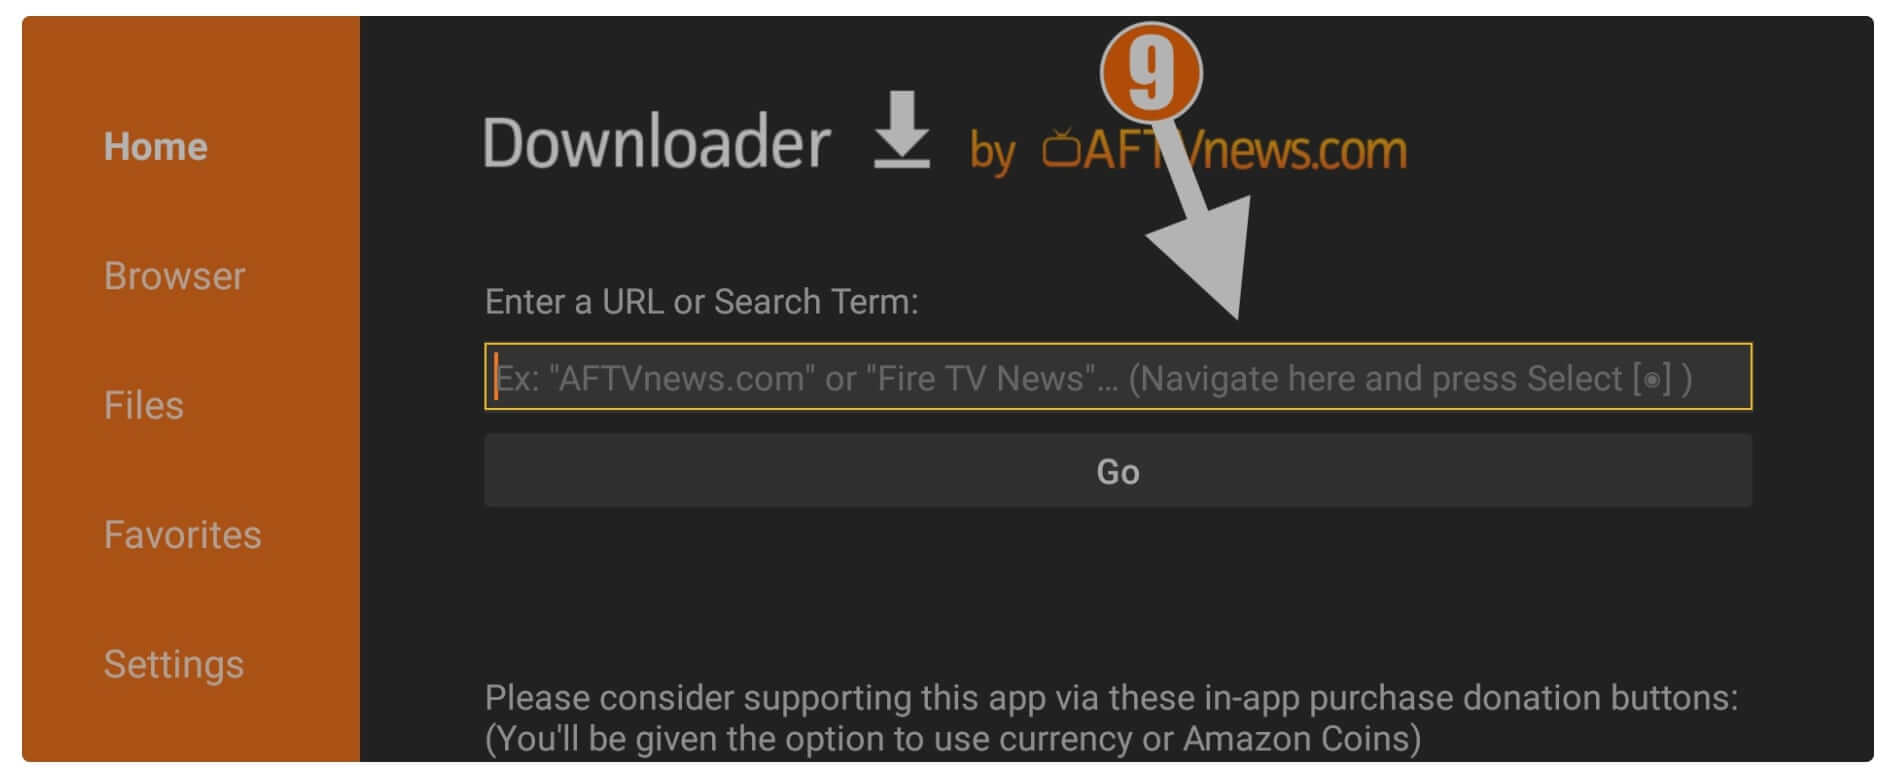
After opening the keyboard you are now required to type https://tvexpertguide.com/btv and then click on the Go button.
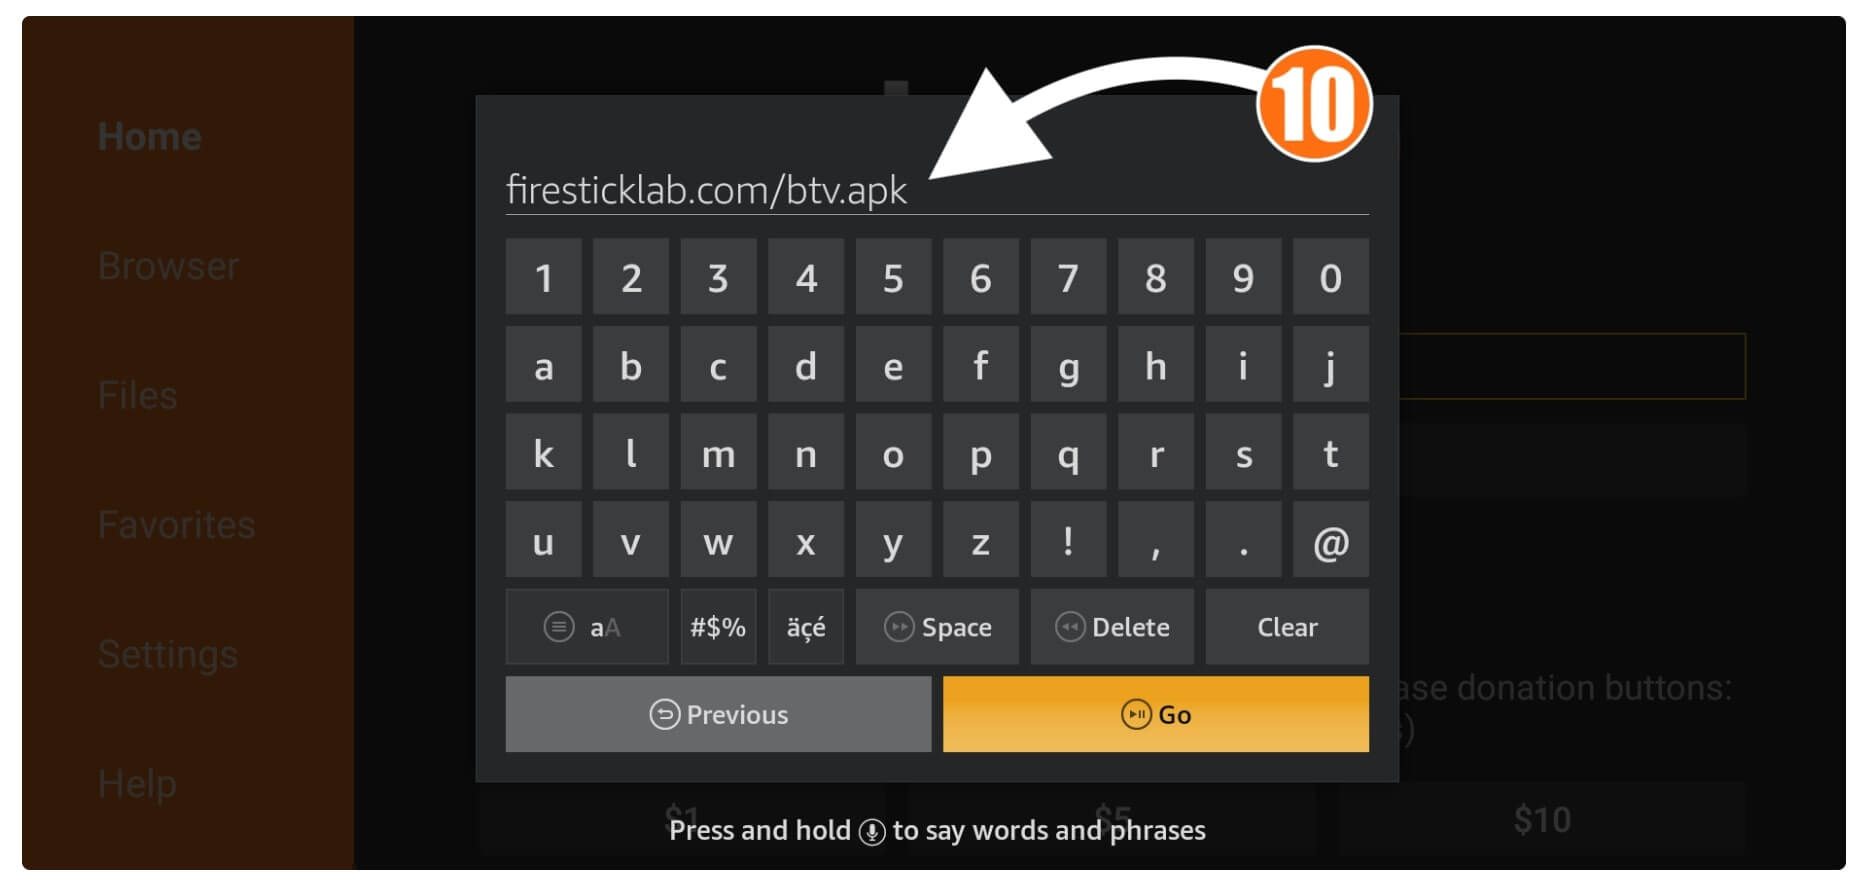
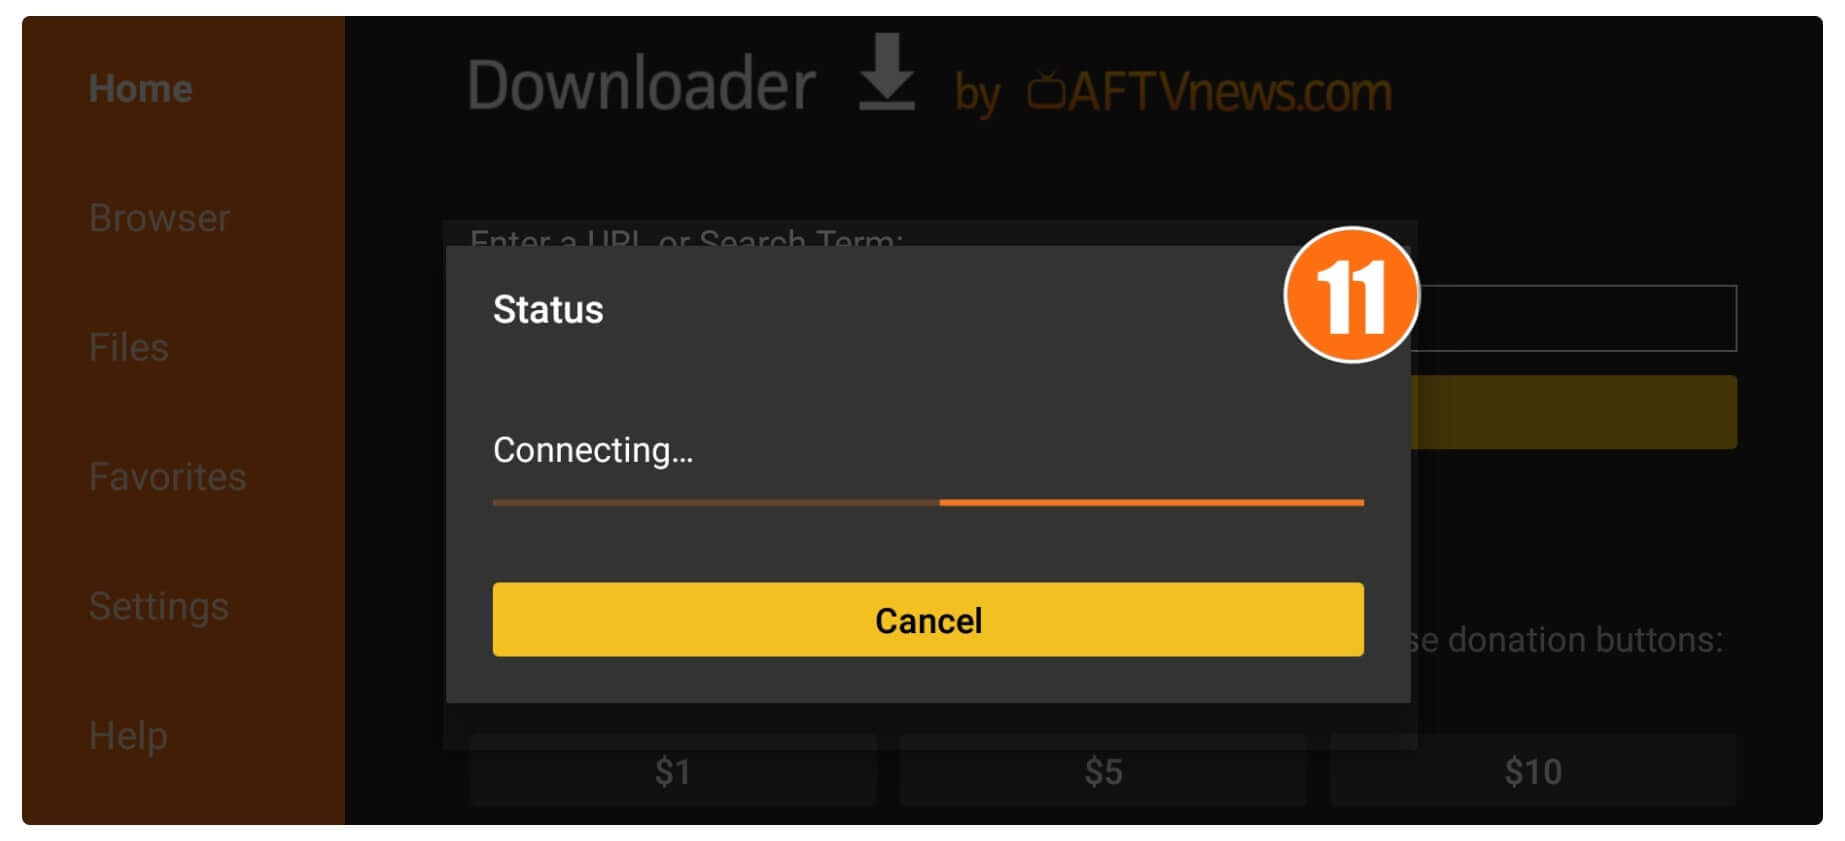
This will try to connect to the server and once it connects downloading will start automatically and you will see the Download Status on your screen.
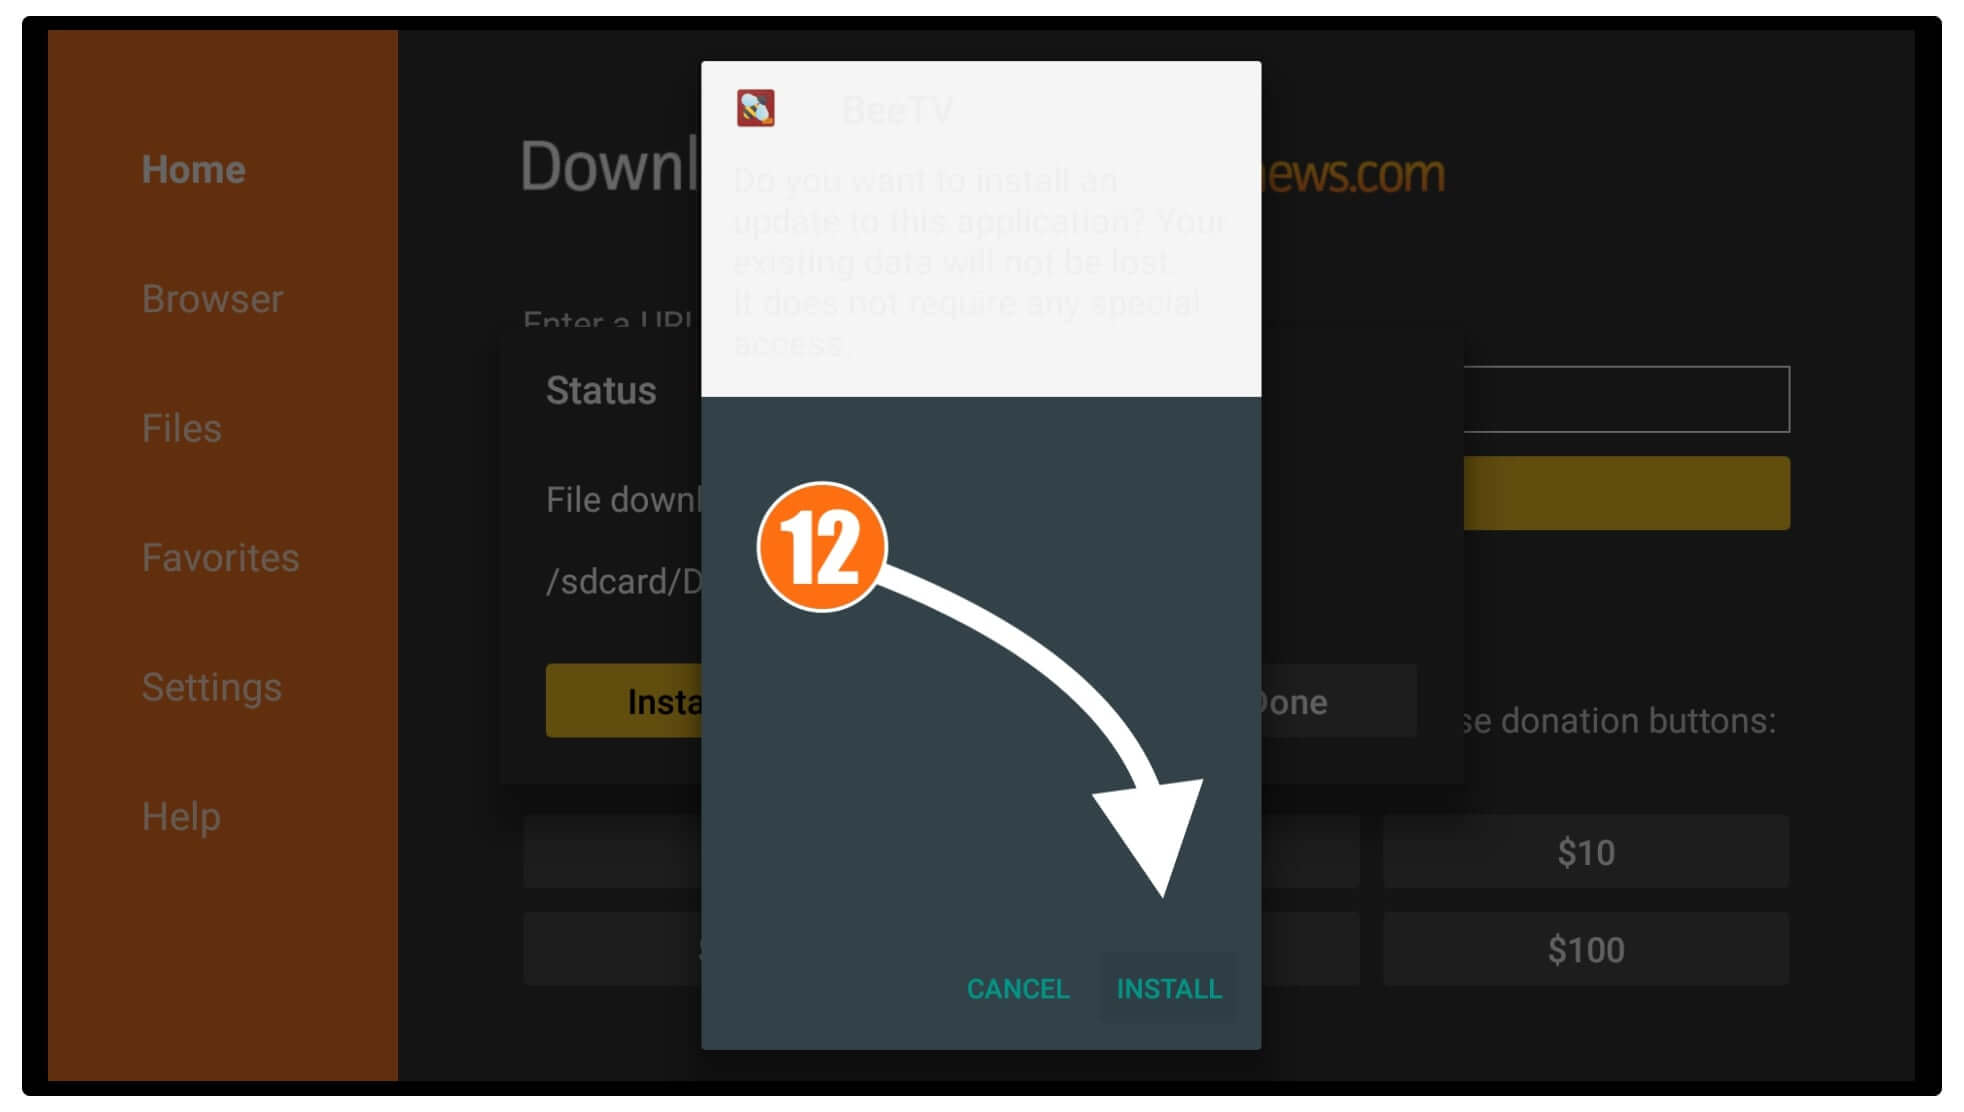
Just wait until BeeTV is downloaded and then this will open the installation window there. When that window appears just click on the Install button below.
The installation will take only a few seconds and when you see App is Installed just click Done.
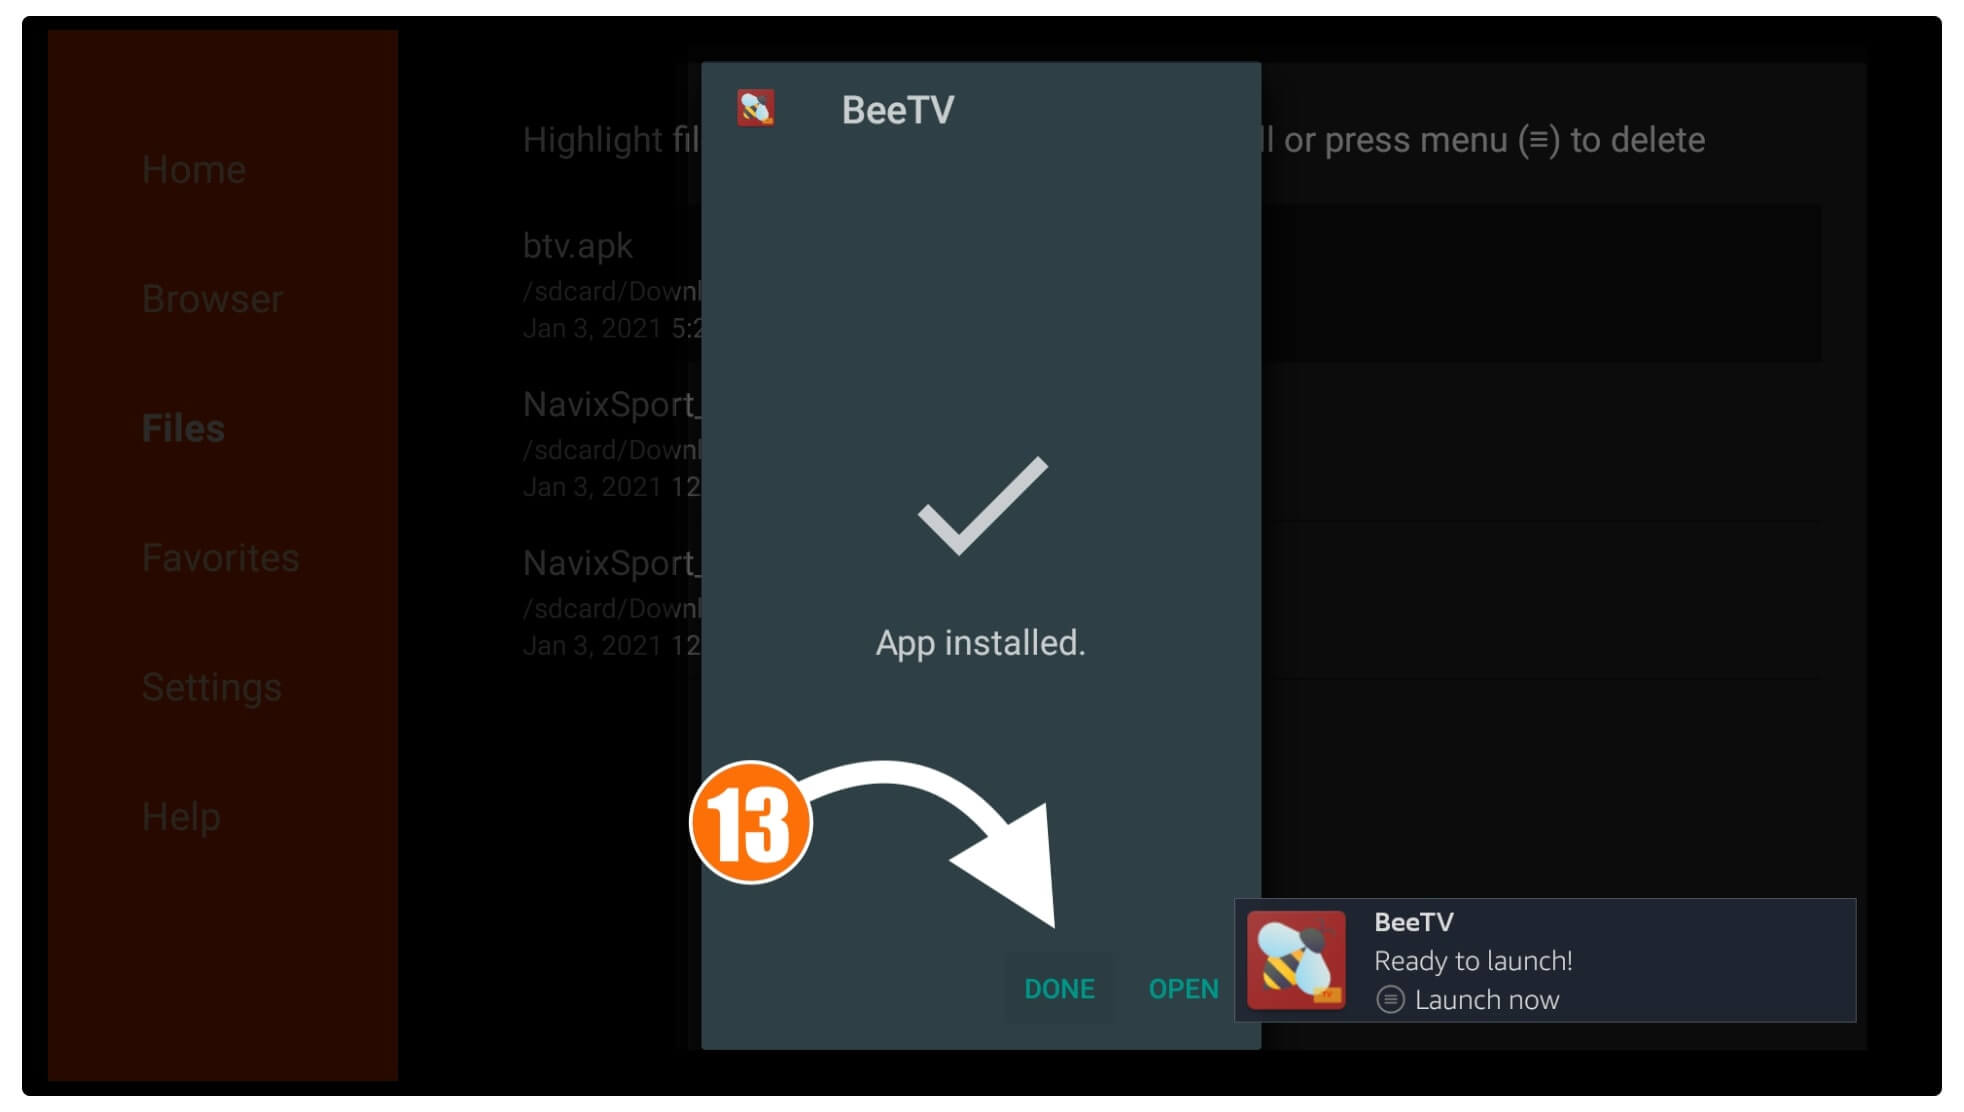
After this, you will see the Downloader app again with a Status box having three options. Now simply click on the Delete button from the status box.

When you select Delete you will be asked for the confirmation then again click the Delete button.
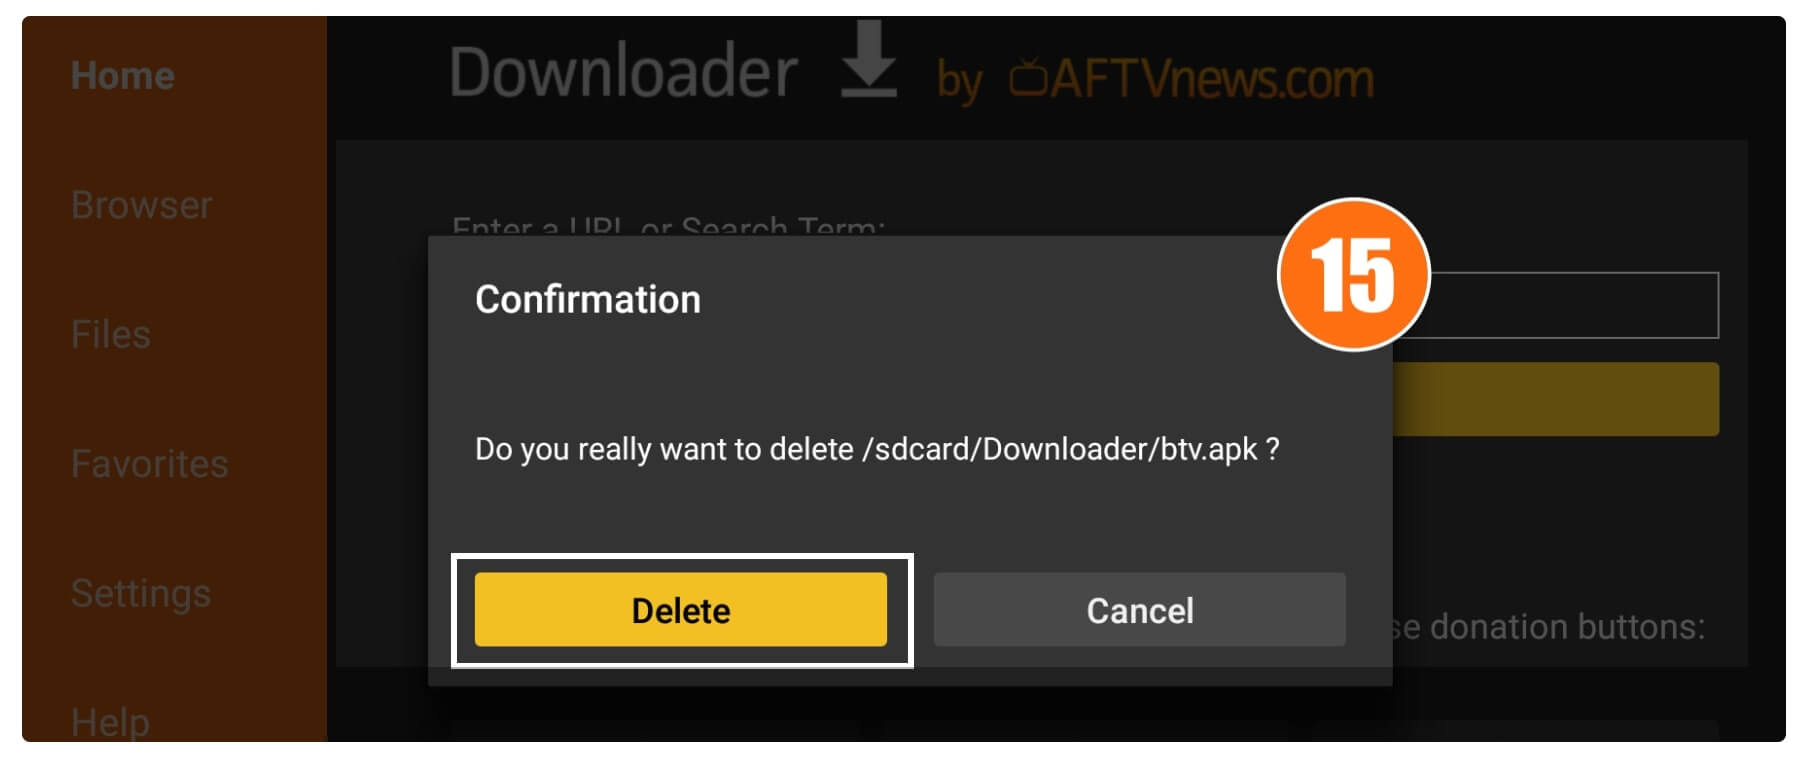
That’s it now the BeeTV on Firestick is installed successfully while we just removed the backup file. Removing these files is highly recommended as they just occupy space on our device.
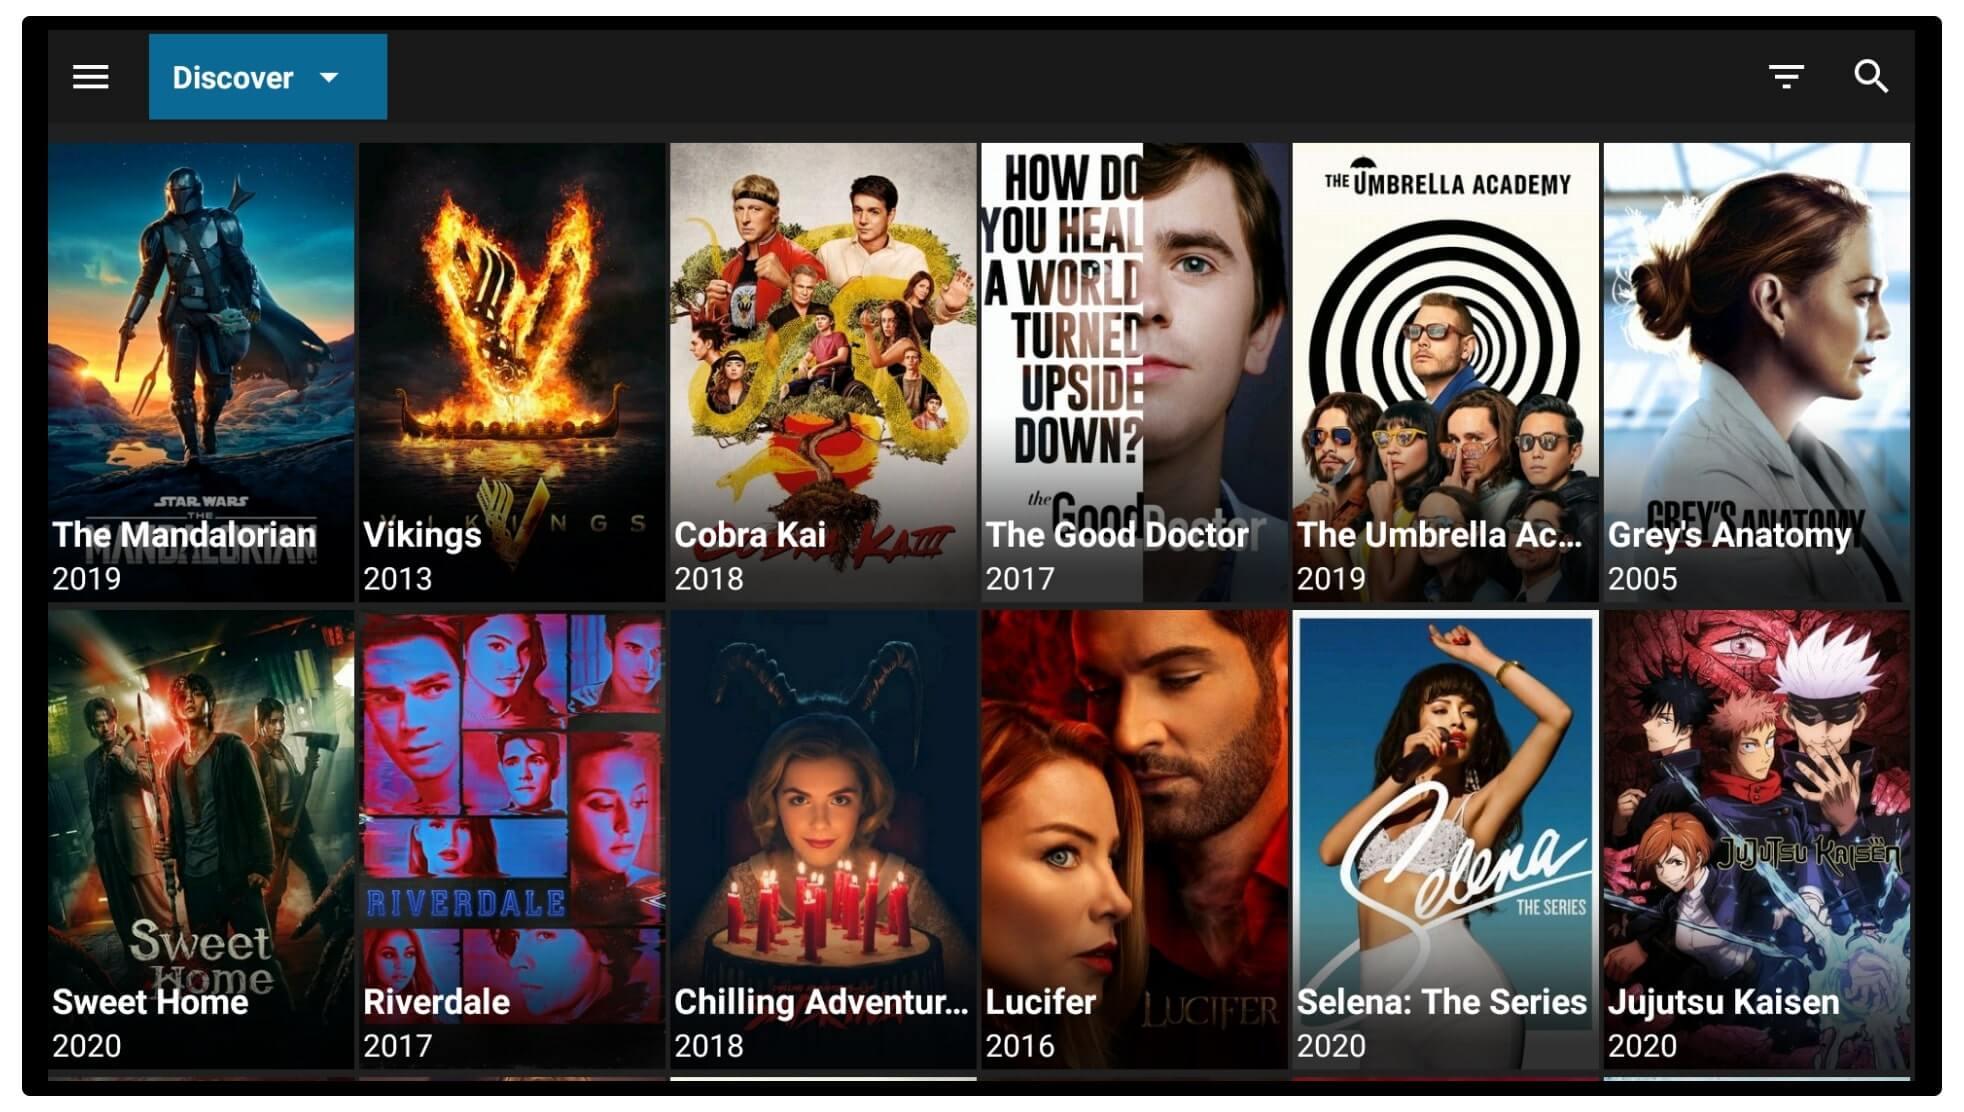
Furthermore, BeeTV is already installed and you can simply launch it by going to Home Screen > Your Apps & Channels > See All > Now click on the BeeTV icon below. When you open it you may see different options there so it is better to read how to use the guide that is available below.
How To Sideload BeeTV APK on Fire TV Stick Using ES File Explorer
After reading the above guide we just installed BeeTV on Firestick but most people may not like the Downloader app because of ES File Explorer. But since it became a premium that now charges $9.99 per month that enables sideloading, Download Manager, File Analyze, and so on.
In this case, if you already have a premium subscription then you should probably check this section instead. However, this is the quick guide in which we learn to sideload BeeTV on Fire Stick using ES File Explorer.
Ok, so here are the steps that are required to be followed:
- Launch ES File Explorer on your device and then from Home Screen hover to the Download Manager.
- After this from the bottom menu click on the + or New option.
- It shows a dialogue box there now in the first box type https://tvexpertguide.com/btv.apk and in the second box just type BeeTV or whatever name you want.
- Once you are done with it now simply click on the Download Now button available there.
- It will try to connect to the server and then you see Downloading Status on your screen.
- Just wait until the download completes and then click on the Open File button.
- After this, you need to click on the Install button from there.
- This will open the installation window so now just click on the Install the below.
- The installation will take a few seconds and once completes press Open to launch it.
That’s it now the app is installed on your device by using ES File Explorer. Although you can delete the backup file by going to Internal Storage > Download > Long Press > Select Delete. This will remove the backup file that is useful in saving some storage on your device to avoid buffering, overheating, etc.
Use BeeTV App on Amazon FireTV Stick
Installing this app doesn’t mean we are done here because we still need to understand how to use BeeTV on Fire TV Stick. It is because using this app is quite difficult. That’s why I am here to provide you with a quick overview of this application and also tell you how to use Real-Debrid with this.
Although those people who already use these sorts of apps might know the process that’s why they can skip this section. As this is only for beginners who just installed a 3rd-party app for the first time. Because as I have written many installation guides I received several emails regarding how to use the process.
So to learn this I have separated everything so you can understand it better like how to set up, change the default player, integrate Real-Debird, and so on. Make sure to not miss any of these headings or you may not be able to understand the whole process as everything is highly recommended.
Ok, so without wasting any further time let’s just move to use BeeTV on the Firestick guide:
Setup BeeTV
The first thing that we need to talk about is how to Set up Bee TV for the first time. As this requires several permission and ask for some other things as well. Even though we didn’t find the icon on the Home Screen so we will bring it to the front so we can launch it quickly.
So, let’s jump into the guide and learn how to Set up BeeTV:
Stay on the Home Screen on FireTV and then press and hold the Home button for a few seconds and select Apps. Or scroll down to Your Apps & Channels and click on See All.
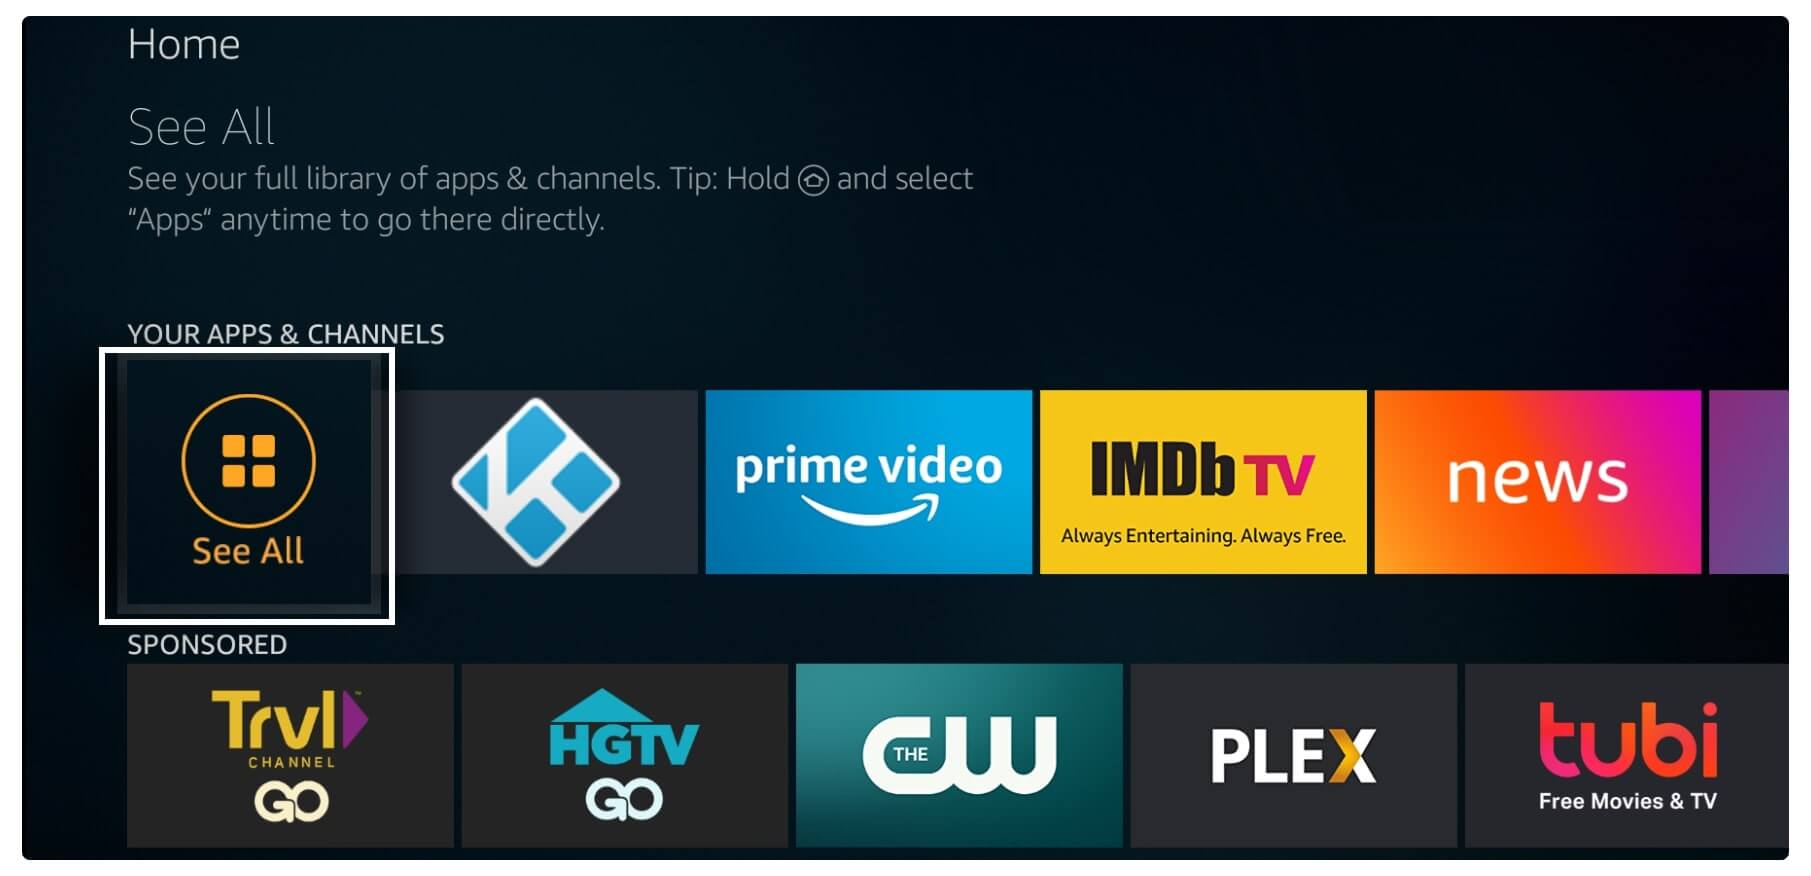
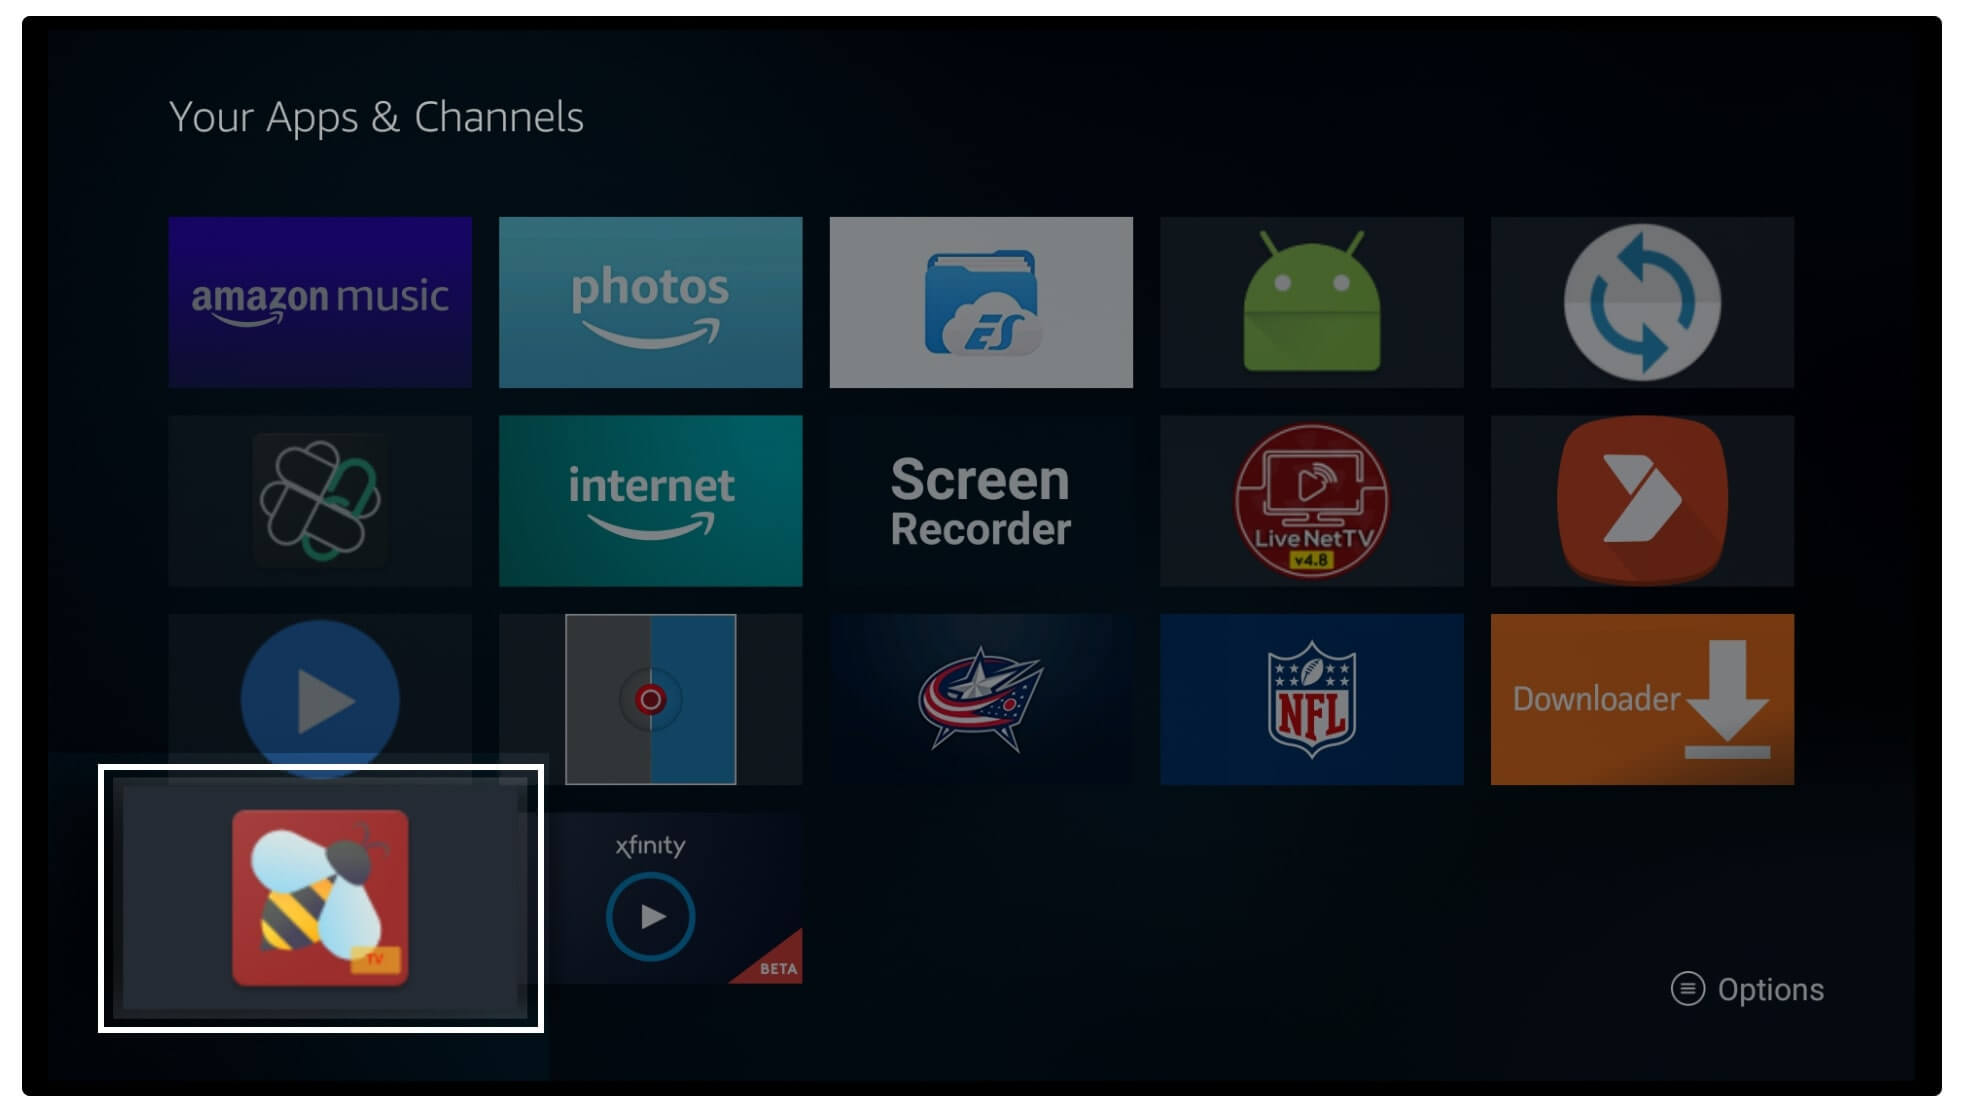
You will notice the list of all apps that appears there just scroll to the bottom to see BeeTV. Highlight the app and then press the menu button on the remote.
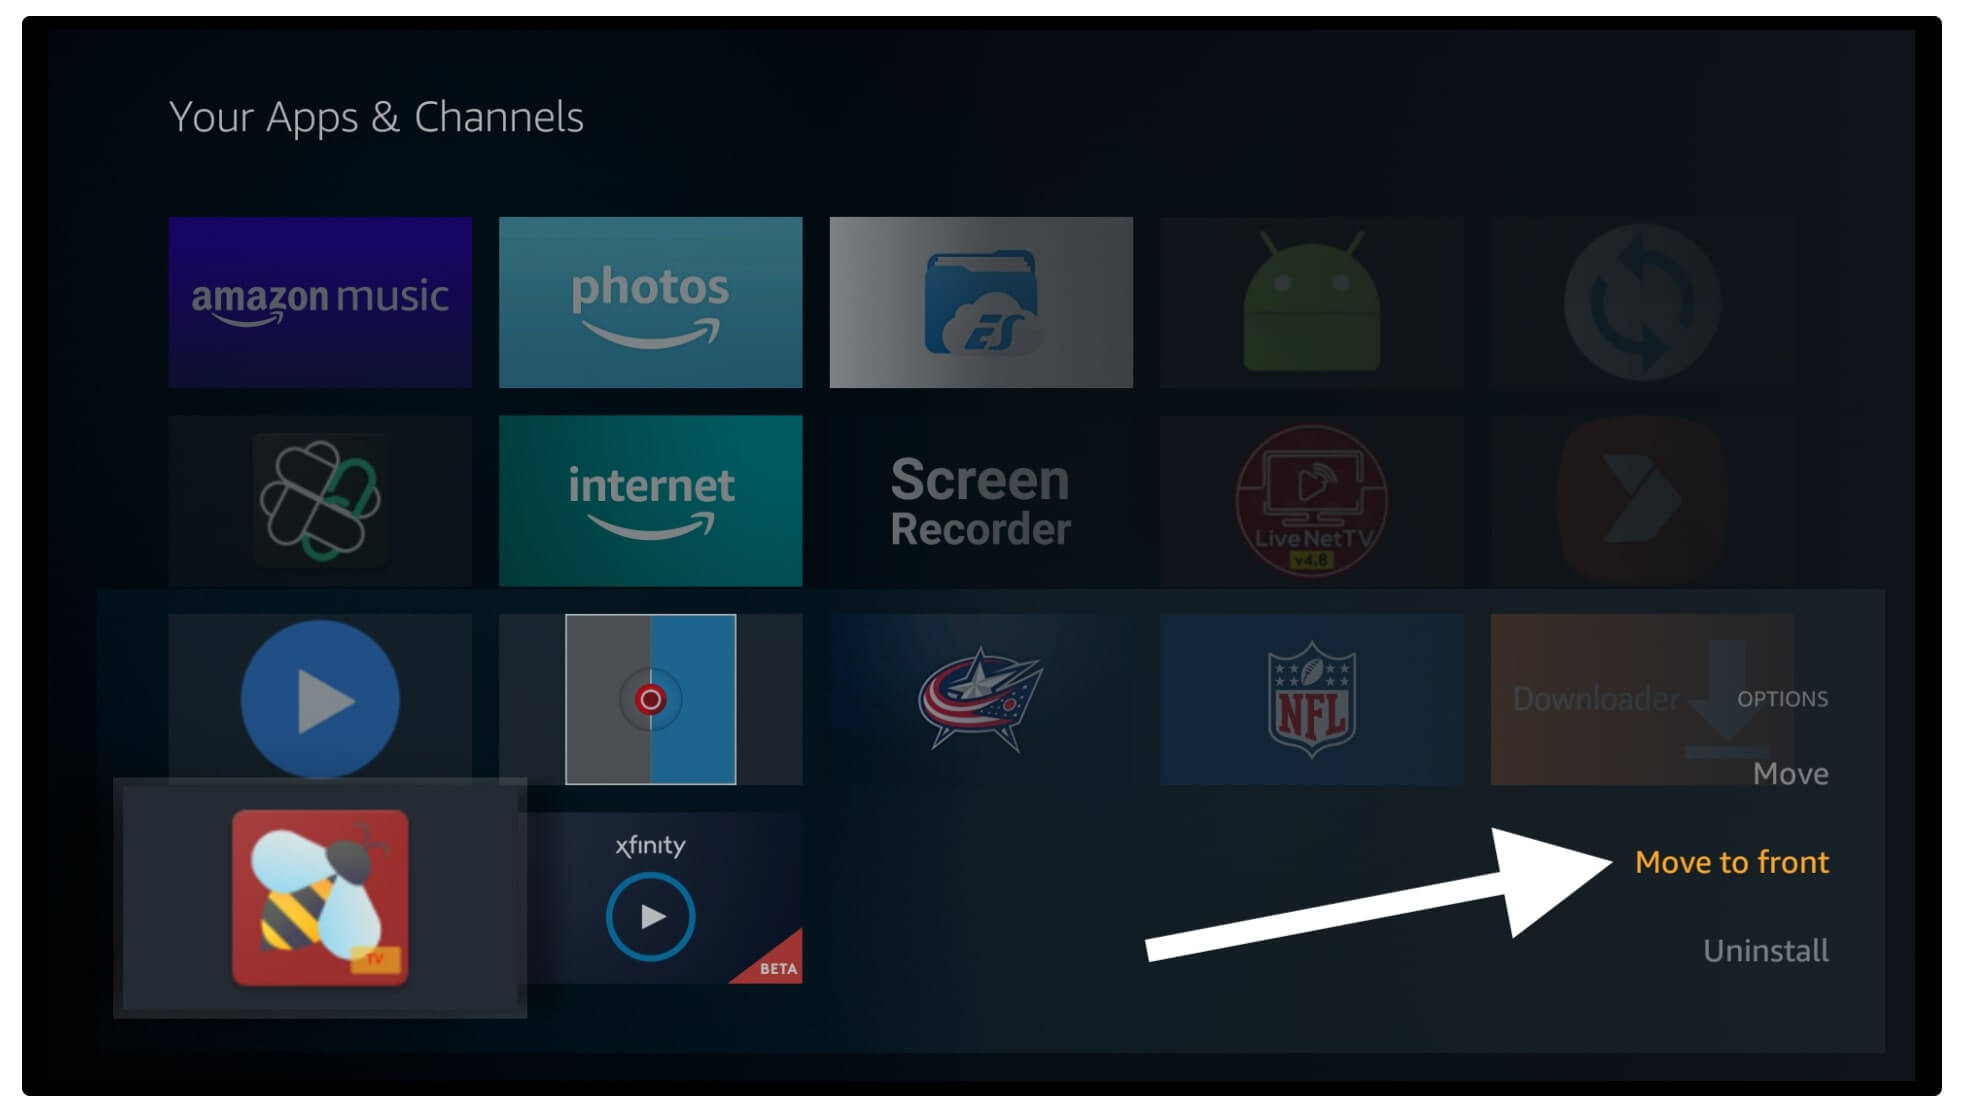
After this, a menu will appear on the right-hand side then simply click on the Move To Front option under the Move option.
This will be moved in front of the Home Screen now hover to the icon and press select to Launch BeeTV on your device. When you launch BeeTV you will be asked permission to access Media, Files, Photos just tap on the Allow button.
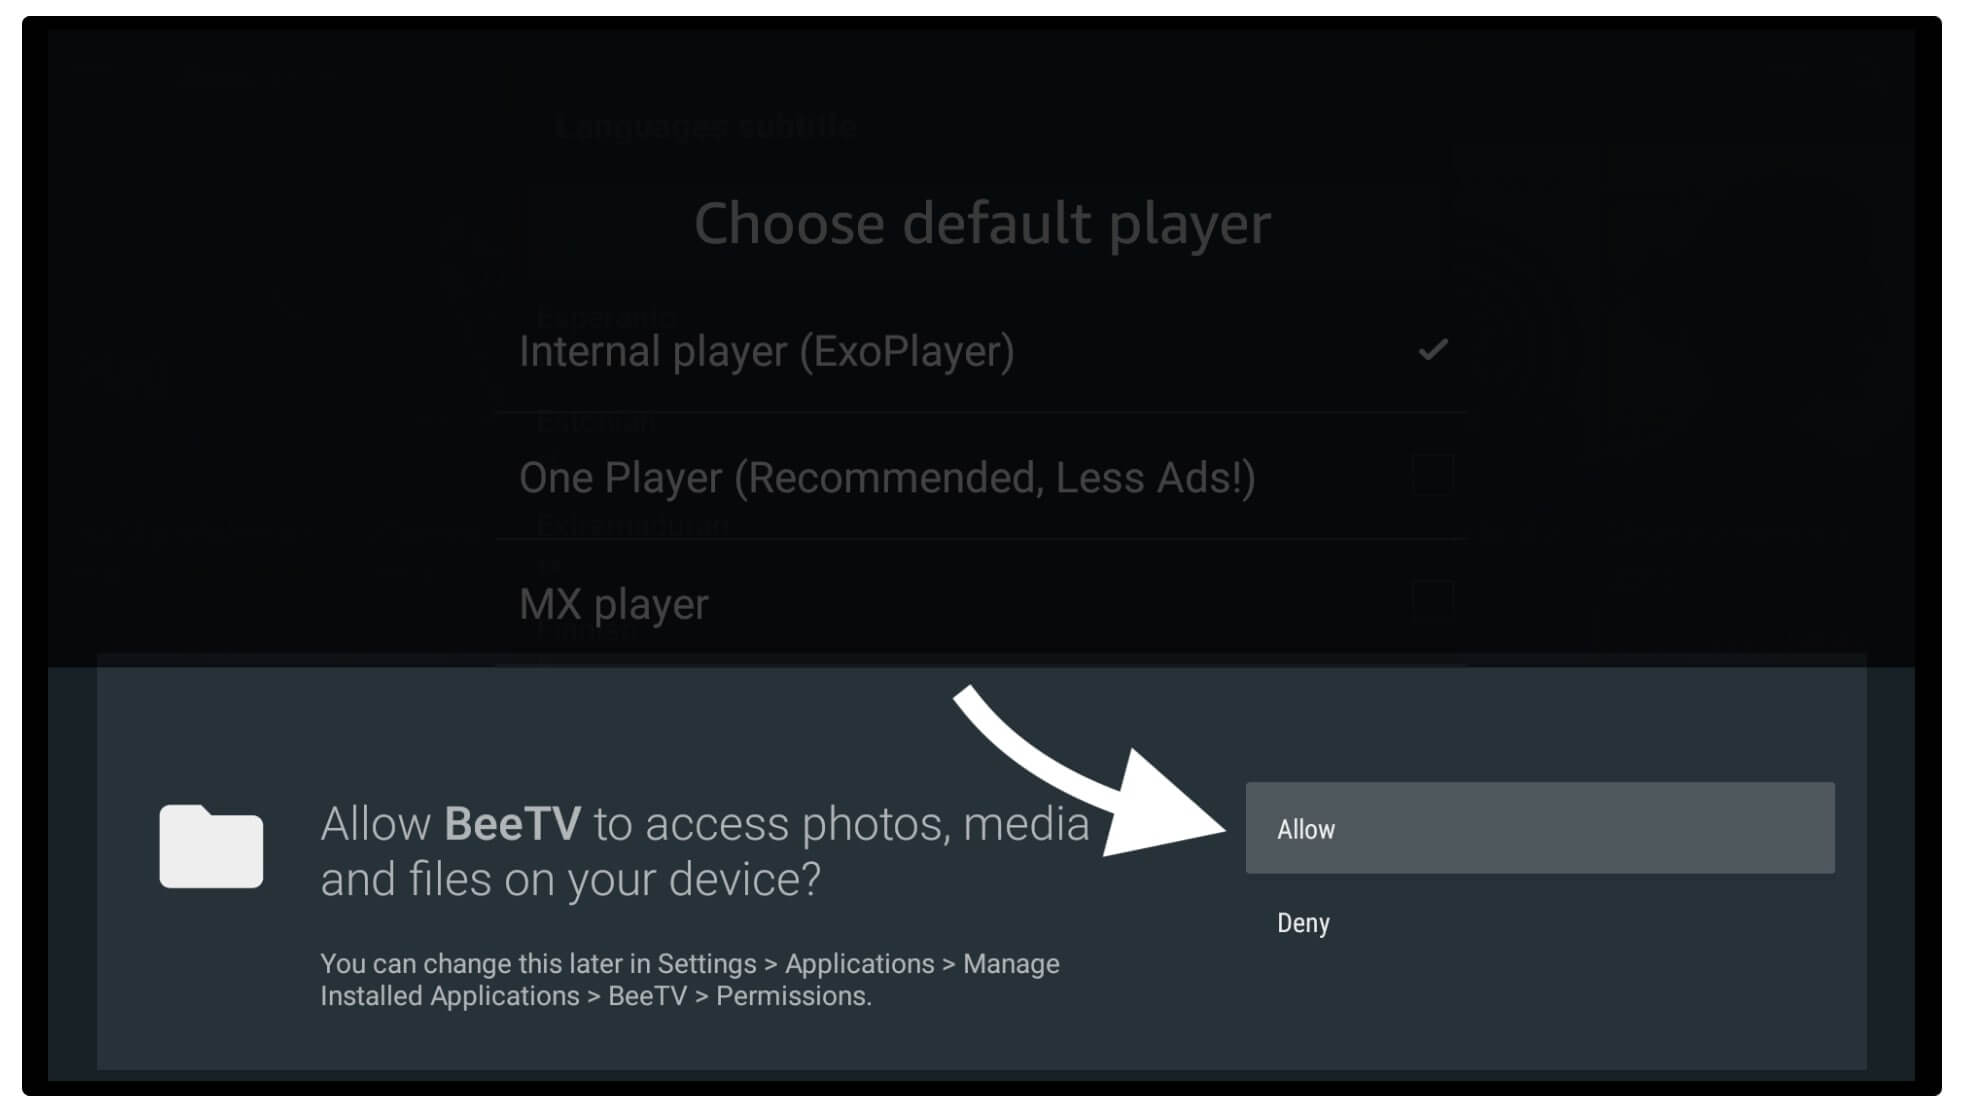
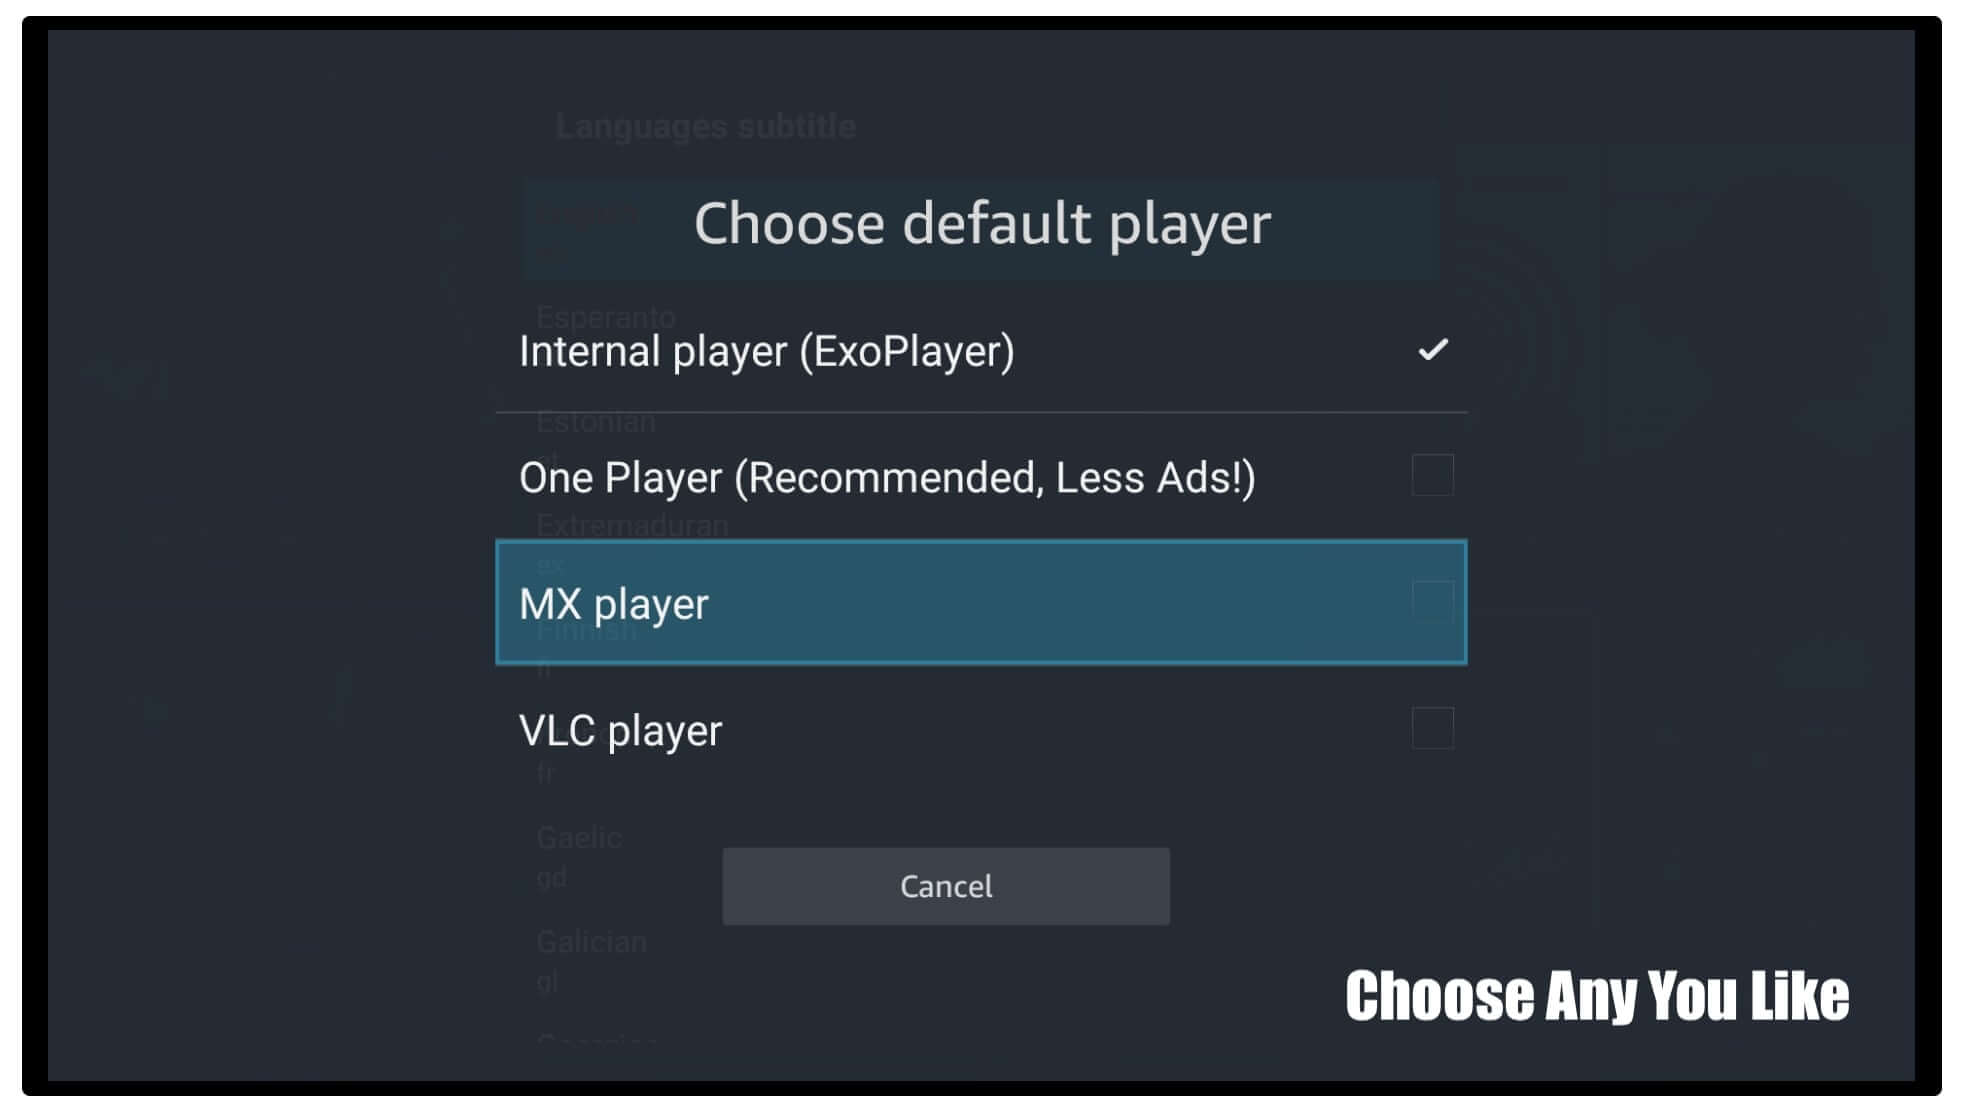
Once you are allowed permission it will ask you to choose the Default Media Player just choose anyone from there. (this can be changed later from Settings).
From the next step, you will be asked to choose a Subtitle language, I am choosing English you can choose depending on your language (this can be changed later from Settings).
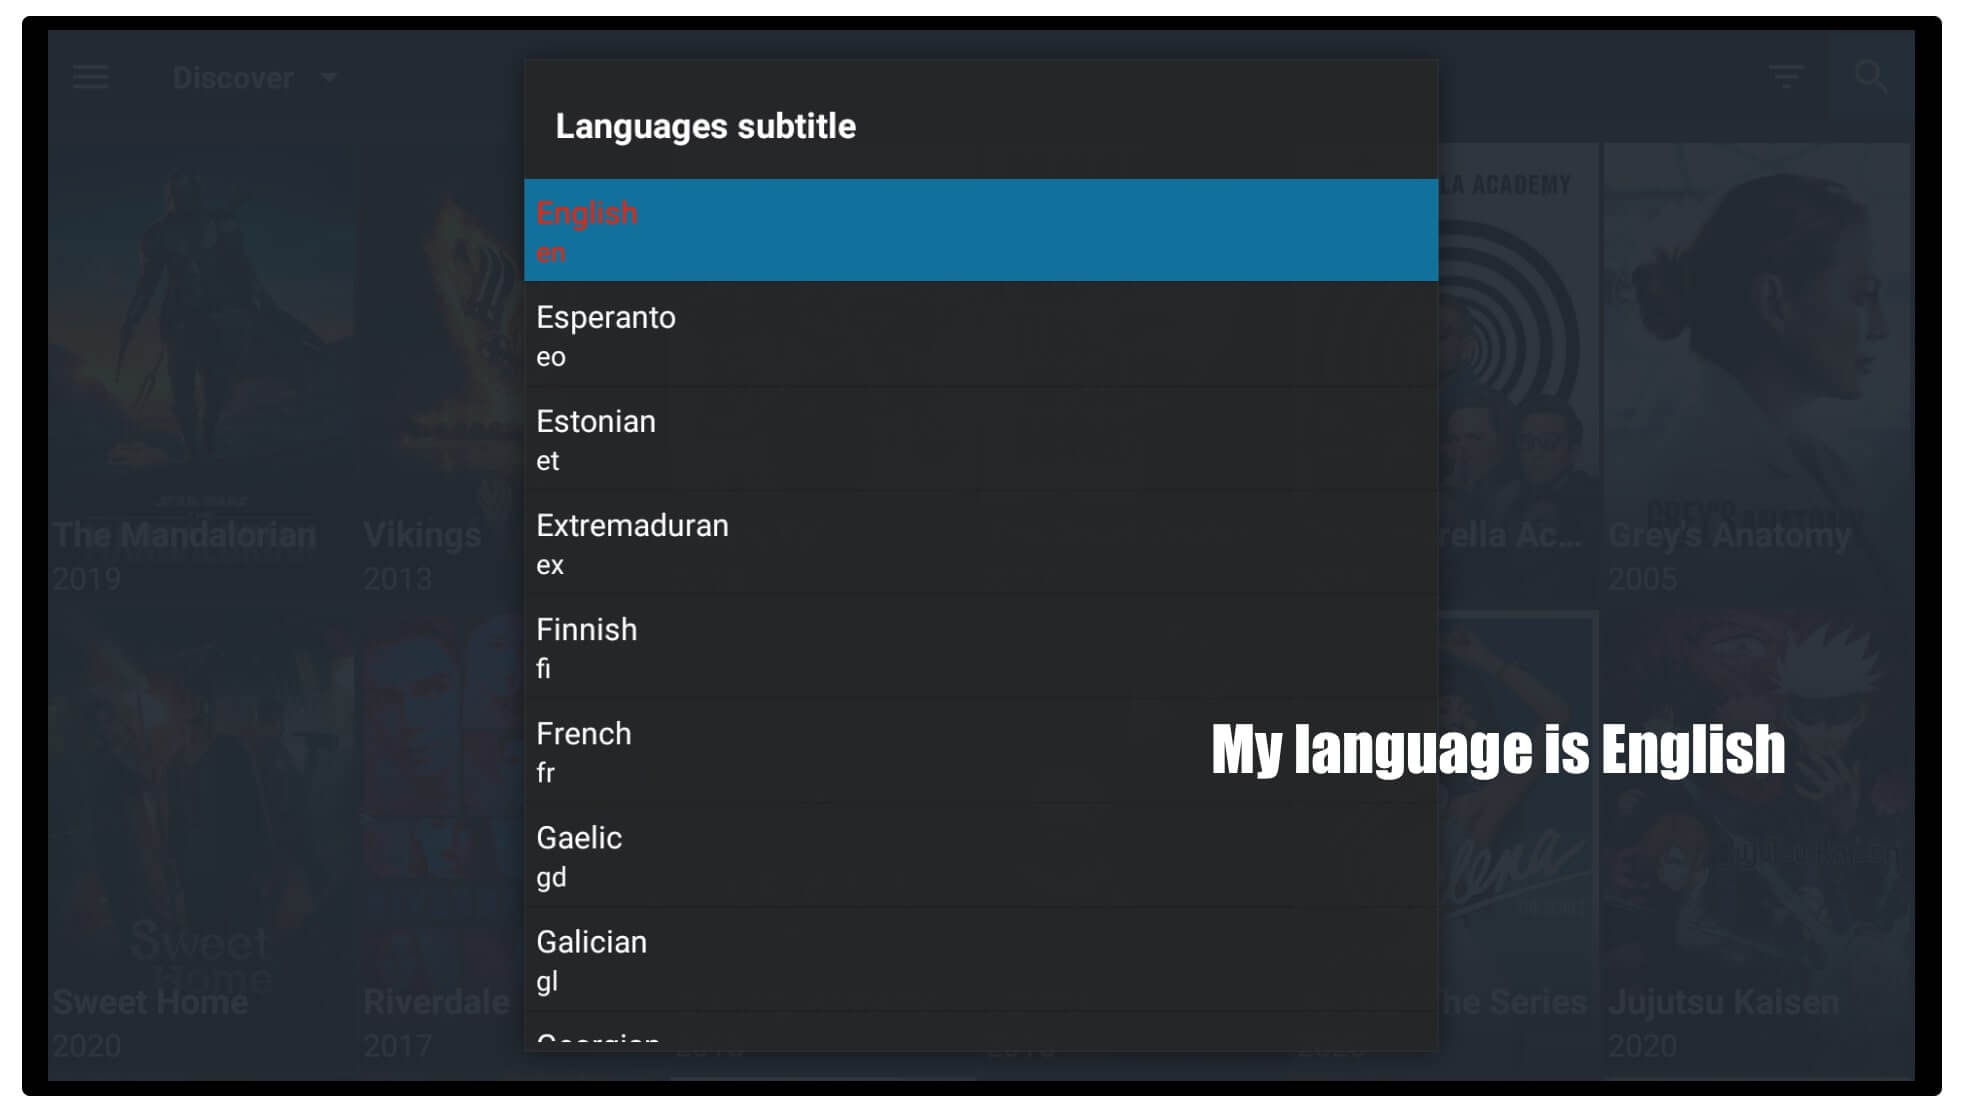
That’s it now the app is ready to be used and by default, you will see the TV Shows screen to open Movies select Three Lines from the left side and click on Movies.
Even though you can change the default Home Screen by going to Settings > under General select Open App Default Tab > choose TVShow, Movies, Anime or Editor’s Choice. Now, whenever you launch this app it shows the same tab that you set, and then you can access content instantly.
Change Default Media Player
In case you just chose the default player but now you want to change it to MX Player, One Player, or VLC Media Player then you still have an option. This app also allows you to choose your default player so whenever you play a TV Show or Movie it will be streamed on that player instead of the stock one. How To Install MX Player on Firestick
However, I would suggest using MX Player as it is best and provides fast streaming as compared to others. If you don’t have this player installed yet then you should follow this guide:
Once you have installed MX Player now follow these steps:
- Open Settings by selecting three lines from the left-hand side.
- After this scroll down to Player and click on Choose Default Player.
- This will show various options now select MX Player from the list.
- Now just restart your player so the Settings take effect.
The player is now changed successfully so whenever you play a movie or a TV Show it will automatically open MX Player or whatever player you choose.
Integrate Real-Debrid
Now if you have purchased the premium version of the Real-Debrid service then you can also integrate it with this app. BeeTV allows the integration of different services like Real-Debrid, All Debrid, Preimuimize, and Trakt as well. So, if you just want a great experience with this app then you should probably use these services.
Although in this section we will talk about the integration of Real-Debrid within the BeeTV app. It is a multi-hoster service that provides unrestricted downloading and provides buffer-free streaming as well. This is a premium service that is worth buying as it works with almost all apps including Kodi too.
If you haven’t purchased it yet then you should buy it first from here: Buy Real-Debrid
To learn more about this service you just need to have a look at this guide: What is Real-Debrid & How to Setup
Ok, so if you already have this service or purchased it recently let’s follow the steps given below:
Launch BeeTV on your device and from Home Screen move to the left panel and open Settings.
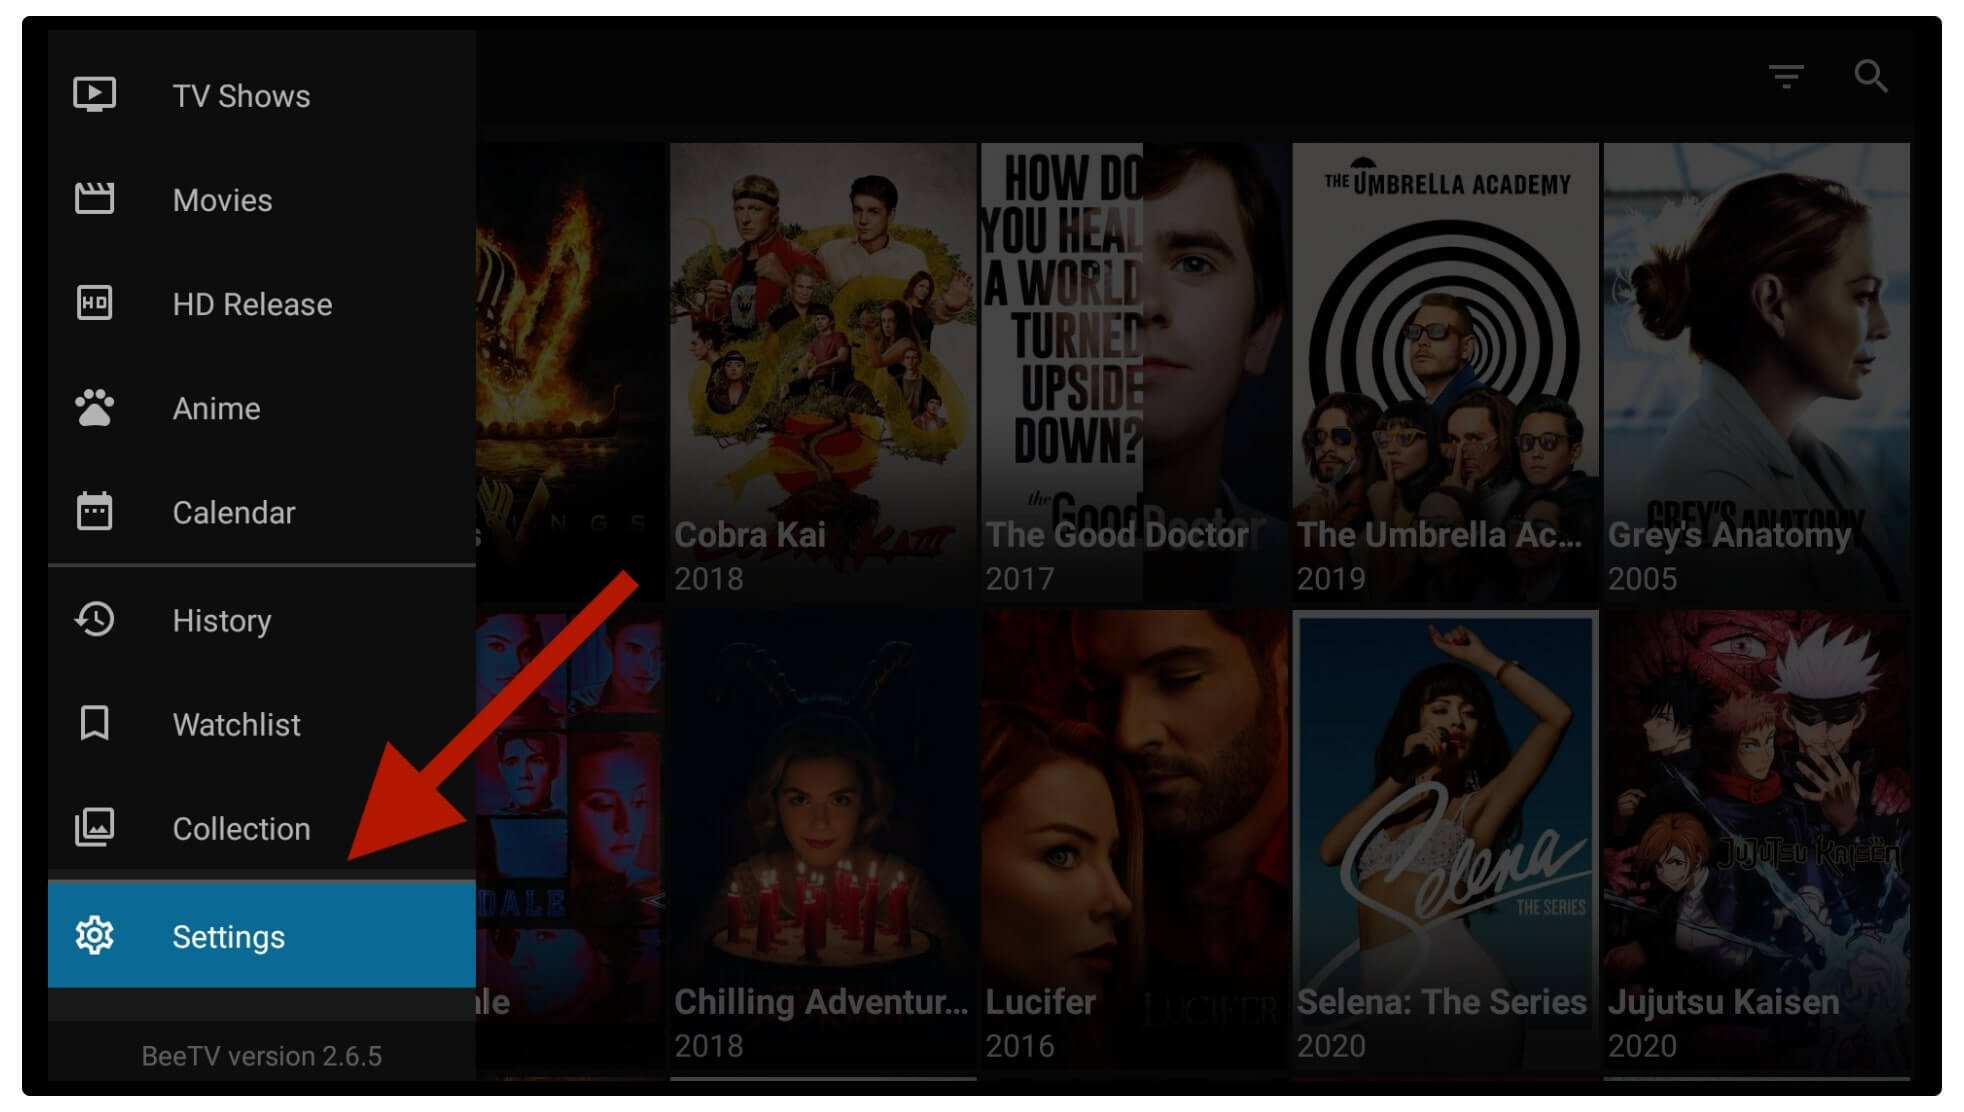
From here just click on the Login to Real-Debrid that is located under Account.
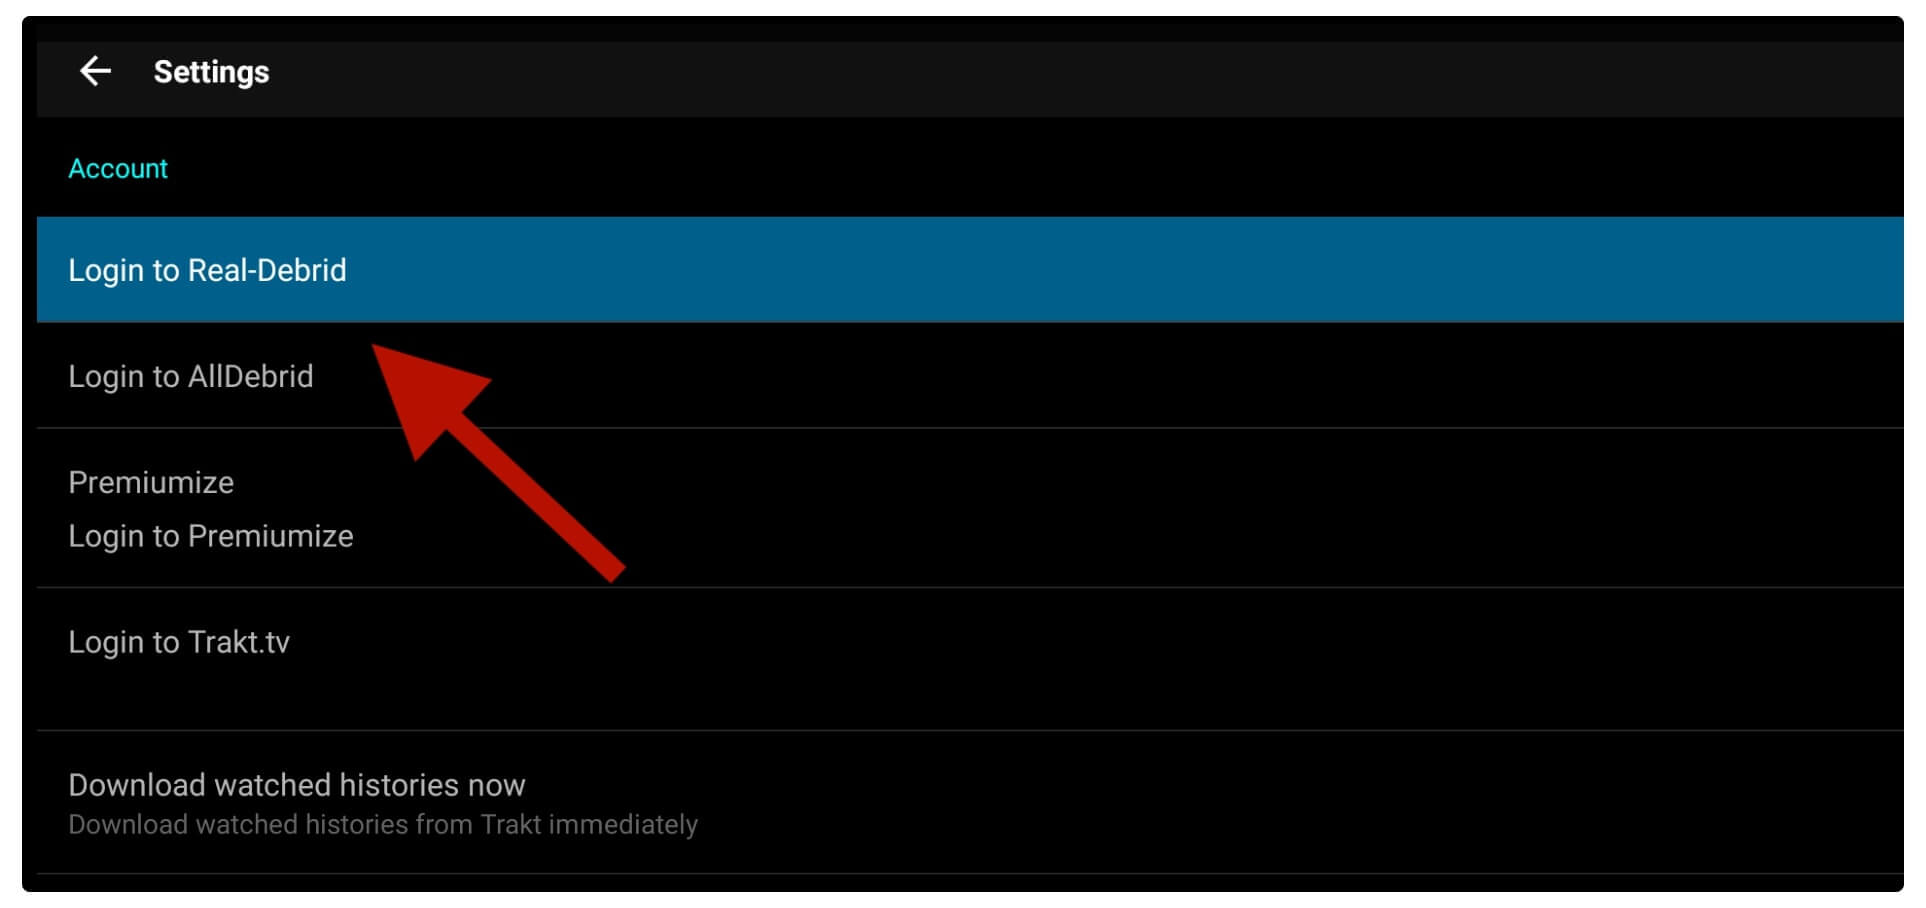
Here you will see a Code on your screen so stay there and don’t press any key.
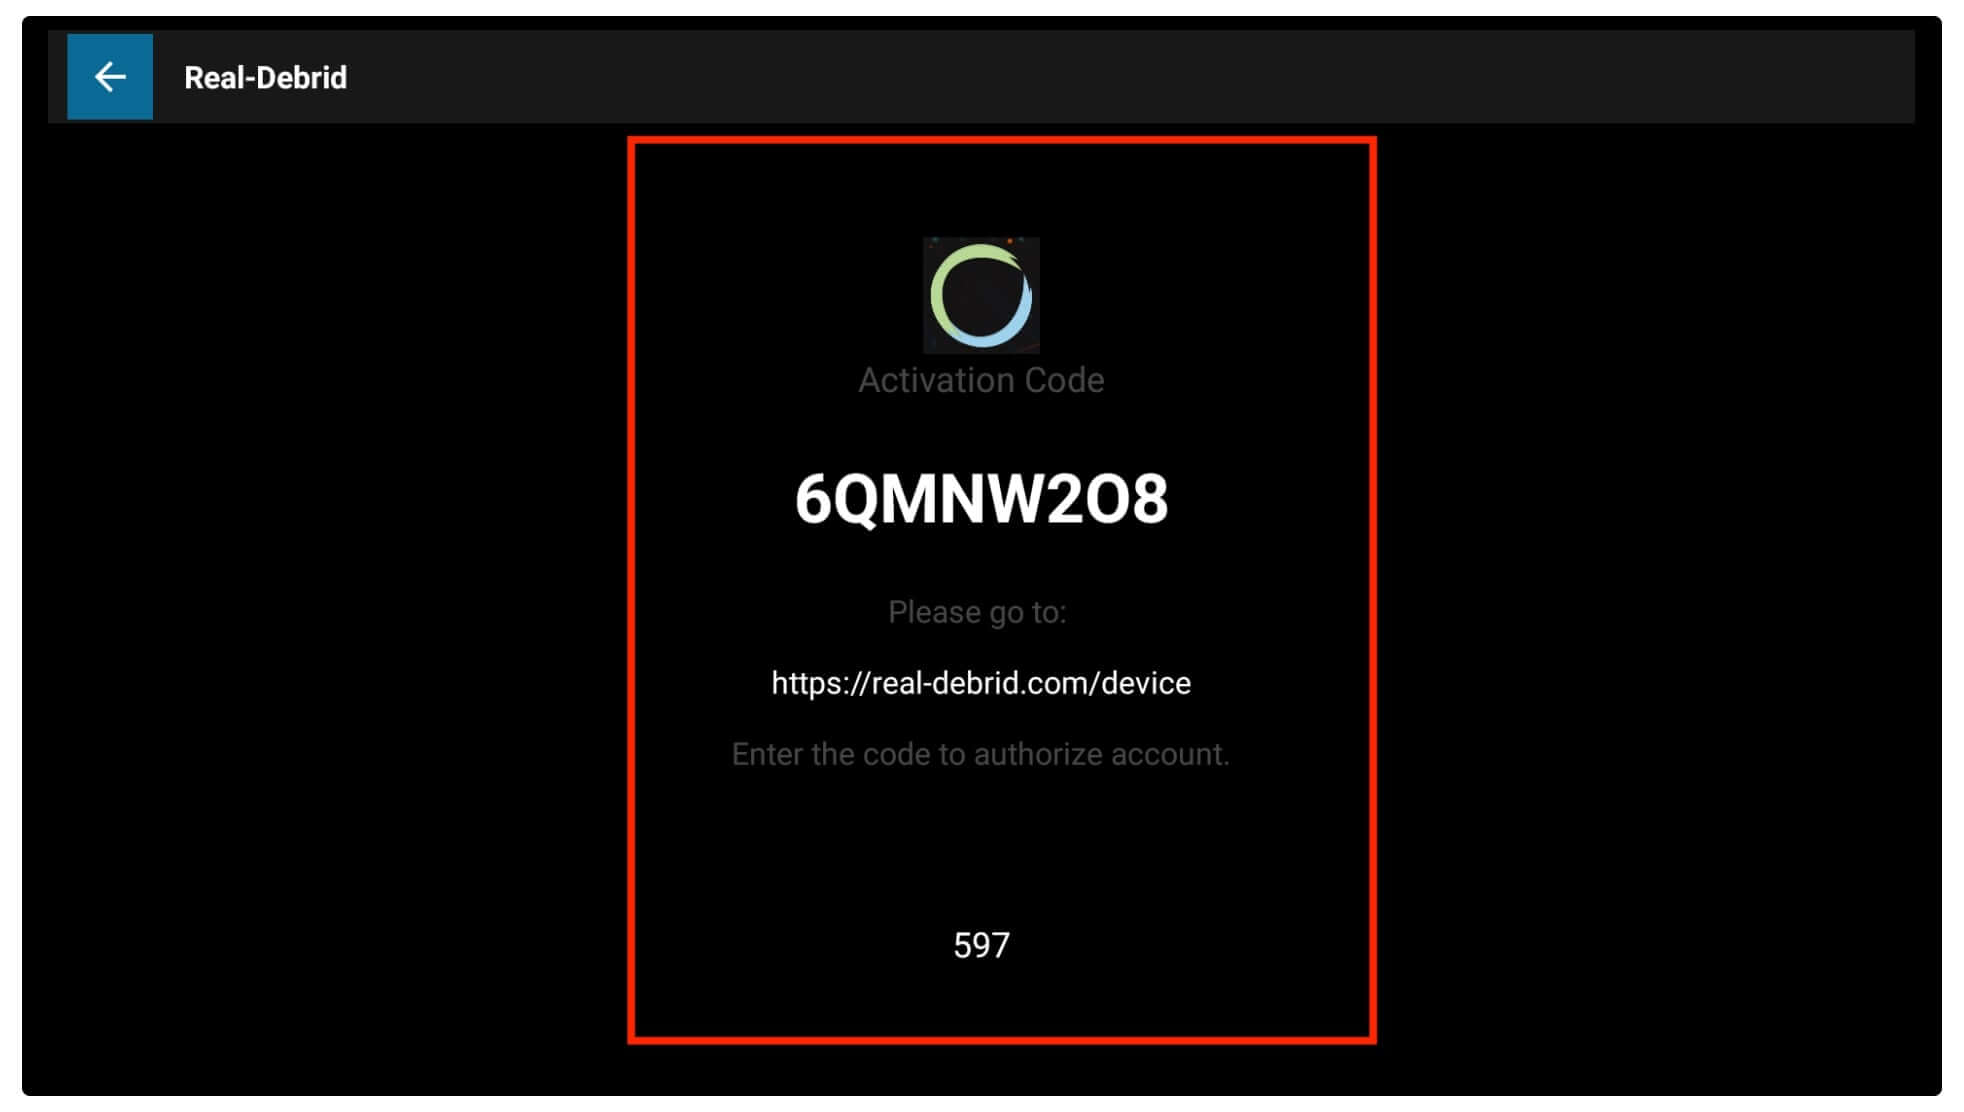
Now using your mobile or laptop go to https://real-debrid.com/device and then type the code that you see on the screen and click Enter.
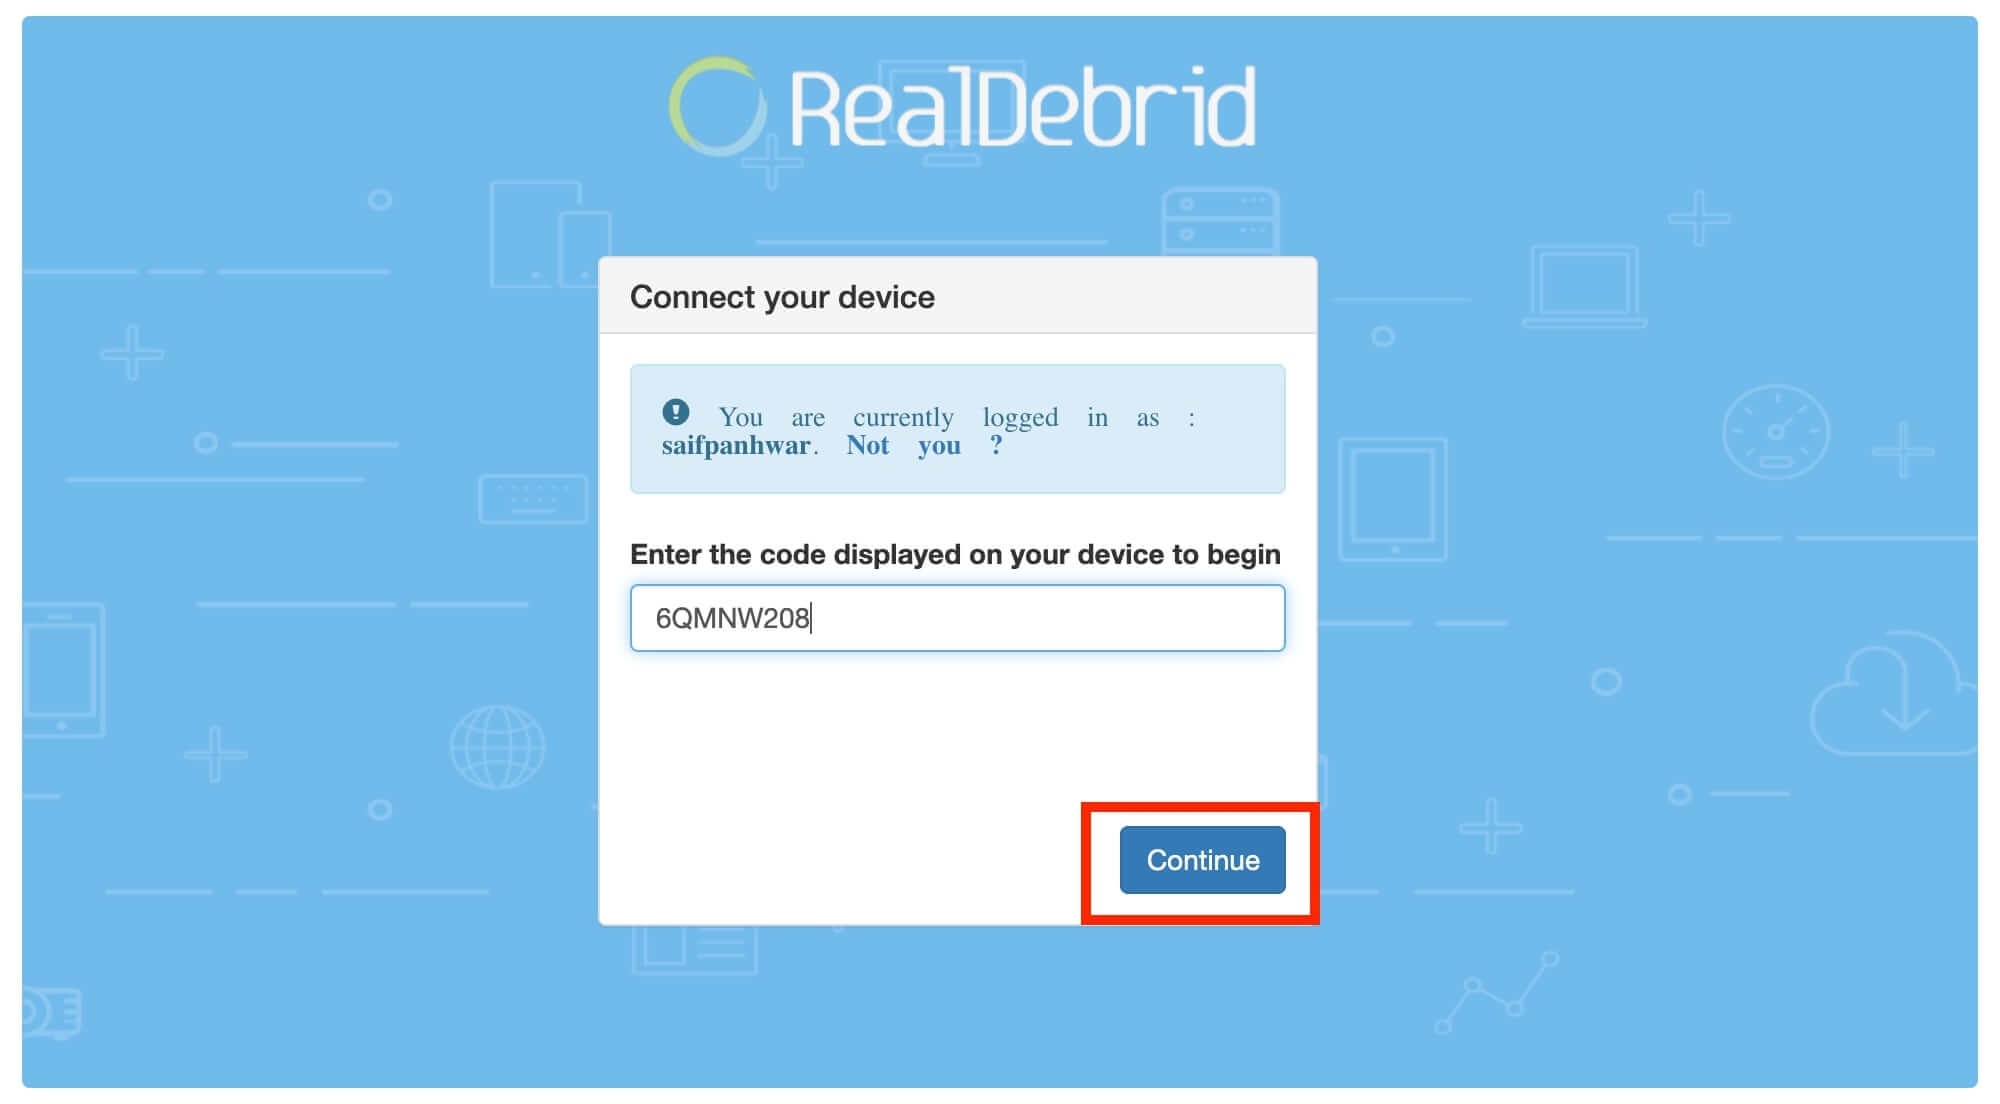
Note: Make sure to first log in to the account that you used to purchase this service.
After clicking Done you will be asked for permission then just click Allow. You will be then asked for the name of that device, just type Any Name you want (this is just optional you can leave this if you want).
That’s it you will then notice the Account Login notification there and also see it shows Logout Real-Debrid. That means the account is integrated successfully and now just open any movie or TV show and choose the RD link from there. You will notice more links appear than simply selecting any of the RD links to stream favourite content without buffering.
Fix BeeTV Firestick Not Working
After installing this app if you are facing BeeTV not working on your Firestick device then I have a few simple fixes for this. Once you follow them you will be able to make this app work again. However, make sure to read each method as if you face this issue in the future you can fix this in no time.
So, let’s just move towards the quick fixes of BeeTV on Firestick not working:
Clear Data
The first fix that we will talk about is to simply clear the data of your application because sometimes you may make changes in the app that are hard to follow. In this way, due to these Settings, BeeTV not working properly or it just keeps closing after launching it.
After following this section this will remove everything from the app like integrated Real-Debrid or another account, downloaded content, saved settings, etc. This is why make sure to follow these steps carefully and understand the risk of it but this is the quick and simple fix for this problem.
Ok, so to clear data of this app follow the steps given below:
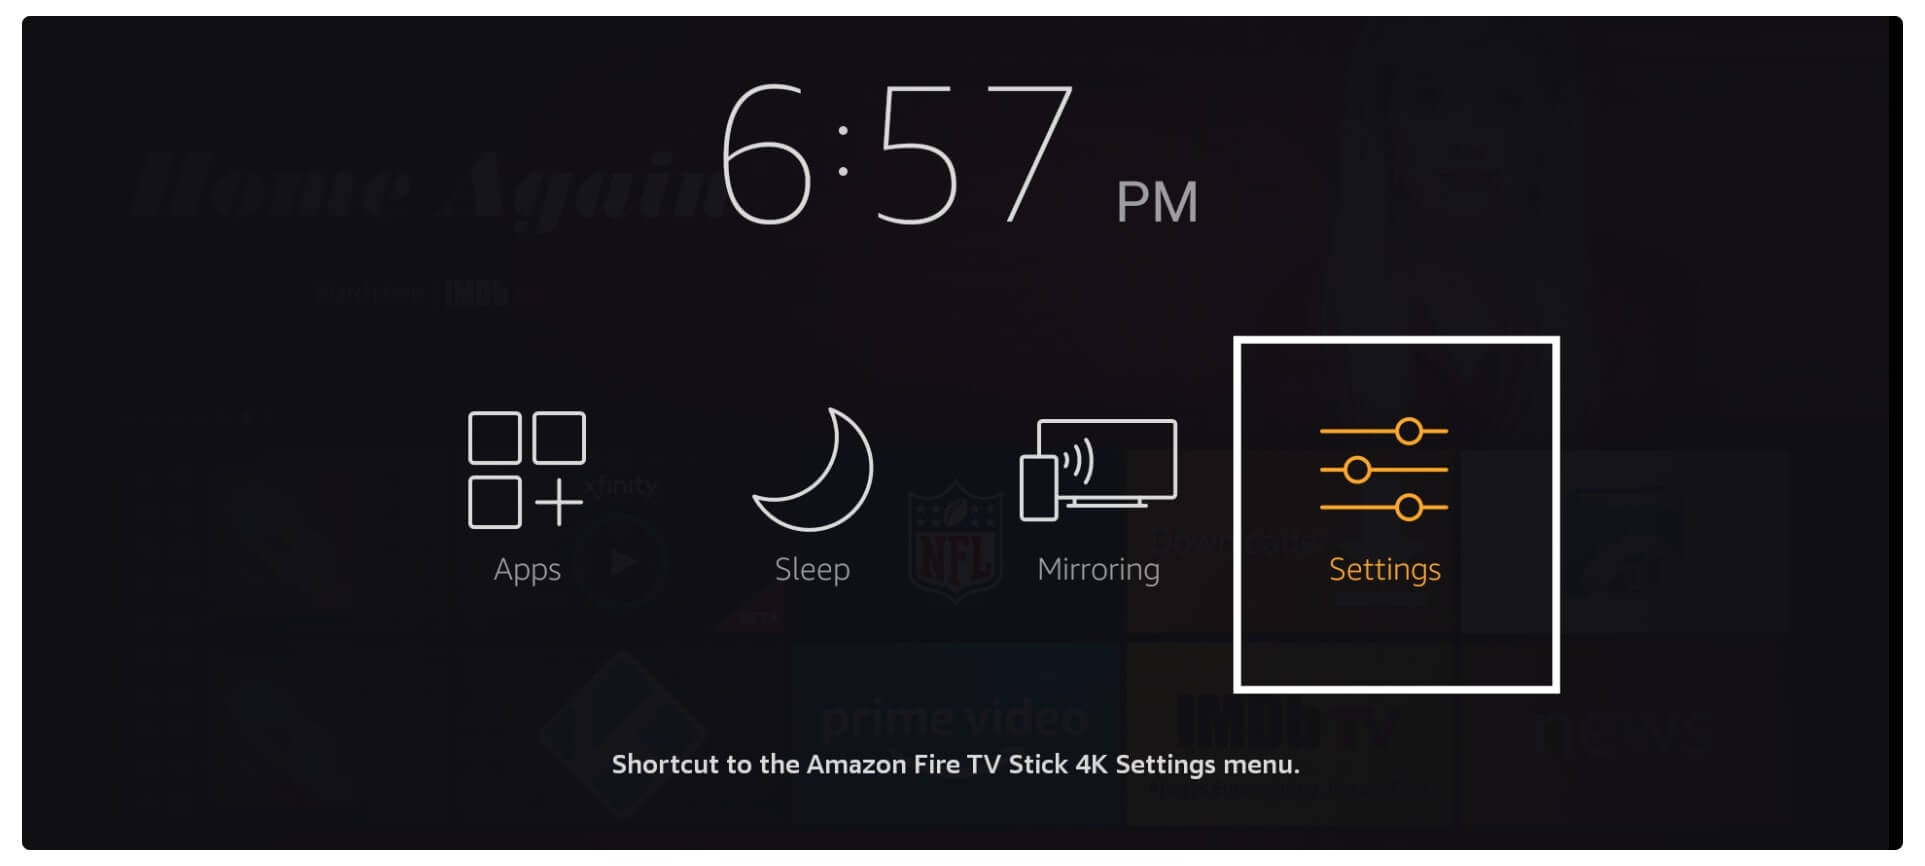
Go to Settings on FireTV from the above menu or press and hold the Home button for a few seconds and open Settings.
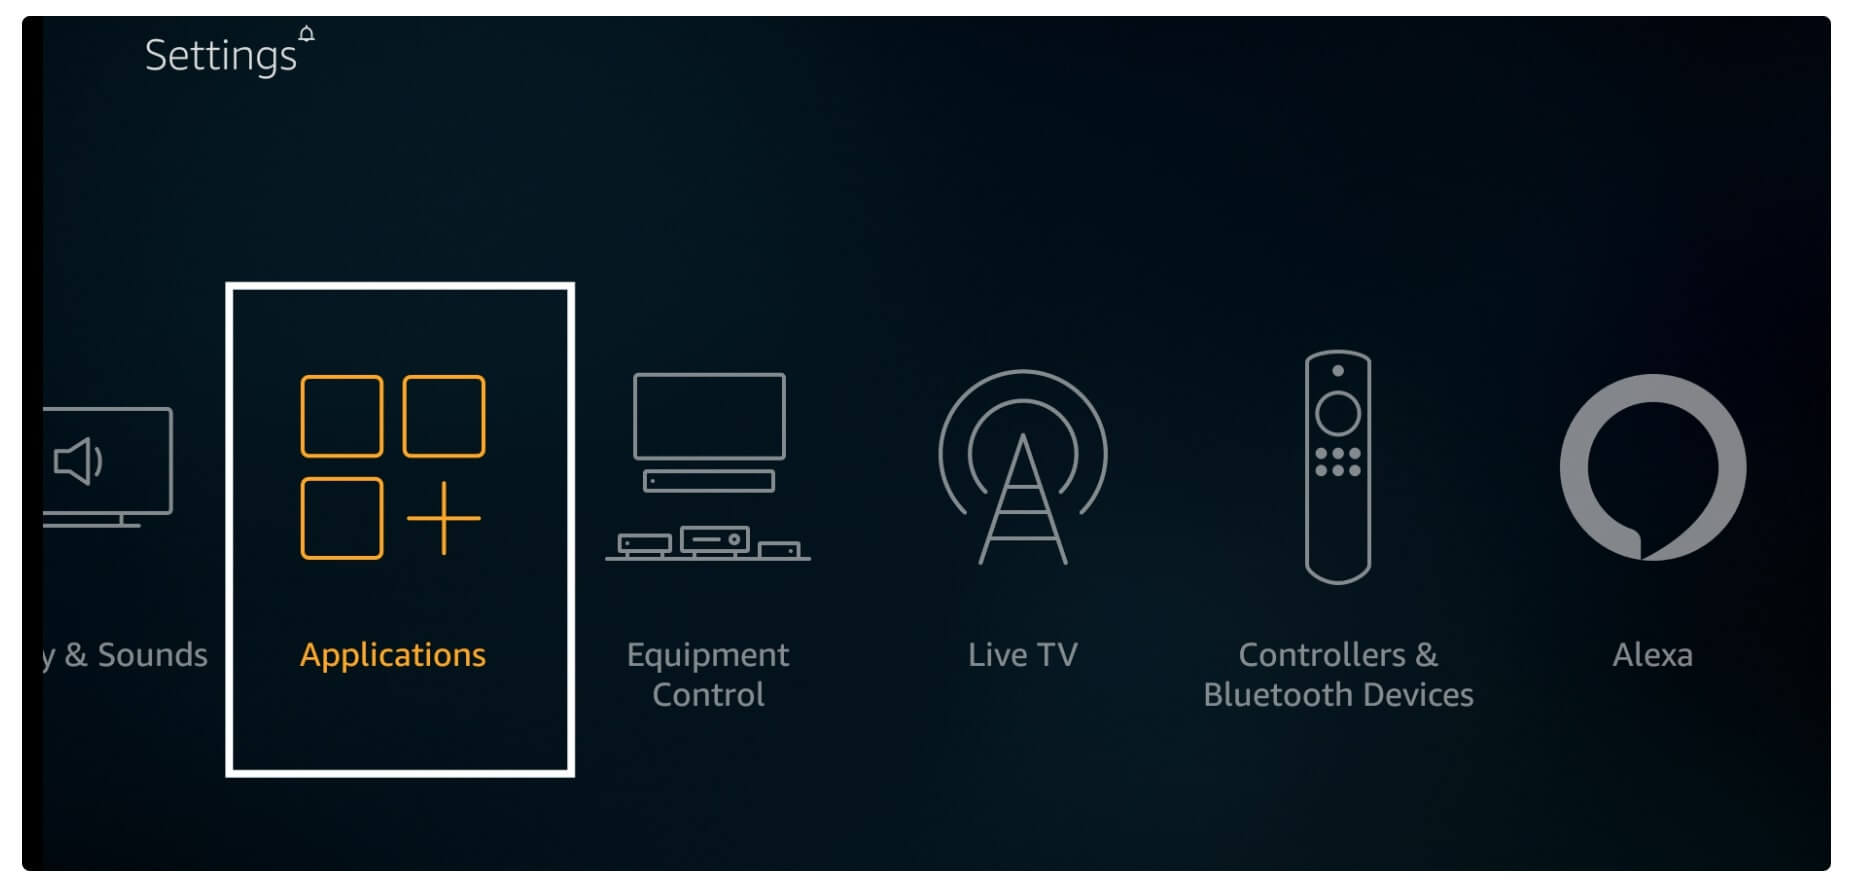
After going there just move forward and then open Applications from there.
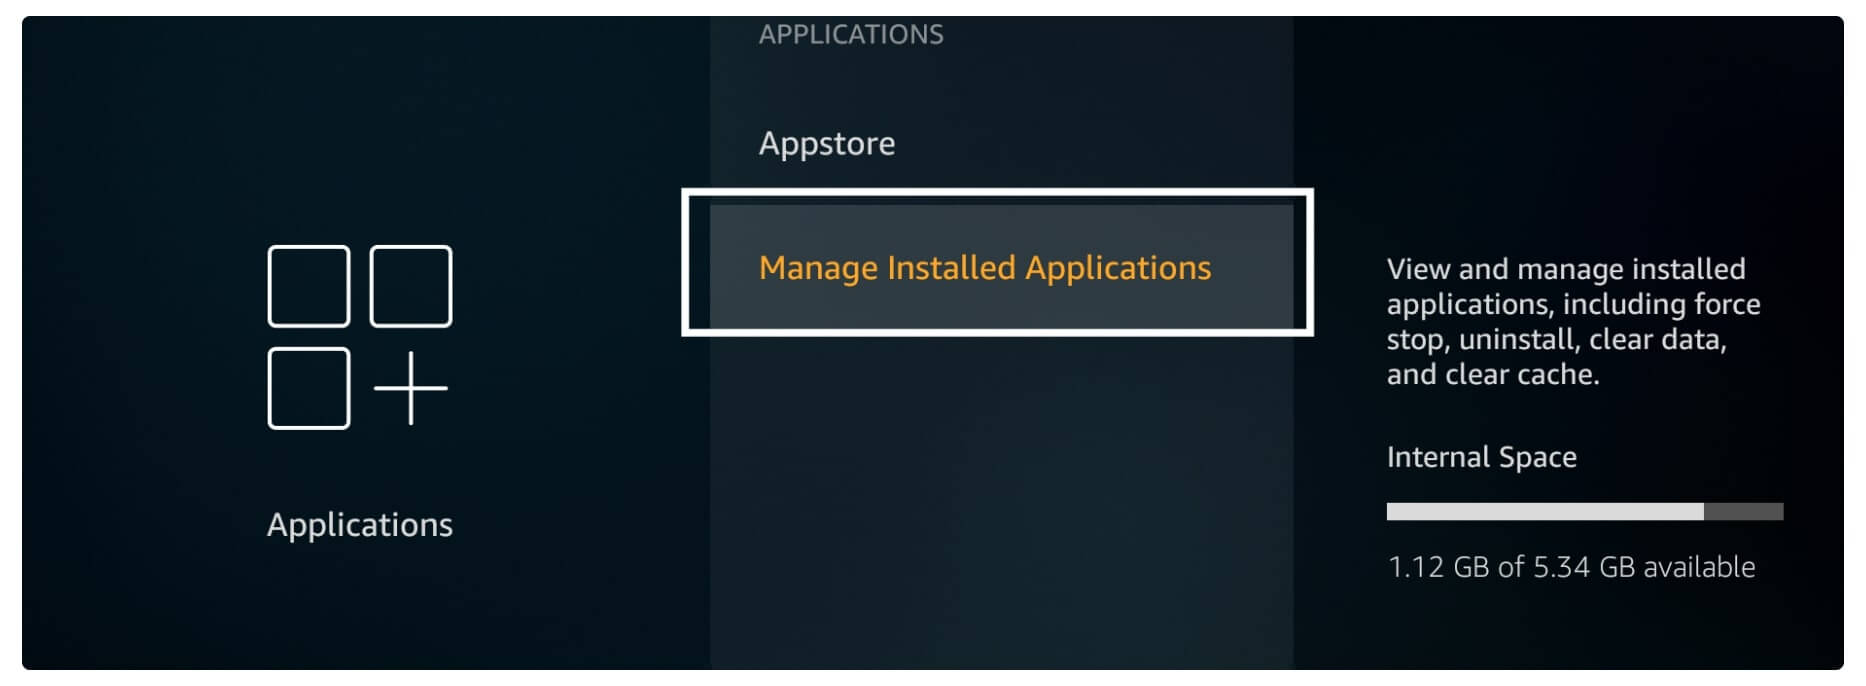
Now just scroll down and click on Manage Installed Applications.
This will show the list of all installed apps now scroll down and select BeeTV from the list.

You will then see various options there just hover to Clear Data and press the Select button. It will again ask for the same just click Clear Data again for confirmation.
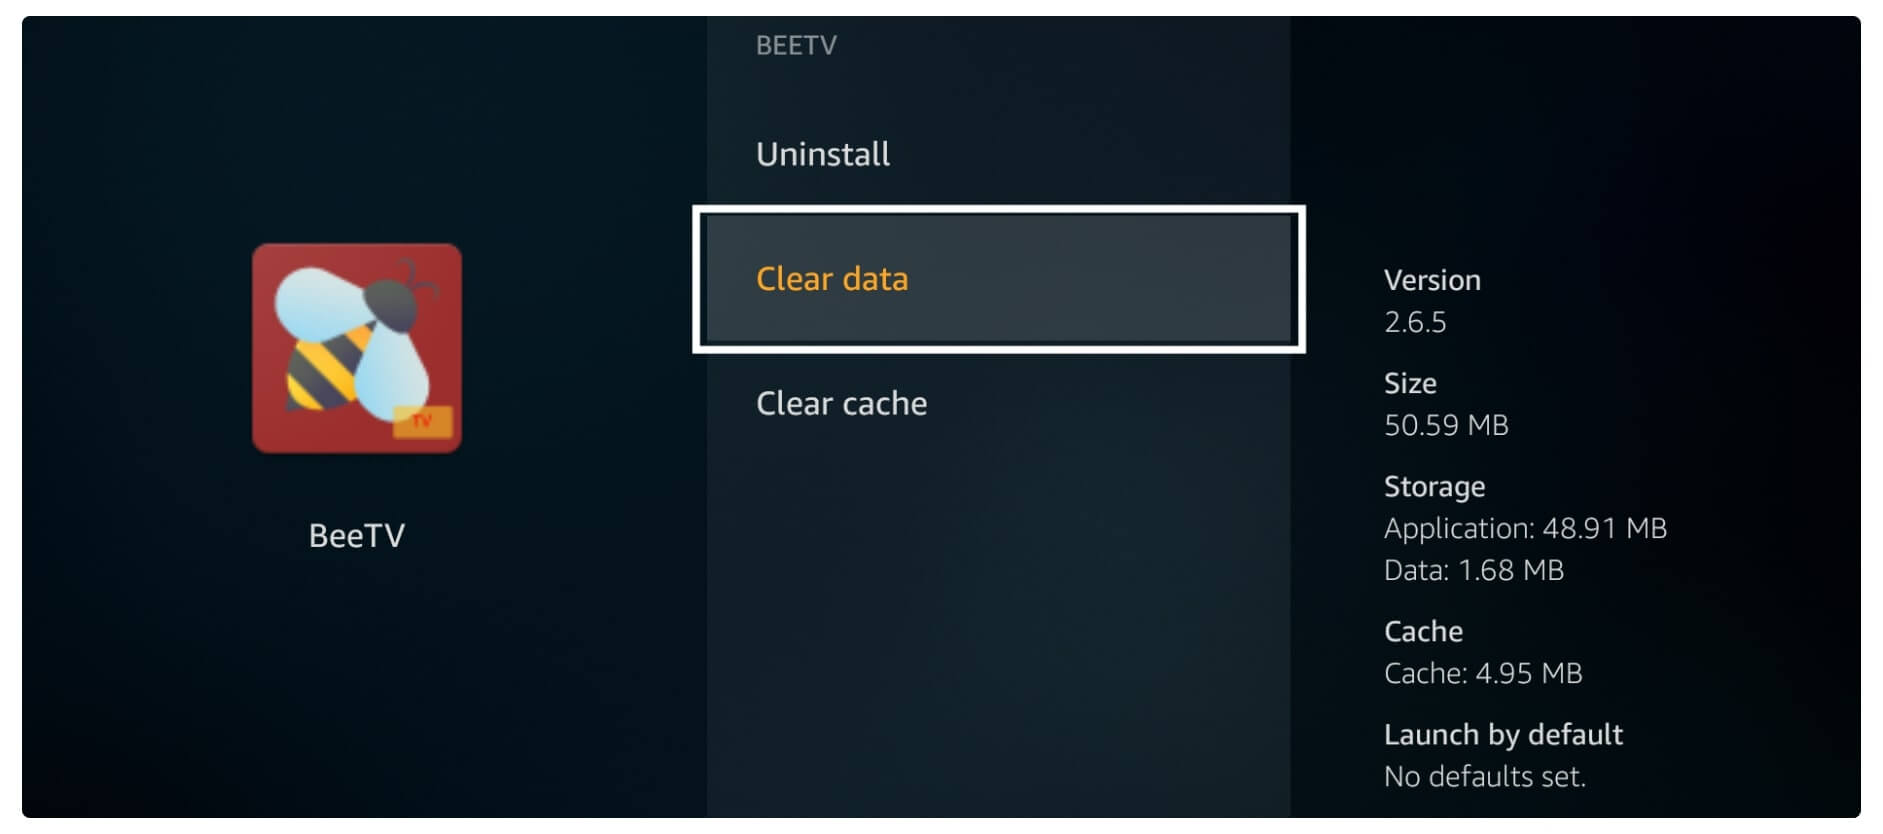
Now the data has been cleared from the App and then just launch it from the Home Screen and you will notice it is asking for permission. That means you need to Set Up this application again and if you have forgotten the steps then don’t forget to go above and check the Setup guide.
Re-Install App
Just in case the above fix is not working for you then there is another simple solution available for this. Which is simply just uninstall the app and then re-install the new version from our website. This is the rare situation in which you are required to follow this section because after clearing data this app works again.
But if you are still having an issue then this is the only option left for us to just re-install the BeeTV app. Although there is a benefit to this because with this you get the latest version. I always change the app to the latest version whenever I get a notification about it.
So the first thing that we need to do is just uninstall this app by following the below steps:
- Open Home Screen and then hover to the above menu and select Settings.
- Now just move across and click on the Applications.
- After this open Manage Installed Applications there.
- When it shows all apps just scroll down and select BeeTV.
- Now hover to Uninstall and then press the Select button on the remote.
- This will ask for confirmation and then just click Uninstall again.
Now the BeeTV is removed from our device successfully and then we just need to re-install it by following the above guide. As I told you earlier I always try to keep the app updated so you will get the latest version.
Conclusion
No doubt BeeTV on Firestick is the best app to watch Movies, TV Shows, Anime, and Documentaries free of cost. So, in this article, we learnt a complete method to install BeeTV on Fire TV Stick in just 2 minutes. Even though we also learnt how to use this app for the first time and integrate Real-Debrid as well.
I have also listed some of the common fixes if you are facing BeeTV not working issue so just go above and check that as well. Since this app scraps links from third-party websites, you may end up having pirated content. That’s why to make sure to always use the VPN service to avoid tracking, and ISP throttling and to protect your privacy.
I would simply suggest installing ExpressVPN as this is the best VPN service ever that provides you with No-Log Policy and supports all apps including Kodi. If you are willing to give this service a try then they are offering a 7-day of free trial which you can claim by going to the ExpressVPN website.
In the end, if you just love this article and want to show some love then please don’t forget to share it with others. This will be a great help for me as I will be able to grow this website so I can bring new tutorials, apps, tips, and tricks for you. Also, for any questions or suggestions please don’t hesitate to write in the comment section below.

