Have you been searching for a guide that helps you to understand what is Kodi URL resolver? But until now you haven’t found anything useful on Google? If so then your search is finally over because in this article I came up with a complete explanation guide above the URL Resolver.
In case you want to learn everything about it like how it works and what actually it does then just don’t forget to keep reading this article. Because there are several things that I am going to provide you here which will help you in understanding this term even better than any other guide.
Despite this, I came up with a complete guide on how to install it and how update it as well. So, if you don’t want to miss any of this information then just stick with this article. However, the installation process will work on each device like all Firestick models including Fire TV Cube, Windows, Linux, Mac, iOS, and Android.
What is Kodi URL Resolver
URL Resolver is a tool that works in the background of Kodi and is used to scrape links from different sources. It actually converts streaming links into media files to stream Movies or TV Shows. The main feature of this script tool is to enhance the user experience by providing them with reliable and fast streaming links.
In other words, a URL resolver works similar to Google in which a user searches for any term, and then Google shows different results. But in this case, a user clicks on the name of a Movie or any other content, and then the URL resolver scraps streaming links from different sources and provides them in one place.
However, this tool came up with various Kodi Add-ons like Exodus Redux, Covenant, Yoda, and many more. So, when you click on the movie name or TV show you will notice the same URLs on all these different add-ons. It is because most of these Add-ons either use the URL resolver or use Resolve URLs which are quite similar.
How to Install URL Resolver
Now in case you are using any 3rd-party Add-on like Covenant or Exodus Redux that means there are chances that you already have URL Resolver installed. Although if even installing these Addons you are having an issue as you didn’t see any scrapped links in your Addon that could be the script is not installed.
In this way, I have a simple and easiest guide for you that you can follow to install the URL resolver tool on Kodi instantly. The process is quite simple, especially for old users. However, don’t worry if you are a beginner then I am going to provide you with screenshots so you can understand each step and follow them.
Although before we move towards the installation section we first need to enable the installation of Unknown Sources. It is because just like Firestick, Kodi also restricts users from downloading 3rd-party add-ons. But don’t worry this can be undone easily and then we can move towards installing a URL resolver section.
So, here are quick steps to enable unknown sources on Kodi:
- Launch Kodi and from Home Screen click on Settings located near the Power button.
- Now click on the System Settings that appear at the bottom right-hand side.
- Click on Basic and Toggle to Advanced or Expert from the left panel.
- After this hover to Addons and click on Unknown Sources.
- A warning message will appear just ignore it and select Yes.
Now the Unknown Source has been enabled on your Kodi which means we are now ready to move further to the installation section. Although if you still didn’t understand any of these steps then you can follow this complete instructions guide along with screenshots: Enable Unknown Sources on Kodi
Ok, so let’s now waste any further time and just check out these steps to install URL resolver:
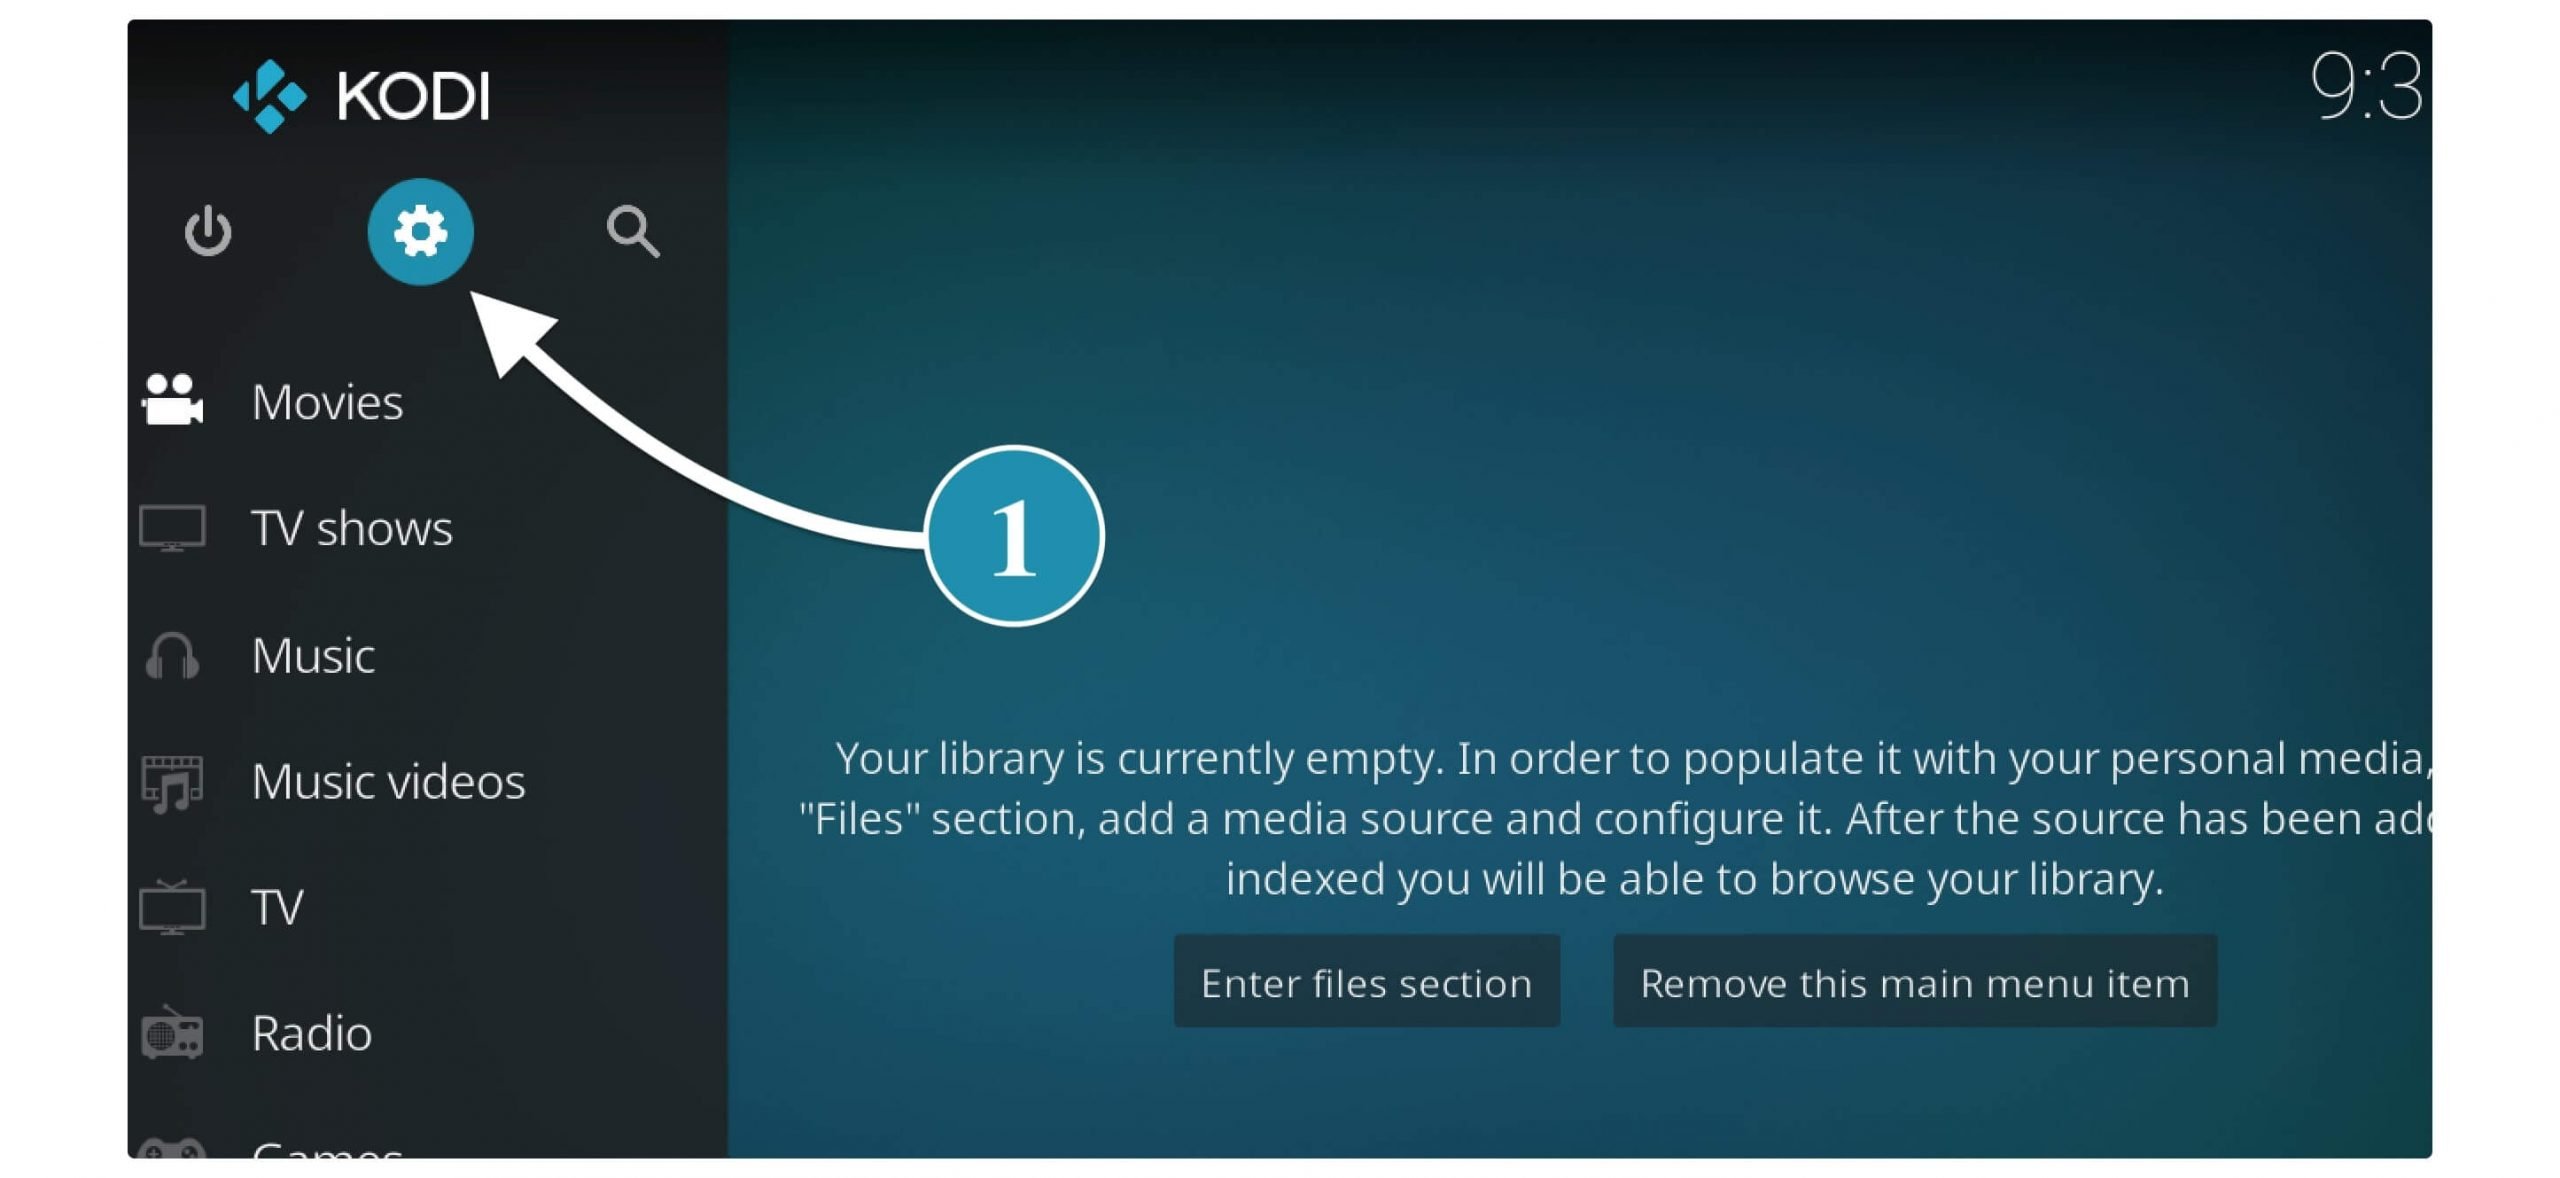
Open Kodi on your desired device and from the Home Screen click on the Gear icon to open Settings next to the Power button.
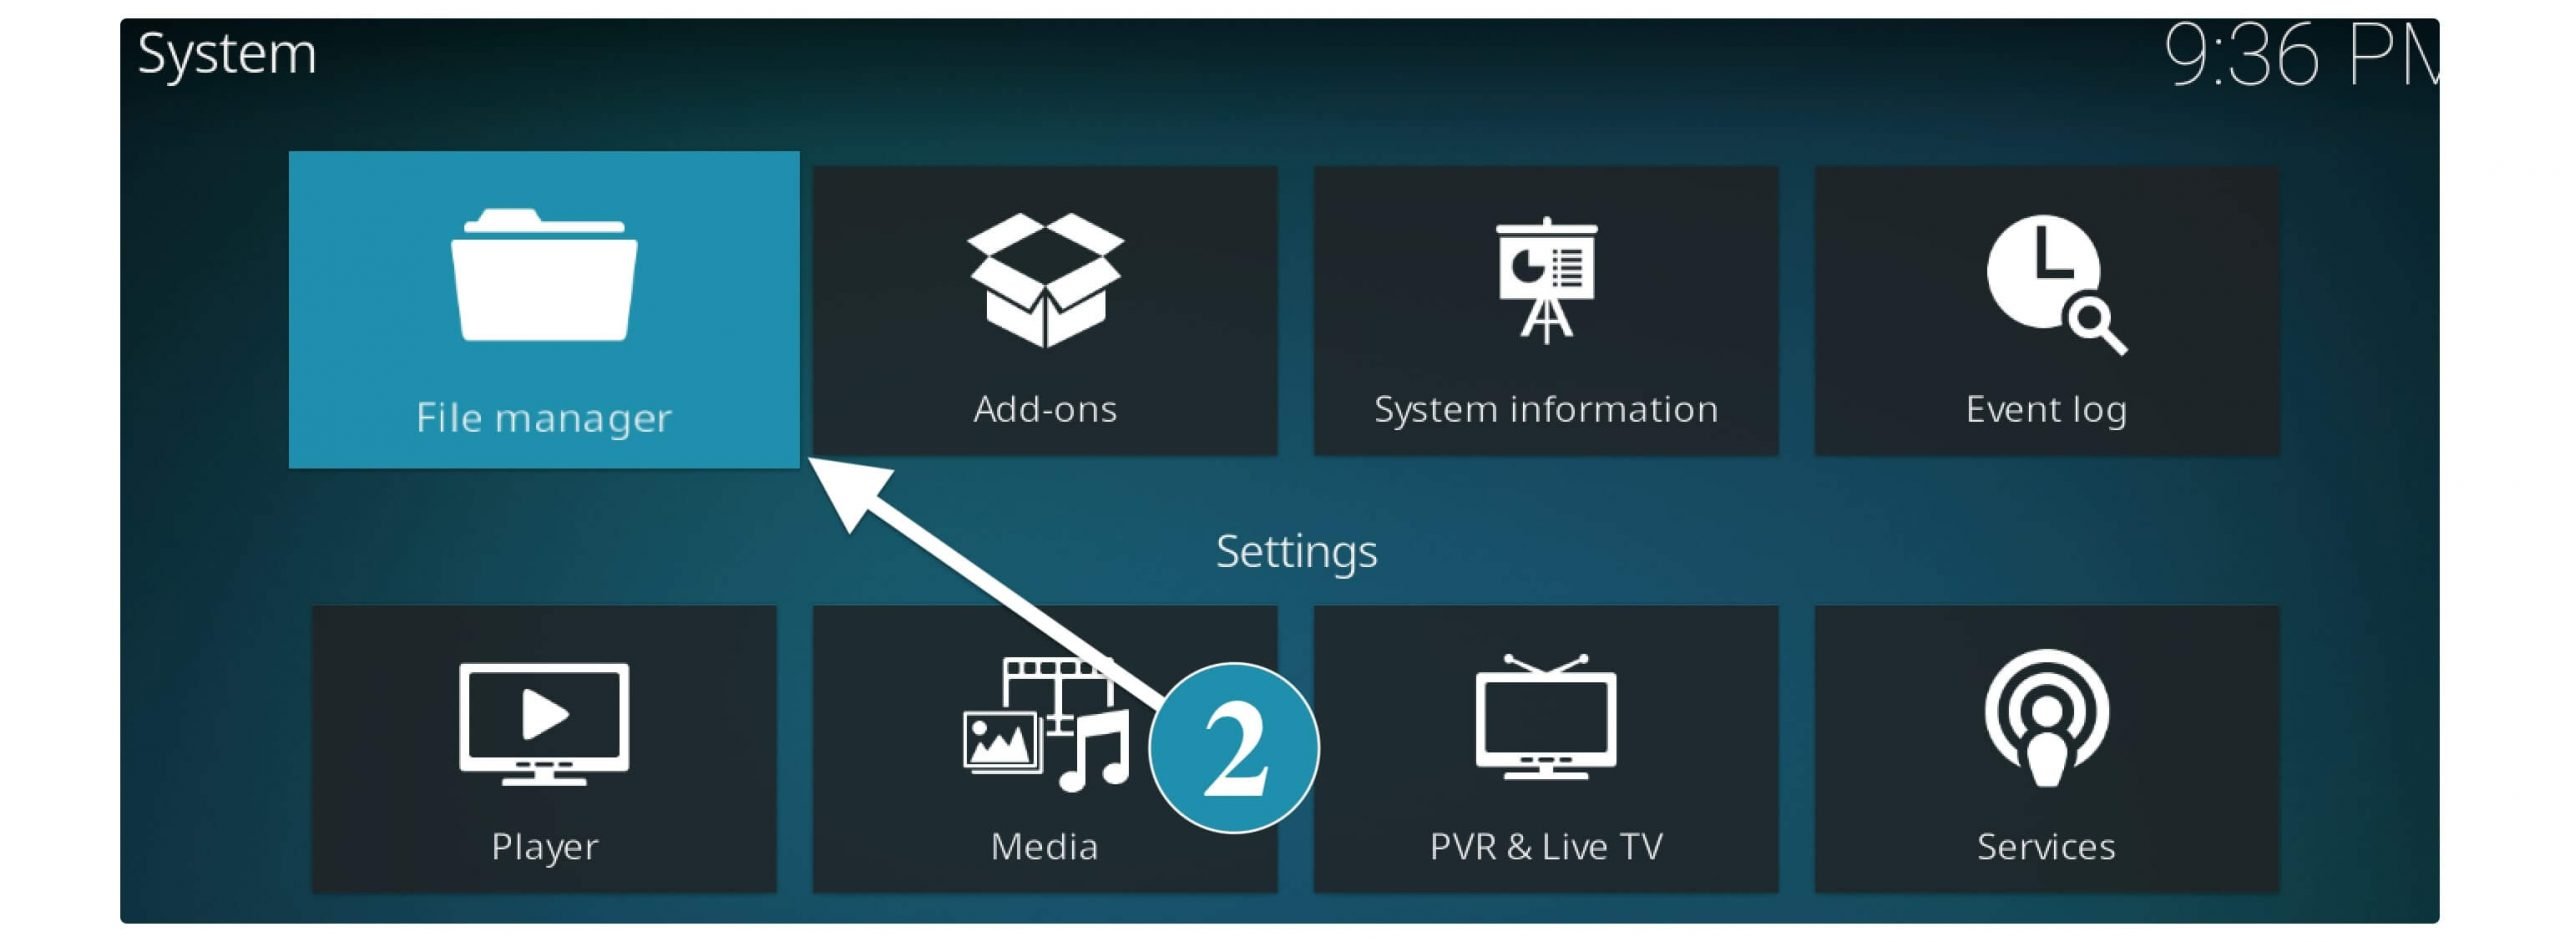
After going there now click on the File Manager located in the top left corner.
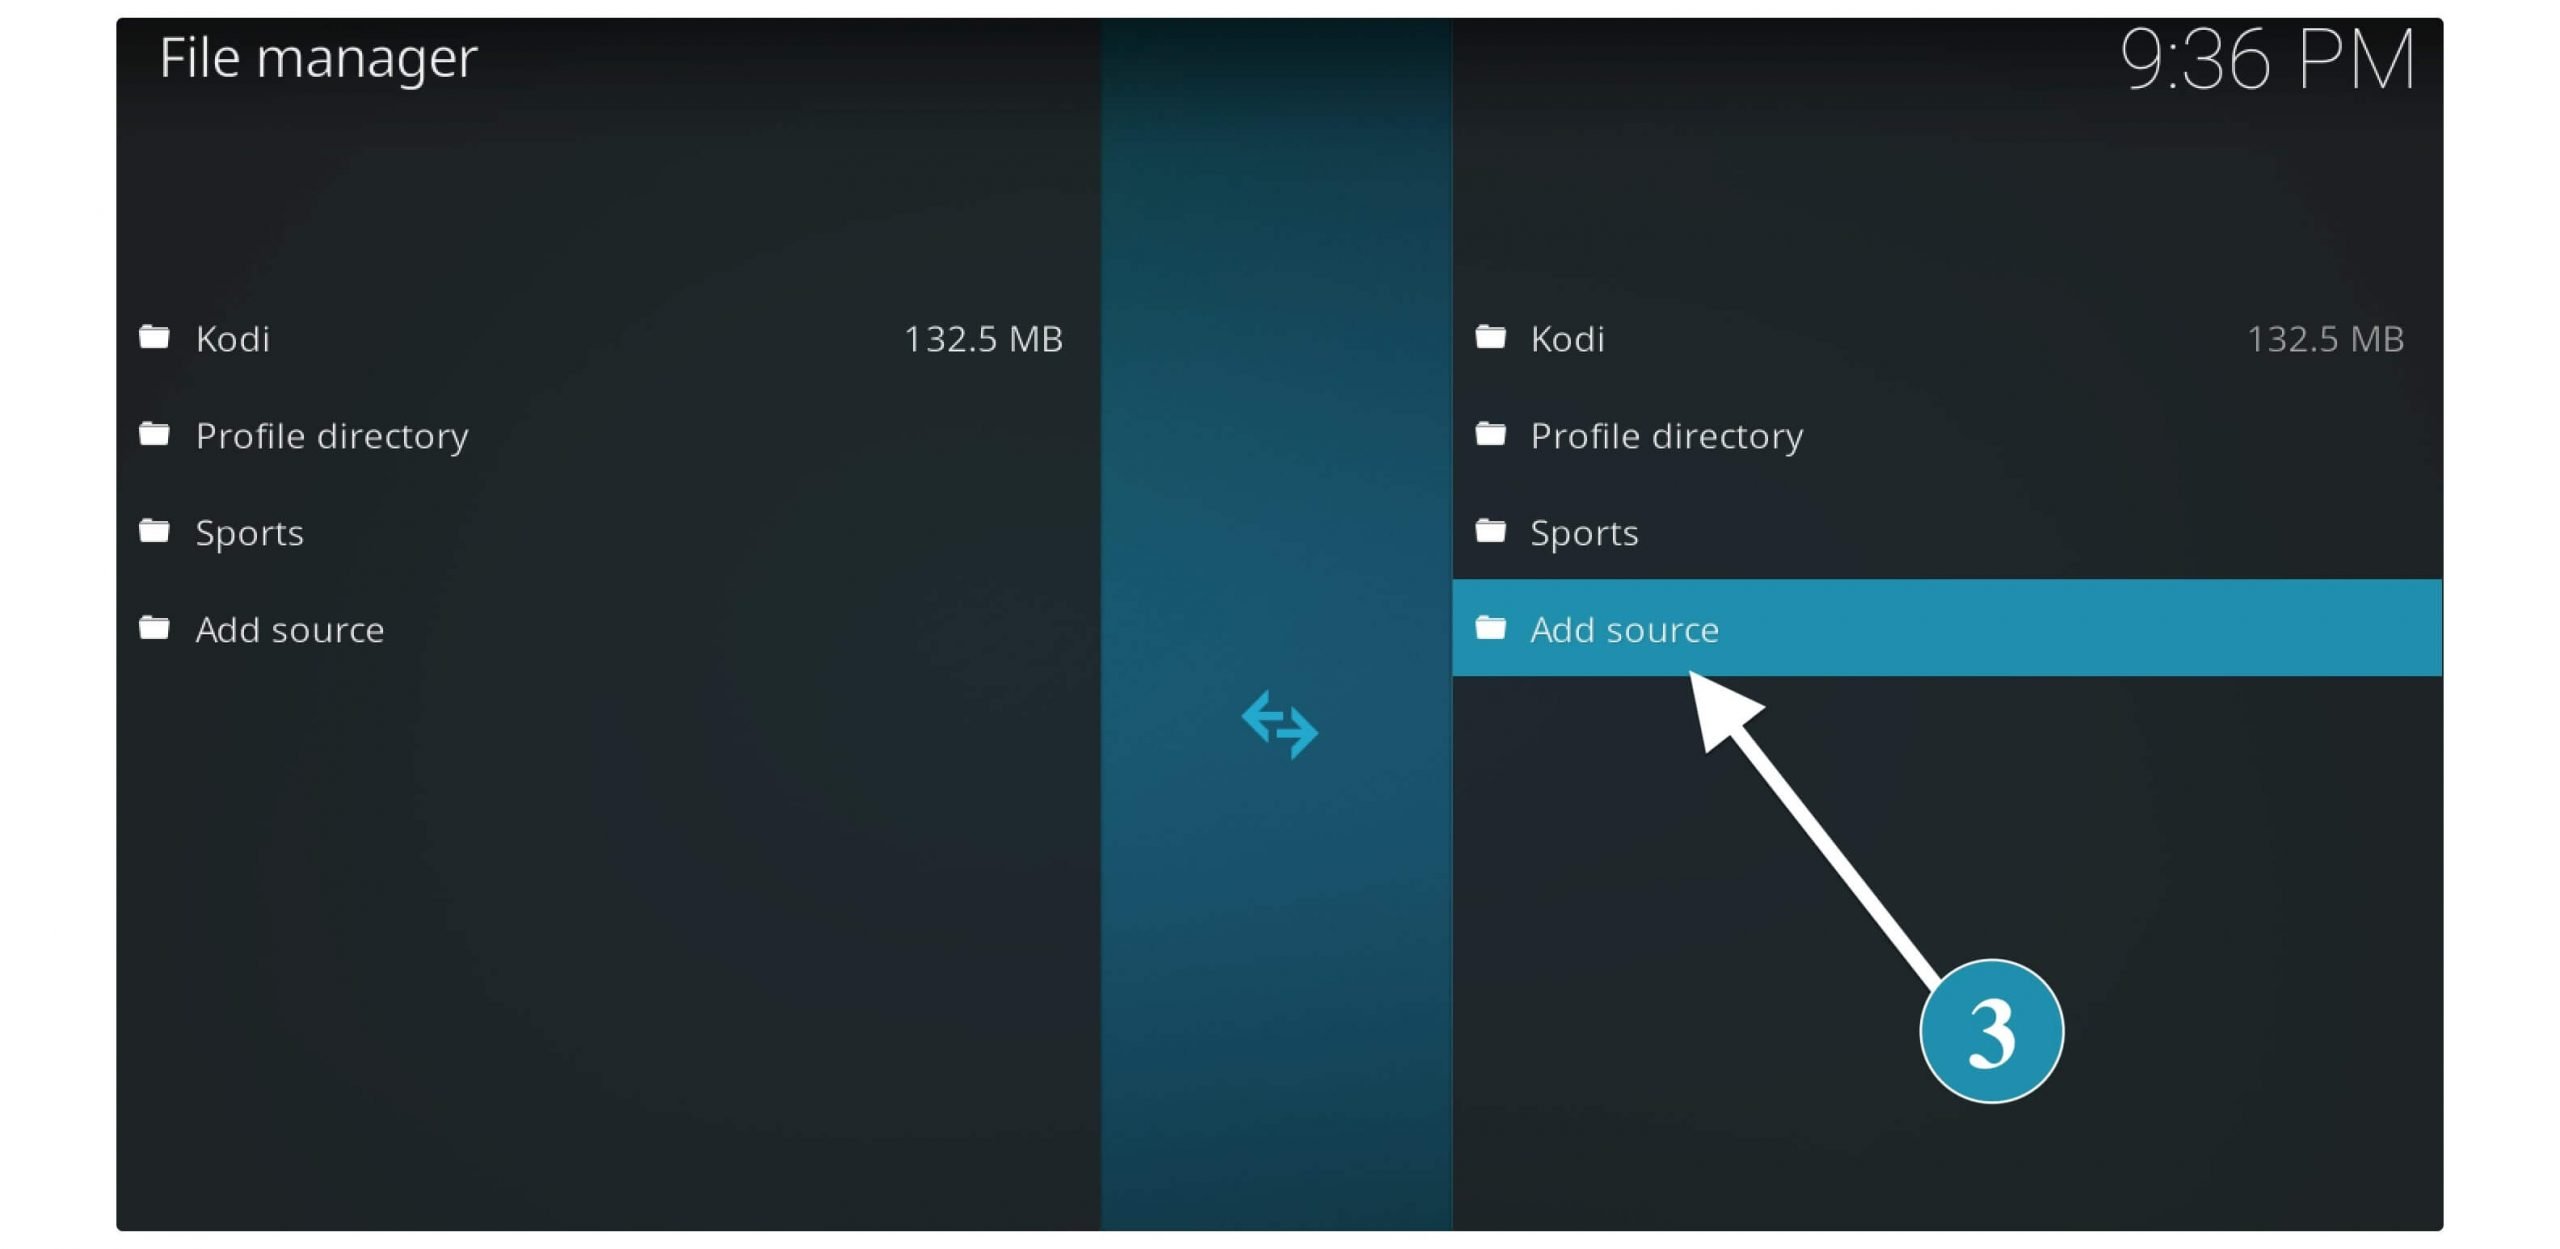
Once going there you just need to click on the Add Source from the left or right side.
A box will appear there click None- and then type http://fusion.tvaddons.co/ and select Ok. Now in the below box type the name of the source like URL Resolver or whatever you want and click Ok again.
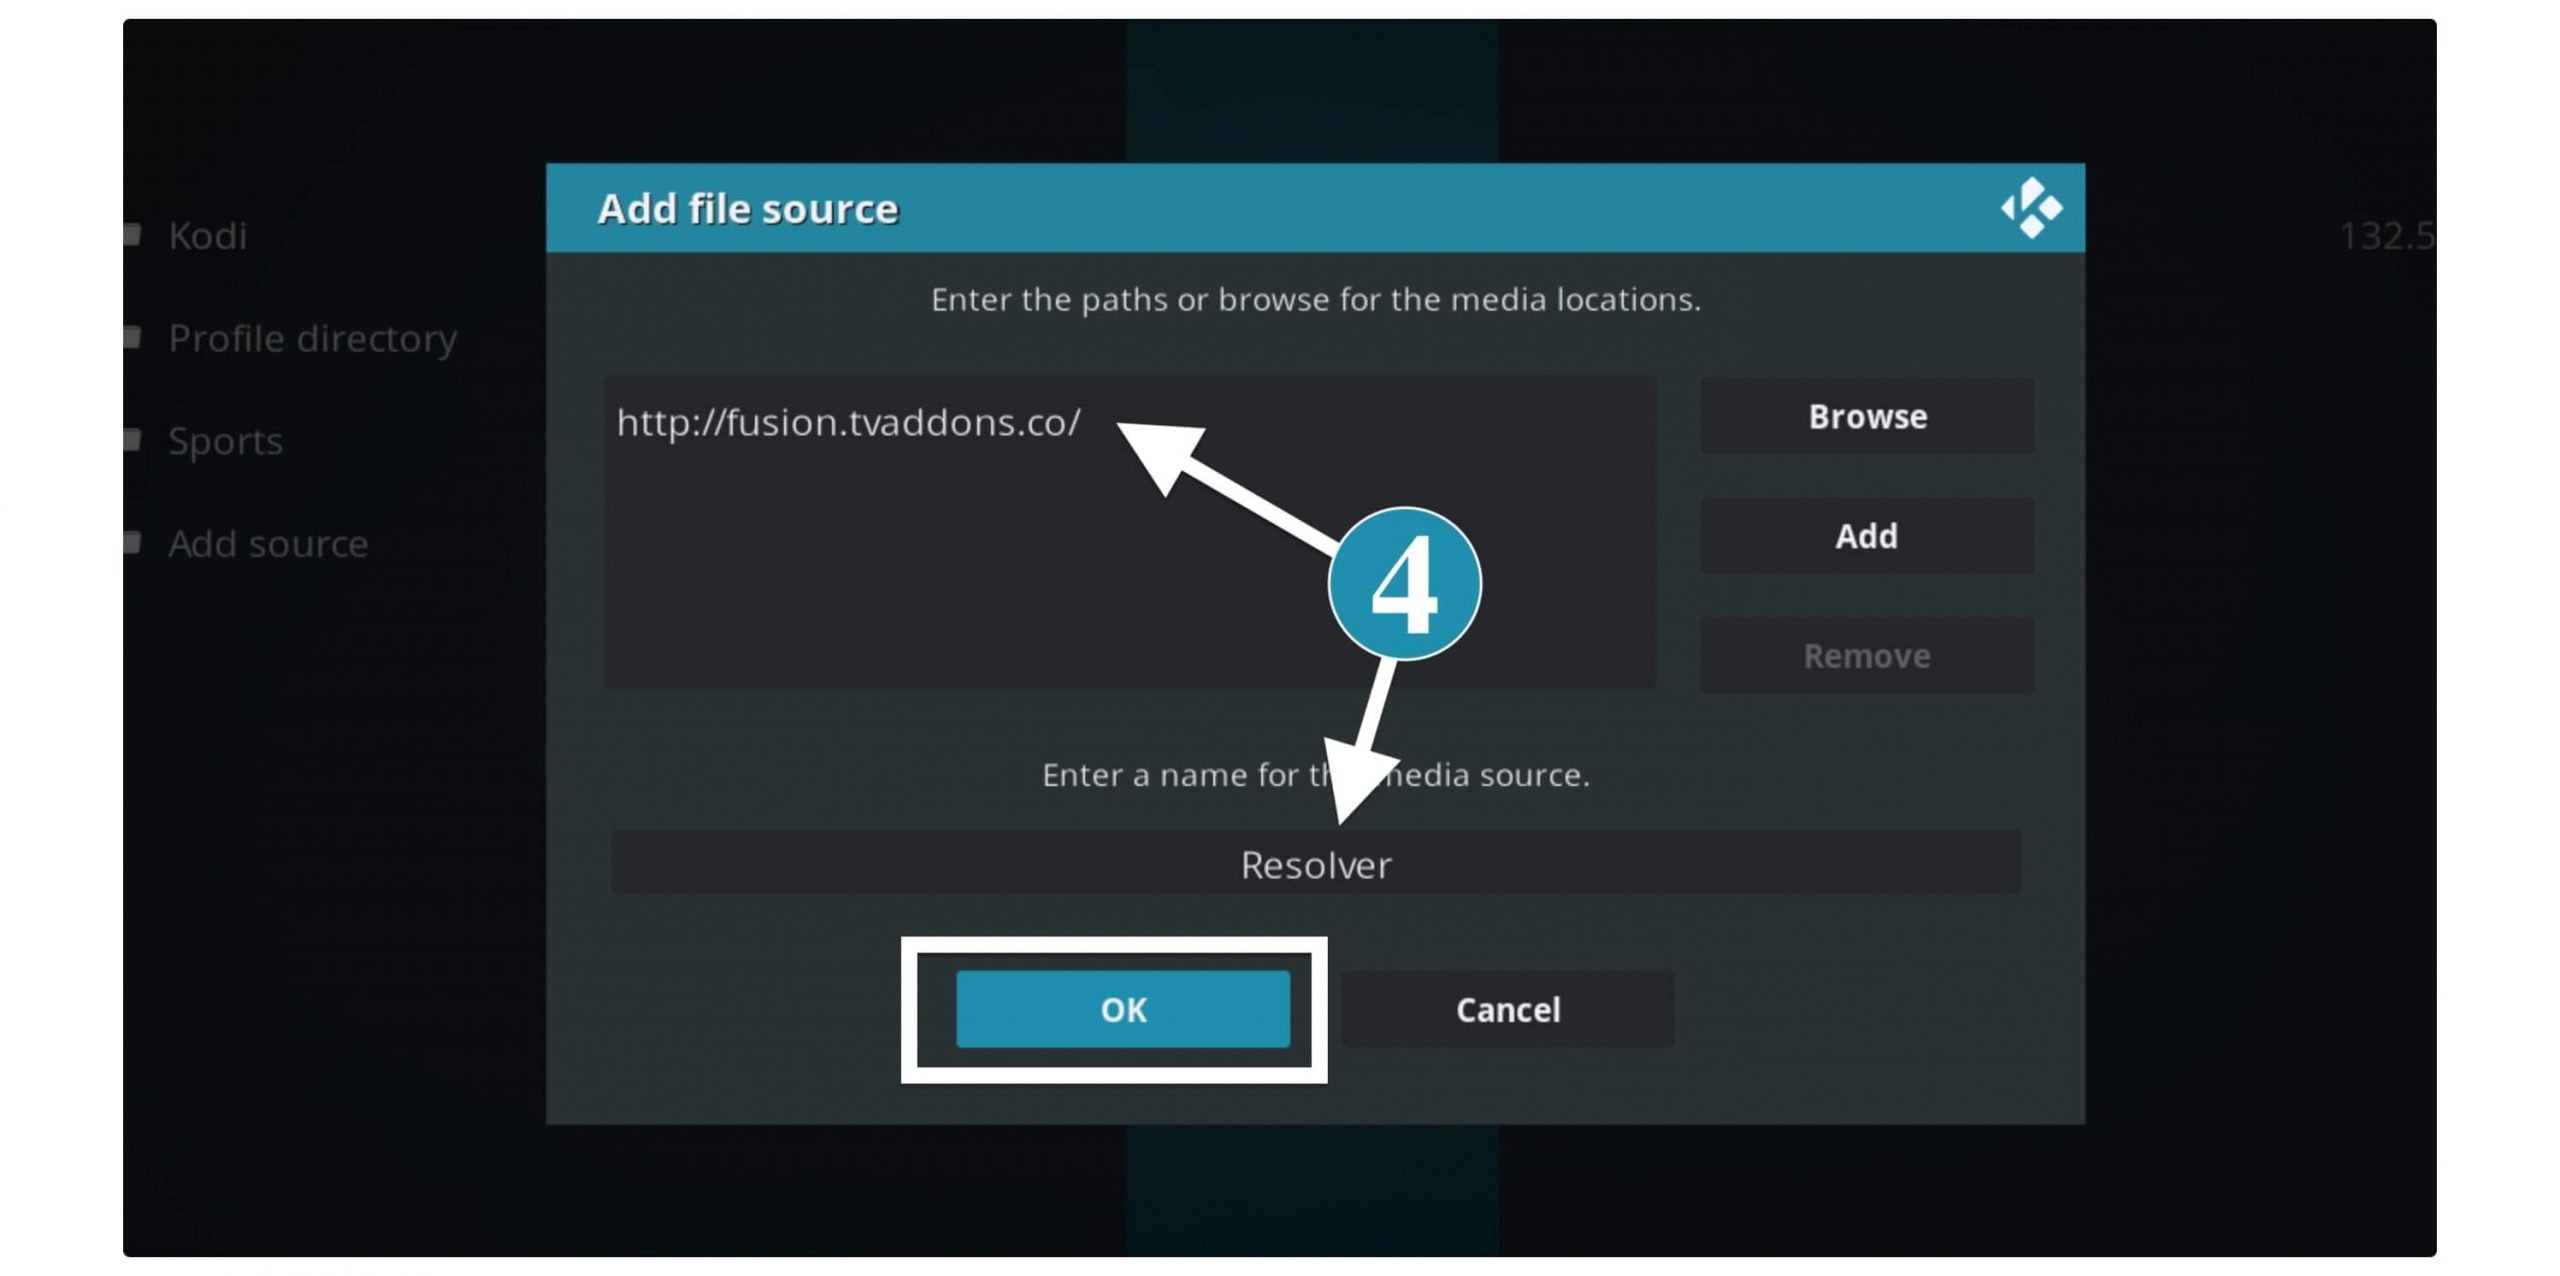
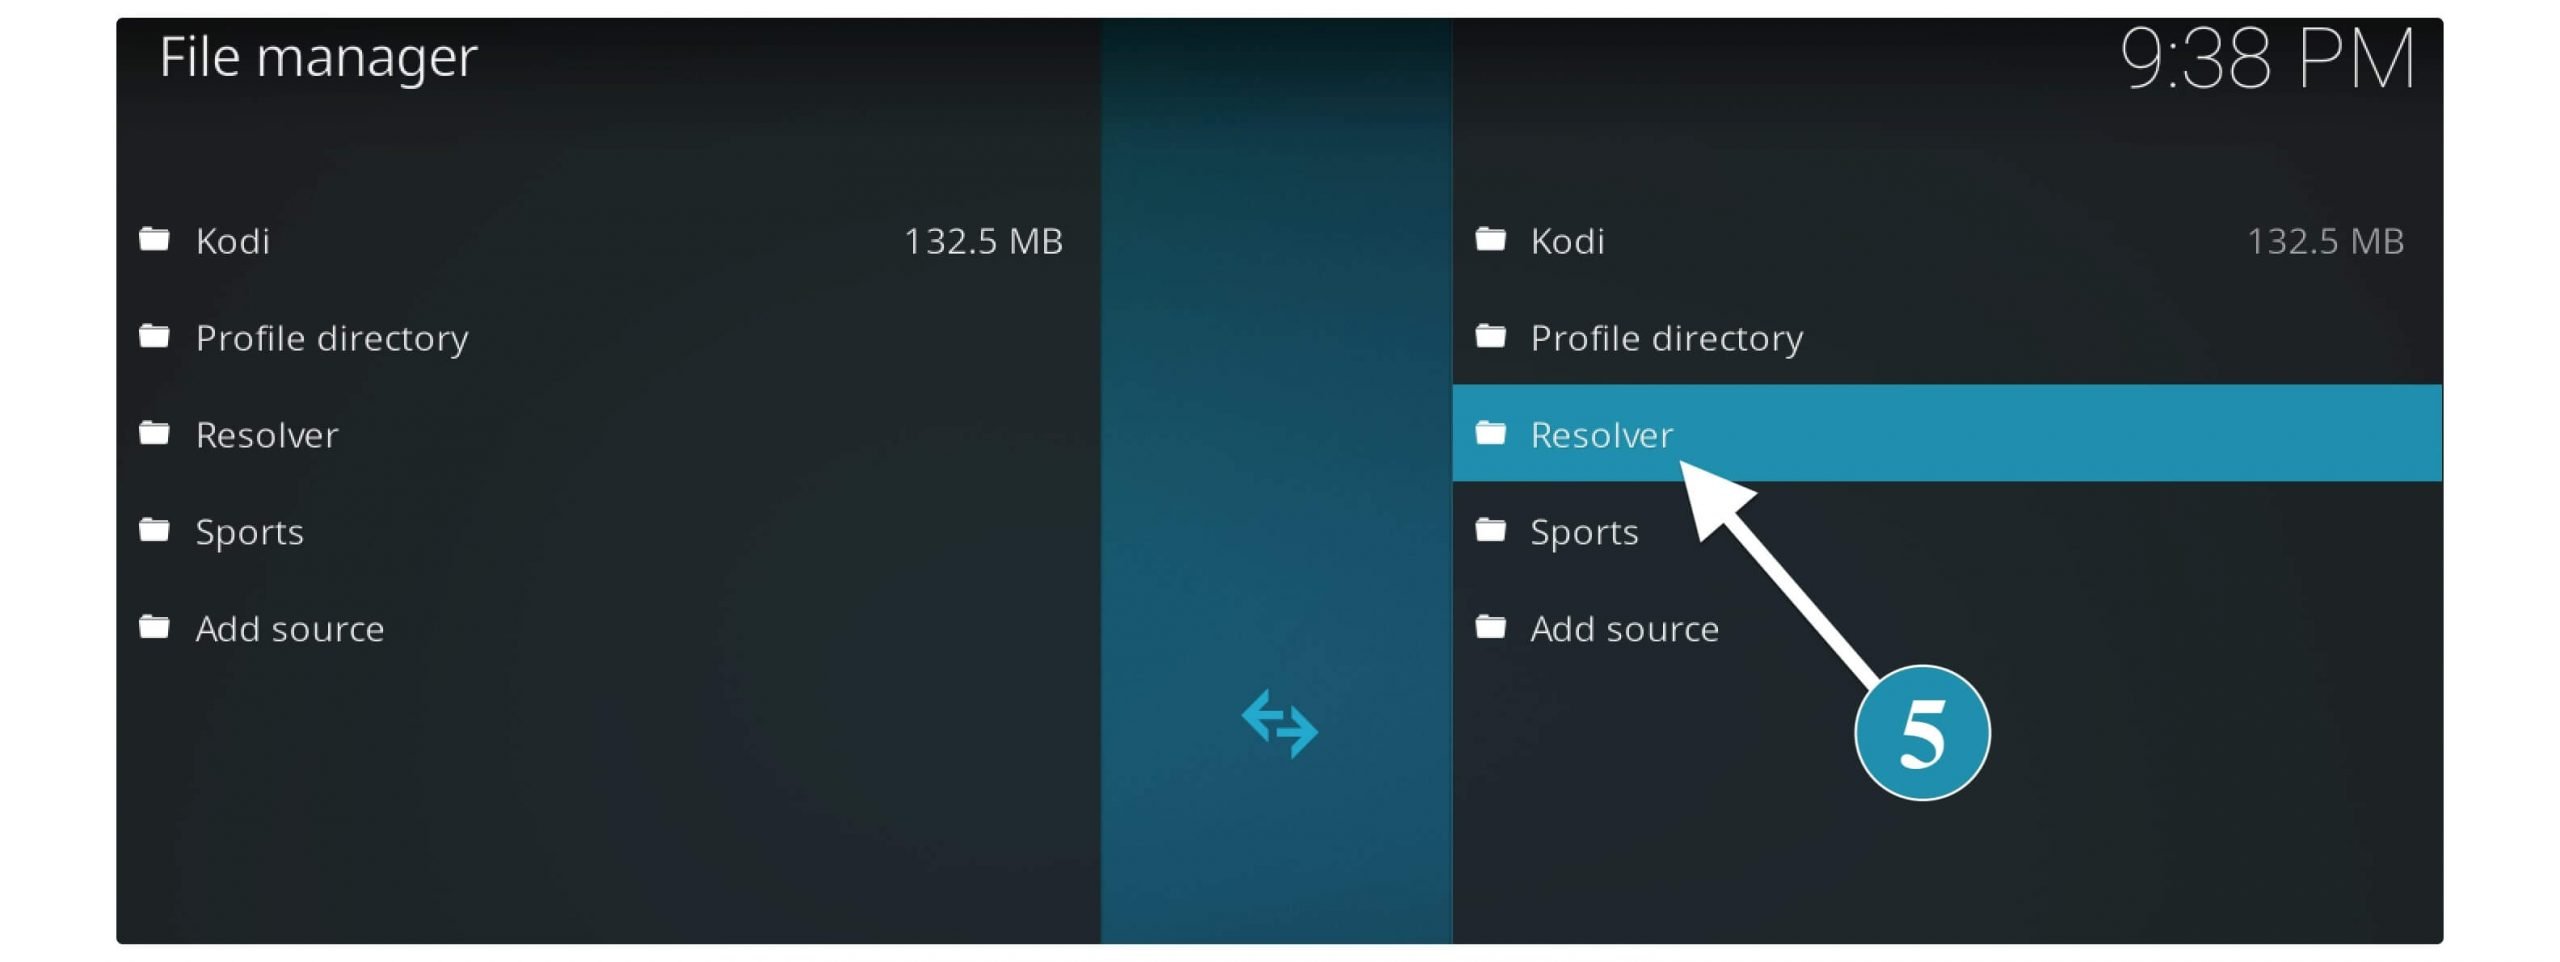
Once you typed the Source URL and the name click Ok to save it and then the name of this will appear in File Manager.
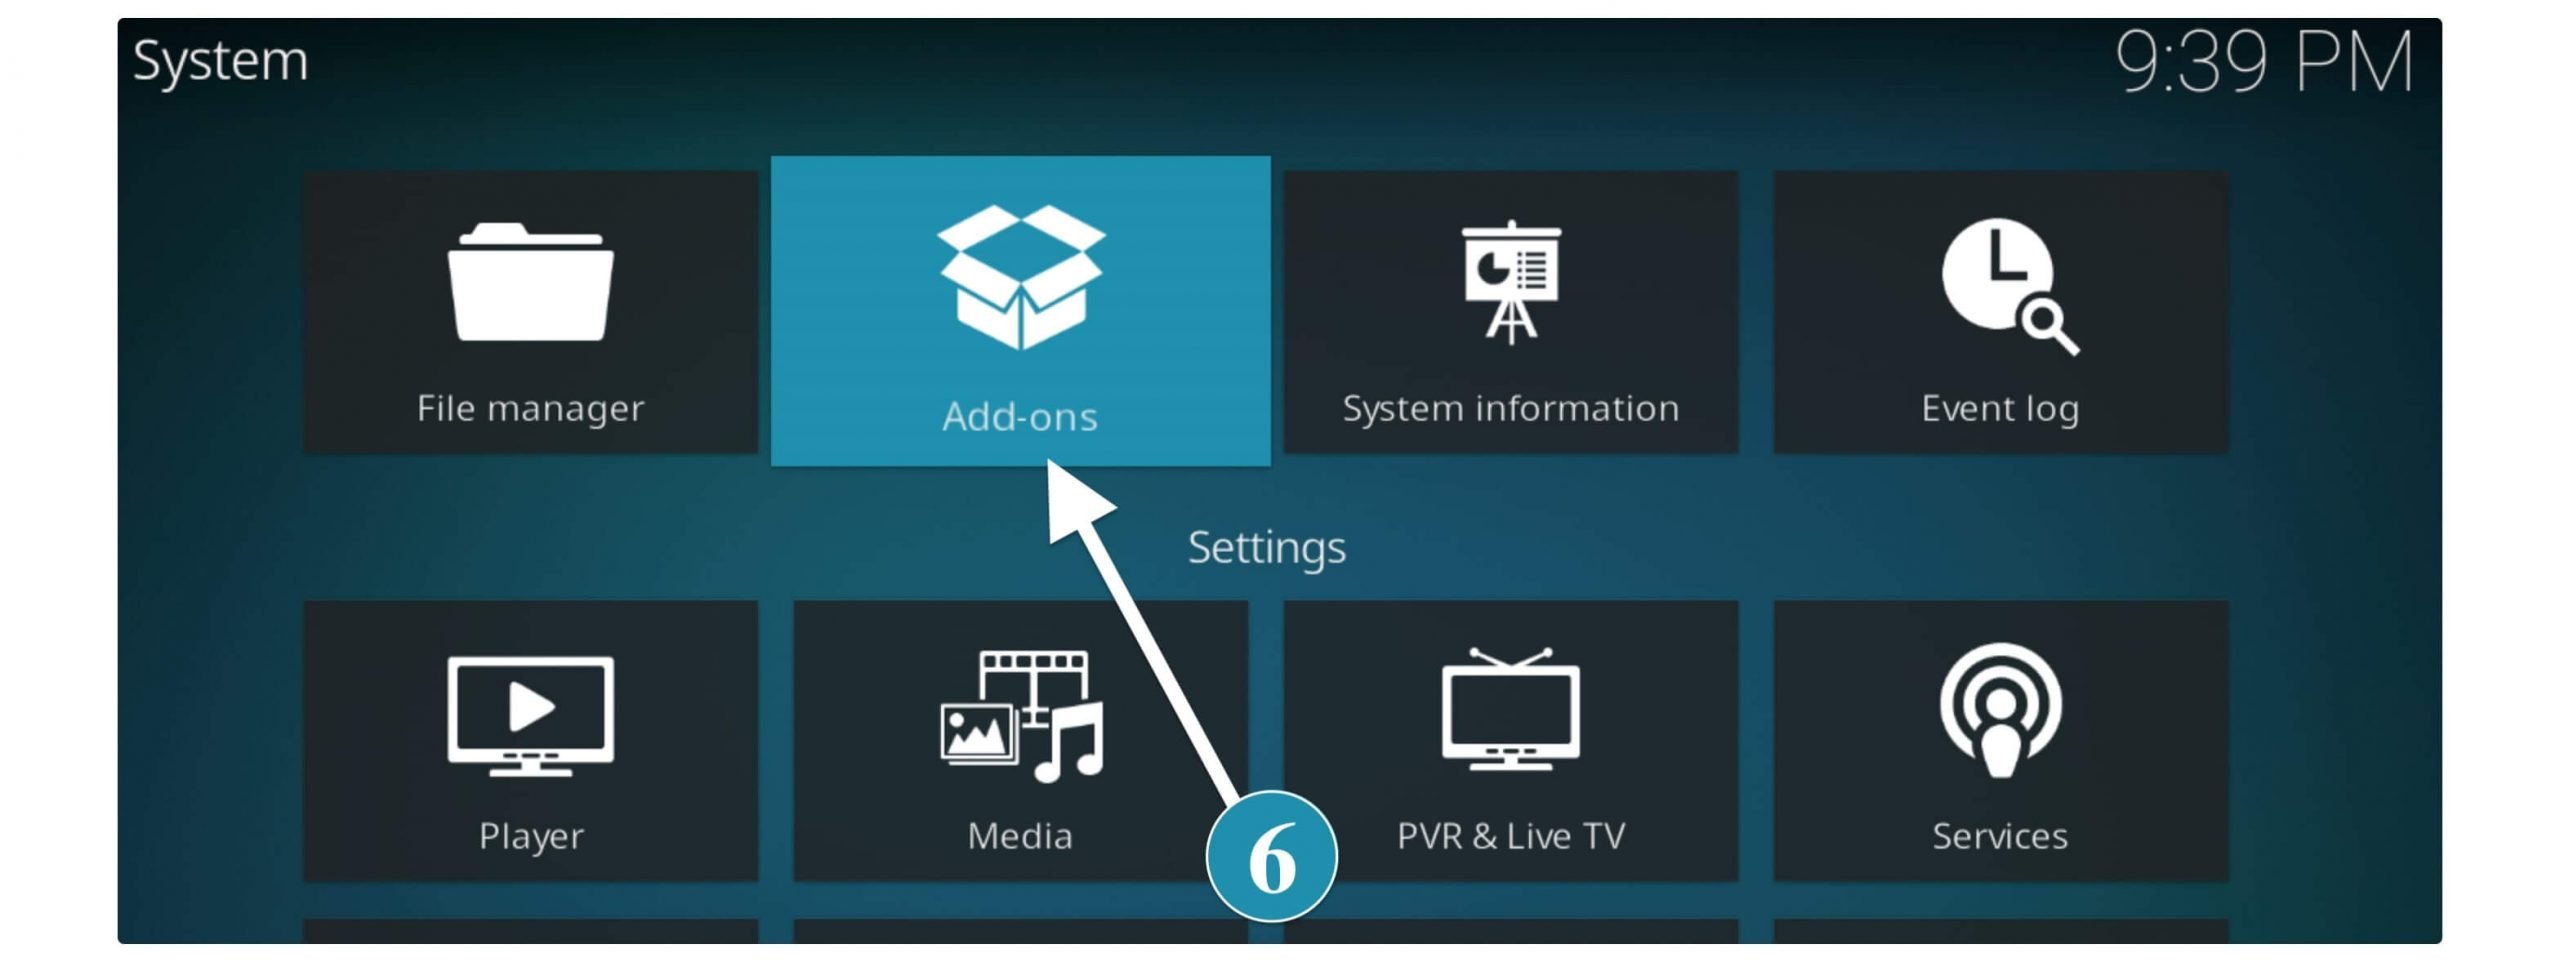
Now go back to the Settings and then at this time click on Add-ons
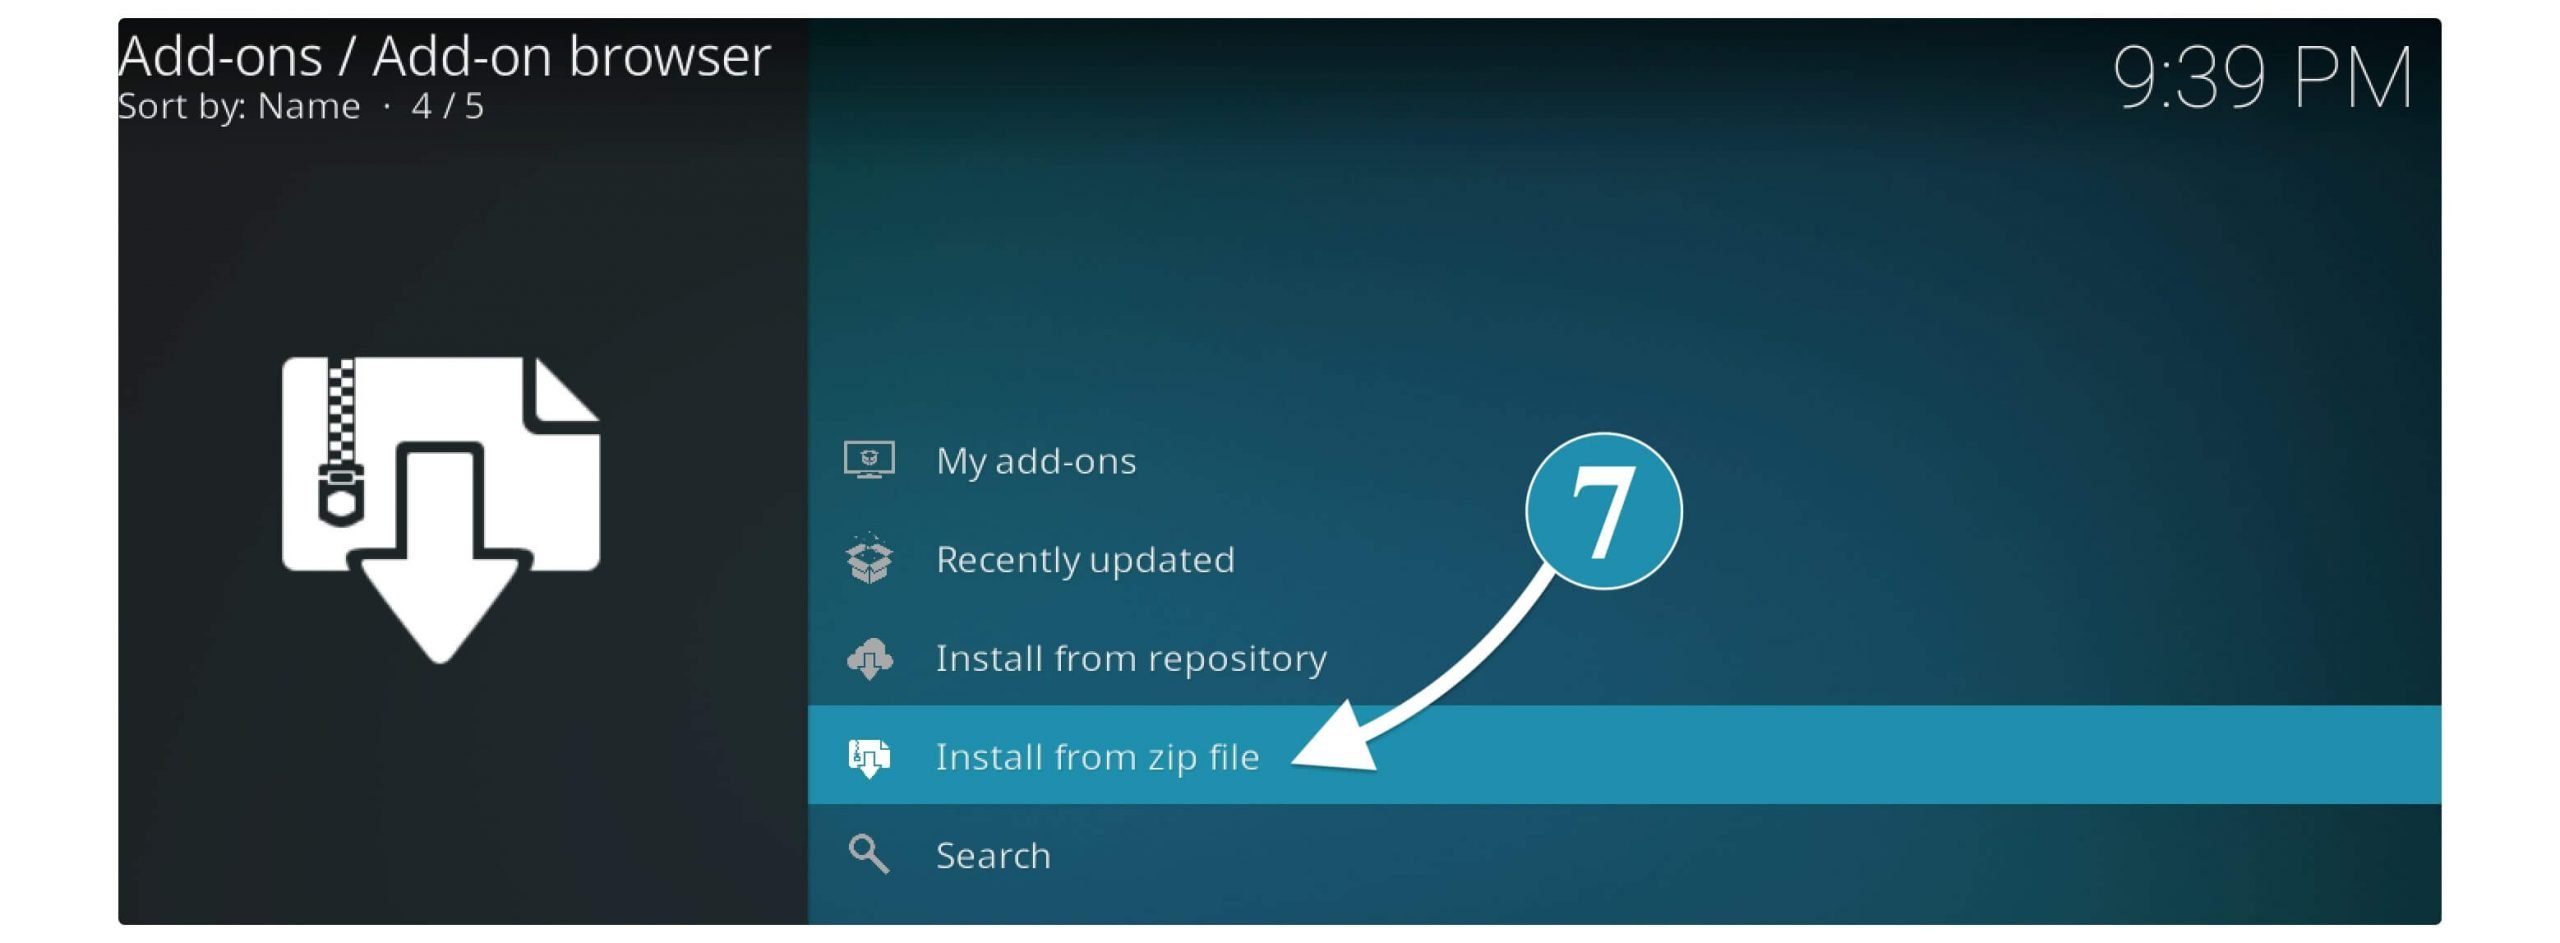
After going there it shows several other options now scroll down and click on Install from Zip File.
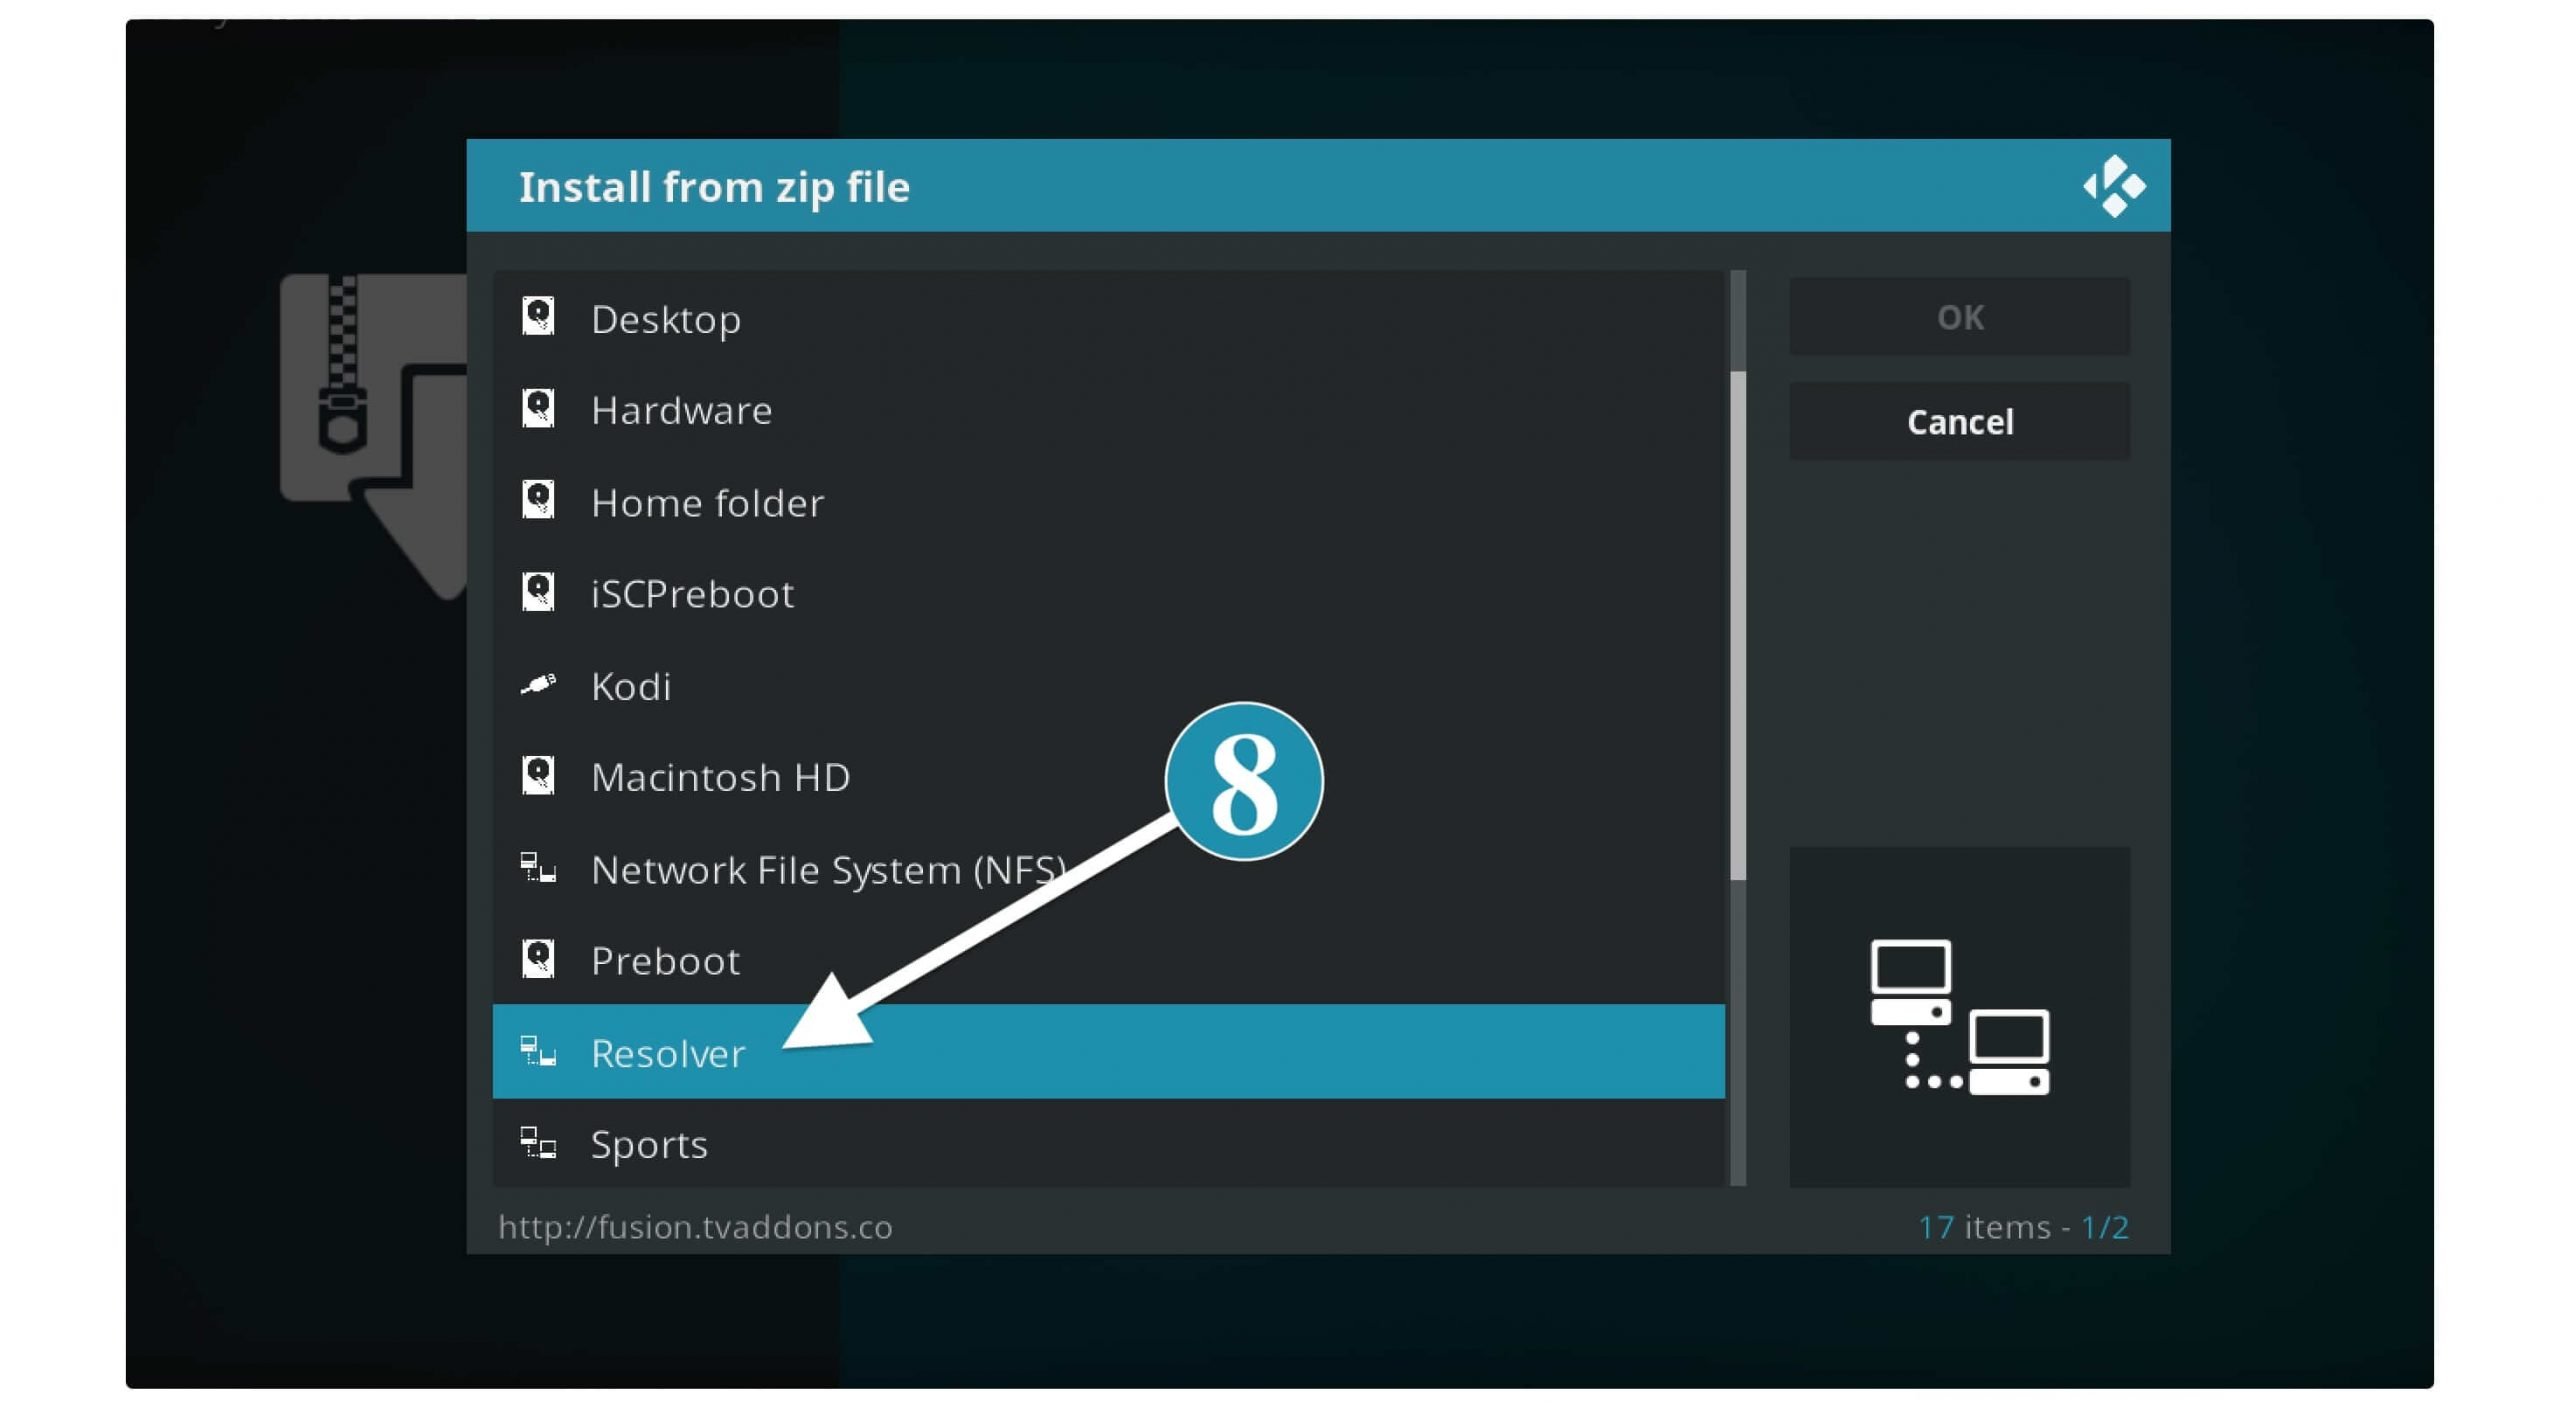
At this time a pop-up window will appear there with different source names just hover to the name that you typed in step 6 as in my case it is URL Resolver.
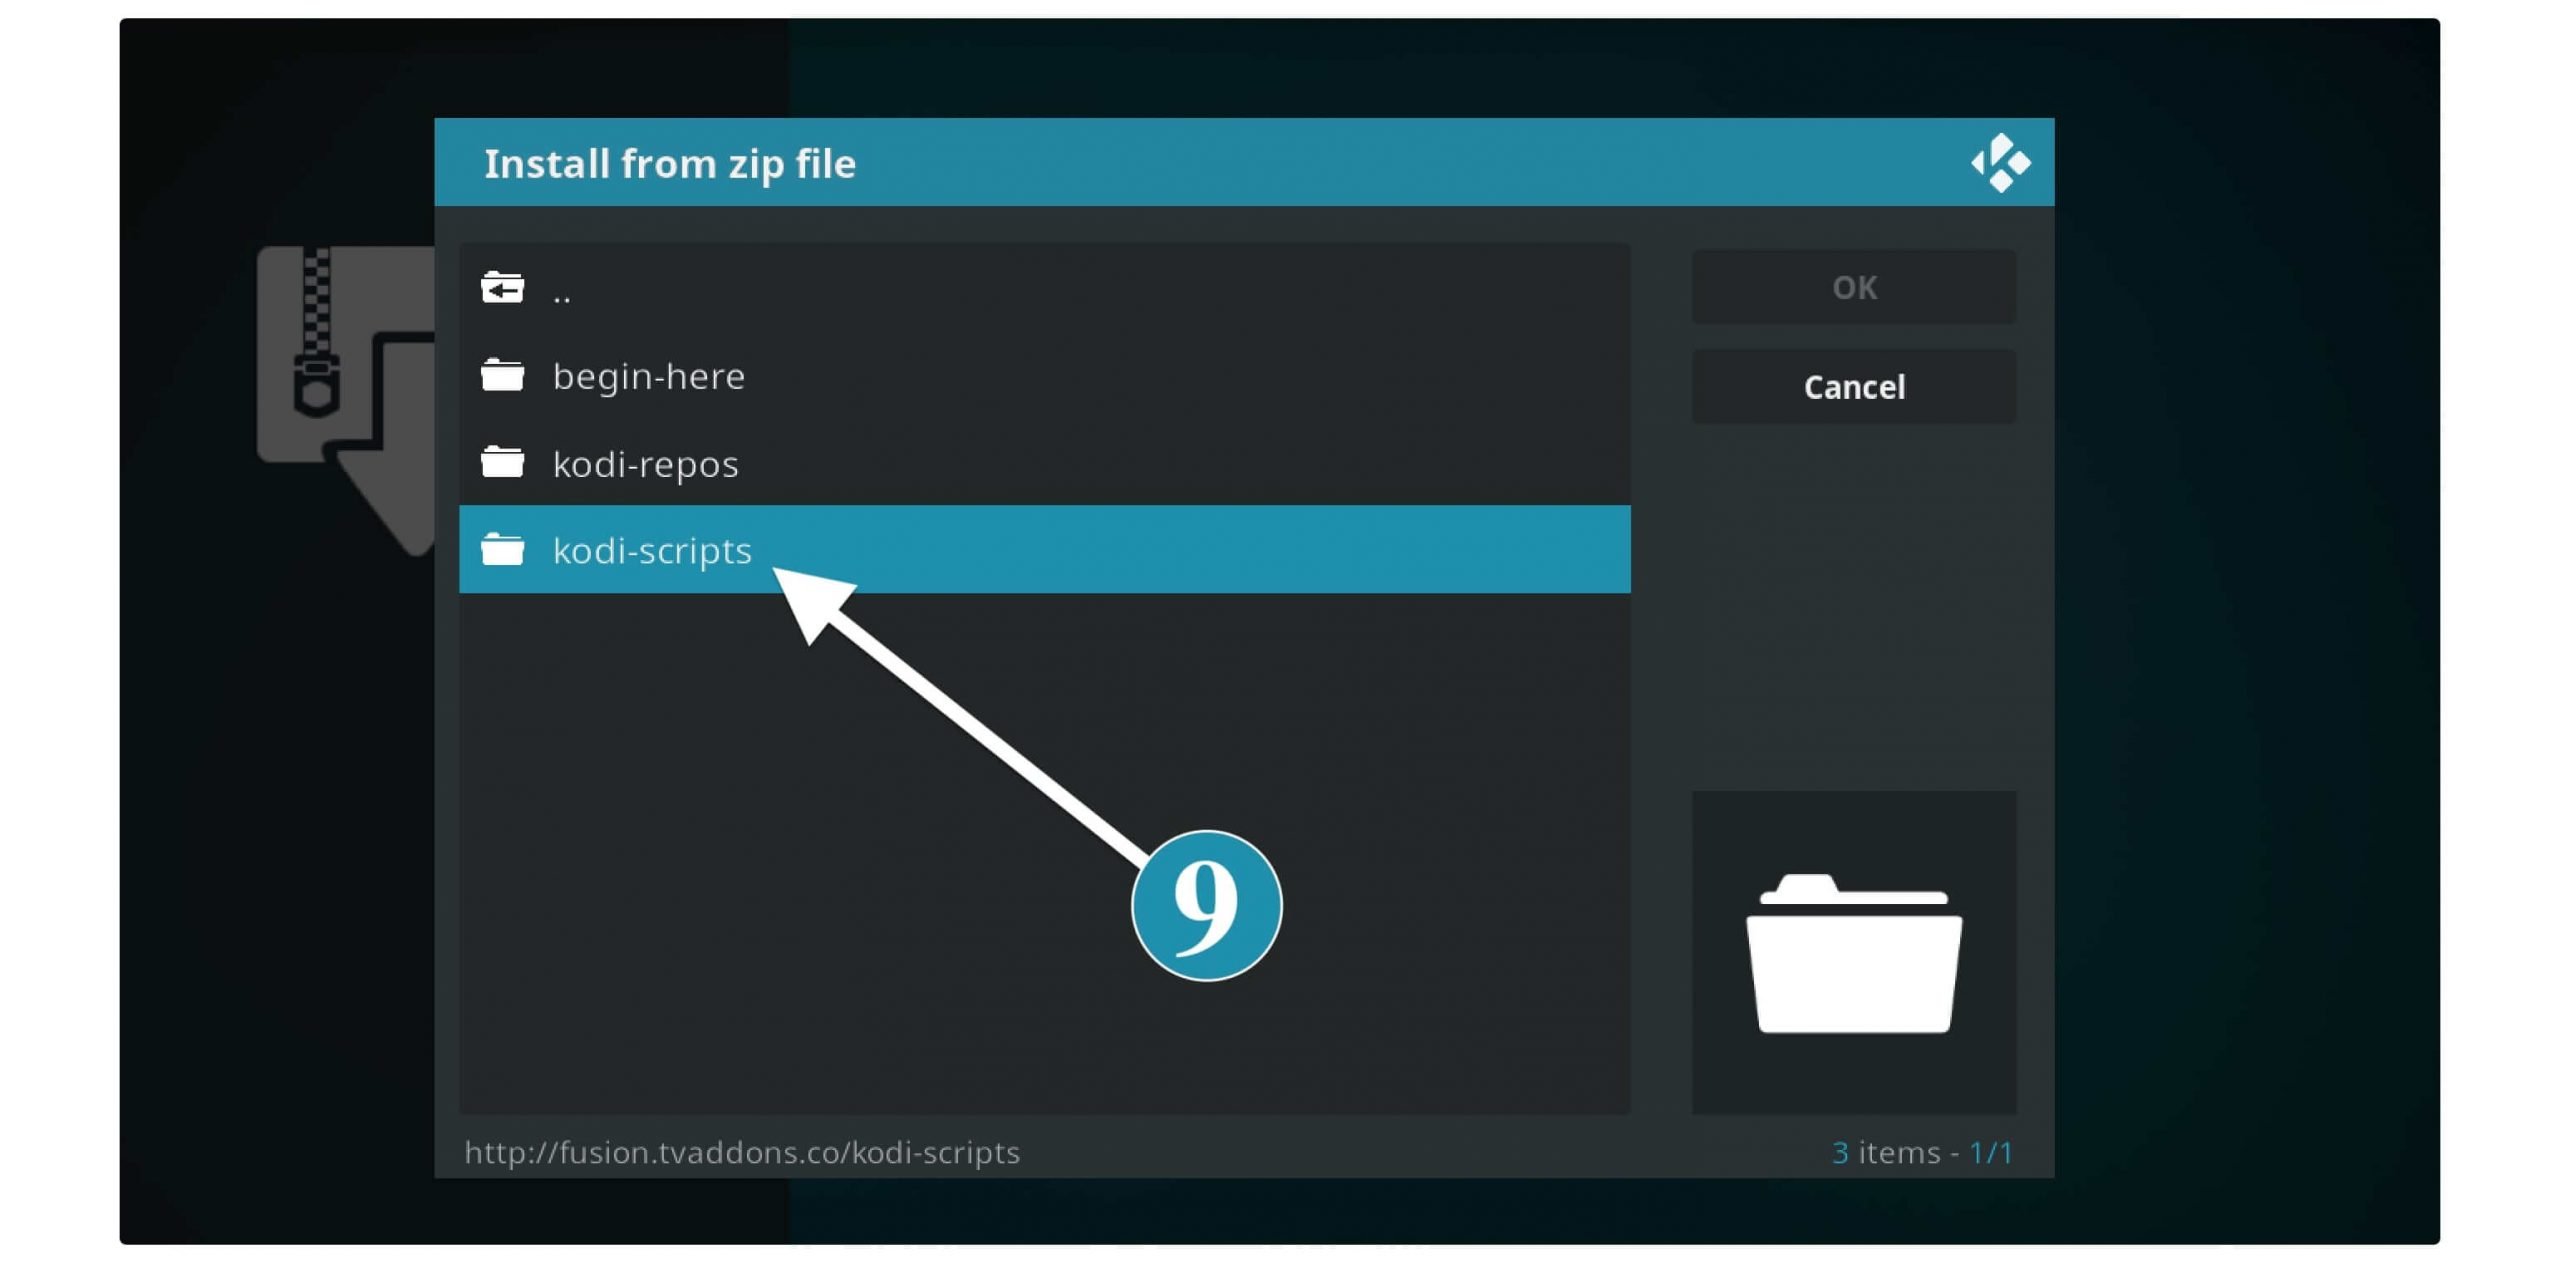
When you select the name of the source you will see three different folders there so now click on the Kodi-scripts.
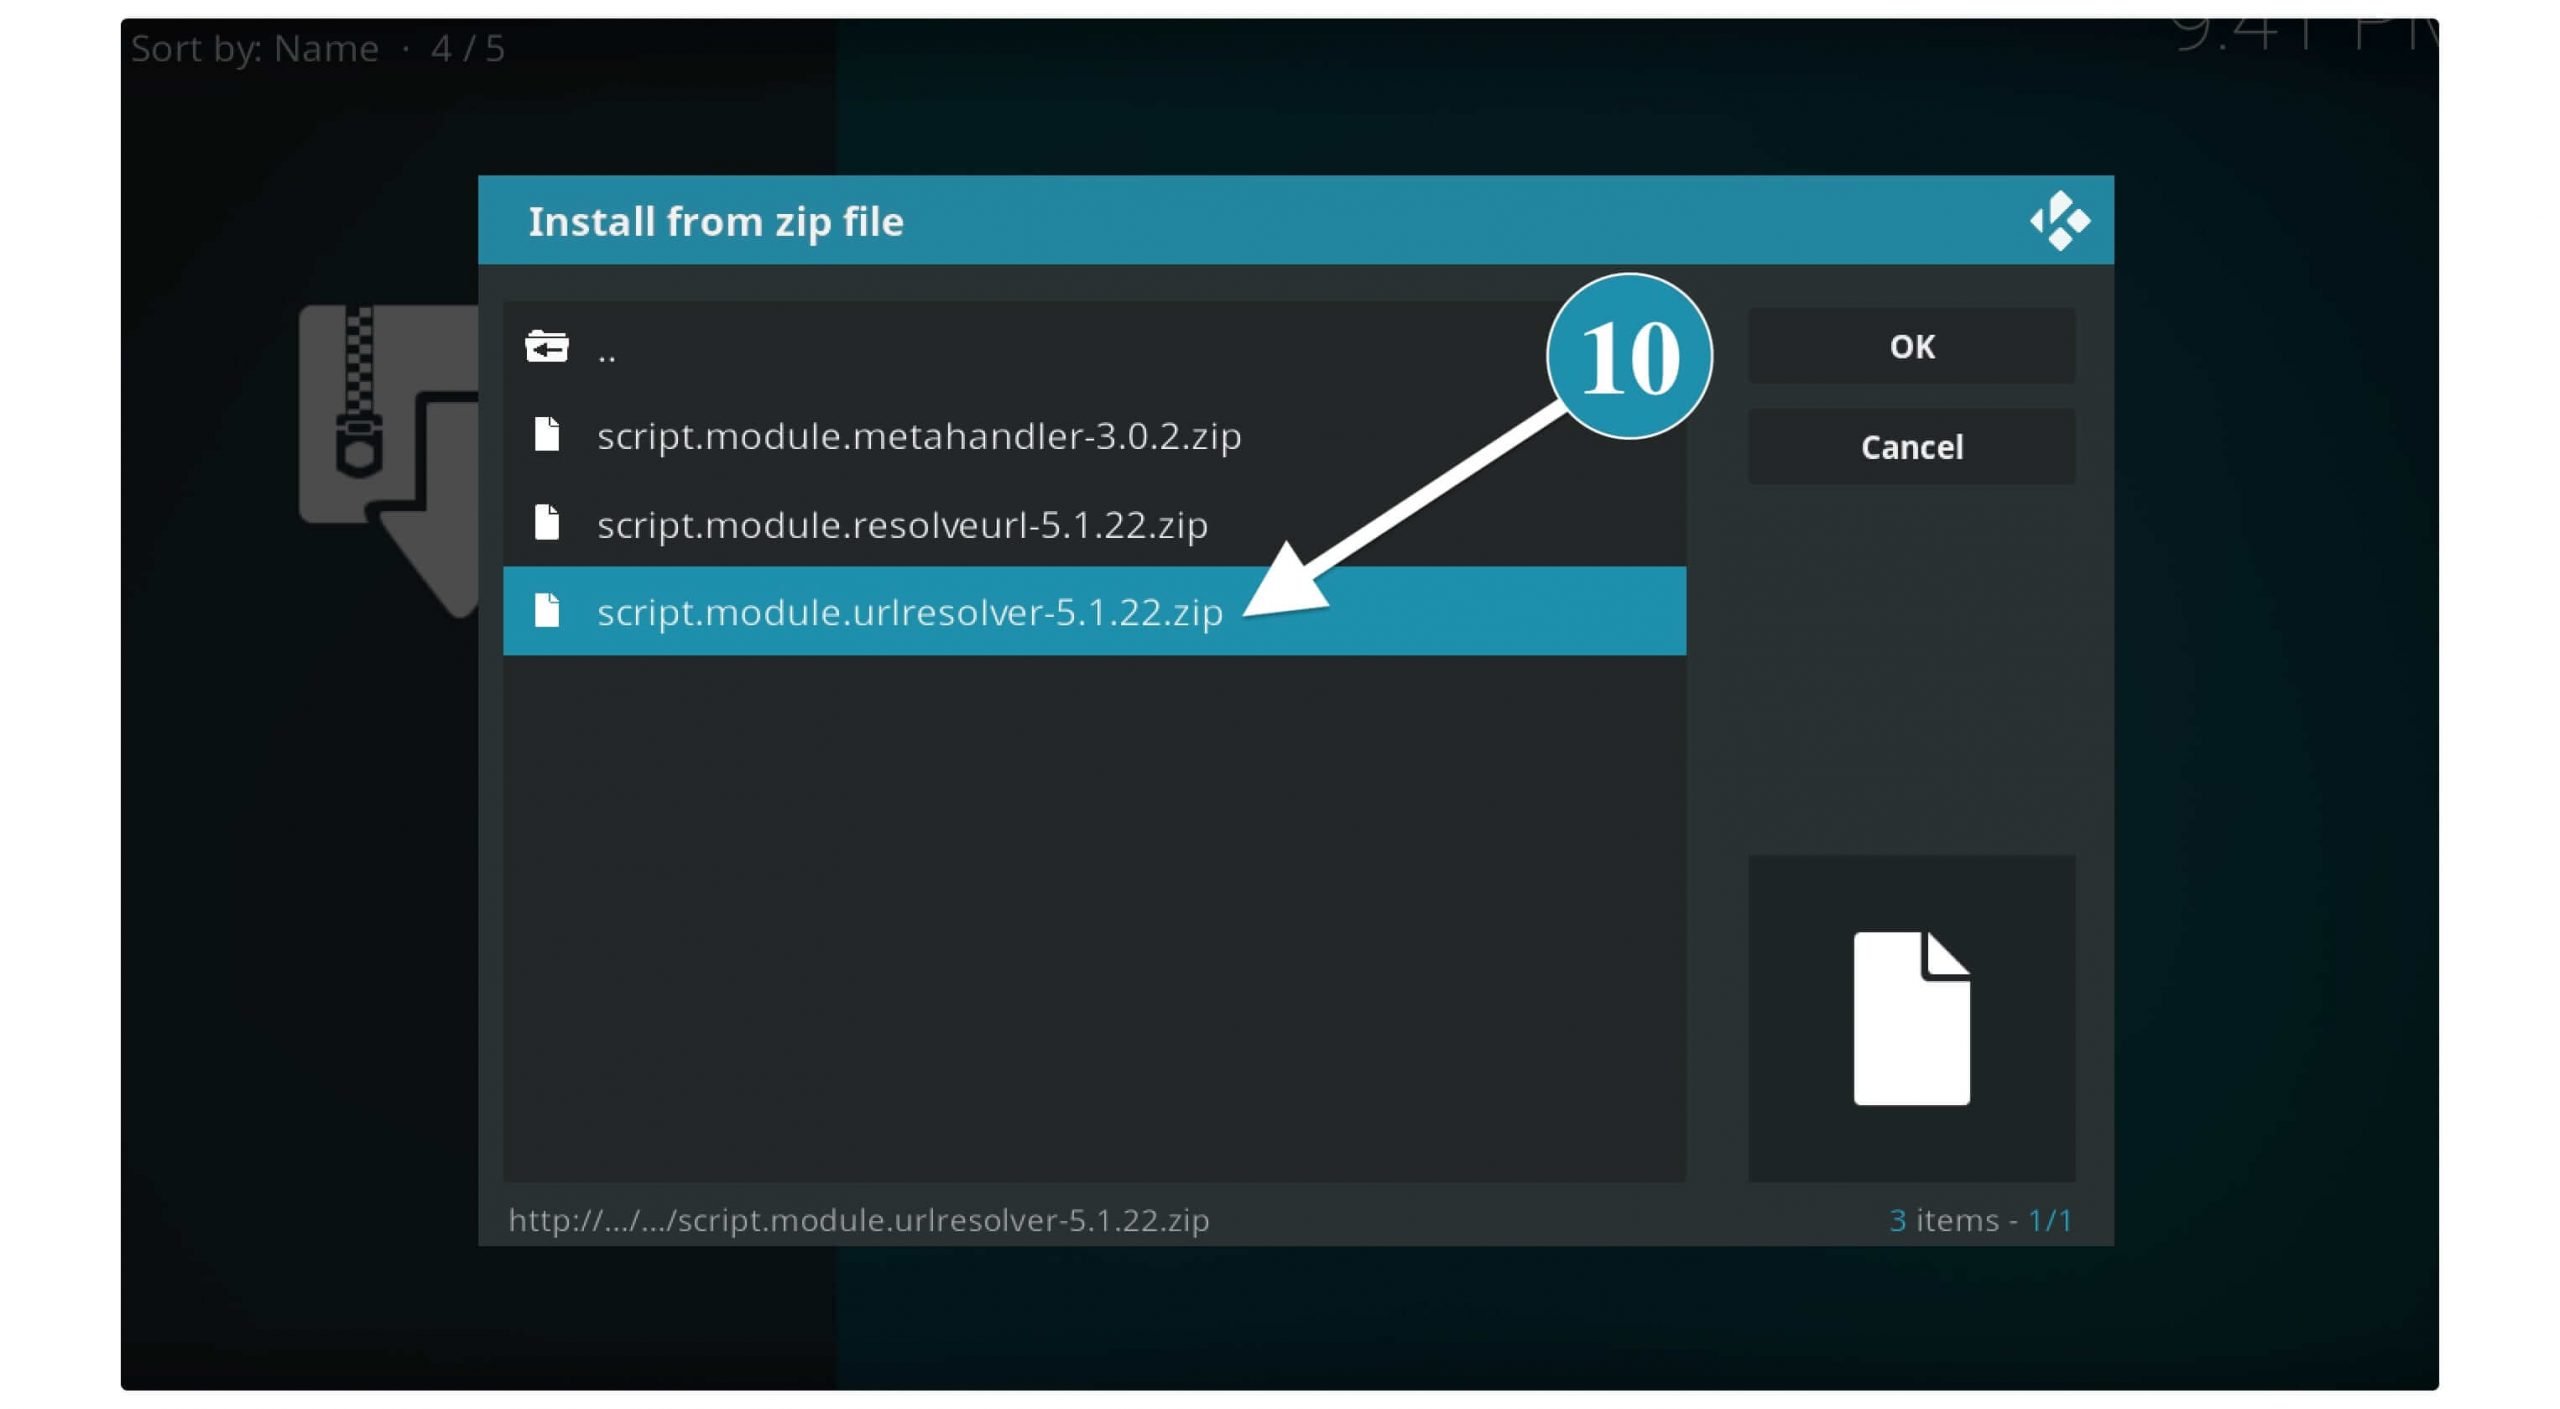
10 In Kodi-scripts it will show three more zip files from here you need to select 3rd file which is the script.module.urlresolver-x.x.x.x.zip (x.x.x.x is the version name that could be different).
Once you click on the name of Addon you just need to wait for a while until you see a notification appears on the top right corner saying Add-on URL Resolver Installed.
When that notification appears that means the URL Resolver on Kodi is installed and now you are ready to watch your favourite TV Shows and Movies without interruption. This will be added to all the Addons you are using automatically which means you don’t need to do anything just open any Movie and then it will start scrapping links for you.
How To Update URL Resolver on Kodi
Although if you have already installed this Addon but it is outdated and you are not getting any links? In this case, you need to just update it to the latest version so it helps in scrapping links. It is because due to having an old version it codes get expired or the developer discontinues it that’s why it is not working anymore.
However, the update of an Addon on Kodi is an automatic feature but due to some bugs, you might not be able to receive the updates. Or else you might have just disabled the updates by mistake and that’s why the URL Resolver is not working anymore. At this point, the best practice is to simply update it manually.
So here are the steps that you can follow to update the URL resolver on Kodi manually:
- Open Kodi and then go to Settings by clicking on the Gear icon.
- Now open System Settings appears at the bottom.
- From the left panel make sure to choose Advanced or Expert and then hover to Addons.
- After hovering to Addons now from the right-hand side just click on the Manage Dependencies.
- Once you open it you will see different scripts appears there now scroll down and open the URL Resolver from the list.
- When you open URL resolver from there now you just need to click on the Update button located at the bottom.
- After clicking on the Update a window will appear there showing a different version just click the one that is listed at the Top.
When you click on the top version this will start downloading the Addon and then you will receive a notification saying Add-on URL Resolver Updated.
That’s it now the URL Resolver on Kodi is up to date which means you won’t face any sort of issue now. Just open any Addon and check if you are having any issues or not.
Although I would recommend you enable the Auto-Update if it is disabled by mistake. To do this open URL resolver from Dependency and then click on the Auto-Update next to the Update option. Now the auto-update is enabled and then you don’t need to follow these steps again which helps in solving all these issues.
Conclusion
Kodi is the best media player app that offers many official and some unofficial Addons that help us to watch free content. This works quite simple and in this article, we have learned a simple feature of this media player which is URL Resolver. In this article, we learn what is this tool and why it is useful to Kodi.
Instead of this, I have also shared a whole instructions guide on how to install this tool or how update it. I hope you read the article completely and understand this script. But if you are still confused then make sure to go above and read this article again because you may have missed something important.
In the end, I would like to say that if you find this article helpful at any point then don’t forget to share it with others. This will help others and helps me in growing this website so I can bring new tips and tricks related to Firestick and Kodi. Also, if you have any suggestions or want to ask any questions please let me know in the comment section below.

