
Last Updated on 2 years by Amelia Johansson
Looking for the guide to installing Kodi Addon Installer for Kodi? Well, you are at the right place then because in today’s article I am going to share with you some working steps to easily get the Installer on Kodi.
This article is for everyone whether you are using this player on Firestick, Windows PC, Mac Machine, iOS Devices, Android, or even on Linux.
So, don’t worry about anything the steps for every platform are the same and with this guide, you will get it for every device.
Then what are you waiting for? Let’s dig in more about this and learn what this actually means and why we should use it on Kodi. If you also looking for these types of answers then don’t worry just read the below paragraph.
Why Use Addon Installer On Kodi
As we know that Kodi is the best and most free open-source media player that lets you watch movies, songs, or any other content from your own source.
But there is a huge benefit of it which is Addons that can be useful to watch some free content as well.
Some Add-ons are developed by this media player itself but some of them are developed by third-party developers. And believe me, if you are looking for free content then I would recommend going for the third-party Addons.
As these are stable all the time and also shut down in some time but even though we have the opportunity to watch some latest content totally free. One of the most famous add-ons is Exodus which is now known as Exodus Redux or V8.
But the problem is we have to find each of these add-ons from different repositories which consumes a lot of our time.
This is why we can use this simple Installer application that has a database of hundreds of thousands of free add-ons that can be installed instantly.
The name of this tool is Fusion which is the most popular name for Kodi old users if you are new then you may not have listened to this before. Ok, so let’s check how to install Fusion on our device easily and faster.
How To Install Fusion Addon Installer for Kodi
So, the fusion is the project that is developed by the TVAddons who have developed so many tools for Kodi users. This is also developed by them and they have just brought all the old and some latest Addons in one place.
If you don’t have Kodi installed on Firestick then follow this guide before and then we can easily move to the next step: Install Kodi On Amazon Firestick TV | Complete Step by Step Guide
After installing now follow the steps given below:
Launch Kodi and from Home Screen click on the Settings icon near the power button.
![]()
From here just navigate down and then open System Settings.
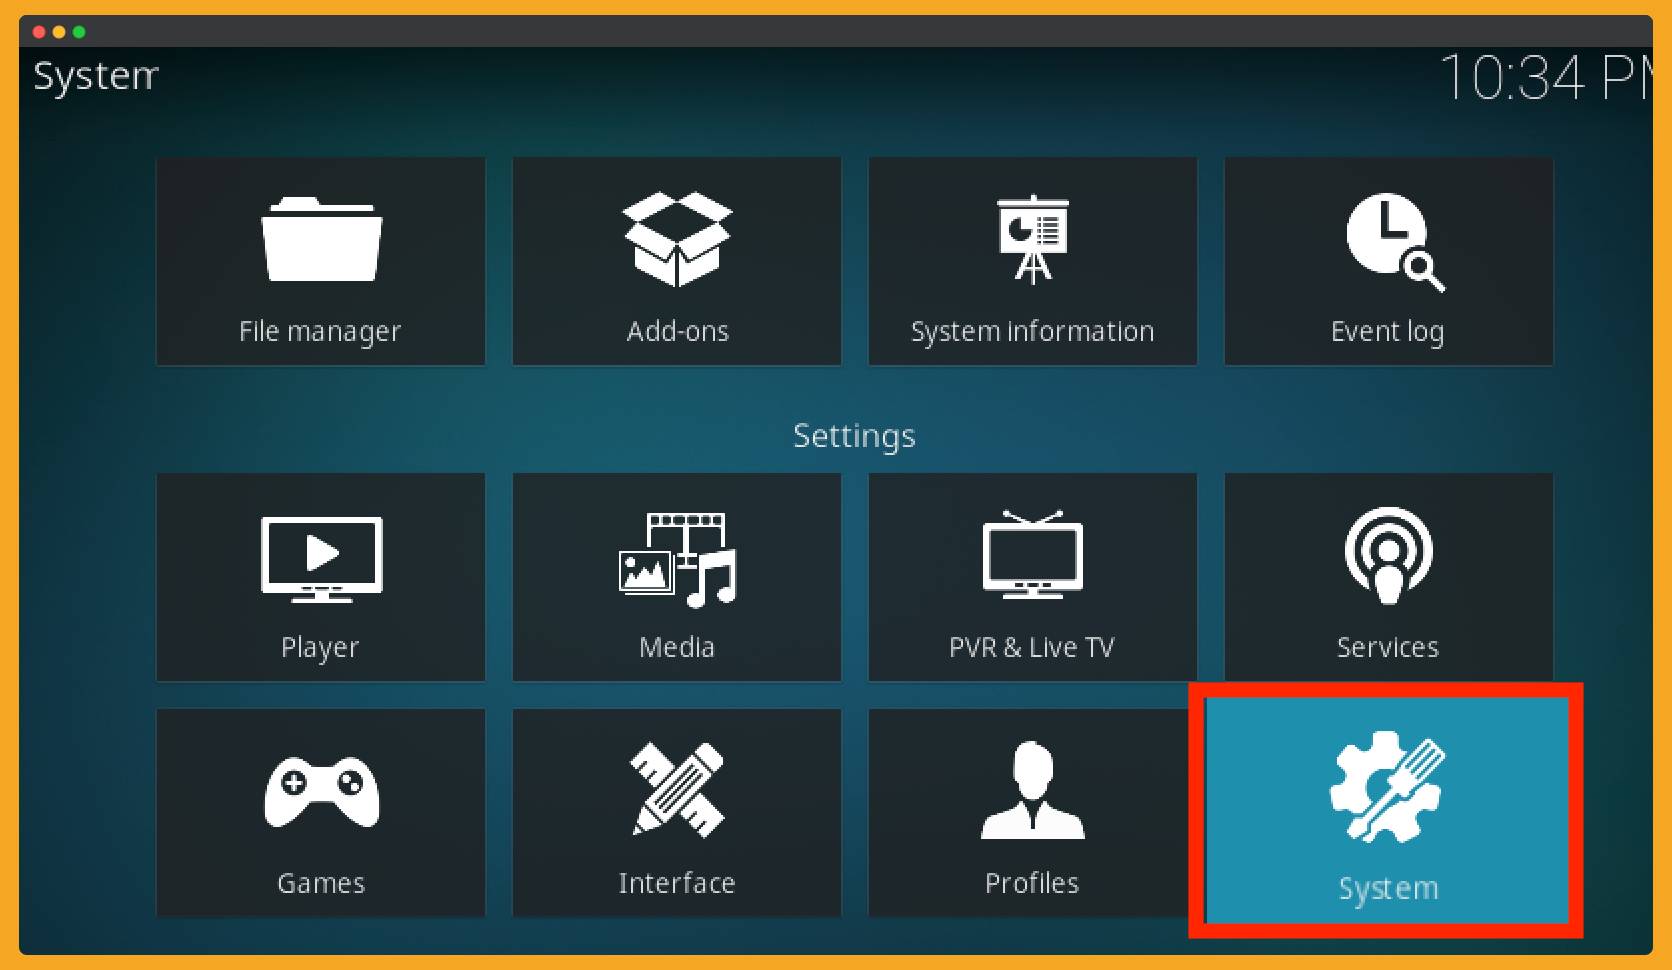
At this time from the left-side menu just select the Addons.

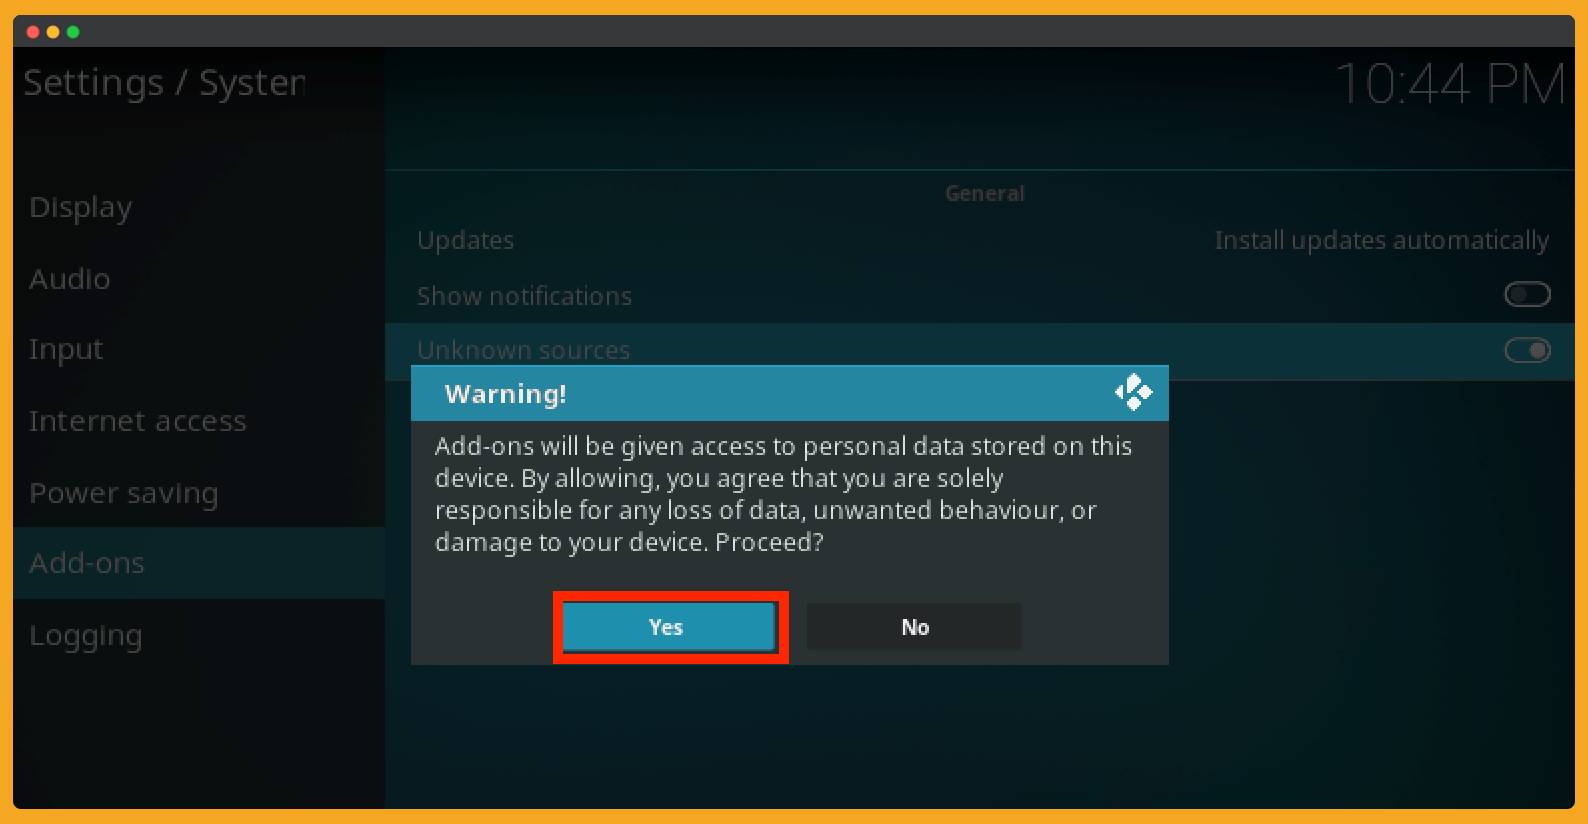
Now from the right-side use the switcher button to enable Unknown Source.

A prompt warning message will appear so just ignore it and press Yes.
That’s it now as we have enabled installation from Unknown Source we are now ready to go for the installation.
Install Fusion on Kodi 17.6 Krypton and 19.0 Leia Step by Step Guide
Fusion is not the addon and it doesn’t install on your system but it is just a source from where we can download hundreds of free Add-ons instantly. The reason why people go for Fusion is with the single source URL you have the access to unlimited content.
Ok, so here are the steps that you have to follow:
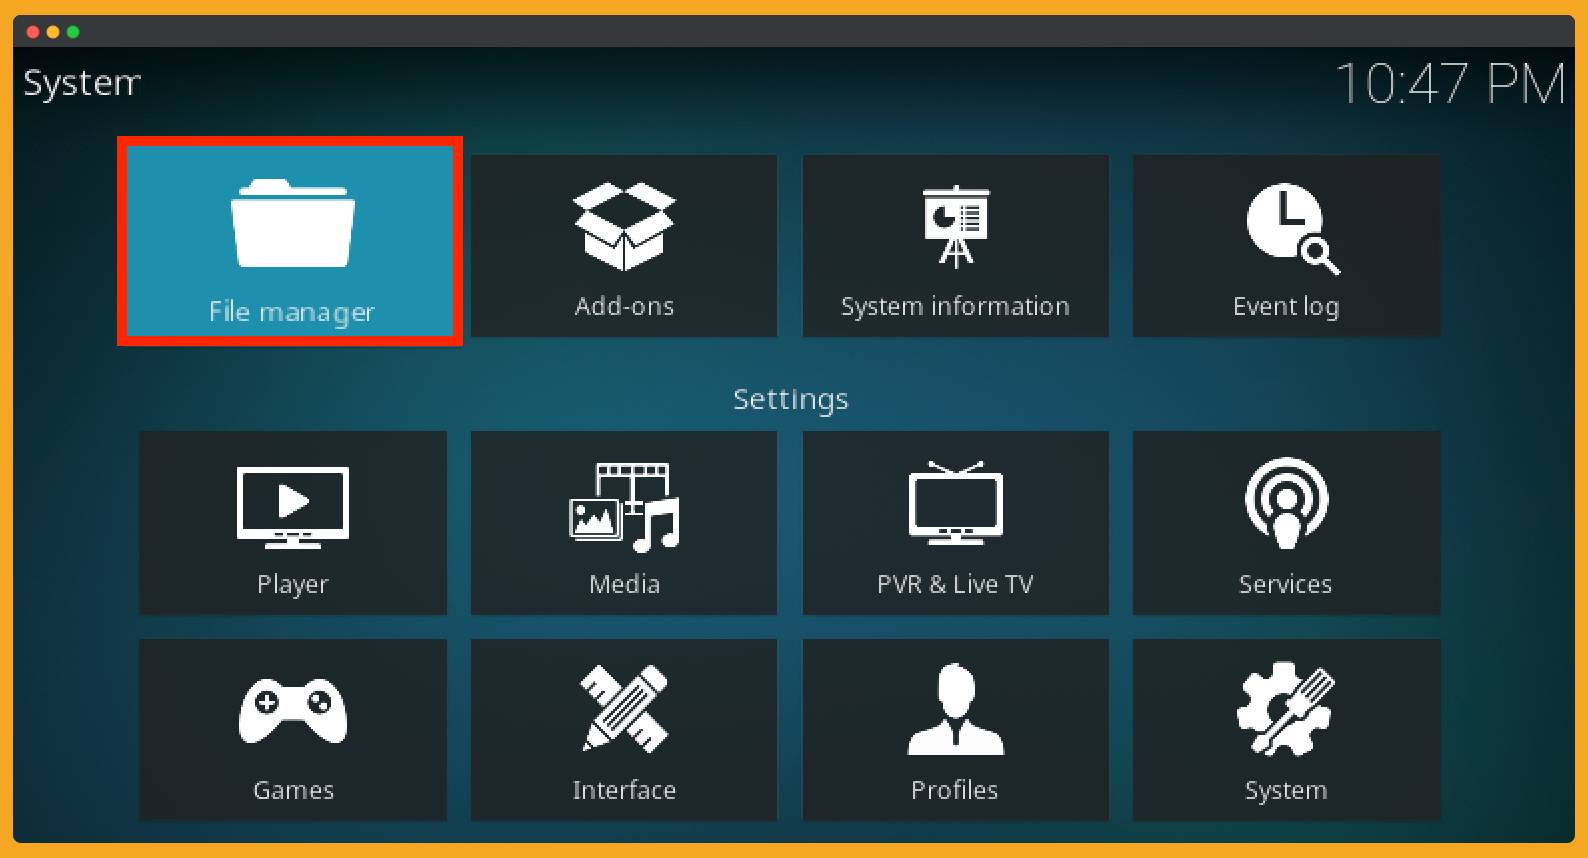
1. After enabling Unknown source now Reboot or Exit Kodi and then relaunch it. Now from the Home Page just click on the Settings icons located near the power icon.
2. From Settings, you need to click on File Manager.
3. Here you will see an empty window of sources so click on Add Source title.
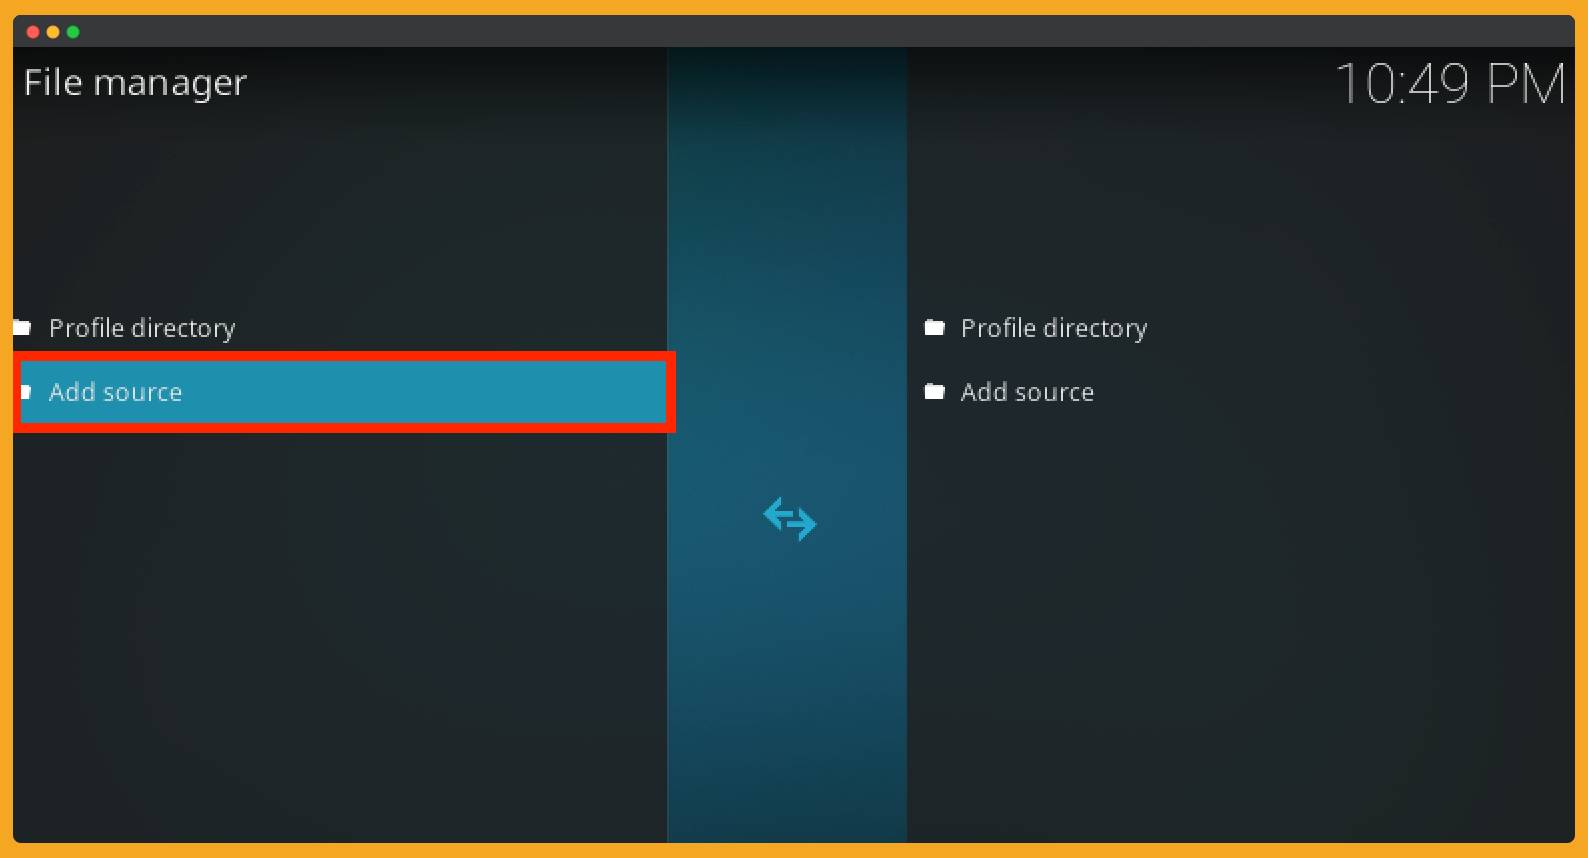
4. It will launch a pop-up window so from here you have to select None-

5. Now it will ask to put the source URL in the box so just type http://fusion.tvaddons.co and hit the Ok button to add.
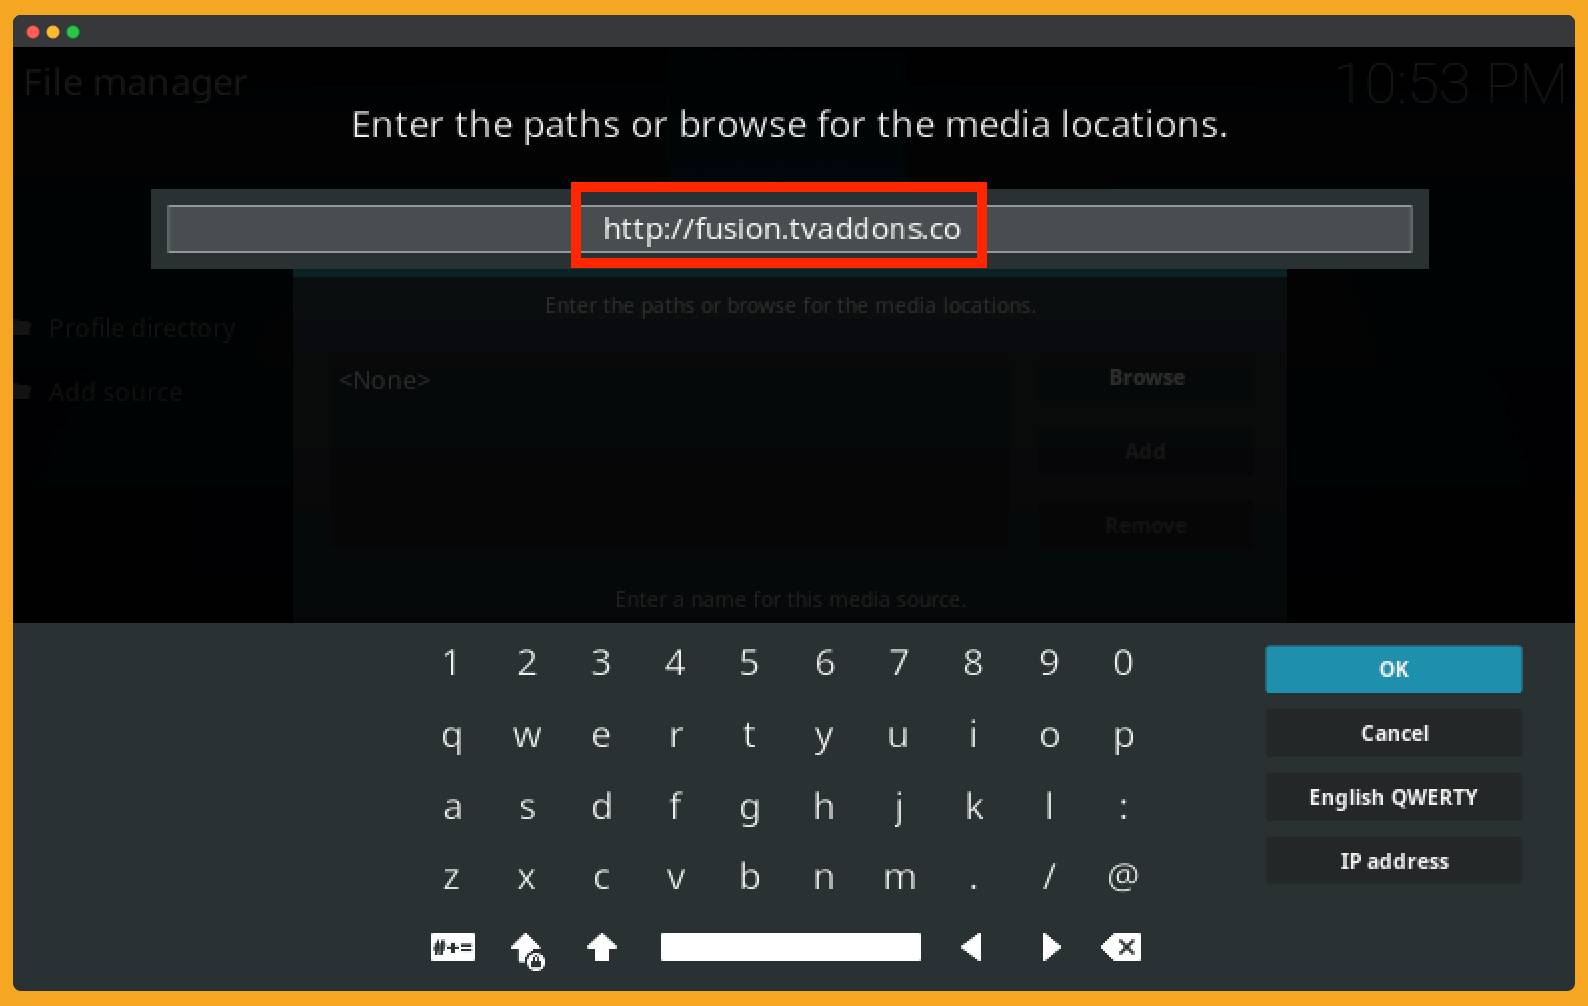
6. After this move the cursor to the below box and here you will be asked to type the name of the source. Just type any name you want I am saving it with Fusion so I can remember it for later use.

7. Now click on the Ok button and then the source will be added to the list.

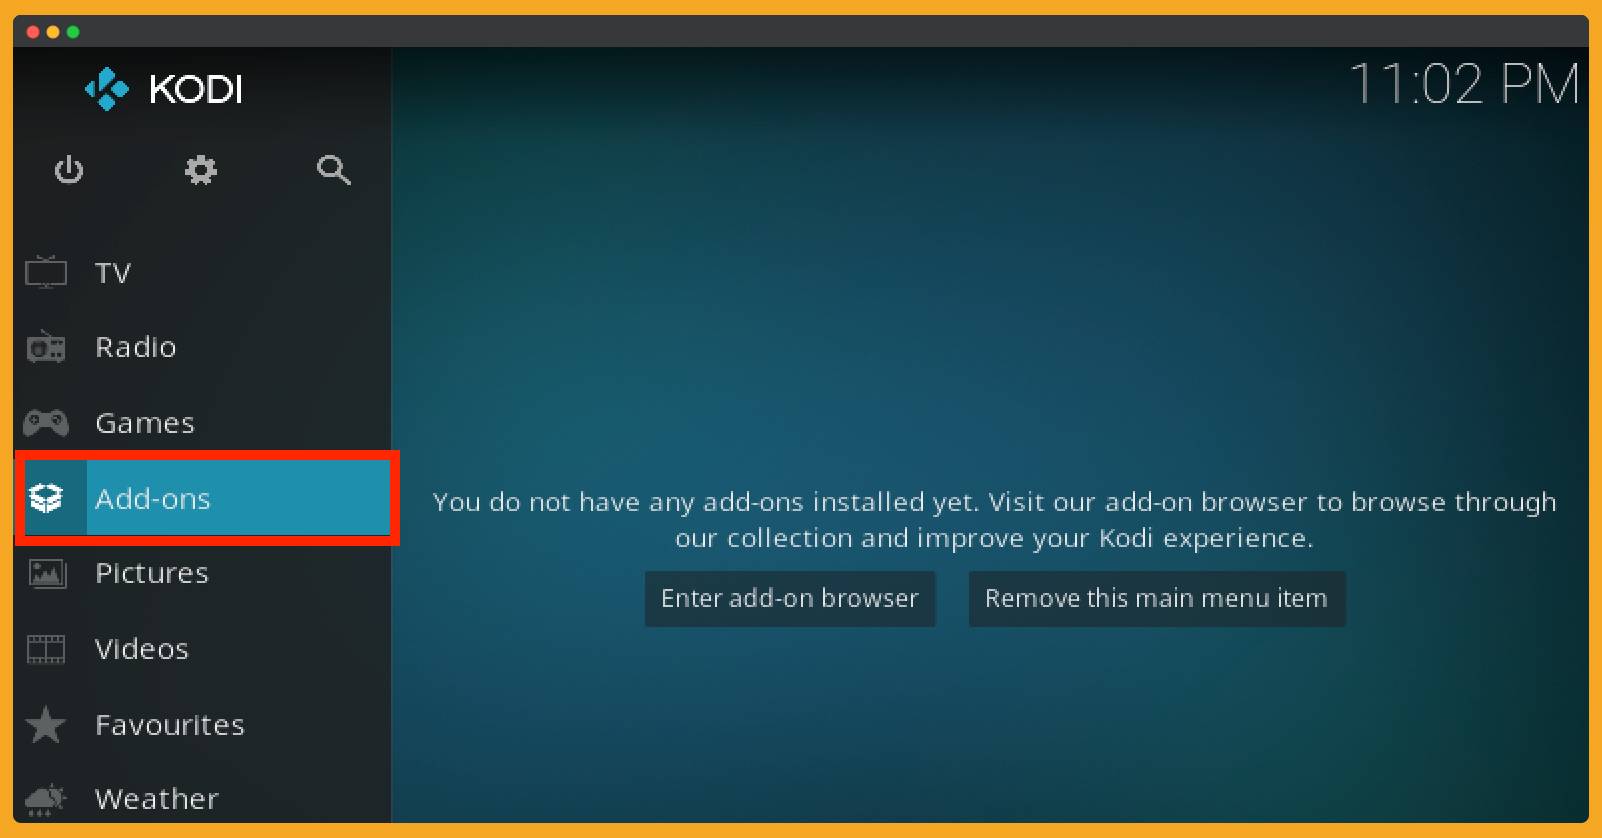
8. Just go back to the Home Screen and at this time select Addons from the left side.
9. After this click on the Box (Addons) icon from the above menu.
![]()
10. From here you need to click on the Install From Zip File option.
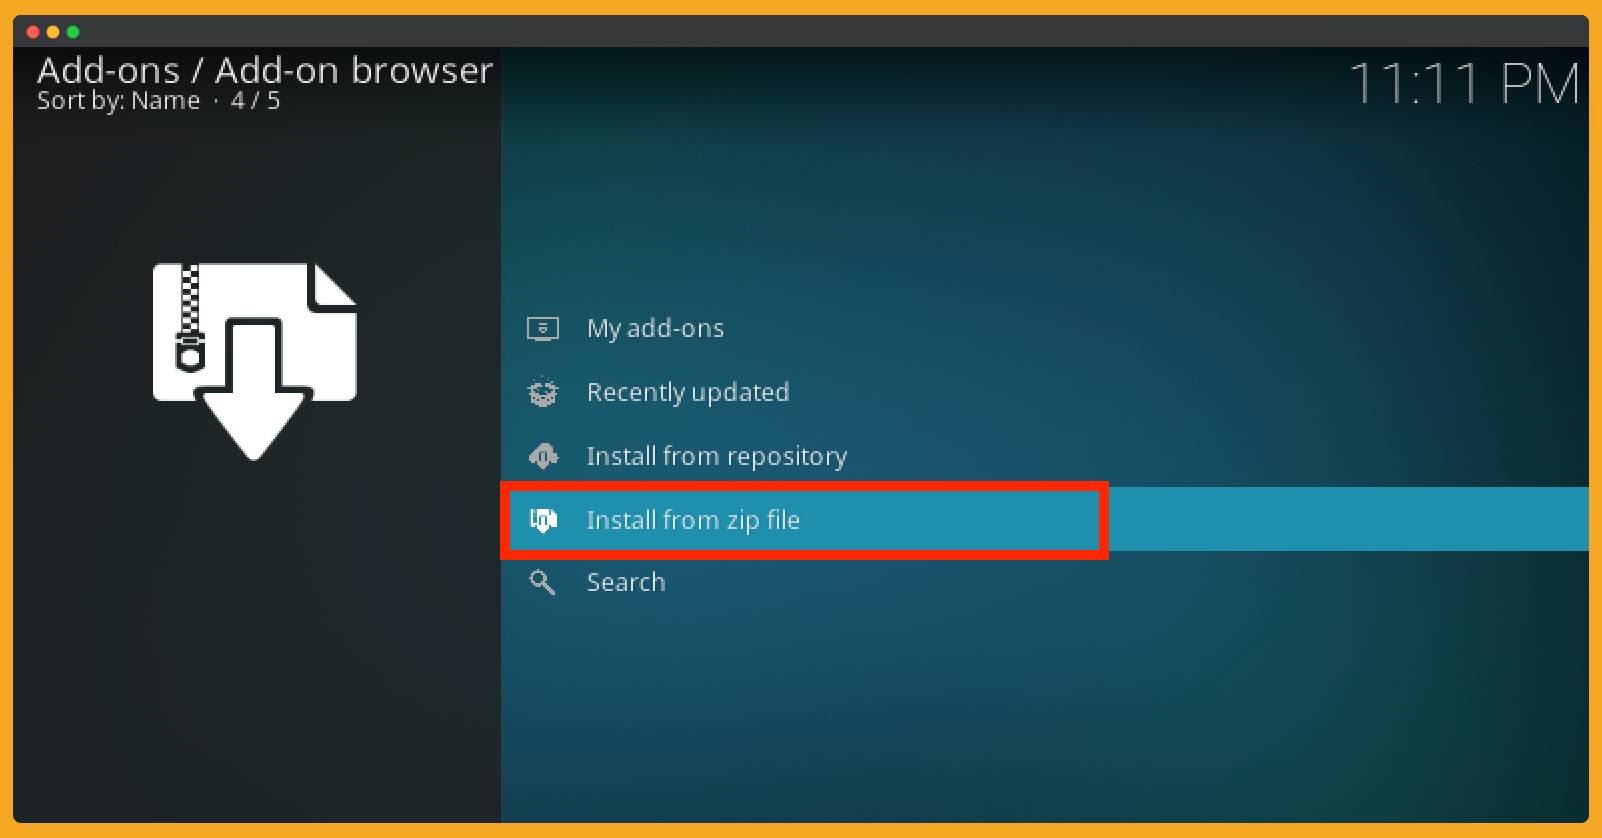
11. Here you will see all the sources that you have added previously or available to install the zip file. So, all you have to do is find the source name you added in step 6. In my case, it is Fusion so I will select it from this list.
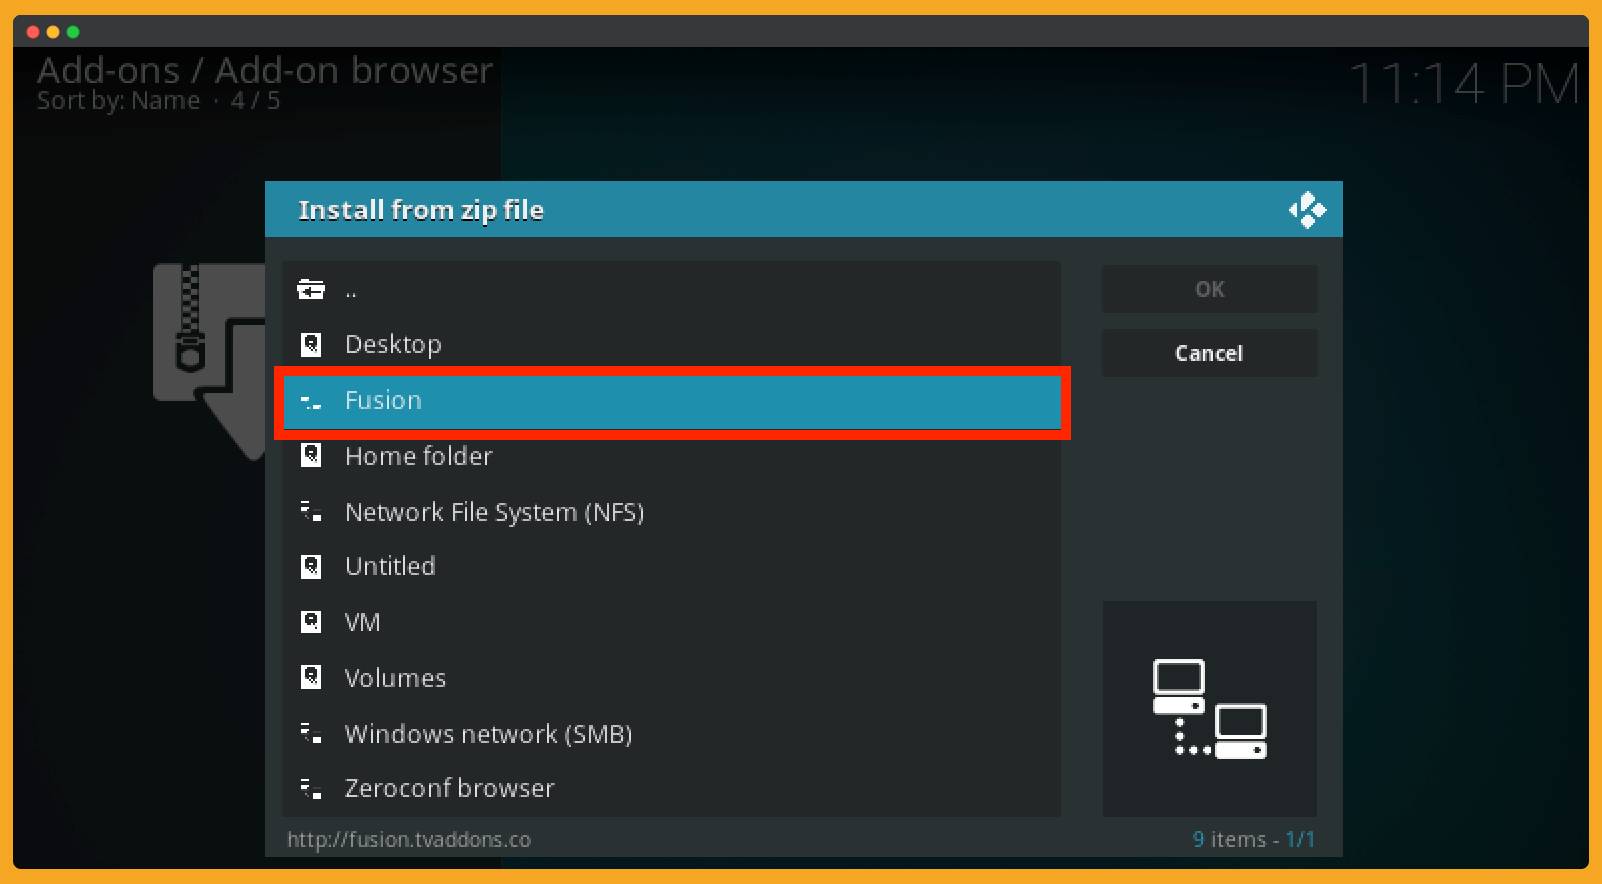
12. Now you will see the Fusion and its repos are organized into three categories namely:
- begin-here
- Kodi-repos
- Kodi-scripts

That’s it we have now just installed this Fusion on Kodi and are ready to go for the installation of Indigo Addon Installer. To learn more just follow the guide that is given below.
Download Indigo Addon Installer on Kodi
Indigo is the add-on that comes with the multiple add-ons database with this you have access to hundreds of free repos from the internet. It comes with only the Fusion repository that’s why we first install it using the above guide.
Now as we have the Fusion on our device now we are ready to download and install Indigo as well. After using this you will forget about other repos as this is all in one. It is helpful to provide some tools and utilities as well.
For example, with this, you can simply factory reset the Kodi and can easily boot or delete all the Add-ons installed on the machine. It helps to check the internet speed and will suggest if you should watch movies or stream or not.
Instead of this, you will get some free Addons to watch live TV channels from all over the world. It has some best tools to watch movies, TV shows, and much other entertainment stuff. You will explore other features after installing so let’s now move to the guide.
Make sure to read these steps twice to avoid making mistakes:
1. First of all, you need to launch Kodi and then click Addons from the left side. After this click the Add-ons icon from the above menu and then click on Install from Zip File. Here you will find all the sources that can be used for installing Zip so from here choose the source you add from the above tutorial.
2. After selecting the begin here from these categories that I already mentioned above.
3. At this time you will see there is a package name Indigo which is a plugin.program.indigo-4.0.15. The number that is mentioned here may be different when you install it. Because it shows the version number which is currently 4.0.15 as I am writing this guide.
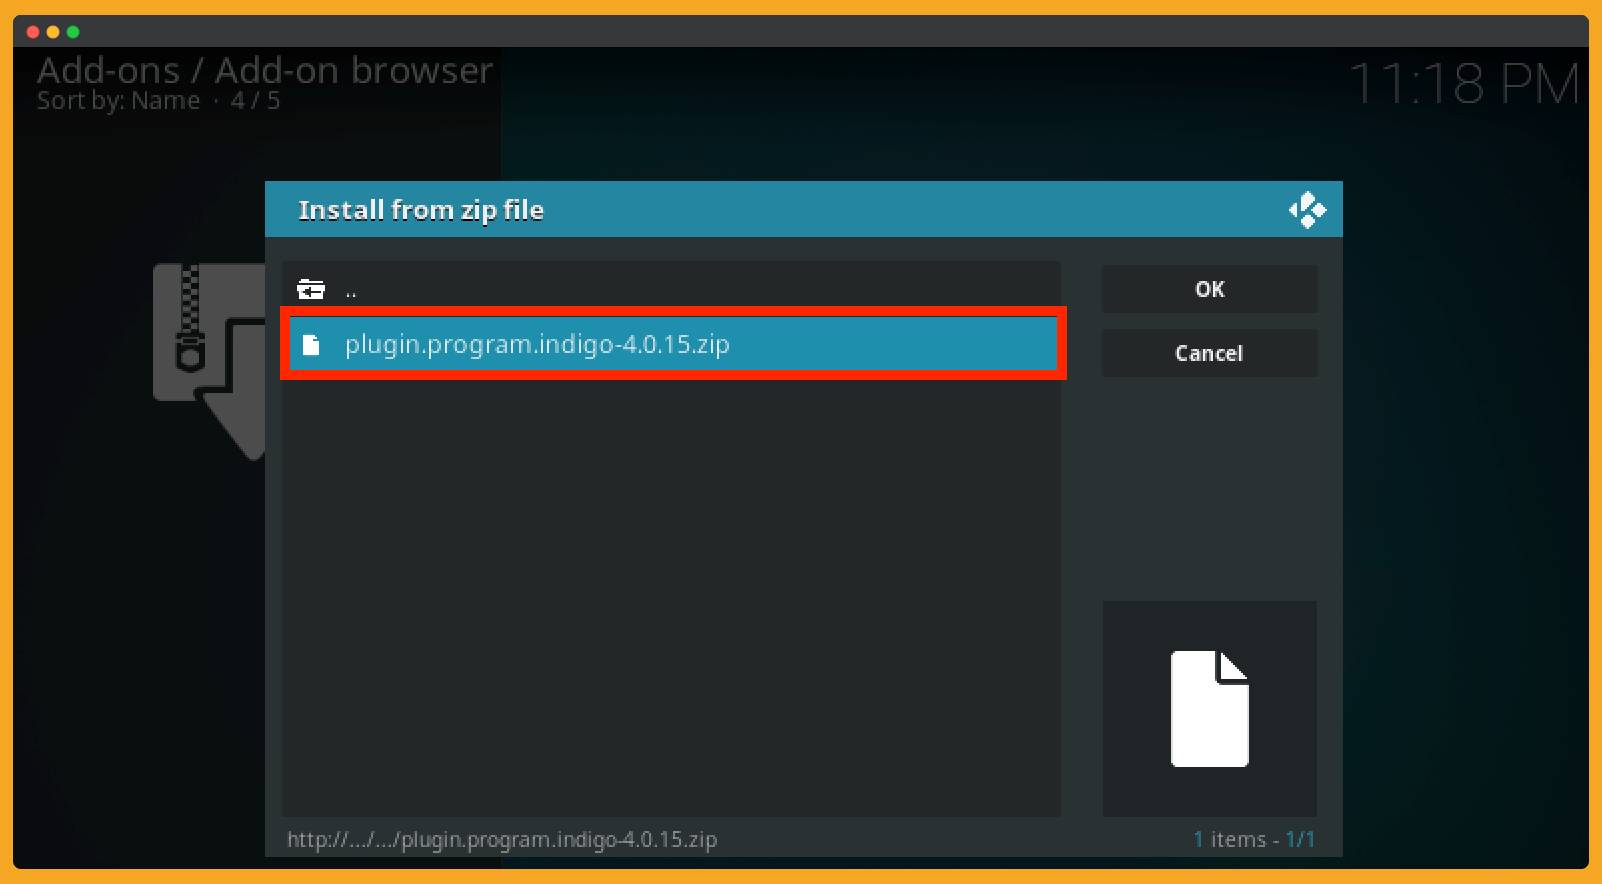
Just select the plugin.program.indigo-4.0.15.zip or hover to the zip and then click Ok.
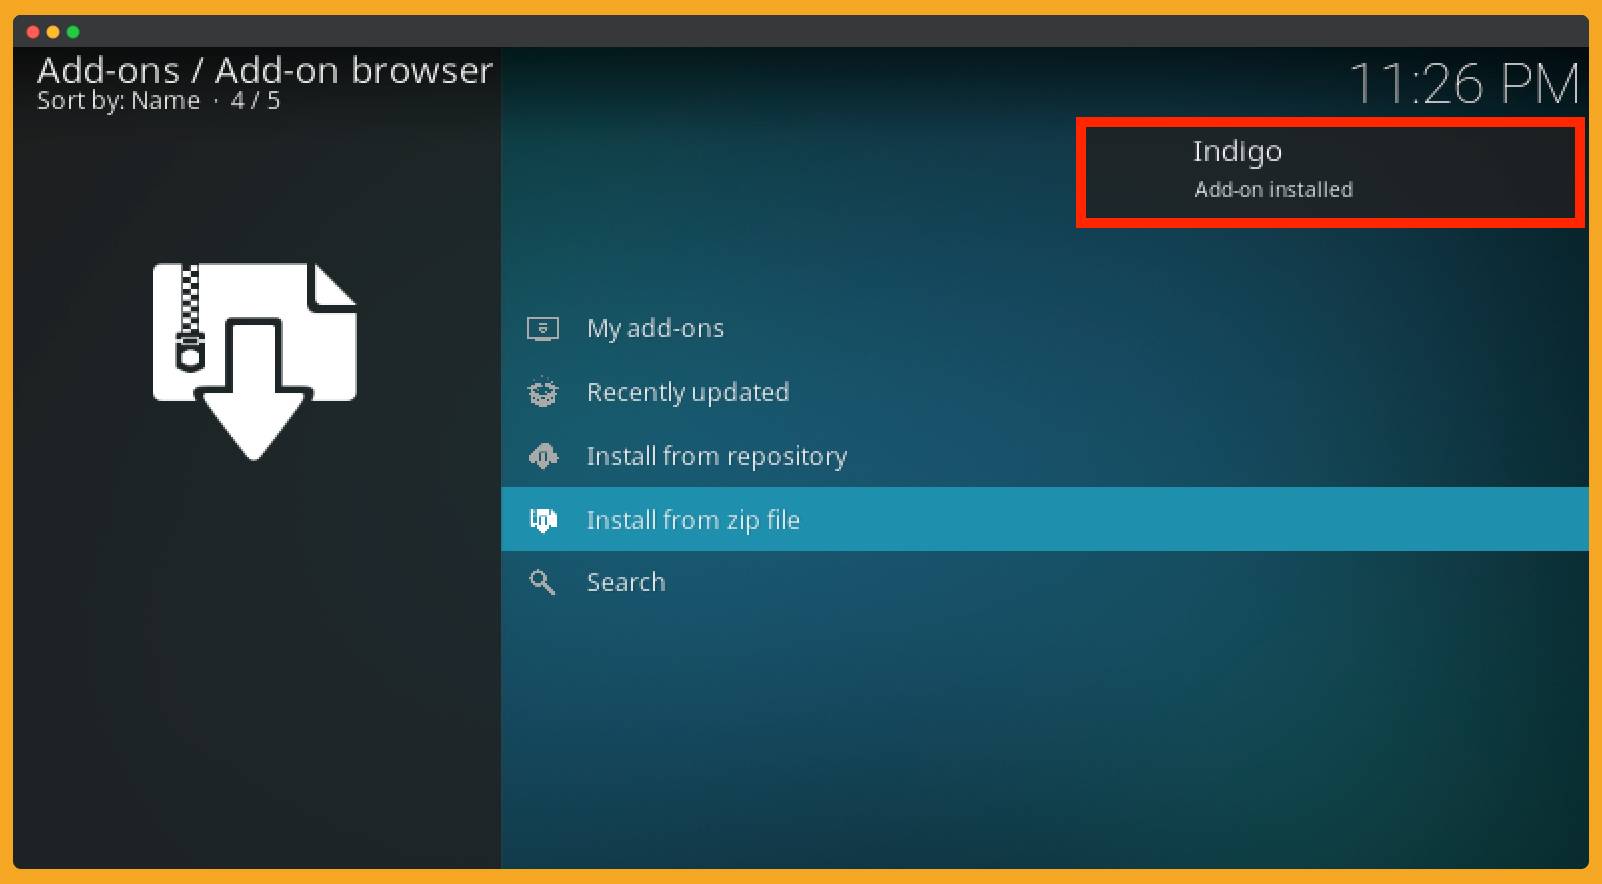
4. After this, you just need to stay on the same page until you see the notification ‘Indigo Add-on installed’ that will be appeared on the right side above the corner.
5. When you see that notification now go back to Kodi Home Screen and at this time select Addons and then hover to the Video Addons section. Here you will find the list of Addons that can be helpful to watch movies, shows, Dramas, etc.
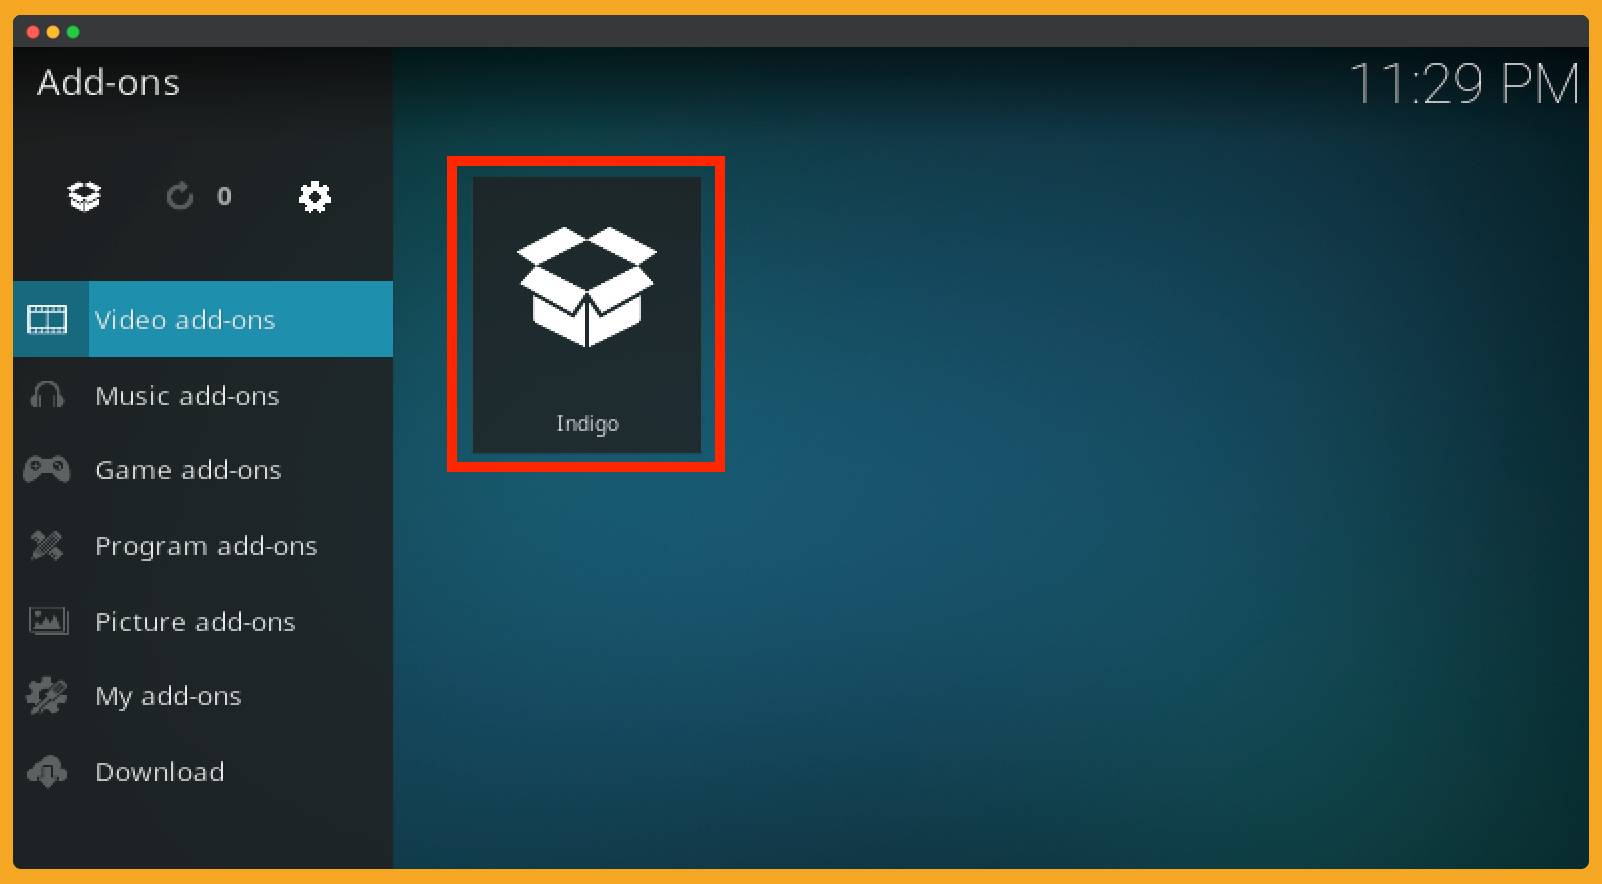
Instead of this, you can also access it through Program Addons as I already mentioned above it has some maintenance tools and utilities as well.
How To Use Idingo Addons Installer
As I have mentioned that Indigo is one tool that provides Addons for everything. So, if you want to learn how to use it then follow this quick look guide to understand how it works.
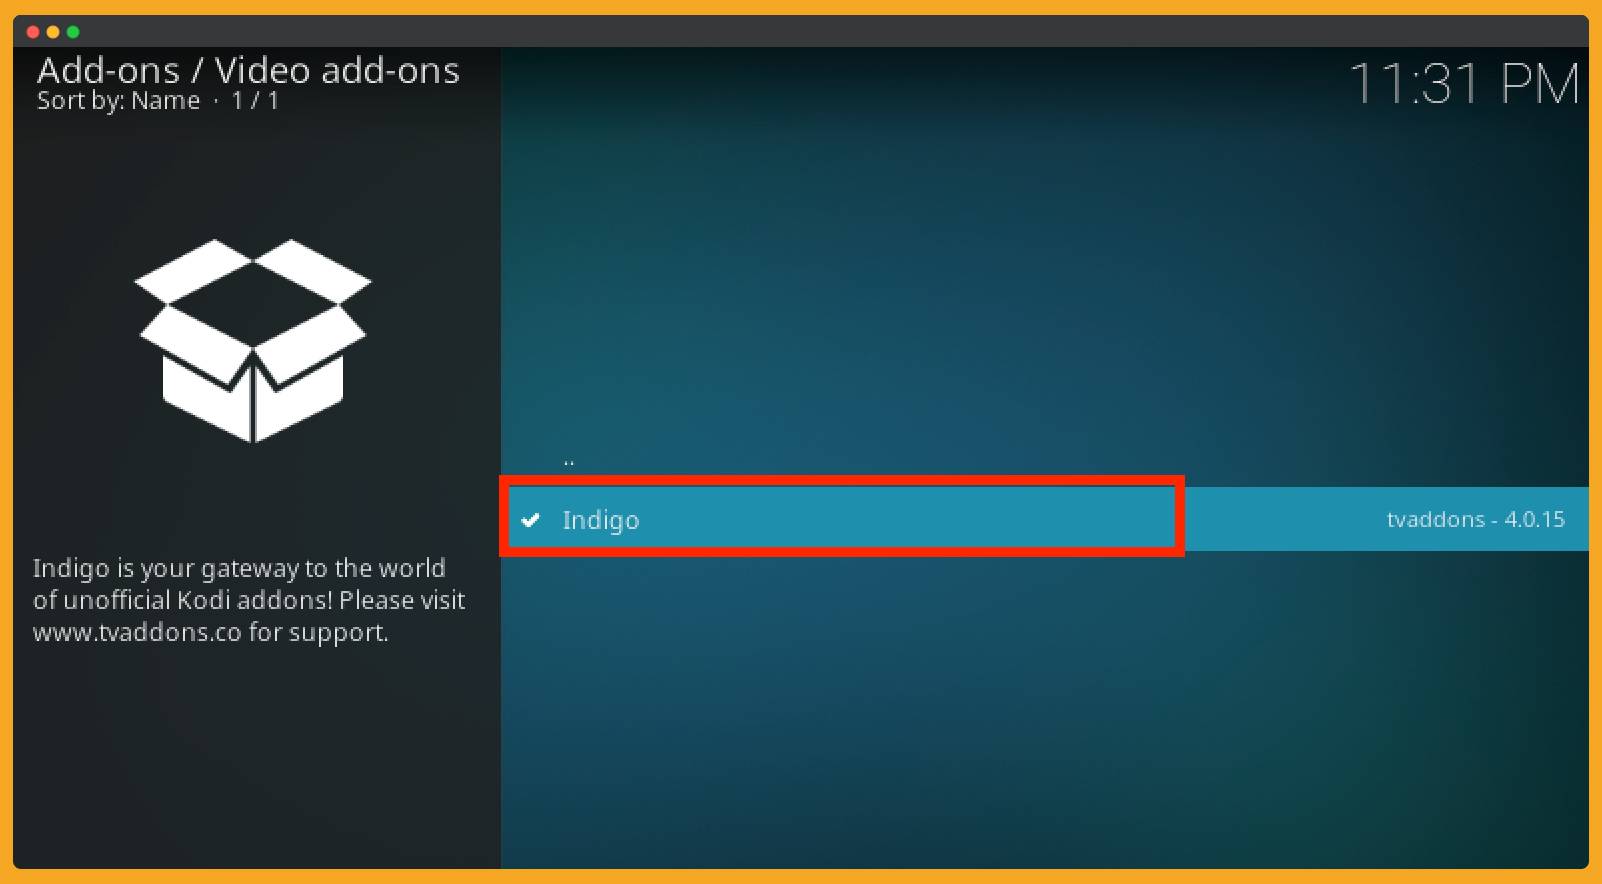
– Go to the Addons section from Home Screen and then click Indigo from the list.
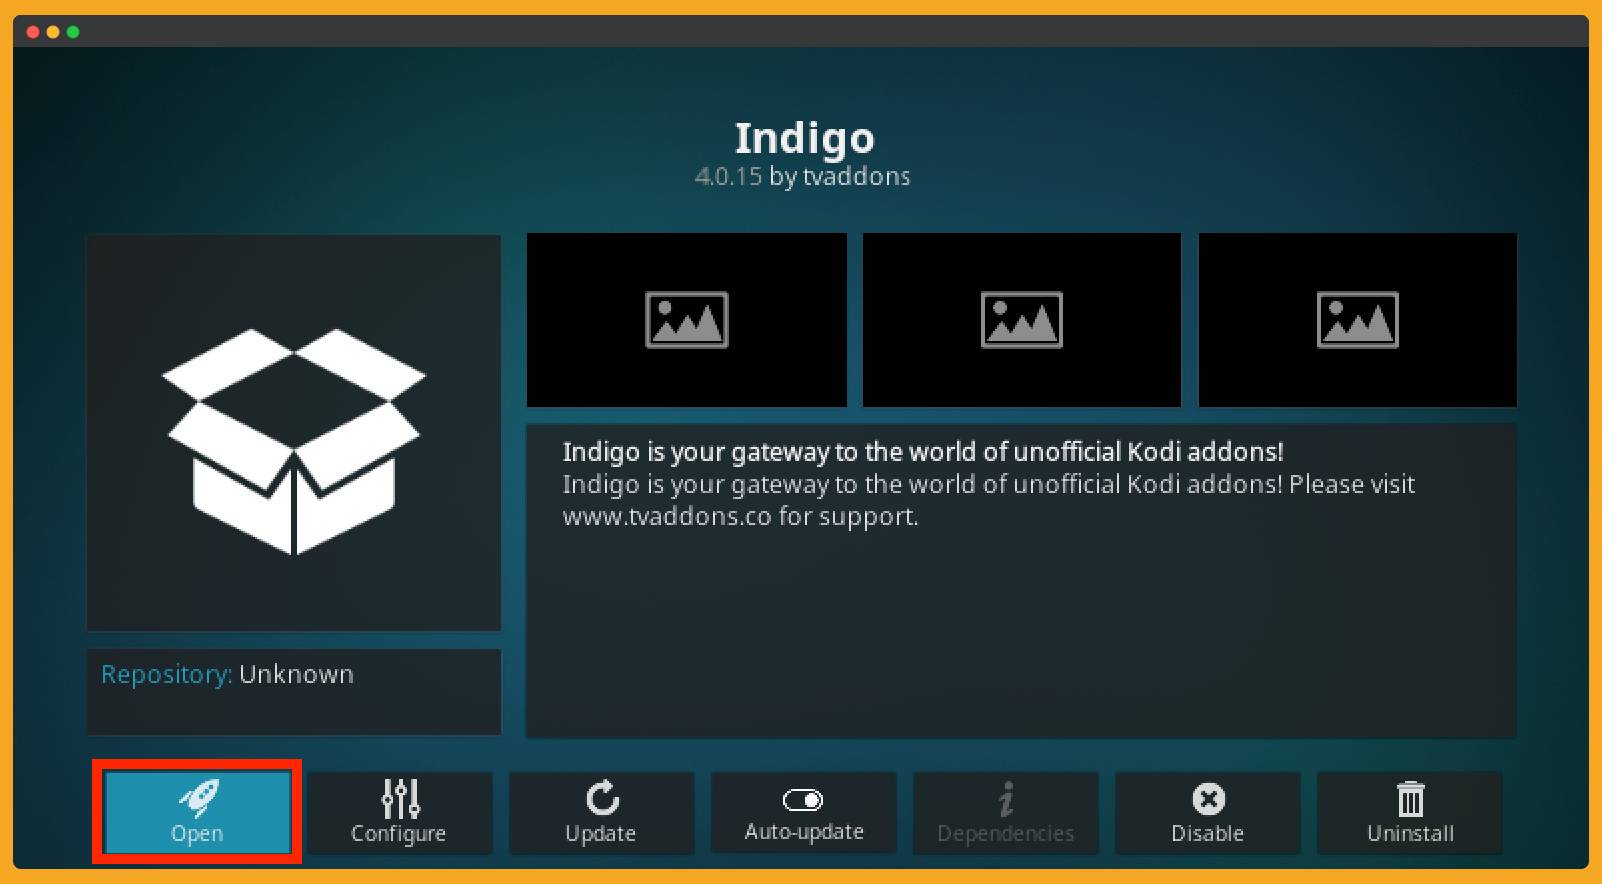
– Now click on the Open button to launch this on your device.
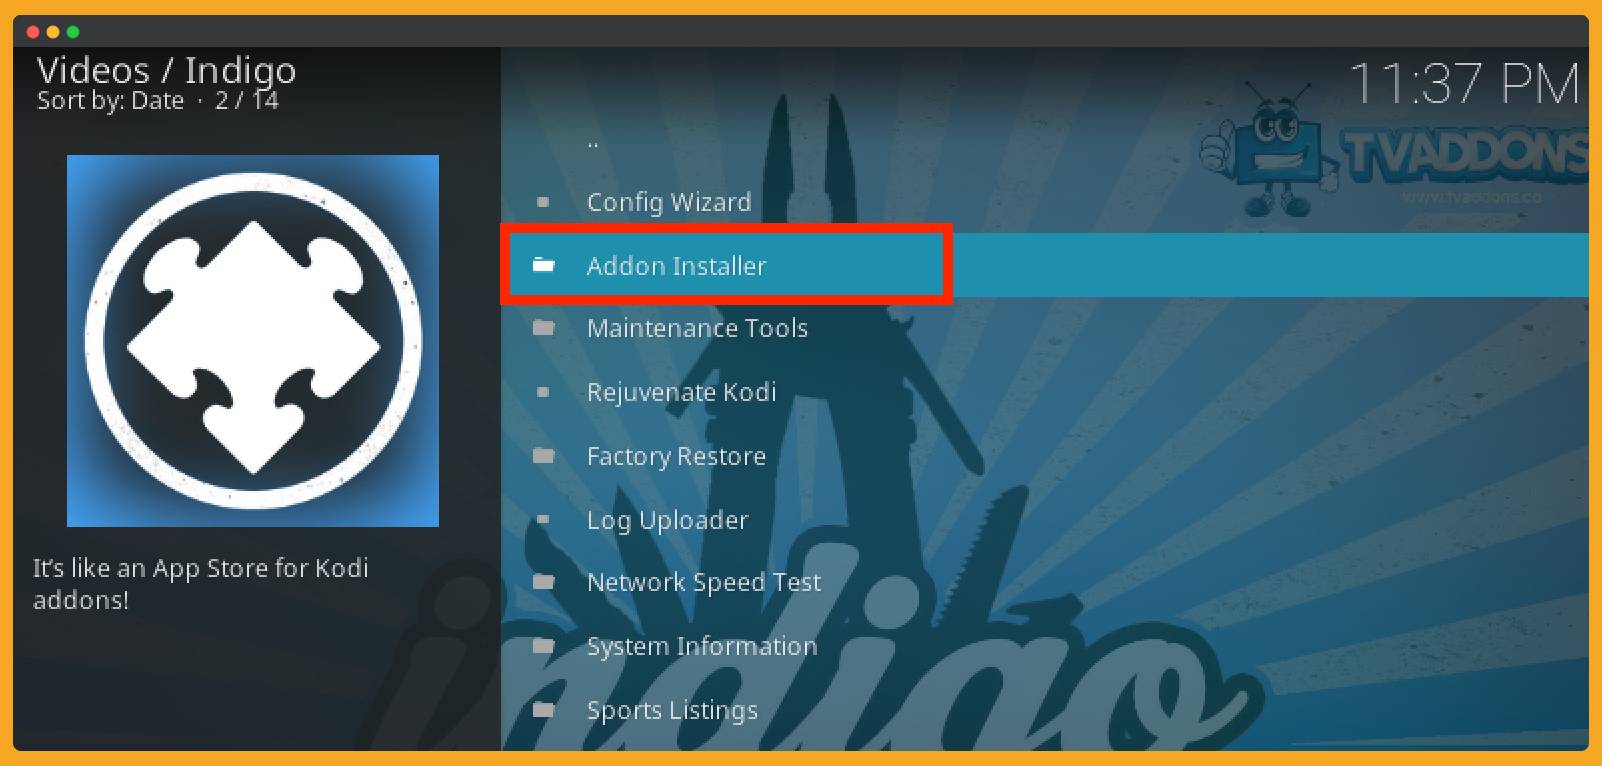
– When it is launched now you can see all the menus available there like you have the options for Maintainance, Factory Restore, Addon Installer, Config Wizard, and so on.

– If you are going to use the Addon Installer then click on its label from these options to open it.
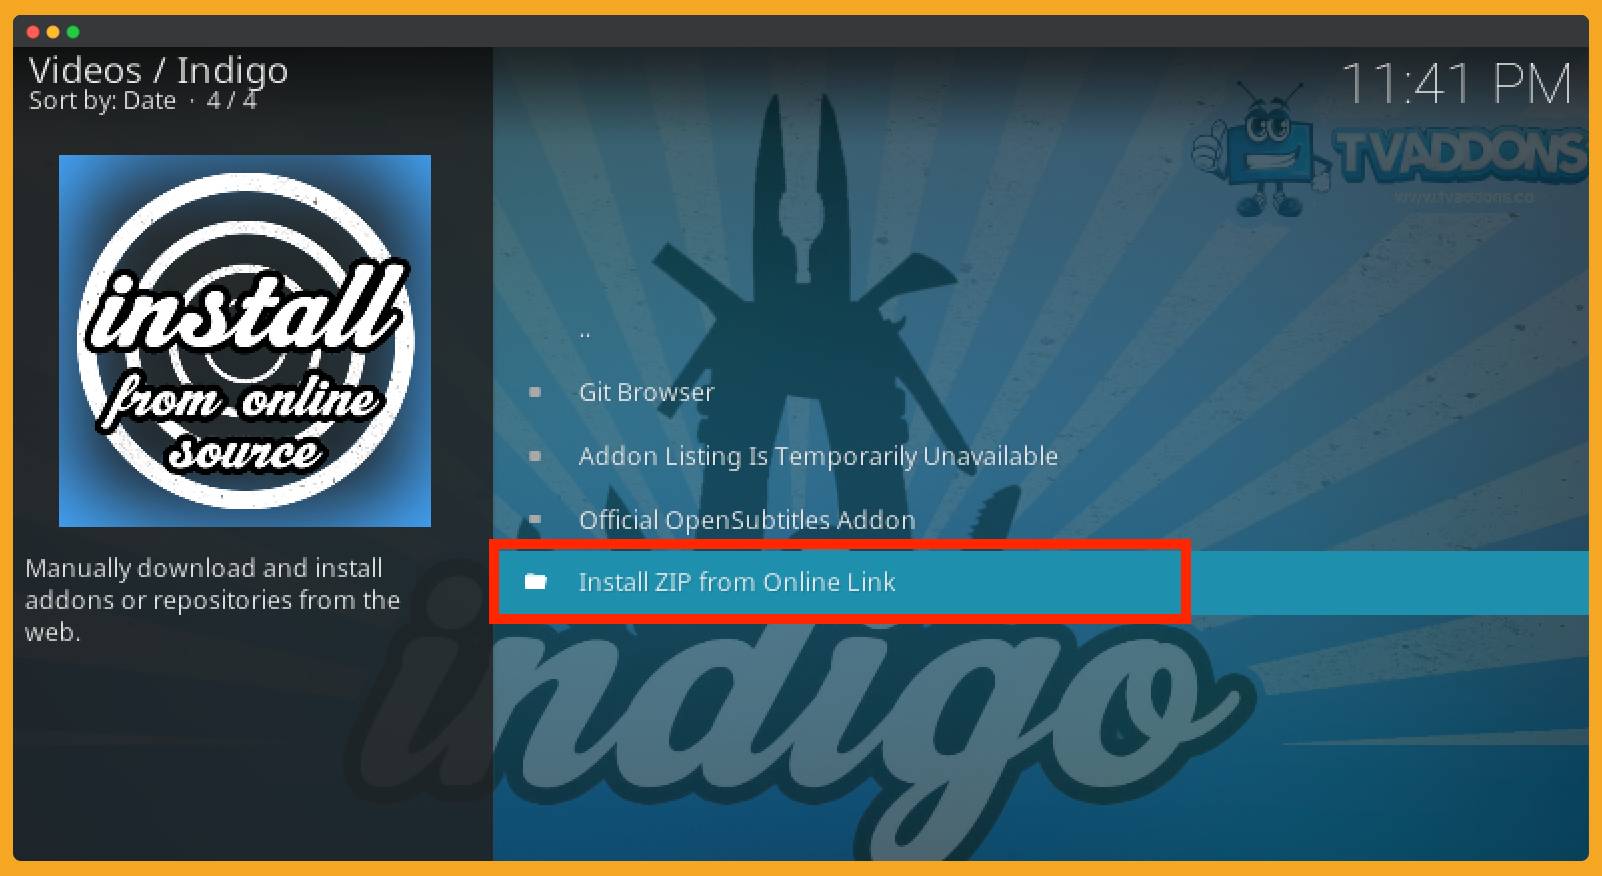
– Here you will see all the available options for this section like Feature Addons, Git Browser, Search By, Video Addons, and so on. You can check these options and then you will see furthermore available add-ons on that specific category.
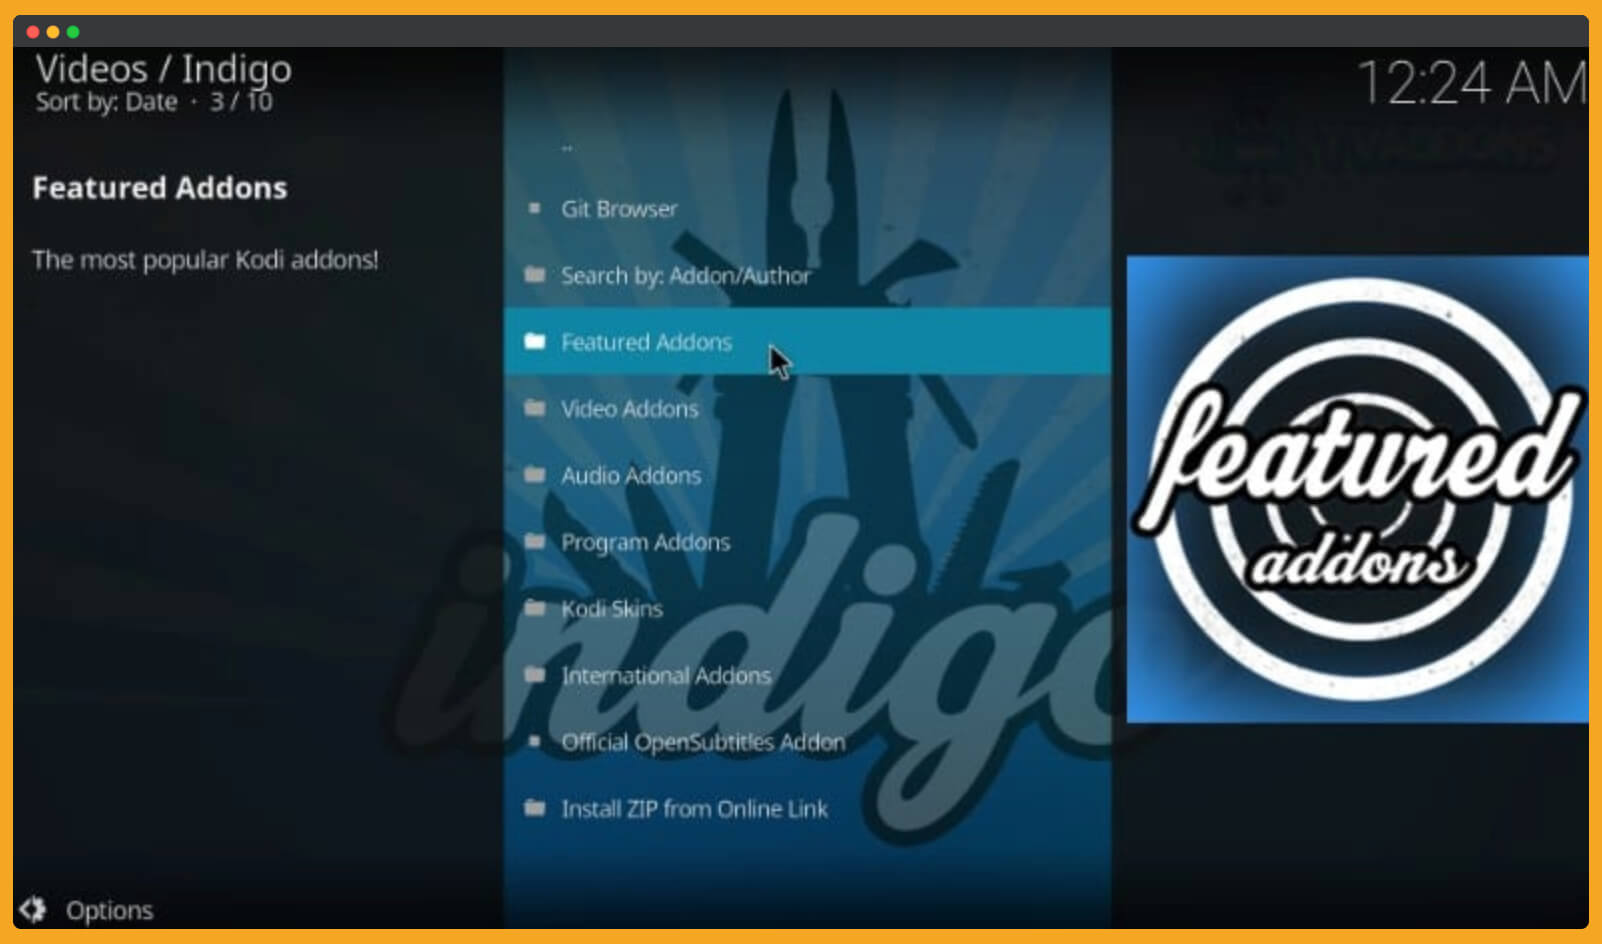
For example, when you enter to Video section it will show you everything related to videos like Movies, Shows, Sports, Dramas, etc. Similarly in the Program section, you will find something related to hardware and in a featured section, you will get some most popular of all time Addons here.
– Another feature that will be provided is Install Zip From Online Link and this option is helpful to download Add-ons without adding the source. It means you just have to type the URL of that specific repository and then directly can see all Addons available there.
That’s it now you can easily get everything from it instantly without remembering every repository. Even though it has some other tools that will help you to make the Kodi experience even better.
Let’s dig more and learn how these tools are helpful and can benefit us.
Indigo Maintainance Tools
With the maintenance tool, we can get many features which I am listing down below after reading you will easily understand the worth of having this Installer.
It has the following utility tools:
Config Wizard: As the name suggests this option will help beginners to configure their Kodi on Firestick and help them to download suggest some useful Addons for the startup.
Rejuvenate Kodi: This option will help you to clear all the configuration settings you have made and then restore it with the latest Configurations.
Factory Restore: Since the name suggests this will help to restore Kodi to original Settings if you use it then it will delete all the programs/Addons/Settings etc.
Network Speed Test: This will let you check the internet speed directly on Kodi instead of using a third-party app. Doing this it will also tell you if you can stream movies with it or not and will give some suggestions as well.
System Information: In this option, you will see all the information about your system like how much storage you have. The version you are using and several other hardware specifications.
Backup & Restore: This option will let you back up the data and settings that you have made. It can be also restored by using this same option.
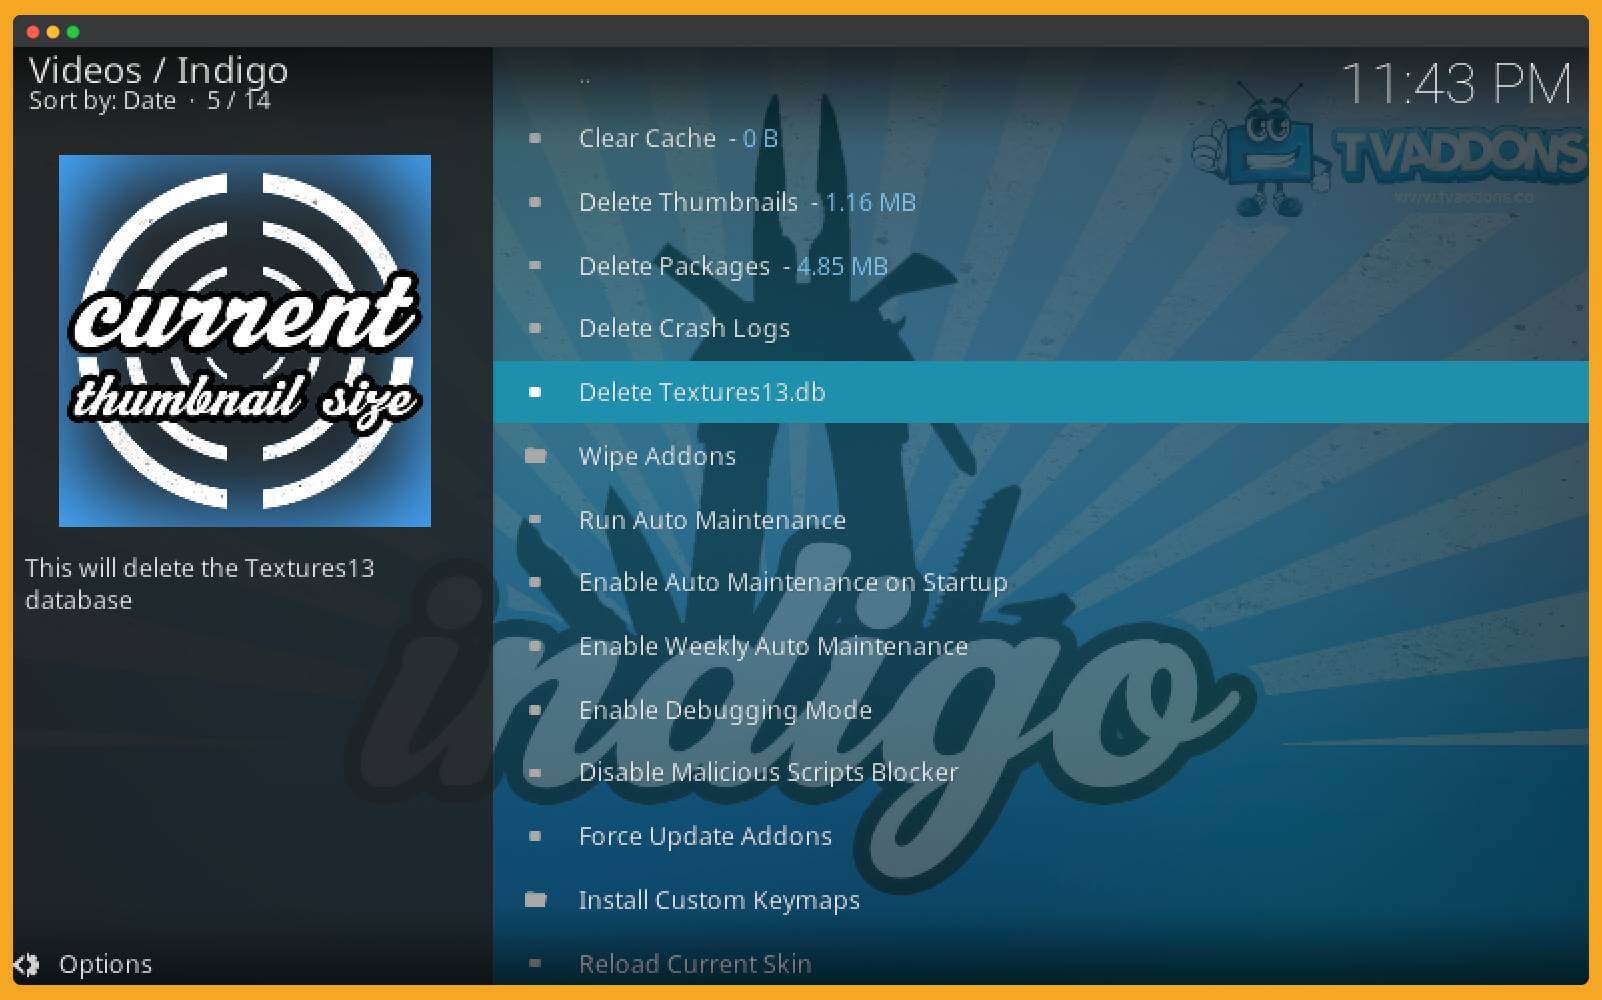
Maintenance Tools: It is an extremely useful option that can be used for multiple purposes and here you will find options for Clear Cache, Delete Thumbnails, Delete Packages, Delete Crash Logs, Wipe Addons, and so on.
So, these are some other best features that you can do with this single Indigo Addon installer.
Frequently Asked Questions (FAQs)
Have you read the whole guide? But still, have some confusion in your mind? Then don’t worry here is the list of some most asked questions on the internet. You can read them and will surely get that answer which clears that confusion.
Somehow if this doesn’t work or didn’t get what you are looking for then you can also comment down below and I will try to answer it as soon as possible.
Can I Download the Addon installer on XMBC?
Yes, you can download the Addon installer on XMBC by using this same guide because both applications are the same. They have recently updated this media player and renamed it from XMBC to Kodi Media Player.
Is Addon Installer free to use?
Yes, this is totally free to use and it doesn’t cost you a penny for using. Instead of this, you won’t face any type of advertisement in it as we see in other addons.
Conclusion
At the end of the article, I would like to say that Addon Installer for Kodi is the best thing that helps to lower the efforts. It is a simple tool that provides many types of add-ons including movies, dramas, TV shows, music, programs, and so on.
This could be also useful when you are trying to factory reset this media player and also to clean some unwanted caches. It also helps to delete thumbnails, and packages, run auto maintenance, Wipe addons and the list goes on.
I hope you understand this and download this tool on your device. If you are also facing any issues with it then make sure to comment down below. I will try my best to answer that question and will try to help you in solving this issue.